
Manuales relacionados para noken SMART LINE 100210496_N386000067


Resumen de contenidos para noken SMART LINE 100210496_N386000067
- Página 1 100210496_N386000067 SMART LINE Carretera CV-20 km.2 · 12540 Vila-real · Castellón · Spain Tel: +34 964 50 64 50 - Fax: +34 964 50 67 93 e-mail: noken@noken.com · www.noken.com...
- Página 2 Attention to Installer • Please read these instructions fully before installation • Please leave these instructions for the end user for reference. Important: Before commencing installation please check the following. • Please check for defects including damage, cracks or manufacturing faults before commencing installation •...
- Página 3 100229726_N386000070 100229730_N386000072 100229706_N386000079 100229714_N386000073 100228760_N386000069 100229731_N386000075 100229708_N386000080 100229694_N386000074 100229727_N386000077 100229707_N386000078 100229713_N386000071 100229740_N386000076...
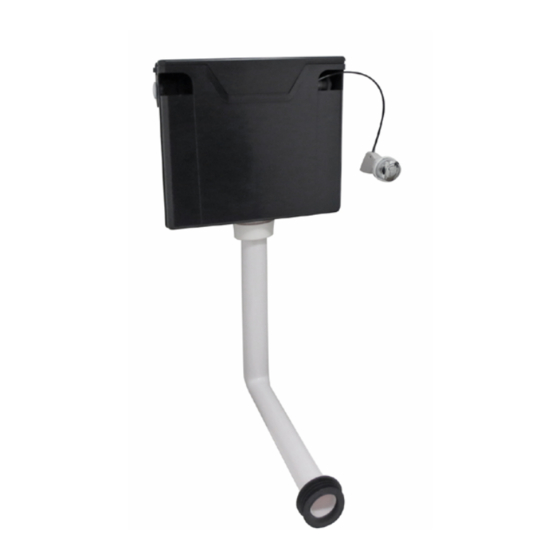
- Página 4 Installing the Cistern and Fixing Bracket 1. Position and fix the cistern support bracket in the centre of the furniture carcass or inline with the waste outlet of the WC. Ensure the indicator tabs are both level with the underside of the top of the furniture unit or shelf. This is to allow for the lid to be removed and provide clearance for valve removal through the front entry opening of the cistern. Fig. 1 Align bracket to centre of underside of the top of the furniture unit or shelf 2. It is advisable to make plumbing and pipework connections before installing the cistern so that connections e.g. soldering, doesn’t have to be made in restricted working areas such as narrow furniture unit etc. 3. When the bracket is firmly fixed, the cistern can be secured to the bracket. Hold the cistern centrally to the bracket aligning the lugs with the recesses in the back of the cistern. Fig.
- Página 5 Instalación de la cisterna y soporte de fijación Coloque y fije el soporte de la cisterna en el centro del armazón del mueble o en línea con el desagüe del WC. Asegúrese de que las pestañas indicadoras están a nivel con la parte inferior de encimera del mueble.
- Página 6 5. Complete supply plumbing connections as installation requires. Noken recommend that this is completed by a qualified plumber. Deisgn S.A. 6. Cut the cistern flush pipe to size ‘Y’ remember that the large end of the pipe requires 35mm to project into the cistern valve. It is recommended to position the pan and check measurements before cutting. Remember to allow for the projection into the toilet inlet. 7. When satisfied with fit, push the black inlet flush cone connector supplied onto the narrow end of the flush pipe. Rubber seal Coupling nut Pre cut flush bend X + depth of inlet on 8.
- Página 7 Complete las conexiones de fontanería según requiere la instalación. Recomendamos que este trabajo lo haga un fontanero cualificado. Corte el tubo de descarga de la cisterna al tamaño deseado. Recuerde que el extremo ancho del tubo requiere 35 mm para entrar en la válvula de la cisterna. Se recomienda colocar el inodoro y comprobar las medidas antes de cortar.
- Página 8 Flush button installation 12. If the unit is MORE THAN 300mm deep the position of the button can be adjusted to suit. Position the run of the cable as shown below for this application. Note that the hole size is 38mm/40mm Diameter for the button. Cistern Thread the cable out through the cistern at the opposite side to the button and round to the front 13.
- Página 9 12. Si la unidad tiene MÁS DE 300 mm de profundidad la posición del botón puede ajustarse. Coloque el tiro de cable como se muestra a continuación para esta aplicación. Tenga en cuenta que el tamaño completo es 38 mm de diámetro para el botón.
- Página 10 14. The dimensions for positioning the cistern button are provided below. Note that the hole size is 38mm/40mm Diameter. 15. Connect the button by fixing the button to the front face of the unit using the large outer nut, press slide ‘A’ to attach the button. Button lock Slide ‘A’ Cable 16. Turn on the water after all connections have been made and if necessary adjust the inlet valve to correct the waterline. This will be pre-set in assembled units but should be verified by the installer. 17. Place the lid onto the cistern and click side clips in place. 18. Before replacing the access panel into position please ensure the cable is not restricted or compressed to prevent operation of the button. Also extra care should be taken to ensure that in narrow units the housing at the rear of pushbutton fits into the cistern cut outs.
- Página 11 14. The dimensions for positioning the cistern button are provided below. 14. Las dimensiones para colocar el botón de 14. The dimensions for positioning the la cisterna se dan a continuación. cistern button are provided below. Tenga en cuenta que el tamaño completo es 38 mm de diámetro. 15. Connect the button by fixing the slide ‘A’ to attach the button. 15. Conecte el botón fijándolo en la cara frontal de la unidad mediante la rosca exterior 15.
- Página 12 Assembly of the cistern Refer to these instructions where applicable if unassembled or if a pre-assembled unit requires the inlet valve on the opposite side to pre assembly. If PRE-ASSEMBLED Before beginning installation consider which side the inlet valve should be positioned. 2. Position the valve inside the tank ensuring internal seal washer (1) is on the threaded shank first. Push down on the valve body and tighten up lock nut.
-
Página 13: Montaje De La Cisterna
Montaje de la cisterna Consulte estas instrucciones donde sean aplicables si una e on the opposite side to pre assembly. unidad premontada necesita la válvula de entrada en el lado contrario del premontaje. 1. Antes de comenzar la instalación, tenga en cuenta Before beginning installation consider which en qué... - Página 14 Special Instructions for reduced flush volume 4.5 litre full flush and 3 litre half flush. This cistern’s flushing capacity can be reduced by following the instructions below. Firstly set the inlet valve to the lower waterline. Unlock the fixing clip to adjust the overflow pipe to desired height Fixing clip then lock the fixing clip. HALF FLUSH ADJUSTING FULL FLUSH ADJUSTING SLIDE SLIDE To reduce volume of flush...
-
Página 15: Instrucciones Especiales
Instrucciones especiales Descarga completa de 4.5 litros y media descarga de 3 litros. La capacidad de descarga de esta cisterna puede reducirse siguiendo las This cistern’s flushing capacity can be reduced by following the instructions instrucciones a continuación. below. Primero, ajuste la válvula de entrada a la línea de agua más baja. Firstly set the inlet valve to the lower waterline. - Página 16 Maintenance - Side Inlet Valve TO GET THE BEST RESULTS FROM YOUR FLUIDMASTER VALVE, PLEASE READ THESE INSTRUCTIONS CAREFULLY. IMPORTANT: ALWAYS CLEAR ANY DEBRIS FROM WATER LINE TO COMPLETE INSTALLATION Shut off water supply to toilet cistern or tank, unsnap float adjustment rod from arm, then remove cap assembly by rotating 1/8 turn anti-clockwise and pulling out. Hold hand over opening, turn water supply on and off to clear out debris that may be in supply line. Turn off water supply and replace cap assembly by engaging lugs and rotating 1/8 turn clockwise to stop. Make certain cap assembly and valve body are in locked position or valve may fail to turn on. Then snap float adjustment rod back on to the arm. Turn on water supply. LOW PRESSURE APPLICATION: If it takes longer than 4 minutes to refill your cistern, you can increase the flow of water by removing the flow restrictor. IMPORTANT: Always clear any debris from water line before installation. 1. Turn off water 2. Pull valve away 3. Remove flow...
-
Página 17: Mantenimiento - Válvula De Entrada
Mantenimiento - Válvula de entrada Side Inlet Valve Side Inlet Valve TO GET THE BEST RESULTS FROM YOUR FLUIDMASTER VALVE, PLEASE READ THESE INSTRUCTIONS CAREFULLY. PARA OBTENER LOS MEJORES RESULTADOS DE SU VÁLVULA, TO GET THE BEST RESULTS FROM YOUR FLUIDMASTER VALVE, LEA ESTAS INSTRUCCIONES DETENIDAMENTE. PLEASE READ THESE INSTRUCTIONS CAREFULLY. IMPORTANTE: LIMPIE SIEMPRE CUALQUIER RESIDUOS DE LA TUBERIA DE AGUA PARA COMPLETAR LA INSTALACIÓN Shut off water supply to toilet cistern or tank, unsnap float adjustment rod from Cierre el suministro de agua a la cisterna o depósito del inodoro, libere arm, then remove cap assembly by rotating 1/8 turn anti-clockwise and pulling... - Página 18 TROUBLESHOOTING – SEAL REPLACEMENT. If valve won’t turn on or shut off or refill of cistern water is slow after valve has been in use for some time, a replacement seal may be needed. Install as follows: 1. Turn off water, flush 2. Remove seal, do 3. Hold hand over 4. Engage lugs, be opening, turn water toilet. Unsnap float not bend stainless sure assembly is rod. Push in on steel stem. Replace on and off to clear fully turned to stop side and remove...
- Página 19 RESOLUCIÓN DE PROBLEMAS – SUSTITUCIÓN DE JUNTAS. Si la válvula no gira o el cierre o el rellenado de la cisterna es lento después de que la If valve won’t turn on or shut off or refill of cistern water is slow after valve has válvula haya sido utilizada durante algún tiempo, puede que necesite un recambio. Pida la junta 100109785 e instálela de la siguiente manera: Install as follows: 1. Turn off water, flush...
- Página 20 FDP_30-1-0415-100210496-1217-0 www.noken.com...