Publicidad
Idiomas disponibles
Idiomas disponibles
Enlaces rápidos
7226213EBL
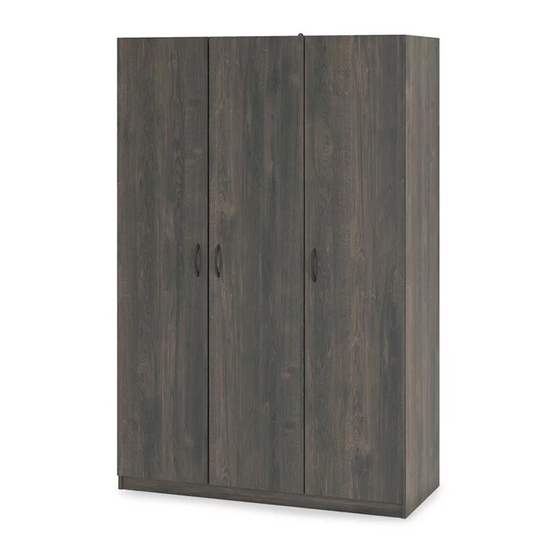
3 Door Wardrobe
Date of Purchase ___ / ___ / ___
Lot Number:
THIS INSTRUCTION BOOKLET CONTAINS IMPORTANT SAFETY INFORMATION. PLEASE READ AND KEEP FOR FUTURE REFERENCE.
Secure Your Furniture
Keep your home and family safe
with the wall anchor kit that is
included with the product.
Serious or fatal crushing injuries can
occur from tipping furniture.
WARNING: Manufacturer assumes no liability
for improper installation or excessive loads
placed on screws or bracket. This wall anchor
is not a substitute for proper adult supervision.
Do Not Return This Product!
Contact our customer service team for help first.
Call: 1‐800‐489‐3351 (toll free)
Monday‐Friday 9am ‐ 5pm CST
Visit: www.ameriwoodhome.com
Easy
Assembly Difficulty Meter
Follow Ameriwood Home
B347226213EBL0
Tough
You
Tube
Publicidad

Manuales relacionados para Ameriwood HOME 7226213EBL


Resumen de contenidos para Ameriwood HOME 7226213EBL
- Página 1 7226213EBL 3 Door Wardrobe B347226213EBL0 Date of Purchase ___ / ___ / ___ Lot Number: Do Not Return This Product! Contact our customer service team for help first. Call: 1‐800‐489‐3351 (toll free) Monday‐Friday 9am ‐ 5pm CST Visit: www.ameriwoodhome.com THIS INSTRUCTION BOOKLET CONTAINS IMPORTANT SAFETY INFORMATION. PLEASE READ AND KEEP FOR FUTURE REFERENCE. Secure Your Furniture Keep your home and family safe with the wall anchor kit that is included with the product. Easy Tough Assembly Difficulty Meter Serious or fatal crushing injuries can occur from tipping furniture. Follow Ameriwood Home WARNING: Manufacturer assumes no liability for improper installation or excessive loads placed on screws or bracket. This wall anchor Tube is not a substitute for proper adult supervision.
-
Página 2: Helpful Hints
Contact Us! Do NOT return this product! Contact our friendly customer service team first for help. Assembly Tips Call us! 1‐800‐489‐3351 Monday‐Friday 9am ‐ 5pm CST Tube Visit ameriwoodhome.com to view the limited warranty valid in the U.S. and Canada. Helpful Hints PEOPLE NEEDED FOR ASSEMBLY: 1‐2 ESTIMATED ASSEMBLY TIME: 2 HOURS ‐ Open your item in the area you plan to keep it to avoid excessive heavy lifting. ‐ Identify, sort and count the parts before attempting assembly. ‐ Compression dowels are lightly tapped in with a hammer. ‐ Slides are labeled with a R (right) and L (left) for proper placement. ‐ Make sure to always face the point on the top of the Cam Lock towards the outer edge. ‐ Use all the nails provided for the back panel and spread them out equally. ‐ Back panel must be used to make sure your unit is sturdy. ‐ Do NOT use harsh chemicals or abrasive cleaners on this item. ‐ Never push, pull, or drag your furniture. 2 ameriwoodhome.com... -
Página 3: Before You Start
Before You Start Read through each step carefully and follow the proper order Separate and count all your parts and hardware Give yourself enough room for the assembly process Have the following tools: Flat Head Screwdriver, #2 Phillips Head Screwdriver and Hammer Caution: If using a power drill or power screwdriver for screwing, please be aware to slow down and stop when screw is tight. Failure to do so may result in stripping the screw. 3 ameriwoodhome.com... - Página 4 Board Identification Not actual size 37226213040 Partition Bottom Left Panel Right Panel 37226213010 37226213030 37226213050 37226213020 Small Shelf Shelf Adjustable shelf kick 37226213070 37226213060 37226213080 37226213090 This part is paperboard construction. It is not made from wood, but is required for the assembly of your unit. Back Panel door K722600000 37226213100 4 ameriwoodhome.com...
- Página 5 Board Identification Not actual size This part is paperboard construction. It is not made from wood, but is required for the assembly of your unit. 5 ameriwoodhome.com...
-
Página 6: Part List
Part List Actual Size (x8) (x24) (x20) (x4) (x2) #A23030 #A53600 #A12210 #A21660 #A11080 confirmat screw angle bracket #8 x 1/2" pan head wood dowel #6 x 7/16" flat head (x6) (x20) (x44) (x8) #A12700 #A24037 #A21110 #A80250 #8 x 7/8" pan head nail screw head cap shelf support (x2) (x6) #A82020 #A89210 rod bracket 6 ameriwoodhome.com... - Página 7 Part List Not Actual Size (x9) (x3) (x1) #A65615 #A50690 #A84050 hinge handle safety bracket kit (x1) #I20410 wardrobe rod 7 ameriwoodhome.com...
- Página 8 STEP 1 (x1) (x1) (x3) #A65615 #A11080 #A82020 Loosen screw and separate hinge plate from hinge arm. finished edge 8 ameriwoodhome.com...
- Página 9 STEP 2 (x1) (x1) (x3) (x4) #A11080 #A82020 #A65615 #A21660 Loosen screw and separate hinge plate from hinge arm. finished edge Notice, the wood dowels (2) will insert into the larger end holes. 9 ameriwoodhome.com...
- Página 10 STEP 3 (x3) #A65615 Loosen screw and separate hinge plate from hinge arm. finished edge 10 ameriwoodhome.com...
- Página 11 STEP 4 (x4) (x1) #A21660 #A84050 Do not fully tighten this screw. unfinished surface finished edge Notice, the wood dowels (2) will insert into the larger end holes. 11 ameriwoodhome.com...
- Página 12 STEP 5 (x8) #A21660 Notice, the wood dowels (2) will insert into the larger end holes. 12 ameriwoodhome.com...
- Página 13 STEP 6 (x4) (x4) (x8) #A21660 #A53600 #A12210 finished edge Notice, the wood dowels (2) will insert into the larger end holes. 13 ameriwoodhome.com...
- Página 14 STEP 7 (x4) #A23030 unfinished surface unfinished surface rod bracket on this surface finished edge * raw edges are shaded 14 ameriwoodhome.com...
- Página 15 STEP 8 (x4) #A23030 finished surface finished edge finished edge * raw edges are shaded 15 ameriwoodhome.com...
- Página 16 STEP 9 (x16) #A23030 finished edge finished edge * raw edges are shaded 16 ameriwoodhome.com...
- Página 17 STEP 10 IMPORTANT! THE BACK PANEL IS A STRUCTURAL PART OF THIS UNIT AND MUST BE INSTALLED PROPERLY. (x44) #A21110 Attached the back panel as shown nailing straight into the raw edges. Assure that the unit is square. Distance from corner to corner must be equal as shown. Assure that the unit is square. Distance from corner to corner must be equal as shown. unfinished surface Be sure the back panel is flush with the bottom edge of the bottom (E). 17 ameriwoodhome.com...
- Página 18 STEP 11 (x9) (x3) (x6) #A65615 #A50690 #A12700 18 ameriwoodhome.com...
- Página 19 STEP 12 For Masonry, Concrete, or other wall materials: Consult your local hardware store for appropriate anchors to securely (x1) attach the safety bracket. #A84050 IMPORTANT: THIS UNIT MUST BE SECURE TO THE WALL TO HELP PREVENT TIPOVER. FOLLOW THESE INSTRUCTIONS TO INSTALL THE ANTI‐TIPPING SAFETY BRACKET PROVIDED WITH THIS PRODUCT. WARNING hole Serious or fatal crushing injuries can occur from furniture tipover. stud To prevent tipover: * Install tipover restraint provided * Place heaviest items in the lowest drawers * Unless specifically designed to accomodate, do not set TVs or other heavy objects on the top of this product wallboard * Never allow children to climb or hang ...
- Página 20 STEP 13 (x6) #A89210 Slide hinge arm onto hinge plate and tighten screw. Apply rubber pad onto top and bottom corners where door meets shelf. Door Adjustment Loosen screw A Loosen screw C Loosen screw C Adjust door. Turn screw B to Adjust door. Tighten screw A move door. Tighten screw C Tighten screw C *side view Suelte el tornillo A...
- Página 21 STEP 14 (x1) (x20) (x8) #I20410 #A24037 #A80250 Insert closet rod (15) into rod brackets (10). Insert shelf supports (8) at the desired location and place the adjustable shelves (H) onto the supports (8). Press the screw head caps (9) over any exposed screw heads.
- Página 22 Maximum Loads This unit has been designed to support the maximum loads shown. Exceeding these load limits could cause sagging, instability, product collapse, and/or serious injury. 0 lbs 0 kg 25 lbs 25 lbs 11.3 kg 11.3 kg 50 lbs 22.6 kg 25 lbs (closet rod) 11.3 kg 25 lbs 11.3 kg 25 lbs 25 lbs 11.3 kg 11.3 kg Warning: Risk of injury to persons ‐ do not place a television on this furniture. This furniture is not approved for use with a television. Certificate of Conformity 1. This certificate applies to the Dorel Home Furnishings, Inc. product identified by this instruction manual. 2. This certificate applies to compliance of this product with the CPSC Ban on Lead‐Containing Paint (16 CFR 1303). 3. This product is distributed by: Dorel Home Furnishings, Inc. 410 East First Street South Wright City, MO 63390 636‐745‐3351 4. Site of Manufacture: Tiffin OH 5. See front page of instruction manual for date of manufacture. 22 ameriwoodhome.com...
- Página 23 Register your product to receive the following: * New trend details ‐ sneak peek on what's new * Surveys ‐ have a voice within our community * Exclusive deals and discount codes * Quick and easy replacement part service To register your product, visit ameriwoodhome.com Visit your local retailer's website, rate your purchased product and leave us some feedback! We would like to extend a big "Thank You" to all of our customers for taking the time to assemble this Ameriwood Home product, and to give us your valuable feedback. 23 ameriwoodhome.com...
- Página 24 Español Cubierta Delantera Este libro de instrucciones contiene información IMPORTANTE de seguridad. Por favor lea y manténgalo para referencia en el futuro. No Regrese este producto! Comuniquese con nuestro amistoso equipo de servicio al cliente para obtener ayuda. Llamenos al: 1‐800‐489‐3351 (Gratis) Lunes ‐ Viernes 9am ‐ 5pm CST Visitar: www.ameriwoodhome.com PRECAUCION Este mueble puede volcarse y causar graves heridas y/o muerte. Anclar el mueble a un poste de madera en la pared (si esto se requiere). No Permita que los niños monten el mueble. Mantenga los artículos más pesados en los cajones de abajo. Consejos Útiles (página 2) ‐ Abra su artículo en el área donde usted planea utilizarlo para evitar levantar y moverlo menos ‐ Identificar, ordenar y contar las piezas antes de intentar ensamblar ‐ Las clavijas de compresión se golpean con un martillo ‐ Las diapositivas están marcadas con una R (derecha) y L (izquierda) para la colocación correcta ‐ Asegúrese de que siempre este el punto locaizado en la parte superior de bloqueador de leva este volteadohacia borde exterior ‐ Utilizar todos los clavos para el panel de atras y distribuirlos por igual ‐ El panel de atras debe utilizarse para asegurarse de que la unidad quede fija y firme ‐ No use quimicas fuertes ni limpiadores abrasivos en este articulo ‐ Nunca empuje, tire ni arrastre los muebles Antes de Que Empieces (página 3) ‐Lea cuidadosamente cada paso y siga el orden correcto ‐Separar y contar todas sus piezas y hardware ‐Dése suficiente espacio para el proceso de ensamble ‐Tenga las siguientes herramientas: destornillador de cabeza plana, #2 cabeza Phillips Destornillador y martillo ‐Precaución: Si usa un taladro electrónico o un destornillador eléctrico para atornillar, por favor asegúrese que deje de atornillar cuando el tonillos este apretado. Fallar hacer esto puede causar barrer el tornillo. Sistema de fijar el bloqueo de leva (página 3) Esta sistema de fijar el bloqueo de leva sera usado en todo el proceso ensamble. Página 8 Afloje el tornillo y separe la pala de la bisagra del soporte.
- Página 25 Español Página 9 Afloje el tornillo y separe la pala de la bisagra del soporte. Fíjese en que los pernos de madera (2) se inserten en los orificios más grandes de los extremos. Página 10 Afloje el tornillo y separe la pala de la bisagra del soporte. Página 11 No apriete este tornillo del todo. Fíjese en que los pernos de madera (2) se inserten en los orificios más grandes de los extremos. Página 12 Fíjese en que los pernos de madera (2) se inserten en los orificios más grandes de los extremos. Página 13 Fíjese en que los pernos de madera (2) se inserten en los orificios más grandes de los extremos. Página 17 ¡IMPORTANTE! EL PANEL TRASERO ES UNA PARTE ESTRUCTURAL DE ESTA UNIDAD Y SE DEBE INSTALAR CORRECTAMENTE. Acople el panel trasero como se muestra clavando directamente en los bordes de la pieza. Asegúrese de que la unidad esté a escuadra. La distancia de esquina a esquina debe ser igual a la indicada. Asegúrese de que la unidad esté a escuadra. La distancia de esquina a esquina debe ser igual a la indicada. Asegúrese de que el panel trasero esté a ras con el borde inferior de la parte inferior (E). Página 19 Para mampostería, concreto u otro tipo de paredes: Acude a tu ferretería local para obtener los anclajes adecuados para fijar de forma segura el soporte de seguridad. IMPORTANTE: ESTA UNIDAD DEBE ASEGURARSE A UNA PARED PARA EVITAR QUE SE VUELQUE. SIGUE ESTAS INSTRUCCIONES PARA INSTALAR EL SOPORTE DE SEGURIDAD ANTICAÍDA QUE SE PROPORCIONA JUNTO CON ESTE PRODUCTO. ADVERTENCIA Un mueble al volcarse puede provocar heridas por aplastamiento que pueden resultar graves o mortales. Para prevenir que un mueble se vuelque: * Instala el dispositivo contra caídas que se proporciona 25 ...
- Página 26 Español * Instala el dispositivo contra caídas que se proporciona * Coloca los artículos más pesados en los cajones de más abajo * A menos que esté específicamente diseñado para tal fin, no coloques televisiones ni ningún otro objeto pesado sobre este mueble * Nunca permitas que los niños se suban o cuelguen de los cajones, puertas o repisas. * Nunca abras más de un cajón a la vez El uso de los dispositivos contra caídas puede reducir, pero no eliminar por completo el riesgo de que el mueble se vuelque. OPCIÓN 1: acoplado a un travesaño de la pared (método recomendado) Ubica un travesaño en la pared utilizando un localizador de travesaños. Coloca tu unidad contra la pared, con el soporte de seguridad alineado en ese lugar. Para facilitar la entrada del tornillo, puedes perforar un agujero guía de 1/8" (3 mm) de diámetro a través del soporte de seguridad hasta llegar al travesaño. Introduce el tornillo en el travesaño de la pared a través del soporte de seguridad. Aprieta el tornillo que no apretaste completamente en el paso 4. OPCIÓN 2: acoplado a un panel de pared Coloca tu unidad en el lugar deseado contra una pared y marca la pared a través del soporte de seguridad, luego retira tu unidad hacia un lado. Perfora un agujero de 3/16" de diámetro (5 mm) en el tablero de la pared. Golpea el anclaje de pared para introducirlo en el agujero hasta que quede a ras. Vuelve a colocar tu unidad en su lugar y sujeta el soporte de pared al anclaje de pared con el tornillo. Aprieta el tornillo que no apretaste completamente en el paso 4. Página 20 Deslice el soporte de la bisagra sobre la pala y apriete el tornillo. Coloque una almohadilla de goma en las esquinas superior e inferior donde la puerta se une con el estante. Página 21 Inserte la varilla del armario (15) en los soportes de la varilla (10). Ubique los soportes del estante (8) en el lugar deseado y coloque los estantes ajustables (H) sobre los soportes (8). Coloque los tapones roscados (9) sobre los tornillos que queden descubiertos. Es posible que los deba golpear suavemente con un martillo para que queden bien ajustados. 26 ameriwoodhome.com...
- Página 27 Español Página 22 CARGA MAXIMA Esta unidad ha sido diseñada para soportar la carga máxima anotada. El exceder estos límites puede causar inestabilidad, colapsarse y/o causar serias lesiones. ADVERTENCIA: Riesgo de lesiones a las personas ‐ no coloque un televisor sobre muebles. Este mueble no está aprobado para su uso con un televisor. Página 23 Registre su producto para recibir lo siguiente: * Detalles de nuevas tendencias ‐ Vistazo a lo nuevo * Encuestas ‐ alec su voz entre su comunidad * Códigos de ofertas y descuentos exclusivos * Fácil y rápido servicio de partes de remplace Para registrar su producto, visite ameriwoodhome.com Clasificasión de 5 estrellas Visite el sitio web de su tienda local, califique su comprado y denos sus comentarios! Nos gustaría enviar un gran "Agradecimiento" a todos nuestros clientes por tomarse el tiempo de ensamblar este producto de Ameriwood Home, y por darnos sus valiosos comentarios. Gracias 27 ameriwoodhome.com...