Tabla de contenido
Publicidad
Idiomas disponibles
Idiomas disponibles
Enlaces rápidos
Drawing Number:
Description:
Revision:
Drawn By:
Revision History
Rev.
Date
A
07/12/17
Printing Specifications
Tolerance:
Material:
Color:
Bindery:
Folds:
Trimmed Dimensions:
Finished Dimensions:
Notes:
Content Management System (CMS) Details
GUID:
Version:
Language(s):
Notes
This drawing and the specifications contained herein are the property of
GARMIN Ltd. or its subsidiaries and may not be reproduced or used in whole or
in part as the basis for manufacture or sale of products without written
permission.
Specification Control Document
190-02265-90
KT15 Quick Start Manual (ML)
A
MEH 07/12/17
±0.0787" (±2 mm)
100-lb matte finish offset. Approved equivalents allowed.
4-color process.
Saddle stitch. Approved equivalents allowed.
Not applicable
9.5 x 4.75 in.
4.75x4.75 in.
This part shall comply with Garmin Banned & Restricted Substances (GPN 001-00211-00).
GUID-92F39E97-605C-43B4-95B8-66B4D37E3341
1
EN-US, FR-FR, IT-IT, DE-DE, ES-XM, PT-PT, NL-NL, CS-CZ, HU-HU, RO-RO
CONFIDENTIAL
Description of Change
Production Release
ECO No.
----
Garmin Ltd. or its subsidiaries
C/O Garmin International, Inc.
1200 E. 151
st
Street
Olathe, Kansas 66062 USA
Sheet 1 of 1
Publicidad
Tabla de contenido

Manuales relacionados para Garmin KT 15


Resumen de contenidos para Garmin KT 15
- Página 1 Garmin Ltd. or its subsidiaries This drawing and the specifications contained herein are the property of C/O Garmin International, Inc. GARMIN Ltd. or its subsidiaries and may not be reproduced or used in whole or 1200 E. 151 Street in part as the basis for manufacture or sale of products without written Olathe, Kansas 66062 USA permission.
-
Página 2: Tabla De Contenido
KT 15 Quick Start Manual Manual de Início Rápido Manuel de démarrage Snelstartgids rapide Stručný návod k obsluze Manuale di avvio rapido Kezdő lépések Schnellstartanleitung Manual de iniţiere rapidă Guía de inicio rápido... -
Página 3: Quick Start Manual
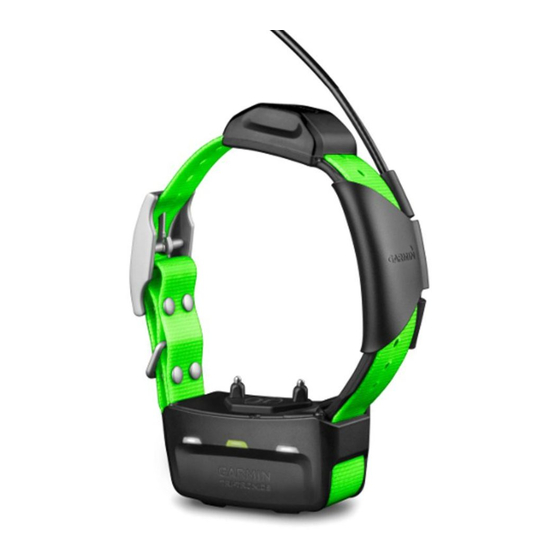
KT 15 VHF antenna Quick Start Manual GPS antenna Getting Started Power key WARNING Contact points See the Important Safety and Product Status LED and flashing beacon LEDs Information guide in the product box for product warnings and other important Turning On the Devices information. - Página 4 Snap the charging clip onto the Select the power key on the handheld device device. shows the GPS signal strength. When the collar has acquired satellite signals, the status LED flashes a double- blink or triple-blink in green. Adding a Dog to the Atemos ®...
- Página 5 Selecting and Installing the Contact Do not spray the device or collar with Points harsh chemicals including but not limited For best results, select the correct contact to flea or tick spray. Always ensure that points based on your dog's coat. any flea or tick spray that is applied to the dog is completely dry before placing the Select the correct contact point length...
- Página 6 Finally, when the dog consistently One Atemos handheld device can track up obeys commands using the leash and to 20 devices (KT 15 dog collar devices collar, you may be able to remove the and Atemos handheld devices). leash to train with only the dog collar Dog Tracking device.
-
Página 7: Device Information
You must not use the device with a third Getting the Owner's Manual party antenna or an antenna not approved You can get the latest owner's manual by Garmin . Go to www.garmin.com ® from the web. /tracking-legal for details about the Go to www.garmin.com/support. -
Página 8: Manuel De Démarrage Rapide
KT 15 Dog Collar Device Specifications Operating From -20° to 60°C (from temperature range -4° to 140°F) Charging From 0° to 40°C (from temperature range 32° to 104°F ) Wireless 169 MHz @ 26.84 dBm, frequencies/ 2.4 GHz @ 6.16 dBm... - Página 9 Mise hors tension de l'appareil • Sur l'appareil pour collier de chien, appuyez sur le bouton Marche/Arrêt jusqu'à ce que le voyant DEL d'état s'allume rouge puis relâchez le bouton. L'appareil émet un bip sonore. Chargement de l'appareil pour collier de chien Branchez la petite extrémité...
- Página 10 Mettez les deux appareils sous tension Après avoir ajouté l'appareil pour (page 7). collier de chien, saisissez le nom du chien et sélectionnez > OK. Sélectionnez le bouton Marche/Arrêt sur l'appareil portable. Sélection et installation des points de contact indique l'intensité du signal GPS. Pour des résultats optimaux, sélectionnez Lorsque des signaux satellites ont été...
- Página 11 Ajustement du collier au chien vers la mâchoire du chien et les points de contact contre sa gorge. ATTENTION Serrez la sangle pour qu'elle soit bien Pour éviter toute irritation due aux points ajustée autour du cou du chien et de contact, retirez le collier au moins attachez la boucle.
- Página 12 : « Au pied », jusqu'à 20 appareils (appareils pour collier « Assis », « Viens ». Une fois que le chien de chien KT 15 et appareils portables comprend ces trois ordres de base, vous Atemos).
-
Página 13: Informations Sur L'appareil
Suivez les instructions à l'écran pour antenne qui n'a pas été approuvée par sélectionner votre produit. Garmin. Rendez-vous sur Mise à jour du logiciel www.garmin.com/tracking-legal pour Pour mettre à jour le logiciel de l'appareil... -
Página 14: Manuale Di Avvio Rapido
Caractéristiques techniques des appareils pour collier de chien KT 15 Plage de tempéra- de -20 °C à 60 °C (de tures de fonctionne- -4 °F à 140 °F) ment Plage de tempéra- De 0 à 40 °C (de 32 à... - Página 15 diventa rosso fisso, quindi rilasciare il tasto di accensione. Il dispositivo emette un segnale acustico. Caricare il collare AVVISO Per prevenire fenomeni di corrosione, asciugare i contatti del collare e l'area Collegare l'estremità più piccola del circostante prima di collegare il dispositivo cavo di alimentazione alla porta mini- di ricarica.
- Página 16 Selezionare il tasto di accensione sul Selezione e installazione dei punti di dispositivo portatile. contatto Per risultati ottimali, selezionare i punti di indica la potenza del segnale contatto corretti in base al pelo del cane. GPS. Selezionare la lunghezza corretta dei Quando il collare ha acquisito i segnali punti di contatto per il tipo di pelo del satellitari, il LED di stato lampeggia due o...
- Página 17 Questo dispositivo non è progettato per NOTA: il collare deve essere fissato l'uso sugli essere umani. Non tentare di saldamente e non deve ruotare o utilizzarlo sulle persone. scorrere sul collo del cane. Il cane deve poter deglutire cibo e acqua Non spruzzare sul dispositivo o sul collare normalmente.
-
Página 18: Tracciamento Del Cane
20 dispositivi (siano essi addestramento Atemos. Addestrare il cane collari per cani KT 15 o dispositivi portatili a camminare al vostro fianco, a sedersi e Atemos). a venire verso di voi. Una volta che il cane Tracciamento del cane ha compreso questi tre comandi di base, è... -
Página 19: Info Sul Dispositivo
NOTA: con l'aggiornamento del software Ottimo non vengono cancellati i dati o le impostazioni. Buono Visitare il sito Web www.garmin.com /products/webupdater. Scarso Seguire le istruzioni visualizzate sullo schermo. Specifiche radio VHF Questo prodotto può essere utilizzato solo Info sul dispositivo... -
Página 20: Schnellstartanleitung
Specifiche del collare per cani KT 15 Temperatura Da -20° a 60 °C (da -4° operativa a 140 °F) Temperatura di Da 0 a 40 °C (da 32 a ricarica 104 °F) Frequenze/ 169 MHz @ 26.84 dBm, Protocolli wireless 2.4 GHz @ 6.16 dBm... -
Página 21: Abschalten Des Geräts
Abschalten des Geräts • Halten Sie am Hundehalsbandgerät die Einschalttaste gedrückt, bis die Status-LED rot leuchtet. Das Gerät gibt einen Signalton aus. Aufladen des Hundehalsbandgeräts HINWEIS Zum Schutz vor Korrosion sollten Sie die Stecken Sie das schmale Ende des Kontakte des Halsbands und den Netzkabels in den Mini-USB- umliegenden Bereich vor dem Anschluss am Ladeklemmen-Kabel. - Página 22 Schalten Sie beide Geräte ein Wenn das Hundehalsbandgerät (Seite 19). erfolgreich hinzugefügt wurde, geben Sie den Namen des Hundes ein, und Wählen Sie am Handgerät die wählen Sie > OK. Einschalttaste. Auswählen und Installieren der kennzeichnet die GPS- Kontaktpunkte Signalstärke. Sie erzielen die besten Ergebnisse, wenn Wenn das Halsband Satellitensignale Sie basierend auf dem Fell des Hundes...
- Página 23 Wenn Sie dem Hund das Halsband kann ein erfolgreiches Training verzögern anlegen, stellen Sie sicher, dass die oder verhindern. Kontaktpunkte dicht am Hals anliegen. Positionieren Sie das Gerät vorne am Anlegen des Hundehalsbands Hals des Hundes. Die Status-LED muss zum Kinn des Hundes weisen, ACHTUNG und die Kontaktpunkte müssen an der Damit es nicht zu Reizungen durch die...
- Página 24 Hundeortung und -training verwendet werden. Mit einem Atemos Handgerät lassen sich Beginnen Sie, Ihren Hund an der Leine bis zu 20 Geräte orten (KT 15 und ohne das Atemos Trainingssystem zu Hundehalsbandgeräte und Atemos trainieren. Üben Sie mit dem Hund die Handgeräte).
-
Página 25: Aktualisieren Der Software
Funkfrequenzen verwendet werden, die je herunterladen. nach Nutzungsland unterschiedlich sind. Rufen Sie die Website Es ist möglich, auf dem Handgerät und www.garmin.com/support auf. dem Hundegerät eine andere Antenne zu Wählen Sie Handbücher. montieren. Ein Antennenwechsel kann die Funkleistung verbessern und die Strahlungsleistung erhöhen. -
Página 26: Guía De Inicio Rápido
KT 15 Sie das Gerät nicht mit der Antenne eines Drittanbieters oder einer nicht von Garmin Guía de inicio rápido zugelassenen Antenne. Details zur Inicio Leistung und Funkfrequenz dieses ADVERTENCIA Produkts sowie zu zulässigem Zubehör Consulta la guía Información importante... -
Página 27: Encendido De Los Dispositivos
Debes cargar completamente la pila antes Antena VHF de utilizar el dispositivo por primera vez. Antena GPS Una batería totalmente descargada tarda Botón de encendido aproximadamente cinco horas en Puntos de contacto cargarse. LED de estado y LEDs de localización Coloca el clip cargador en el parpadeantes... -
Página 28: Añadir Un Perro En El Dispositivo De Mano Atemos 100 Mediante Vinculación Inalámbrica
antes de que le pongas el collar al perro. En el dispositivo de mano, selecciona La detección de satélites puede tardar Lista de perros > Añadir perro. unos minutos. Acerca el collar para perros al Dirígete a un lugar al aire libre. dispositivo de mano y selecciona Sí. - Página 29 Ajústalos con la llave incluida sin llegar está muy suelto o se coloca de forma a apretarlos en exceso. incorrecta, la estimulación no se realizará de una forma coherente. Esto puede Cuando le coloques el collar al perro, provocar que el adiestramiento se retrase asegúrate de que los puntos de contacto o no se realice de forma adecuada.
-
Página 30: Seguimiento Y Adiestramiento De Perros
(collares para perros KT 15 y dispositivos de mano Atemos). Rastreo de perros El dispositivo de mano te permite rastrear la posición de tu perro a través de la brújula de rastreo o el mapa. El mapa muestra tu ubicación, así como la ubicación y los tracks del perro. -
Página 31: Comunicación Con El Collar
Puedes descargar la versión más reciente órdenes básicas, podrás comenzar a del manual del usuario de Internet. adiestrarlo con el collar para perros y la Visita www.garmin.com/support. correa. Por último, cuando el perro Selecciona Manuales. obedezca por norma general las órdenes... -
Página 32: Especificaciones Del Collar Para Perros
Como começar Este dispositivo no debe utilizarse con una antena suministrada por terceros o que no ATENÇÃO esté aprobada por Garmin. Visita Consulte no guia Informações importantes www.garmin.com/tracking-legal para de segurança e do produto, na obtener más información acerca del... -
Página 33: Ligar Os Dispositivos
Desligar o dispositivo • No dispositivo para coleira de cão, mantenha premido o botão de alimentação até que o LED de estado passe a vermelho fixo. O dispositivo emite um sinal sonoro. Carregar o dispositivo para coleira de cão AVISO Para evitar corrosão, limpe minuciosamente os contactos na coleira e a área circundante antes de ligar o clipe... -
Página 34: Adquirir Sinais De Satélite
Prima o botão de alimentação no dispositivo portátil. A força do sinal de GPS é visível através de Assim que a coleira adquirir sinais de satélite, o LED de estado pisca duas ou três vezes a verde. Adicionar um cão ao dispositivo Ligue a extremidade pequena do cabo portátil Atemos 100 através do de alimentação ao conector mini-USB... -
Página 35: Escolher E Colocar Os Pontos De Contacto
Após a adição bem-sucedida do Ao colocar a coleira no cão, certifique-se dispositivo da coleira do cão, introduza de que os pontos de contacto estão bem o nome do cão e selecione > OK. ajustados contra o pescoço. Escolher e colocar os pontos de Colocar a coleira no seu cão contacto CUIDADO... - Página 36 Um dispositivo portátil Atemos consegue comportamento do cão para verificar monitorizar um máximo de 20 dispositivos se a coleira não está excessivamente (dispositivos para coleiras de cão KT 15 e apertada. dispositivos portáteis Atemos). Localização de cães O dispositivo portátil permite localizar o seu cão com a bússola de localização ou...
-
Página 37: Atualizar O Software
Pode obter o manual do utilizador mais lado, sentar-se e vir até si. Depois de o recente a partir da Web. cão compreender estas três ordens Visite www.garmin.com/support. básicas, pode começar a treiná-lo com a coleira e a trela. Por último, quando o cão Selecione Manuais. -
Página 38: Aan De Slag
Aceda a www.garmin.com/products Especificações do dispositivo para /webupdater. coleira de cão KT 15 Siga as instruções no ecrã. Intervalo da De -20 °C a 60 °C (de Informações de rádio VHF temperatura de -4 °F a 140 °F) funcionamento Este produto apenas pode ser utilizado em frequências de rádio específicas, que... - Página 39 Halsbandtoestel De toestellen inschakelen • Houd de aan-uitknop ingedrukt op het OPMERKING: Uw halsbandtoestel ziet er halsbandtoestel totdat het mogelijk anders uit dan het afgebeelde statuslampje knippert en de halsband toestel. piept. Het toestel uitschakelen • Houd de aan-uitknop op het halsbandtoestel ingedrukt totdat het statuslampje rood blijft branden en laat vervolgens de aan-uitknop los.
- Página 40 Selecteer de aan-uitknop op het handheld-toestel. geeft de GPS-signaalsterke aan. Als de halsband satellietsignalen ontvangt, knippert het statuslampje twee of drie keer in het groen. Een hond toevoegen aan de Atemos 100 handheld via draadloze koppeling Sluit het smalle uiteinde van de Schakel het halsbandtoestel uit als voedingskabel aan op de mini-USB- deze is ingeschakeld.
-
Página 41: De Contactpunten Selecteren En Installeren
De contactpunten selecteren en De halsband omdoen installeren VOORZICHTIG Voor de beste resultaten selecteert u de Als u irritatie door de contactpunten wilt juiste contactpunten op basis van de vacht voorkomen, verwijdert u om de 24 uur de van uw hond. halsband gedurende ten minste acht uur. - Página 42 Volgen en trainen van honden of de band niet te strak zit. Eén Atemos handheld-toestel kan tot 20 toestellen volgen (KT 15 halsbandtoestellen en Atemos handheld- toestellen). Honden volgen Met het handheld-toestel kunt u uw hond volgen met behulp van een kompas of kaart.
-
Página 43: De Gebruikershandleiding Downloaden
Wanneer de hond consequent gehoorzaamt aan Ga naar www.garmin.com/support. commando's met de riem en de halsband, Selecteer Handleidingen. kunt u wellicht de riem afdoen en alleen Volg de instructies op het scherm om trainen met het halsbandtoestel. -
Página 44: Stručný Návod K Obsluze
POZNÁMKA: Váš psí obojek může de prestaties en radiofrequentie van dit vypadat jinak než obojek na obrázku. product, goedgekeurde accessoires en voedingslimieten per land. KT 15 halsbandtoestel - specificaties Bedrijfstempera- Van -20° tot 60°C (van tuurbereik -4° tot 140°F) Laadtemperatuur- Van 0°... - Página 45 červeně svítit, a poté zapínací tlačítko uvolněte. Obojek zapípá. Nabíjení psího obojku OZNÁMENÍ Aby nedocházelo ke korozi, osušte důkladně kontakty na obojku a okolní oblast předtím, než připojíte nabíjecí klip. POZNÁMKA: Váš psí obojek může vypadat jinak než obojek na obrázku. Než...
- Página 46 Připojte nabíjecí kabel k napájecímu Podržte tlačítko , dokud obojek psa zdroji. nevydá dvě řady pípnutí (asi 2 vteřiny), a poté uvolněte. Při nabíjení obojku bude stavová kontrolka svítit červeně. Kontrolka stavu rychle zeleně bliká. Nyní je obojek psa připraven Jakmile začne stavová...
- Página 47 Utáhněte je dodaným klíčem, avšak ne zdržovat úspěch při výcviku, nebo mu příliš. bránit. Když obojek psovi nasadíte, zkontrolujte, Umístěte zařízení obojku zepředu že psovi kontaktní body pevně přiléhají ke psího krku, přičemž stavová kontrolka krku. směřuje k bradě psa a kontaktní body proti krku.
- Página 48 Jakmile pes rozumí těmto třem základním Jedno přenosné zařízení Atemos dokáže povelům, můžete jej začít cvičit pomocí sledovat až 20 obojků (psí obojky KT 15 a obojku se zařízením a vodítka. A konečně, přenosná zařízení Atemos). jakmile pes konzistentně plní povely na vodítku s využitím obojku, můžete vodítko...
-
Página 49: Aktualizace Softwaru
Aktualizace softwaru příslušenství a omezení záření v různých Než budete moci aktualizovat software zemích. přenosného zařízení nebo obojku, musíte Specifikace obojku pro psa KT 15 přenosné zařízení nebo obojek připojit k počítači. Rozsah provozních -20º až 60 °C (-4º až... -
Página 50: Kezdő Lépések
2.4 GHz @ 6.16 dBm Stupeň vodotěs- 1 atmosféra* nosti *Zařízení vydrží tlak odpovídající hloubce 10 m. Další informace najdete na webové stránce www.garmin.com/waterrating. KT 15 Kezdő lépések Első lépések FIGYELMEZTETÉS! A termékre vonatkozó figyelmeztetéseket és más fontos információkat lásd a termék VHF antenna dobozában található... -
Página 51: A Készülék Kikapcsolása
A készülék kikapcsolása • Tartsa lenyomva a nyakörvkészülék bekapcsológombját, amíg az állapotjelző LED folyamatos piros fénnyel nem kezd világítani, majd engedje fel a bekapcsológombot. A készülék sípolással reagál. A nyakörvkészülék töltése Csatlakoztassa a tápkábel keskenyebb ÉRTESÍTÉS végét a töltőcsipesz kábelén lévő mini- A korrózió... - Página 52 Válassza ki a bekapcsológombot a A nyakörvkészülék sikeres kézi készüléken. hozzáadása után adja meg a kutya nevét, majd válassza az > OK szimbólum a GPS-jel erősségét lehetőséget. mutatja. Az érintkezési pontok kiválasztása és Amikor a nyakörv műholdas jeleket fog, az felhelyezése állapotjelző...
- Página 53 pontok szorosan illeszkednek a kutya Igazítsa a készüléket a kutya nyakához. nyakának elülső részére úgy, hogy az állapotjelző LED a kutya álla felé A nyakörv felhelyezése a kutyára nézzen, az érintkezési pontok pedig a VIGYÁZAT! torkához illeszkedjenek. Az érintkezőpontok által okozott irritáció Szorítsa meg a szíjat, hogy szorosan elkerülése érdekében 24 óránként vegye körbevegye a kutya nyakát, majd...
- Página 54 átfogó képzési program részeként ajánlott. Egy Atemos kézi készülék akár 20 Kezdje a tréninget úgy, hogy kutyája készülék (KT 15 kutyanyakörv-készülékek pórázon sétál, az Atemos képzési és Atemos kézi készülékek) nyomon rendszer nélkül. Tanítsa meg kutyájának a követésére képes.
-
Página 55: Készülékadatok
és magasabb kisugárzott teljesítményhez vezethet. A készüléket Válassza a Manuals lehetőséget. tilos harmadik féltől származó, illetve a A termék kiválasztásához kövesse a Garmin által nem jóváhagyott antennával képernyőn megjelenő utasításokat. használni. A termék teljesítményével és a Kezdő lépések... -
Página 56: Manual De Iniţiere Rapidă
AVERTISMENT a www.garmin.com/tracking-legal Consultaţi ghidul Informaţii importante weboldalra. privind siguranţa şi produsul din cutia A KT 15 kutyanyakörv-készülék produsului pentru a vedea avertismentele specifikációi pentru produs şi alte informaţii importante. Üzemi hőmérséklet- -20° és 60°C között (-4°... - Página 57 NOTĂ: este posibil ca dispozitivul pentru Antenă VHF zgardă să fie diferit de dispozitivul din Antenă GPS imagine. buton de pornire Înainte de utilizarea pentru prima dată a Puncte de contact dispozitivului este recomandat să încărcaţi LED de stare şi LED-uri intermitente complet bateria.
- Página 58 După ce LED-ul de stare luminează semnale sonore (circa 2 secunde), continuu în verde, îndepărtaţi clema de apoi eliberaţi . încărcare de pe zgardă. LED-ul de stare luminează intermitent Obţinerea semnalelor de la sateliţi în verde, la intervale mici. Acum, dispozitivul pentru zgardă...
- Página 59 Dacă este necesar, utilizaţi cheia fixă Pentru un dresaj eficient al câinelui, inclusă pentru scoaterea punctelor de zgarda şi dispozitivul trebuie să fie contact. potrivite pentru câine. În cazul în care zgarda este prea lejeră sau poziţionată Răsuciţi punctele de contact în zgardă. incorect, este posibil ca stimularea să...
- Página 60 înţelege aceste trei comenzi de urmări până la 20 de dispozitive bază, puteţi începe dresajul cu dispozitivul (dispozitive pentru zgardă KT 15 şi pentru zgardă şi lesă. În final, când câinele dispozitive de mână Atemos). respectă în mod constant comenzile cu...
-
Página 61: Actualizarea Software-Ului
şi o putere radiată mai mare. Nu trebuie să Descărcaţi manualul de utilizare utilizaţi dispozitivul cu o antenă terţă sau Puteţi descărca cel mai nou manual de cu o antenă neaprobată de Garmin. utilizare de pe web. Accesaţi www.garmin.com/tracking-legal Vizitaţi www.garmin.com/support. - Página 62 şi limitele de putere în diferite ţări. Specificaţii pentru dispozitivul pentru zgardă KT 15 Interval de Între -20° şi 60°C (între temperatură optimă -4° şi 140°F) de funcţionare Interval de Între 0° şi 40°C (între temperatură de 32° şi 104°F) încărcare...
- Página 65 Garmin Ltd. or its subsidiaries, registered in the USA and ® ® other countries. These trademarks may not be used without the express permission of Garmin. Other trademarks and trade names are those of their respective owners. Printed in Taiwan...
- Página 66 Part Information GPN: 190-02265-90 Description: KT15 Quick Start Manual (ML) Part Type: Manuals / Printed Literature Lifecycle Phase: Production Rev: IR#093433 Item Attribution Document Review Required: Item Notes: Preferred Rating: ESD Sensitive: Moisture Sensitive: Limited Shelf Life: Magnetic Sensitive: Item Attribution 1 of 1 Item: 190-02265-90 Rev:A IR#093433 Creation Date: 12-Jul-2017 04:12 PM CST...