Publicidad
Idiomas disponibles
Idiomas disponibles
Enlaces rápidos
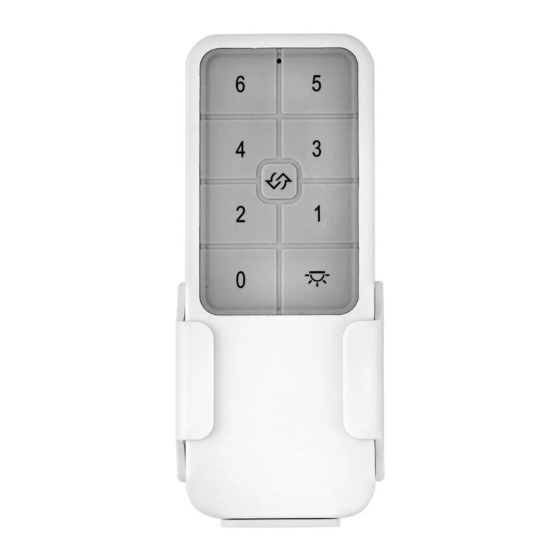
HANDHELD TRANSMITTER
Specified DC motor fan use.
●
PAIRING PROCESS
Remove the set screw on the back of transmitter, take out the battery
cover. Insert the 3 volt battery (included) and make sure they are
seated correctly in each recess with the Positive + sign facing up.
When remove or insert the batteries, use a suitable screwdriver to
loosen or tighten the screws and open the back cover.
NOTE: To prevent damage to the transmitter, remove these batteries
if not used for long periods of time (months).
WARNING: Chemical Burn Hazard. Keep batteries away from
children.
This product contains a lithium button/coin cell battery. If a new or
used lithium button/coin cell battery is swallowed or enters the body,
it can cause severe internal burns and can lead to death in as little as
2 hours. Always completely secure the battery compartment. If the
battery compartment does not close securely, stop using the product,
remove the batteries, and keep it away from children. IF you think
batteries might have been swallowed or placed inside any part of the
body, seek immediate medical attention.
The batteries shall be disposed of properly, including keeping them
away from children; Even used cells may cause injury.
With the fan's power off, restore power to the fan. Press and hold
0
"
" button for about 5 seconds and release. If optional light kit is
installed, the light kit will flash twice and the signal light on the wall
control will come on when the button is pressed. The fan has
completed the pairing process with the wall control and is ready for
use.
NOTE: A single fan can be controlled with as many as 3 controls in
one room. Every control will need to repeat the pairing process
based on instructions above and all controls must be within 30 feet
of the fan.
NOTE: If the self calibration test failed, turn the AC power off;
restore power and process the self calibration test again.
NOTE: During self calibration test, the remote is non-fuctional.
NOTE: The learning frequency function and self calibration test will
continue to retain the last set frequency and calibration set even
when the AC power is shut off. If the frequency is changed the self
calibration test will occur again.
6 SPEED FAN & LIGHT
REMOTE CONTROL
INSTALLATION INSTRUCTIONS
READ AND SAVE THESE INSTRUCTIONS
Fig. 1
6
4
2
0
Fig. 2
Model: 980003
Set screw
5
3
1
Publicidad

Manuales relacionados para Hinkley 980003

Resumen de contenidos para Hinkley 980003
- Página 1 6 SPEED FAN & LIGHT REMOTE CONTROL INSTALLATION INSTRUCTIONS Model: 980003 READ AND SAVE THESE INSTRUCTIONS HANDHELD TRANSMITTER Specified DC motor fan use. ● PAIRING PROCESS Set screw Remove the set screw on the back of transmitter, take out the battery cover.
- Página 2 (no dimmable function) and is to be used with Fig. 3 CFL and LED bulbs as CFL bulbs cannot be dimmed properly. NOTE: To operate the reverse function on this fan, press the reverse button while the fan is running. For Warranty Information please visit www.hinkley.com...
-
Página 3: Proceso De Emparejamiento
CONTROL REMOTO DE 6 VELOCIDADES Y VENTILADOR INSTRUCCIONES DE INSTALACIÓN Modèle: 980003 LEA Y GUARDE ESTAS INSTRUCCIONES TRANSMISOR DE MANO Uso especificado del ventilador del motor de CC. ● PROCESO DE EMPAREJAMIENTO Tornillo de ajuste Retire el tornillo de fijación en la parte posterior del transmisor, saque la tapa de la batería. - Página 4 CFL y LED ya que Fig. 3 las bombillas CFL no pueden atenuarse adecuadamente. NOTA: Para operar la función de retroceso en este ventilador, presione el botón de retroceso mientras el ventilador está funcionando. Para obtener información sobre la garantía, visite www.hinkley.com...
- Página 5 TÉLÉCOMMANDE VENTILATEUR ET LUMIÈRE À 6 VITESSES INSTRUCTIONS D'INSTALLATION Modèle: 980003 LISEZ ET CONSERVEZ CES INSTRUCTIONS ÉMETTEUR PORTABLE Utilisation spécifiée du ventilateur du moteur à courant continu. ● PROCESSUS DE COUPLAGE Retirez la vis de réglage à l'arrière de l'émetteur, retirez le couvercle Vis de réglage...
- Página 6 être utilisée avec les ampoules CFL et LED car les ampoules CFL ne peuvent pas être gradées correctement. REMARQUE: Pour utiliser la fonction d'inversion sur ce ventilateur, appuyez sur le bouton d'inversion pendant que le ventilateur fonctionne. Pour des informations sur la garantie, veuillez visiter www.hinkley.com...