
Manuales relacionados para Bticino Polyx Memory Display


Resumen de contenidos para Bticino Polyx Memory Display
- Página 1 369411 - 369421 - 369511 - 369521 - 368415 Polyx Memory Display Istruzioni d’uso • Instruction sheet...
- Página 2 Polyx Memory Display ITALIANO ENGLISH FRENCH GERMAN SPANISH FLEMISH RUSSIAN...
-
Página 3: Tabla De Contenido
Polyx Memory Display 1 Introduzione e funzioni base 1.1 Informazioni generali 1.2 Il tuo Polyx Memory Display: usalo subito! 1.2.1 Tasti funzioni videocitofoniche 1.2.2 Tasti di navigazione 1.2.3 Tasto funzione Segreteria 1.3 Funzioni da menù 1.3.1 Regolazione volume 1.3.2 Regolazione monitor (giorno/notte) 1.3.3 Data/Ora 1.3.4 Brandeggio telecamera 1.3.5 Impostazione suonerie 1.3.6 Cercapersone 1.4 Segreteria... -
Página 4: Avvertimento Importante
AVVERTIMENTO IMPORTANTE Sui diritti delle persone interessate alla ripresa di immagini e/o alle registrazioni di suoni. • Il tuo Polyx Memory Display che hai acquistato contiene dispositivi tecnologici che con- sentono di registrare filmati. • I filmati, i suoni, la voce ed i nomi sono dati personali – talvolta sensibili – e possono altre- sì... - Página 5 Polyx Memory Display Introduzione e Funzioni Base Informazioni generali Il tuo Polyx Memory Display: usalo subito! Funzioni da menù Segreteria...
-
Página 6: Introduzione E Funzioni Base
Tasto serratura produzione e non indica un funzionamento errato e/o difettoso. Tasti di navigazione Tasto Segreteria: attiva/ L’uso improprio di Polyx Memory Display e di tutti i dispositivi ad disattiva la funzione Segreteria Tasto accensione posto esso collegati, esclude qualsiasi garanzia! -
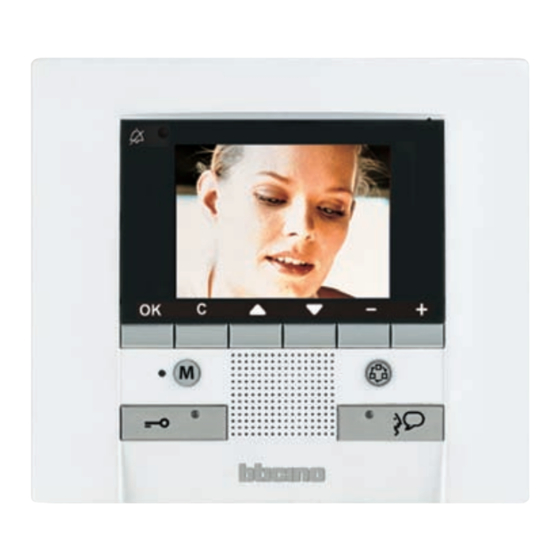
Página 7: Tasti Funzioni Videocitofoniche
Polyx Memory Display 1.2.1 Tasti funzioni videocitofoniche 1.2.2 Tasti di navigazione Attivazione Posto Esterno/Ciclamento Tasto OK Attiva l’accensione del Posto Esterno associato e se Permette l’accesso al menù; conferma la scelta effet- presenti, permette la visualizzazione in ciclata degli tuata. -
Página 8: Funzioni Da Menù
1 Introduzione e funzioni base Funzioni da menù COMUNICAZIONE Tramite il tasto OK è possibile accedere al menù principale: Esempio di menù principale con programmazione dei soli comandi di comunicazione. Segreteria Intercomunicante Luci scale Impostazioni IMPOSTAZIONI ATTIVAZIONE DOMOTICA È possibile selezionare le funzioni desiderate tra quelle disponibili tramite i tasti Esempio di menù... - Página 9 Il menù personalizzato consente un utilizzo più intuitivo delle funzioni Nelle tabelle sottostanti l’installatore ha riportato l’esatta configura- di Polyx Memory Display. Il menù infatti visualizza solo le funzioni zione del tuo Polyx Memory Display; se non l’ha compilato richiedilo.
-
Página 10: Regolazione Volume
1 Introduzione e funzioni base 1.3.1 Regolazione volume NOTA: Durante una chiamata videocitofonica puoi accedere in modo diretto al menù Regolazioni premendo il tasto All’interno del menù Seleziona seleziona una delle Regolazioni voci (es. Suonerie) Premi OK per Regola il volume al accedere al menù... -
Página 11: Regolazione Monitor (Giorno/Notte)
Polyx Memory Display 1.3.2 Regolazione monitor (giorno/notte) È possibile scegliere due regolazioni differenti, una per l’immagine diurna ed una per quella notturna; per passare da una regolazione all’altra, pre- mere il tasto C durante la chiamata videocitofonica. NOTA: Durante una chiamata videocitofonica puoi accedere in modo diretto al menù... -
Página 12: Data/Ora
1 Introduzione e funzioni base 1.3.3 Data/Ora Imposta la e l’ora attuali. Premi OK; le Seleziona > ORA :17:36:50 prime due cifre Regolazioni lampeggiano DATA :12:03:10 Premi OK per Imposta l’ora accedere al menù REGOLAZIONI Premi OK per confermare Seleziona Imposta i minuti :17:36:50 Data/ora... -
Página 13: Brandeggio Telecamera
Polyx Memory Display 1.3.4 Brandeggio telecamera NOTA: Questo menù è accessibile solamente durante la connessione con il posto esterno, se quest’ultimo è predisposto al brandeggio delle telecamere. Seleziona Regolazioni Regola la corretta angolazione della telecamera Premi OK per accedere al menù... -
Página 14: Impostazione Suonerie
1 Introduzione e funzioni base 1.3.5 Impostazione suonerie Puoi abbinare una delle sedici melodie ad ogni evento di chiamata. Scegli la melodia Seleziona Regola il volume Suonerie Seleziona Conferma e premi OK per memorizzare la scelta e tor- MELODIA Premi OK per nare alla pagina precedente accedere al menù... -
Página 15: Cercapersone
Polyx Memory Display 1.3.6 Cercapersone È possibile attivare la funzione cercapersone direttamente premendo il tasto (se configurato dall’installatore). Una volta attivata la comunicazione la voce verrà diffusa su tutto l’impianto. -
Página 16: Segreteria
è possibile inoltre memorizzare un messaggio audio diretta- mente dal Polyx Memory Display (funzione Memo). Premendo il tasto M il led rosso si accende e segnala l’attivazione della segreteria, per disattivarla premere nuovamente lo stesso tasto;... -
Página 17: Registra Un Messaggio "Memo
Polyx Memory Display 1.4.2 Registra un messaggio “Memo” Questa funzione permette di registrare un messaggio audio diretta- mente dal Polyx Memory Display. Premi il tasto OK. Il Seleziona la funzio- video viene messo in pausa. REGISTRA MEMO A questo punto è... -
Página 18: Registra Messaggio Di Benvenuto
Ora hai a disposizione 8 secon- di per registrare il messaggio Il messaggio viene riprodotto di benvenuto. Un BEEP indica la fine della registrazione NOTA: in caso di chiamata il messaggio verrà riprodotto sia dal Posto Esterno che dal Polyx Memory Display. -
Página 19: Cancella Tutti I Messaggi
Polyx Memory Display 1.4.4 Cancella tutti i messaggi 1.4.5 Impostazioni Per cancellare contemporaneamente tutti i messaggi: Questa funzione permette di abilitare/disabilitare il messaggio di Benvenuto e scegliere la modalità di registrazione dei messaggi Seleziona la Seleziona la funzione funzione CANCELLA I MESSAGGI... - Página 20 MODALITA 1 FOTO messaggi É possibile selezionare due In caso di memoria piena diverse modalità. il Polyx Memory Display 1 foto: il messaggio è com- sovrascrive i messaggi par- posto da una singola foto del tendo dal più vecchio. visitatore e dal messaggio audio da lui dettato.
- Página 21 Polyx Memory Display Soluzioni ad eventuali inconvenienti Modalità Push to Talk...
-
Página 22: Soluzioni Ad Eventuali Inconvenienti
2 Soluzioni ad eventuali inconvenienti Modalità Push to Talk Ricezione di una chiamata dal posto esterno. Premere il tasto Connessione per rispondere alla chiamata. Il Led connessione si accende. Durante la conversazione è possibile attivare la funzione PUSH TO TALK. Premere il tasto Connessione per almeno 2 secondi per parlare con il posto esterno. - Página 23 Polyx Memory Display Rilascia il tasto per poter ascoltare dal posto esterno. Il Led diventa rosso. Per terminare la connessione premi brevemente il tasto connessione. Il Led si spegne.
- Página 24 - è possibile comunicare in modalità PUSH TO TALK (vedi pagine precedenti). - verificare la regolazione dei volumi di Polyx Memory Display - verificare che non siano presenti forti sorgenti rumorose in prossimità di Al posto interno è difficoltoso sentire chi parla Polyx Memory Display - è...
- Página 25 Polyx Memory Display 1 Introduction and basic functions 1.1 General information 1.2 Your Polyx Memory Display: use it now! 1.2.1 Video door entry function keys 1.2.2 Navigation keys 1.2.3 Key for answering machine functions 1.3 Menu functions 1.3.1 Volume adjustment 1.3.2 Monitor adjustment (day/night) 1.3.3 Date/Time 1.3.4 Camera swing 1.3.5 Bells adjustment 1.3.6 Paging 1.4 Answering Machine 1.4.1 Message display 1.4.2 Record a "Memo" message 1.4.3 Record a Welcome message 1.4.4 Delete all messages...
-
Página 26: Important Warning
IMPORTANT WARNING On the rights of people involved in the taking of pictures and the recording of sounds. • The Polyx Memory Display which you have purchased contains technological devices which allow the taking of films. • The films, sounds, voice and names are personal data – sometimes sensitive – and can be the subject of copyright or other rights of intellectual ownership by third parties. • Consequently, anyone using the equipment is obliged to respect: – legislation regarding the protection of personal data; – data security obligations; – picture and portrait rights, as well as the regulations on copyright and intellectual and industrial property. • BTicino is not responsible for the illegitimate use of its equipment by its customers. - Página 27 Polyx Memory Display Introduction and basic functions General information Your Polyx Memory Display: use it now! Menu functions Answering Machine...
-
Página 28: Introduction And Basic Functions
Fitting in with My Home • Scenarios: Runs the scenarios saved in the Scenario module. • Alarms: Signals the last alarm events which have occurred and the division of the system. • Sound system: Manages the BTicino digital sound system. • Temperature control: Displays and adjusts the temperature in the various zones of the home and the state of the control unit. LCD screen note The LCD screen has been manufactured using advanced high precision technology. It is however possible that sometimes up to... -
Página 29: Video Door Entry Function Keys
Polyx Memory Display 1.2.1 Video door entry function keys 1.2.2 Navigation keys Activation Entrance Panel/Cycling OK key It activates the switching on of the associated Allows access to the menu; confirms the selection Entrance Panel and, if present, allows the cycling dis- made. play of the other Entrance Panels/cameras. keys Door lock key Inside the menu they select the previous or next item. -
Página 30: Menu Functions
1 Introduction and basic functions Menu functions COMMUNICATION Use the OK key to access the main menu: Main menu example with programming of just the communication commands. Answering machine Intercommunication Staircase lights Settings SETTINGS ANSW. MACHINE HOME AUTOMATION Use the keys to select the functions from those available: Main menu example with communication and home automation Submenu and commands submenu. Use the settings icon to access a series of adjustments/services de- scribed below Communication Scenarios... - Página 31 Polyx Memory Display CUSTOMISED MENU The customised menu allows more intuitive use of the Polyx Memory The installer has given the exact configuration of your Polyx Memory Display functions. In fact the menu only displays the functions in your Display the tables below; if he has not filled it in ask for it. My Home system and the text of each command can be customised in the installation phase. COMMUNICATION Using the customised menu also lets you: FUNCTIONS DESCRIPTION • Have the PROFESSIONAL STUDIO, HANDS FREE and ANSWERING MACHINE functions, which otherwise can only be called from the SETTINGS menu, in the main page or in another page.
-
Página 32: Volume Adjustment
1 Introduction and basic functions 1.3.1 Volume adjustment NOTE: During a video door entry call you can access the Adjustments menu directly by pressing the or key. Inside the menu Select select one of the Adjustments items (e.g. Bells) Press OK to access Adjust the volume the menu to the level required. BELLS ADJUSTMENTS EP SOUND = sound volume when talking to the entrance panel. INTERCOM = sound volume when holding an intercom conver- Press OK sation. to confirm BELLS = volume level for all the bells. VOLUME... -
Página 33: Monitor Adjustment (Day/Night)
Polyx Memory Display 1.3.2 Monitor adjustment (day/night) It is possible to select two different adjustments, one for day viewing and one for night viewing; to switch from one mode to the other press C during the video door entry call. NOTE: During a video door entry call you can access the Adjustments menu directly by pressing the or key. Select Adjustments Inside the menu select one of the items (e.g. Contrast) Press OK to access the menu COLOUR ADJUSTMENTS Select Day Monitor Make the adjustment Press OK to confirm DAY MONITOR CONTRAST... -
Página 34: Date/Time
1 Introduction and basic functions 1.3.3 Date/Time Sets the current date and time. Press OK; the first Select > TIME :17:36:50 two numbers flash Adjustments DATE :12:03:10 Press OK to access Set the hour the menu ADJUSTMENTS Press OK to confirm Select Set the minutes TIME :17:36:50 Date/time > DATE :12:03:10 Press C Press OK to confirm Use the same procedure to set DATE/TIME the date... -
Página 35: Camera Swing
Polyx Memory Display 1.3.4 Camera swing NOTE: This menu can only be accessed during the connection with the entrance panel, if this is set up for the camera swing. Select Adjustments Adjust the correct camera angle Press OK to access the menu ADJUSTMENTS Select Swing bracket Press OK to confirm SWING BRACKET... -
Página 36: Bells Adjustment
1 Introduction and basic functions 1.3.5 Bells adjustment You can associate one of sixteen tunes to each call event. Choose the tune Select Adjust the volume Bells Select Confirm and then OK to save the selection and return to TUNE Press OK to access the previous page the menu BELLS CALL FROM EP = call from the entrance panel (S=0 o S=1) INTERNAL INTERCOM = call from the intercom in your apart- ment... -
Página 37: Paging
Polyx Memory Display 1.3.6 Paging The page function can be activated directly by pressing the key (if the installer has configured it). Once the communication is activated the voice will be played on the whole system. -
Página 38: Answering Machine
1 Introduction and basic functions Answering Machine With this function it is possible to save and play back any audio and video messages left from visitors in case of absence; an audio mes- sage can also be saved directly from the Polyx Memory Display (Memo function). To activate de function press M. The red LED comes on to indicate that the answering machine is active. Press the same key to disable. The red The submenu can only be LED will flash if messages are present. -
Página 39: Record A "Memo" Message
Polyx Memory Display 1.4.2 Record a "Memo" message This function can be used to record an audio message directly from the Polyx Memory Display. Press OK. The video Select the function is paused. RECORD MEMO Press OK to confirm It will now be pos- A BEEP will mark the start of sible to delete the recording selected video using RECORD MEMO It is now possible to record... -
Página 40: Record A Welcome Message
1 Introduction and basic functions 1.4.3 Record a Welcome message To record a Welcome message: It is now possible to play back the recorded message, to ensure that it has recorded correctly Select the function Select the function RECORD WELCOME LISTEN TO WELCOME Press OK to confirm Press OK to confirm A BEEP will mark the start of recording RECORD WELCOME LISTEN TO WELCOME It is now possible to record a welcome message up to 8... -
Página 41: Delete All Messages
Polyx Memory Display 1.4.4 Delete all messages 1.4.5 Settings To delete all messages at once: This function can be used to enable/disable the Welcome message and select the message recording mode Select the function Select the function DELETE MESSAGES SETTINGS Press OK to confirm Select Quit to return To enable/disable DELETE MESSAGES ? to the menu the welcome mes- sage select the cor- > QUIT responding icon and CONFIRM press OK to confirm Select Confirm to (Icon off = disabled;... - Página 42 1 Introduction and basic functions The following screen appears: Select Quit to return DELETE MESSAGES ? to the menu select the > QUIT message recording CONFIRM mode select the corresponding icon Select Confirm to delete all messages 1 PHOTO MODE If the memory is full, Polyx Two modes are available. Memory Display will over- Photo 1: the message con- write existing messages, tains one photo of the visitor starting from the oldest...
- Página 43 Polyx Memory Display Trouble shooting Push to Talk mode...
-
Página 44: Trouble Shooting
2 Trouble shooting Push to Talk mode Receiving a call from the entrance panel. Press the Connection key to answer the call. The connection LED lights up. During the conversation you can activate the PUSH TO TALK function. Press the Connection key for at least 2 seconds to talk to the entrance panel. The LED remains ON. - Página 45 Polyx Memory Display Release the key to hear from the entrance panel. The LED becomes red. To end the connection press the connection key briefly. The LED goes out.
- Página 46 2 Trouble shooting PROBLEM SOLUTION On pressing the Entrance panel Activation/Cycling key ( ) no - the audio/video channel may be busy, wait for it to become free picture appears. (from 1 to 3 minutes) and try again. On pressing the OK key the menu does not switch on and the hand- - the audio/video channel is busy, wait for it to become free (from 1 to set gives a busy sound 3 minutes) and try again.
- Página 47 Polyx Memory Display 1 Introduction et fonctions de base 1.1 Informations générales 1.2 Polyx Memory Display: utilisez-la dès à présent! 50 1.2.1 Touches fonctions interphone vidéo 1.2.2 Touches de navigation 1.2.3 Touche fonctions répondeur 1.3 Fonctions depuis menu 1.3.1 Réglage volume 1.3.2 Réglage moniteur (jour/nuit) 1.3.3 Date/Heure 1.3.4 Orientation Caméras 1.3.5 Sélection sonneries 1.3.6 Cherche-personne 1.4 Répondeur 1.4.1 Visualisation des messages 1.4.2 Enregistrer un message «Memo»...
-
Página 48: Avertissements Importants
AVERTISSEMENTS IMPORTANTS Au sujet des droits des personnes photographiées, filmées ou enregistrées. • Le Polyx Memory Display dont vous venez de faire l’achat contient des dispositifs tech- nologiques qui permettent de filmer. • Enregistrements vidéo/audio et noms sont des données personnelles – parfois sensibles – qui peuvent faire l’objet de copyright ou autres droits de propriété intellectuelle de tiers. • Aussi, quiconque fait usage du dispositif est tenu de veiller au respect: – de la législation en vigueur concernant les données personnelles; – des obligations en matière de sécurité des données; – des droits applicables aux images et portraits, ainsi que de la réglementation sur le copyright et sur la propriété intellectuelle et industrielle. • BTicino décline toute responsabilité en cas d’utilisation abusive de ses dispositifs par les clients. - Página 49 Polyx Memory Display Introduction et fonctions de base Informations générales Polyx Memory Display: utilisez-la dès à présent! Fonctions depuis menu Répondeur...
-
Página 50: Introduction Et Fonctions De Base
Permet l’exécution des scénarios mémorisés dans le module scé- narios. • Alarmes: Signale les dernières alarmes déclenchées et la partialisation de l’installation. • Diffusion sonore: Permet de gérer la diffusion sonore numérique BTicino. • Thermorégulation: Permet de visualiser et de régler la température dans les différentes pièces de l’habitation ainsi que de visualiser l’état de la centrale. Note sur le moniteur LCD Le moniteur LCD a été réalisé en recourant à une technologie avancée de haute précision. Il est toutefois possible qu’apparais-... -
Página 51: Touches Fonctions Interphone Vidéo
Polyx Memory Display 1.2.1 Touches fonctions interphone vidéo 1.2.2 Touches de navigation Activation Poste Externe/Cyclage Touche OK Active l’allumage du Poste externe associé et, si pré- Permet d’accéder au menu et de confirmer la sélec- sents, permet la visualisation cyclique des autres tion effectuée. Postes Externes/caméras. Touches Touche serrure Dans les différents menus, permettent de sélectionner respectivement l’option précédente ou suivante. -
Página 52: Fonctions Depuis Menu
1 Introduction et fonctions de base Fonctions depuis menu COMMUNICATION À l’aide de la touche OK, il est possible d’accéder au menu principal: Exemple de menu principal avec programmation des seules com- mandes de COMMUNICATION. Répondeur Intercommunicant Éclair. escal Paramètres PARAMETRES REPONDEUR DOMOTIQUE Il est possible de sélectionner les fonctions voulues parmi celles dis- ponibles à l’aide des touches Exemple de menu principal avec sous-menus de communication et domotique. Sous-menus et commandes Par l’intermédiaire de l’icône Paramètres, il est possible d’accéder à une série de réglages/services décrits ci-après Communication Scénarios... - Página 53 Polyx Memory Display MENU PERSONNALISÉ Le menu personnalisé permet une utilisation plus intuitive des fonc- Dans les tableaux ci-dessous, l’installateur doit avoir indiqué la configu- tions de la Polyx Memory Display. Le menu affiche en effet uniquement ration exacte de la Polyx Memory Display; si tel n’est pas le cas, la lui les fonctions effectivement présentes sur l’installation My Home et le demander. texte de chaque commande peut être personnalisé lors de l’installation. COMMUNICATION L’utilisation du menu personnalisé offre en outre: FONCTIONS DESCRIPTION • La possibilité de disposer, dans le menu principal ou sur une autre...
-
Página 54: Réglage Volume
1 Introduction et fonctions de base 1.3.1 Réglage volume NOTE: durant un appel sur interphone vidéo, il est possible d’accéder directement au menu Réglages en appuyant sur la touche ou Sélectionner une Sélectionner des options du Réglages menu (Sonneries par exemple) Appuyer sur OK Régler le volume au pour accéder au niveau voulu SONNERIES menu REGLAGES PHONIQUE PE = volume audio en cas de conversation avec le poste externe INTERCOM = volume audio en cas de conversation intercom- Appuyer sur OK municante... -
Página 55: Réglage Moniteur (Jour/Nuit)
Polyx Memory Display 1.3.2 Réglage moniteur (jour/nuit) Il est possible de sélectionner deux réglages différents, l’un pour l’image diurne et l’autre pour l’image nocturne ; pour passer d’un réglage à l’autre, appuyer sur la touche C durant l’appel sur interphone vidéo. NOTE: Durant un appel sur interphone vidéo, il est possible d’accéder directement au menu Réglages en appuyant sur la touche ou Sélectionner Réglages Sélectionner une des options du menu (Contraste Appuyer sur OK par exemple) pour accéder au menu COULEUR REGLAGES Sélectionner Moniteur jour Effectuer le réglage... -
Página 56: Date/Heure
1 Introduction et fonctions de base 1.3.3 Date/Heure Permet de programmer date et heure actuelles. Appuyer sur OK; Sélectionner > HEURE :17:36:50 les deux premiers Réglages chiffres clignotent DATE :12:03:10 Appuyer sur OK Régler l’heure pour accéder au menu REGLAGES Appuyer sur OK pour confirmer Sélectionner Régler les minutes HEURE :17:36:50 Date/heure > DATE :12:03:10 Appuyer sur C Appuyer sur OK pour confirmer Appliquer la même procédure DATE/HEURE pour programmer la date... -
Página 57: Orientation Caméras
Polyx Memory Display 1.3.4 Orientation Caméras NOTE: le menu est accessible uniquement lors de la connexion au poste externe, à condition que ce dernier oit prévu pour l’orientation des caméras. Sélectionner Réglages Pour régler correc- tement l’orientation de la caméra Appuyer sur OK pour accéder au menu REGLAGES Sélectionner Balance Appuyer sur OK pour confirmer BALANCE... -
Página 58: Sélection Sonneries
1 Introduction et fonctions de base 1.3.5 Sélection sonneries Permet d’associer une des seize mélodies à chaque événement d’appel. Choisir la mélodie Régler le volume Sélectionner Sélectionner Confirmer Sonneries appuyer sur OK pour mémoriser la sélection et revenir à la page MELODIE précédente. Appuyer sur OK pour accéder au menu SONNERIES APPEL DEPUIS PE = appel depuis le poste externe (S=0 o S=1). INTERCOM INTERNE = appel depuis intercommunicant présent dans l’appartement. -
Página 59: Cherche-Personne
Polyx Memory Display 1.3.6 Cherche-personne Il est possible d’activer directement la fonction cherche-personne en appuyant sur la touche (à condition qu’elle ait été configurée par l’installateur). Une fois la communication activée, la voix est diffusée sur toute l’ins- tallation. -
Página 60: Répondeur
1 Introduction et fonctions de base Répondeur Cette fonction permet de mémoriser et ensuite de visualiser les mes- sages audio et vidéo laissés par des visiteurs en votre absence; il est également possible de mémoriser un message audio directement depuis le Polyx Memory Display (fonction Mémo). En appuyant sur la touche M, le voyant rouge s’allume et signale l’activation du répondeur; pour le désactiver, appuyer à nouveau sur En l’absence de messages, il la même touche; si le voyant rouge clignote, cela indique que de nou-... -
Página 61: Enregistrer Un Message «Memo
Polyx Memory Display 1.4.2 Enregistrer un message «Mémo» Cette fonction permet d’enregistrer un message audio directement depuis le Polyx Memory Display. Appuyer sur la Sélectionner la touche OK. Le fonction moniteur est mis en pause ENREGISTRER MEMO À ce stade, il est Appuyer sur OK possible d’effacer pour confirmer la vidéo en sélec- Un BIP indique le début de tionnant l’icône l’enregistrement. Eliminer ou bien ENREGISTRER MEMO Dès lors, 16 secondes sont de reprendre la disponibles pour l’enregis- reproduction en trement du message. -
Página 62: Enregistrement D'un Message De Bienvenue
1 Introduction et fonctions de base 1.4.3 Enregistrement d’un message de Bienvenue Pour enregistrer un message de Bienvenue: Ensuite, il est possible de réé- couter le message pour s’as- surer du bon enregistrement. Sélectionner la fonction Sélectionner la fonction ENREGISTRER BIENVENUE ECOUTER BIENVENUE Appuyer sur OK Appuyer sur OK pour confirmer pour confirmer Un BIP indique le début de l’enregistrement ENREGISTRER BIENVENUE ECOUTER BIENVENUE Dès lors, 8 secondes sont disponibles pour l’enregis-... -
Página 63: Éliminer Tous Les Messages
Polyx Memory Display 1.4.4 Éliminer tous les messages 1.4.5 Réglages Pour éliminer simultanément tous les messages: Cette fonction permet d’activer/désactiver le message de Bienvenue et de sélectionner la modalité d’enregistrement des messages Sélectionner la Sélectionner la fonction fonction EFFACER MESSAGES PARAMETRES Appuyer sur OK pour confirmer Pour activer/désac- Sélectionner Sortir tiver le message pour revenir au menu EFFACER MESSAGES? de Bienvenue, ou bien sélectionner l’icône > SORTIR correspondante Sélectionner CONFIRMER et appuyer sur OK Confirmer pour pour confirmer. éliminer tous les (icône éteinte = dé-... - Página 64 1 Introduction et fonctions de base S’affiche ensuite la page sui- vante: Sélectionner Sortir EFFACER MESSAGES ? Pour sélectionner la pour revenir au menu modalité d’enregis- > SORTIR ou bien trement des mes- CONFIRMER Sélectionner sages, sélectionner Confirmer pour éli- l’icône correspon- miner tous les mes- dante MODALITE 1 PHOTO sages...
-
Página 65: Anomalies Et Solutions
Polyx Memory Display Anomalies et solutions Modalité Push to Talk... -
Página 66: Modalité Push To Talk
2 Anomalies et solutions Modalité Push to Talk Réception d’un appel provenant du poste externe. Appuyer sur la touche Connexion pour répondre à l’appel. Le voyant Connexion s’allume. Durant la conversation, il est possible d’activer la fonction PUSH TO TALK. Appuyer sur la touche Connexion pendant au moins 2 secondes pour parler avec le poste externe. Le voyant reste allumé... - Página 67 Polyx Memory Display Relâcher la touche pour pouvoir écouter depuis le poste externe. Le voyant devient rouge. Pour mettre fin à la connexion, appuyer brièvement sur la touche connexion. Le voyant s’éteint.
- Página 68 2 Anomalies et solutions PROBLÈME SOLUTIONS En appuyant sur la touche Activation poste externe/Cycler ( - le canal audio/vidéo pourrait être occupé, attendre qu’il se libère (de aucune image n’apparaît 1 à 3 minutes) et effectuer une nouvelle tentative. - le canal audio/vidéo est occupé, attendre qu’il se libère (de 1 à 3 En appuyant sur la touche OK le menu ne s’allume pas et le poste interne émet le signal “occupé”...
- Página 69 Polyx Memory Display 1 Einführung und Grundfunktionen 1.1 Allgemeine Informationen 1.2 Ihr Polyx Memory Display: Sofort nutzen! 1.2.1 Funktionstasten der Video-Gegensprechanlage 7 3 1.2.2 Navigationstasten 1.2.3 Taste für Anrufbeantworter - Funktionen 1.3 Funktionen über das Menü 1.3.1 Lautstärke einstellen 1.3.2 Regulierung des Monitors (Tag/Nacht) 1.3.3 Datum/Stunde 1.3.4 Kamera schwenken 1.3.5 Läutwerke einrichten 1.3.6 Personensuche 1.4 Anrufbeantworter 1.4.1 Nachrichten anzeigen 1.4.2 Eine Nachricht „ Memo“ aufzeichnen 1.4.3 Gruß aufzeichnen...
- Página 70 WICHTIGER HINWEIS Rechte im Zusammenhang mit der Aufzeichnung von Bildern und Tönen. • Das Polyx Memory Display, das Sie erworben haben, enthält technische Geräte, mit denen Sie Filme aufnehmen können. • Filmaufnahmen, Geräusche, Stimmen und Namen sind personenbezogene Daten, die sensibel sein können und ggf. Urheberrechten oder sonstigen Eigentumsrechten un- terliegen. • Deshalb haben Sie bei der Nutzung des Geräts Folgendes zu beachten: – die Datenschutzbestimmungen; – die Bestimmungen über Datensicherheit; – Bildrechte, Urheberrechte und geistige sowie gewerbliche Eigentumsrechte. • BTICINO haftet nicht für den unrechtmäßigen Einsatz der Geräte durch den Betreiber.
- Página 71 Polyx Memory Display Einführung und Grundfunktionen Allgemeine Informationen Ihr Polyx Memory Display: Sofort nutzen! Funktionen über das Menü Anrufbeantworter...
-
Página 72: Einführung Und Grundfunktionen
Ausführung der Szenarien, die in den Szenarienmodulen gespei- chert sind. • Alarme: Meldung der letzten Alarmereignisse und Partialisierung der Anlage. • Schalldiffusion: Ermöglicht es die digitale Schalldiffusion von BTICINO zu verwalten. • Temperaturregelung: Anzeige und Regulierung der Temperatur in den einzelnen Wohnbereichen sowie Zustandsanzeige der Zentrale. Bemerkung zu dem LCD Bildschirm Der LCD Bildschirm wurde mit Hilfe einer hochgenauen Technik hergestellt. Trotzdem kann es vorkommen, dass fünf kleine schwar-... -
Página 73: Funktionstasten Der Video-Gegensprechanlage
Polyx Memory Display 1.2.1 Funktionstasten der Video-Gegensprechanlage 1.2.2 Navigationstasten Aktivierung einer Türstation/Taktierung Taste OK Aktiviert das Einschalten der zugeteilten Türstation Ermöglicht den Zugang zum Menü; bestätigt die und, wenn vorhanden, ermöglicht die Taktierung der vorgenommene Wahl. anderen Türstationen/Kameras. Tasten In einem Menü, wählt man mit diesen Tasten den Schlosstaste vorhergehenden oder nachfolgenden Eintrag. -
Página 74: Funktionen Über Das Menü
1 Einführung und Grundfunktionen Funktionen über das Menü KOMMUNIKATION Über die Taste OK kann das Hauptmenü abgerufen werden: Beispiel eines Hauptmenüs mit ausschließlicher Programmierung der Kommunikationssteuerungen. Anrufbeantw. Interkommunizierend Treppenlicht Einstellungen EINSTELLUNGEN ANRUFBEANTW. HEIMELEKTRONIK Über die Taste können die zur Verfügung stehenden Funktionen gewählt werden: Beispiel eines Hauptmenüs mit Untermenü für Kommunikation und Heimelektronik. Untermenü und Steuerungen Über das Symbol Einstellungen kann man eine Reihe von Einstellun- gen/Funktionen wie nachstehend beschrieben einrichten. Kommunikation Szenarien Alarme Schalldiffusion Nachstehend werden drei Zusammenstellungsbeispiele für das Temperaturregelung Hauptmenü aufgeführt: Einstellungen... - Página 75 Polyx Memory Display PERSONALISIERTES MENÜ Durch das personalisierte Menü wird der Gebrauch der Funktionen der In den nachfolgenden Tabellen trägt der Installateur die genaue Polyx Memory Display intuitiver gestaltet. In dem Menü werden näm- Konfiguration Ihres Polyx Memory Displays ein; wenn die Tabelle nicht lich nur die tatsächlich vorhandenen Funktionen der Anlage My Home ausgefüllt ist, bitten Sie den Installateur darum. angezeigt und der Text der einzelnen Steuerungen kann während der Installation geändert bzw. personalisiert werden. KOMMUNIKATION Ein personalisiertes Menü gestattet außerdem: FUNKTIONEN BESCHREIBUNG • Im Hauptmenü oder in einer anderen Seite die Funktionen BÜRO, FREIE HÄNDE, ANRUFBEANTW. einzufügen, die ansonsten nur durch...
-
Página 76: Lautstärke Einstellen
1 Einführung und Grundfunktionen 1.3.1 Lautstärke einstellen BEMERKUNG: Während eines Rufs der Video-Gegensprechanlage, kann man direkt das Menü Regelungen durch Drücken der Tasten oder abrufen. Vom Menü aus, Regelungen einen Eintrag wäh- wählen len (z.B. Läutwerke) Um das Menü Lautstärke nach abzurufen, die Taste Wunsch einstellen OK drücken LÄUTWERKE REGELUNGEN AUDIO TÜRSTATION = Lautstärke bei einem Gespräch mit der Türstation. -
Página 77: Regulierung Des Monitors (Tag/Nacht)
Polyx Memory Display 1.3.2 Regulierung des Monitors (Tag/Nacht) Der Monitor kann für Bilder über Tag und für Bilder über Nacht einge- richtet werden. Zum Umschalten zwischen diesen beiden Einstellungen während eines Rufs die Taste C drücken. BEMERKUNG: Während eines Rufs der Video-Gegensprechanlage, kann man direkt das Menü Regelungen durch Drücken der Taste oder abrufen. Regelungen wählen Vom Menü aus, einen Eintrag wäh- len (z.B. Kontrast) Um das Menü abzurufen, die Taste OK drücken FARBE REGELUNGEN Bildschirm Tag wählen Regelung vornehmen OK drücken, um zu... -
Página 78: Datum/Stunde
1 Einführung und Grundfunktionen 1.3.3 Datum/Stunde Aktuelles Datum und Stunde einstellen. OK drücken; die Regelungen > STUNDE :17:36:50 ersten beiden wählen Zahlen blinken DATUM :12:03:10 OK drücken, um zu Stunde einstellen bestätigen REGELUNGEN OK drücken, um zu bestätigen Datum/stunde Minuten einstellen STUNDE :17:36:50 Wählen > DATUM :12:03:10 drücken C OK drücken, um zu bestätigen Denselben Vorgang zur Einstellung des Datums DATUM/STUNDE wiederholen... -
Página 79: Kamera Schwenken
Polyx Memory Display 1.3.4 Kamera schwenken ANMERKUNG: Dieses Menü ist nur bei laufender Verbindung mit der Türstation zugänglich, wenn die betreffende Türstation über die Funktion Kameraausrichtung verfügt. Regelungen wählen Korrekten Aufnahmewinkel der Kamera Um das Menü einstellen abzurufen, die Taste OK drücken REGELUNGEN Schwenkung wählen OK drücken, um zu bestätigen SCHWENKUNG... -
Página 80: Läutwerke Einrichten
1 Einführung und Grundfunktionen 1.3.5 Läutwerke einrichten Einem jeden Rufereignis kann eine der sechzehn Melodien zugeteilt werden. Melodie wählen Lautstärke einstel- Läutwerke wählen Bestätigen wählen und OK drü- cken, um die Wahl zu speichern MELODIE Um das Menü und die vorhergehende Seite abzurufen, die Taste wieder abzurufen OK drücken LÄUTWERKE RUF VON TÜRSTATION = Ruf von der Türstation (S=0... -
Página 81: Personensuche
Polyx Memory Display 1.3.6 Personensuche Die Funktion Personensuche kann direkt durch Drücken der Taste (falls sie vom Installateur konfiguriert worden ist) aktiviert werden. Nachdem die Kommunikation hergestellt worden ist, wird die Stimme über die gesamte Anlage wiedergegeben. -
Página 82: Anrufbeantworter
1 Einführung und Grundfunktionen Anrufbeantworter Mit dieser Funktion können die Audio- und Videonachrichten, die Besucher während Ihrer Abwesenheit hinterlassen, aufgezeichnet und anschließend abgespielt werden; zudem können Audionachrichten direkt von der Polyx Memory Display aus gespeichert werden (Funktion Memo). Wenn die Taste M gedrückt wird, leuchtet die rote Kontrolllampe auf und meldet dadurch, dass der Anrufbeantworter Wenn keine Nachrichten vor- in Betrieb ist. Zum Abschalten erneut dieselbe Taste drücken; wenn liegen, kann das Untermenü... -
Página 83: Eine Nachricht „Memo" Aufzeichnen
Polyx Memory Display 1.4.2 Eine Nachricht „Memo“ aufzeichnen Mit dieser Funktion kann eine Audionachricht direkt über die Polyx Memory Display aufgezeichnet werden. Taste OK drücken. Die Funktion Das Video wird wählen angehalten (Pause) MEMO AUFNEHMEN Nun kann das OK drücken, gewählte Video mit um zu bestätigen dem Icon Löschen Ein BEEP meldet den Beginn gelöscht oder mit der Aufzeichnung dem Icon Play MEMO AUFNEHMEN... -
Página 84: Gruß Aufzeichnen
1 Einführung und Grundfunktionen 1.4.3 Gruß aufzeichnen Zum Aufzeichnen eines Grußes: Nun können Sie die aufge- zeichnete Grußformel abhö- ren und prüfen Die Funktion wählen Die Funktion wählen WILLKOMMEN AUFNEHMEN WILLKOMMEN ABHÖREN OK drücken, um zu OK drücken, um zu bestätigen bestätigen Ein BEEP meldet den Beginn der Aufzeichnung WILLKOMMEN AUFNEHMEN WILLKOMMEN ABHÖREN Nun haben Sie 8 Sekunden Zeit, Ihren Gruß aufzuzeich- Die Nachricht wird abgespielt nen. -
Página 85: Alle Nachrichten Löschen
Polyx Memory Display 1.4.4 Alle Nachrichten löschen 1.4.5 Einstellungen Um alle Nachrichten gleichzeitig zu löschen: Questa funzione permette di abilitare/disabilitare il messaggio di Benvenuto e scegliere la modalità di registrazione dei messaggi Die Funktion wählen Die Funktion wählen MELDUNGEN LÖSCHEN EINSTELLUNGEN OK drücken, um zu bestätigen Beenden wählen, Zum Aktivieren/ um wieder das Menü Deaktivieren der zu öffnen MELDUNGEN LÖSCHEN ? Grußformel... - Página 86 1 Einführung und Grundfunktionen Daraufhin erscheint die fol- gende Bildseite: Beenden wählen, Um den MELDUNGEN LÖSCHEN ? um wieder das Menü Aufzeichnungsmodus zu öffnen > BEENDEN für die Nachrichten einzustellen, das BESTÄTIGEN oder entsprechende Icon anwählen Bestätigen wählen, MODUS 1 FOTO um alle Nachrichten Dabei bestehen zwei zu löschen Wahlmöglichkeiten. 1 foto: Die Meldung besteht Wenn der Speicher voll aus einem einzigen Foto des ist, überschreibt Poly x...
- Página 87 Polyx Memory Display Lösung eventueller Störungen Modus Push to Talk...
-
Página 88: Lösung Eventueller Störungen
2 Lösung eventueller Störungen Modus Push to Talk Empfang eines Rufs von der Türstation. Taste Verbindung drücken, um den Ruf zu beantworten. Die Verbindungsleuchte leuchtet auf. Während des Gesprächs kann die Funktion PUSH TO TALK aktiviert werden. Die Verbindungstaste mindestens 2 Sekunden lang drücken, um mit der Türstation zu sprechen. Die Leuchte leuchtet immer noch. - Página 89 Polyx Memory Display Taste loslassen, um die Türstation hören zu können. Die Meldeleuchte leuchtet rot auf. Um die Verbindung abzubrechen, die Verbindungstaste kurz drücken. Die Meldeleuchte erlischt.
- Página 90 2 Lösung eventueller Störungen STÖRUNG LÖSUNG Durch Drücken der Taste Aktivierung der Türstation/Taktierung ( - der Audio/Video-Kanal könnte belegt sein; warten bis er frei ist (von wird kein Bild angezeigt 1 bis 3 Minuten) und Taste wieder drücken. - der Audio/Video-Kanal belegt ist; warten bis er frei ist (von 1 bis 3 Durch Drücken der Taste OK, wird das Menü nicht angezeigt und an der Hausstation ertönt das Signal für belegt Minuten) und Taste wieder drücken.
- Página 91 Polyx Memory Display 1 Introducción y funciones básicas 1.1 Información general 1.2 Su Polyx Memory Display: ¡úselo ya! 1.2.1 Teclas de funciones del videoportero 1.2.2 Teclas de navegación 1.2.3 Tecla de funciones del contestador telefónico 95 1.3 Funciones de menú 1.3.1 Regolazione volume 1.3.2 Regulación de la pantalla (día/noche) 1.3.3 Fecha/Hora 1.3.4 Mecanismo de la telecámara 1.3.5 Configuración de los timbres 1.3.6 Buscapersonas 1.4 Contestador telefónico 1.4.1 Visualizar los mensajes 1.4.2 Grabar un mensaje con la función “Memo” 1.4.3 Grabar el mensaje de bienvenida 1.4.4 Borrar todos los mensajes...
-
Página 92: Advertencia Importante
ADVERTENCIA IMPORTANTE Sobre los derechos de las personas a las que se sacan fotos y graban voces o sonidos. • El Polyx Memory Display que ha comprado incorpora una tecnología que permite realizar filmaciones. • Las filmaciones, sonidos, voces y nombres son datos personales, que a veces pueden te- ner un carácter sensible y estar sujetos a derechos de autor o a otros derechos de pro- piedad intelectual de terceros. • Por consiguiente, todas las personas que usan este aparato están obligadas a respetar: – la legislación en materia de protección de datos de carácter personal; – las obligaciones sobre la seguridad de los datos; – los derechos de sacar fotos y retratos, así como las normas sobre el derecho de autor y la propiedad industrial e intelectual. • BTicino declina toda responsabilidad en caso de uso ilegítimo del aparato por parte de sus clientes. -
Página 93: Introducción Y Funciones Básicas
Polyx Memory Display Introducción y funciones básicas Información general Su Polyx Memory Display: ¡úselo ya! Funciones de menú Contestador telefónico... -
Página 94: Información General
Polyx Memory Display proporciona, además de las normales funciones de videoportero y de videocontrol, la posibilidad de interactuar con su sistema My Home. Integración con My Home • Escenarios: Permite ejecutar los escenarios memorizados en el Módulo de escenarios. • Alarmas: Señaliza los últimos eventos de alarma producidos y la parcialización de la instalación • Difusión sonora: Permite gestionar la difusión sonora digital BTicino. • Termorregulación: Permite visualizar y regular la temperatura en las varias zonas de la habitación y el estado de la centralita. Nota sobre la pantalla LCD La pantalla LCD se ha producido usando una tecnología avanzada de alta precisión. Es posible que aparezcan hasta 5 puntitos negros y/o luminosos (rojos, azules, verdes) de forma continua en la panta- Micrófono Altoparlante lla LCD. Se trata del resultado normal del proceso de producción y no indica un funcionamiento incorrecto y/o defectuoso. -
Página 95: Teclas De Funciones Del Videoportero
Polyx Memory Display 1.2.1 Teclas de funciones del videoportero 1.2.2 Teclas de navegación Activación Placa Exterior/Rotación telecámaras Tecla OK Activa el encendido de la placa exterior asociada y, si Permite acceder al menú; confirma la opción selec- presentes, habilita la visualización cíclica de las demás cionada. placas exteriores/telecámaras. Teclas keys Tecla cerradura En los menús, seleccionan la opción anterior o sucesiva. Al recibir la llamada, abre la cerradura de la placa exterior desde donde procede la llamada; en reposo,... -
Página 96: Funciones De Menú
1 Introducción y funciones básicas Funciones de menú COMUNICACIÓN Con la tecla OK es posible ingresar al menú principal: Ejemplo de menú principal con programación sólo de los comandos de comunicación Contestador Intercomunicante Luz Escal. Personalización PERSONALIZACIÓN CONTESTADOR DOMÓTICA Es posible seleccionar las funciones deseadas entre las disponibles con las teclas Ejemplo de menú principal con submenús de comunicación y domó- tica. Submenús y comandos Mediante el icono configuración, es posible efectuar una serie de ajustes/servicios descritos a continuación. - Página 97 Polyx Memory Display MENÚ PERSONALIZADO El menú personalizado permite un uso más intuitivo de las funciones de En las tablas siguientes el instalador ha indicado la configuración exacta la Polyx Memory Display. El menú visualiza las funciones efectivamente de su Polyx Memory Display; si no se ha rellenado, es necesario presentes en el sistema My Home y el texto de cada comando persona- solicitarlo. lizado en la fase de instalación. El uso del menú personalizado permite también: • Incluir en el menú principal o en otra página las funciones DESPA- COMUNICACIÓN CHO PROFESIONAL, MANOS LIBRES, CONTESTADOR que, de lo con- FUNCIONES DESCRIPCIÓN trario se pueden llamar sólo mediante el menú PERSONALIZACIÓN. Comunicación Despacho profesional Manos libres Contestador Personalización PERSONALIZACIÓN DOMÓTICA SUBMENÚS PRESENCIA SISTEMA...
-
Página 98: Regolazione Volume
1 Introducción y funciones básicas 1.3.1 Regolazione volume NOTA: Durante una llamada del videoportero, puede acceder en modo directo al menú Ajustes presionando la tecla En el menú, seleccio- Seleccione Ajustes ne una de la opcio- nes (por ej. Timbres) Presione OK para Regule el volumen a acceder al menú nivel deseado TIMBRE AJUSTES VOCAL PE = volume audio in caso di conversazione con il posto esterno INTERCOM = volumen audio en caso de conversación interco- Presione OK municante para confirmar TIMBRE = nivel de volumen para todos los timbres VOLUMEN... -
Página 99: Regulación De La Pantalla (Día/Noche)
Polyx Memory Display 1.3.2 Regulación de la pantalla (día/noche) Es posible seleccionar dos regulaciones diferentes, una para la imagen diurna y otra para la nocturna; para pasar de una regulación a la otra, presione la tecla C durante la llamada de videoportero. NOTA: Durante una llamada del videoportero, puede acceder en modo directo al menú Ajustes presionando la tecla En el menú, Seleccione seleccione una de Ajustes las opciones (por ej. Contraste) Presione OK para acceder al menú COLOR AJUSTES Seleccione Efectúe el ajuste Pantalla de día Presione OK para confirmar PANTALLA DE DÍA CONTRASTE... -
Página 100: Fecha/Hora
1 Introducción y funciones básicas 1.3.3 Fecha/Hora Establece la fecha y hora corrientes. Presione OK; las Seleccione > HORA :17:36:50 primeras dos cifras Ajustes parpadean FECHA :12:03:10 Presione OK para Establezca Hora acceder al menú AJUSTES Presione OK para confirmar Seleccione Establezca los HORA :17:36:50 Fecha/Hora minutos > FECHA :12:03:10 Presione C Presione OK para confirmar Utilice el mismo procedimiento FECHA/HORA para establecer la fecha... -
Página 101: Mecanismo De La Telecámara
Polyx Memory Display 1.3.4 Mecanismo de la telecámara NOTA: a este menú es posible acceder sólo durante la conexión con la placa exterior, si en este último se ha previsto un mecanismo de incli- nación de las telecámaras. Seleccione Ajustes Regule la correcta inclinación de la telecámara Presione OK para acceder al menú AJUSTES Seleccione Inclinación Premi OK per confermare INCLINACIÓN... -
Página 102: Configuración De Los Timbres
1 Introducción y funciones básicas 1.3.5 Configuración de los timbres Puede combinar una de las dieciséis melodías a cada suceso de llamada. Scegli la melodia Seleccione Ajuste el volumen Timbres Seleccione Confirmar y presione OK para memorizar la opción y MELODÍA Presione OK para regresar a la página anterior nacceder al menú TIMBRE LLAMADA DE PE = Llamada de la placa exterior (S=0 o S=1) PORTERO INTERIOR = llamada de intercomunicante presente en su departamento. -
Página 103: Buscapersonas
Polyx Memory Display 1.3.6 Buscapersonas Es posible activar función Buscapersonas directamente pulsando la tecla (si ha sido configurada por el instalador). Una vez activada la comunicación, la voz se difundirá por toda la instalación. -
Página 104: Contestador Telefónico
1 Introducción y funciones básicas Contestador telefónico Esta función permite memorizar y sucesivamente visualizar los men- sajes audio y video que los visitadores dejaron durante su ausencia; también es posible memorizar un mensaje audio directamente en el Polyx Memory Display (función Memo). Al pulsar la tecla M, el led rojo se enciende y señala la activación del contestador; para desactivarlo, pulse de nuevo esta tecla, si el led rojo Si no hay mensajes, no es posi- parpadea, significa que hay nuevos mensajes. -
Página 105: Grabar Un Mensaje Con La Función "Memo
Polyx Memory Display 1.4.2 Grabar un mensaje con la función “Memo” Esta función permite grabar un mensaje audio directamente con el Polyx Memory Display. Pulse la tecla OK. Seleccione la El video se detiene función GRABAR MENSAJE MEMO Presione OK A este punto, es para confirmar posible borrar el vídeo pulsando Un BIP indica el inicio de la el icono Borrar o grabación reanudar la repro- GRABAR MENSAJE MEMO Ahora tiene 16 segundos ducción pulsando el... -
Página 106: Grabar El Mensaje De Bienvenida
1 Introducción y funciones básicas 1.4.3 Grabar el mensaje de bienvenida Para grabar un mensaje de bienvenida: A este punto puede volver a escuchar el mensaje que grabó para verificar el resul- tado Seleccione la función Seleccione la función GRABAR BIENVENIDA ESCUCHAR BIENVENIDA Presione OK Presione OK para confirmar para confirmar Un BIP indica el inicio de la grabación GRABAR BIENVENIDA ESCUCHAR BIENVENIDA... -
Página 107: Borrar Todos Los Mensajes
Polyx Memory Display 1.4.4 Borrar todos los mensajes 1.4.5 Ajustes Para borrar contemporáneamente todos los mensajes: Esta función permite habilitar/deshabilitar el mensaje de bienvenida y seleccionar la modalidad de grabación de los mensajes Seleziona la Seleccione la funzione función BORRAR MENSAJES PERSONALIZACIÓN Presione OK para confirmar Seleccione Salir para regresar al menú BORRAR MENSAJES ? Para habilitar/des- habilitar el mensaje > SALIR de bienvenida, pulse CONFIRMAR el relativo icono y Seleccione Confirmar luego OK para con- para borrar todos los... - Página 108 1 Introducción y funciones básicas Se visualiza la siguiente pantalla: Seleccione Salir para BORRAR MENSAJES? Para seleccionar la regresar al menú modalidad de graba- > SALIR ción de los mensajes, oppure CONFIRMAR pulse el icono corres- pondiente Seleccione Confirmar para borrar todos los MODO 1 FOTO mensajes Es posible seleccionar dos En caso de memoria agota- modalidades diferentes. da el Polyx Memory Display 1 foto: el mensaje está for- sobrescribe los mensajes mado por una única foto del comenzando por el más...
-
Página 109: Solución A Posibles Inconvenientes
Polyx Memory Display Solución a posibles inconvenientes Modo Push to Talk... -
Página 110: Modo Push To Talk
2 Solución a posibles inconvenientes Modo Push to Talk Recepción de una llamada de la placa exterior. Presione la tecla de conexión para contestar a la llamada. El led de conexión se enciende Durante la conversación es posible activar la función PUSH TO TALK. Presione la tecla de conexión almenos 2 segundos para conversar con la placa exterior. El led permanece encendido. - Página 111 Polyx Memory Display Suelte la tecla para poder escuchar desde la placa exterior. El led se vuelve rojo. Para terminar la conexión, presione brevemente la tecla de conexión. El led se apaga.
- Página 112 2 Solución a posibles inconvenientes INCONVENIENTE SOLUCIÓN Al presionar la tecla de Activación placa exterior/Rotación ( ) no se - el canal audio/video podría estar ocupado, espere que se libere y visualiza ninguna imagen. vuelva (de 1 a 3 minutos) e intentar. - el canal audio/video está ocupado, espere que se libere y vuelva (de Al presionar la tecla OK el menú no se enciende y la placa interior produce un sonido de ocupado 1 a 3 minutos) e intentar.
- Página 113 Polyx Memory Display 1 Inleiding en Basisfuncties 1.1 Algemene inlichtingen 1.2 Je Polyx Memory Display: gebruik het onmiddellijk! 116 1.2.1 Toetsen functies van huisbeeldtelefonie 1.2.2 Toetsen van navigatie 1.2.3 Sleutel voor functies antwoordapparaat 1.3 Functies vanuit menu 1.3.1 Volume afstellingen 1.3.2 De monitor instellen (dag/nacht) 1.3.3 Datum/Uur 1.3.4 Swinging van de televisiecamera 1.3.5 Bel afstellingen 1.3.6 Beeper 1.4 Answering Machine 1.4.1 Berichten weergeven 1.4.2 Registreer een “Memo” bericht 1.4.3 Een Welkomsbericht registreren 1.4.4 De berichten wissen...
- Página 114 BELANGRIJKE WAARSCHUWING Betreffende het recht van personen om foto’s te nemen en geluidsopnamen te maken. • Het Videodisplay dat u zojuist aangekocht heeft bevat technische apparatuur waarmee u kunt filmen. • De filmpjes, geluiden, stemmen en namen zijn persoonlijke – soms gevoelige - gege- vens en kunnen onderworpen zijn aan auteursrechten of andere intellectuele eigen- domsrechten van derden. • Om deze reden moet iedereen die van dit apparaat gebruik maakt het volgende in acht nemen: – de wetgeving betreffende de bescherming van persoonlijke gegevens; – verplichtingen betreffende gegevensbescherming; – rechten over afbeeldingen en portretten alsmede de regels voor auteursrechten en intellectuele en industriële eigendommen. • Bticino is niet verantwoordelijk voor een illegaal gebruik van de apparatuur door de gebruikers.
-
Página 115: Inleiding En Basisfuncties
Polyx Memory Display Inleiding en Basisfuncties Algemene inlichtingen Je Polyx Memory Display: gebruik het onmiddellijk! Functies vanuit menu Answering Machine... -
Página 116: Algemene Inlichtingen
Staat de uitvoering toe van de scenario’s opgeslagen in het geheu- gen van de Module scenario’s. • Alarmen3: Signaleert de laatste gebeurtenissen van alarm die zich hebben voorgedaan en de aansnijding van de installatie. • Geluidsdiffusie: Staat toe de digitale geluidsdiffusie Bticino te verspreiden. • Thermische regeling: Staat toe de temperatuur in de verschillende zones van de woning en de staat van de centrale te visualiseren en te regelen. Nota m.b.t. het LCD-scherm Het LCD-scherm werd geproduceerd gebruikmakend van een geavanceerde precisietechnologie. Het is evenwel mogelijk dat er 5 kleine en/of verlichte (rode, blauwe, groene) punten continu op het LCD-scherm verschijnen. Het betreft het normaal resultaat... -
Página 117: Toetsen Functies Van Huisbeeldtelefonie
Polyx Memory Display 1.2.1 Toetsen functies van huisbeeldtelefonie 1.2.2 Toetsen van navigatie Activering Extern Punt/Cyclusopvolgin Toetsen OK Activeert de aanschakeling van het geassocieerd Staat de toegang naar het menu toe, bevestigt de Extern Punt en, indien aanwezig, staat deze de cyclus- uitgevoerde keuze. opvolging van de andere Externe Puntene/televisie- camera’s toe. -
Página 118: Functies Vanuit Menu
1 Inleiding en Basisfuncties Functies vanuit menu COMMUNICATIE Middels de toets OK is het mogelijk naar het hoofdmenu te gaan: Voorbeeld van hoofdmenu met programmering van alleen de bedie- ningen van COMMUNICATIE. Antwoordapp. Intercommunicerend Lichten trap Instellingen INSTELLINGEN ANTWOORDAPP. HUISAUTOMATISERING Het is mogelijk de gewenste functies te selecteren tussen diegene die beschikbaar zijn middels de toetsen Voorbeeld van hoofdmenu met sub menu van communicatie en huis- automatisering Submenu’s en bedieningen Middels de icoon instellingen is het mogelijk naar een reeks van re- gelingen/diensten te gaan die hierna beschreven worden. Communicatie Scenario’s Alarmen Geluidsdiffusie Hierna worden drie mogelijke oplossingen van samenstelling van het Thermische regeling hoofdmenu gegeven: Instellingen • menu met functies van COMMUNICATIE; SCENARIO’S • menu met functies van WONINGAUTOMATISERINGSSYSTEEM • VERPERSOONLIJKT menu. - Página 119 Polyx Memory Display VERPERSOONLIJKT MENU Het verpersoonlijkt menu staat een meer intuïtief gebruik van de func- In de onderstaande tabellen heeft de installateur de exacte configuratie ties van het Polyx Memory Display toe. Het menu visualiseert immers van je Polyx Memory Display aangegeven; indien hij deze niet heeft niet alleen de functies die effectief aanwezig zijn in je installatie My ingevuld, ze terug vragen. Home en de tekst van iedere bediening kan verpersoonlijkt worden in de fase van installatie. Het gebruik van het verpersoonlijkt menu staat bovendien toe: COMMUNICATIE • De mogelijkheid in het hoofdmenu of in een andere pagina de func- ties Professionele studio, HANDSFREE, ANTWOORDAPP. te hebben...
-
Página 120: Volume Afstellingen
1 Inleiding en Basisfuncties 1.3.1 Volume afstellingen OPMERKING: Tijdens een oproep van beeldhuistelefonie kun je recht- streeks naar het menu Afstellingen gaan door te drukken op de toetsen of Binnen in het menu Afstellingen een van de rubrie- selecteren ken selecteren (vb. Bel) Op OK drukken om Regel het volume op naar het menu te het gewenst niveau gaan AFSTELLINGEN KLANK EP (EXTERN PUNT) = audio-volume in geval van gesprek met het extern punt... -
Página 121: De Monitor Instellen (Dag/Nacht)
Polyx Memory Display 1.3.2 De monitor instellen (dag/nacht) U kunt voor twee verschillende instellingen kiezen: een dag- en een nacht- weergave. Houd tijdens een oproep van de beeldhuistelefonie de toets C ingedrukt om van de ene naar de andere afstelling om te schakelen. OPMERKING: Tijdens een oproep van beeldhuistelefonie kun je rechtstreeks naar het menu Afstellingen gaan door te drukken op de toetsen Binnen in het menu een van de rubrie- Afstellingen ken selecteren (vb. selecteren Contrast) Op OK drukken om naar het menu te gaan KLEUR AFSTELLINGEN De aftselling Dag monitor uitvoeren selecteren Op OK drukken om... -
Página 122: Datum/Uur
1 Introduzione e funzioni base 1.3.3 Datum/Uur Huidige datum en uur instellen. Op OK drukken; de Afstellingen > UUR :17:36:50 eerste twee cijfers selecteren knipperen DATUM :12:03:10 Op OK drukken om Het uur instellen naar het menu te gaan AFSTELLINGEN Op OK drukken om te bevestigen Datum/Uur De minuten instellen :17:36:50 selecteren > DATUM :12:03:10 Op C drukken Op OK drukken om te bevestigen Dezelfde procedure gebruiken DATUM/UUR... -
Página 123: Swinging Van De Televisiecamera
Polyx Memory Display 1.3.4 Swinging van de televisiecamera OPMERKING: Dit menu is alleen toegankelijk tijdens de verbinding met het extern punt, indien dit laatste vooringesteld is voor de swinging van de tv-camera’s. Afstellingen selecteren Regelt de correcte hoekstand van de tv-camera Op OK drukken om naar het menu te gaan AFSTELLINGEN Balancering selecteren Op OK drukken om te bevestigen BALANCERING... -
Página 124: Bel Afstellingen
1 Inleiding en Basisfuncties 1.3.5 Bel afstellingen Je kunt een van de zestien melodieën koppelen aan iedere gebeurtenis van oproep. De melodie kiezen Het volume regelen selecteren Bevestig selecteren en op OK drukken om de keuze op te slaan en terug te keren naar de vorige MELODIE Op OK drukken om pagina naar het menu te gaan OPROEP VAN EP = oproep vanop het extern punt (S=0 of S=1). INTERCOM INTERN = coproep van intercommunicerend toestel aanwezig in je appartement. De gebeurtenis selecteren INTERCOM EXTERN = oproep van intercommunicerend toestel aanwezig in een ander appartement. Op OK drukken om te bevestigen OPROEP OP DE VERDIEPING = oproep afkomstig van de druk- knop in de nabijheid van je ingangsdeur. -
Página 125: Beeper
Polyx Memory Display 1.3.6 Beeper Het is mogelijk de functie beeper rechtstreeks te activeren door te drukken op de toets (indien geconfigureerd door de installateur). Eens dat de communicatie geactiveerd is zal de stem verspreid worden op de hele installatie. -
Página 126: Answering Machine
1 Inleiding en Basisfuncties Answering Machine Deze functie biedt u de mogelijkheid berichten op te slaan en vervol- gens weer te geven die mogelijke bezoekers in uw afwezigheid hebben achtergelaten. Het is tevens mogelijk om direct op het Videodisplay een audiobericht achter te laten (Memo functie). Als u de toets M indrukt begint de rode led te branden. Hiermee wordt aangegeven dat het antwoordapparaat geactiveerd is. Druk wederom Als er geen berichten aanwe- op dezelfde toets om het antwoordapparaat te deactiveren. Als de led zig zijn kunt u het submenu rood knippert zijn er nieuwe berichten aanwezig. niet betreden Het is mogelijk om een extern gesprek te beantwoorden als het ant- woordapparaat geactiveerd is. De functie 1.4.1 Berichten weergeven selecteren BOODSCHAPPEN Op OK drukken om... -
Página 127: Registreer Een "Memo" Bericht
Polyx Memory Display 1.4.2 Registreer een “Memo” bericht Deze functie biedt u de mogelijkheid direct op het Videodisplay een audiobericht te registreren. Druk op de toets OK. De functie selecteren Het bericht wordtop op pauze gezet MEMO OPSLAAN Nu is het mogelijk Op OK drukken om het bericht te wis- te bevestigen sen. Kies voor de Een PIEPTOON geeft het icoon Verwijderen begin van de registratie aan. of hervat de repro- MEMO OPSLAAN U heeft u 16 seconden de tijd ductie met de icoon om uw bericht te registreren. -
Página 128: Een Welkomsbericht Registreren
1 Inleiding en Basisfuncties 1.4.3 Een Welkomsbericht registreren Een Welkomstbericht registreren: U kunt nu uw geregistreerde bericht afluisteren om het resultaat te controleren. De functie selecteren De functie selecteren REGISTREER WELKOM LUISTER NAAR WELKOM Op OK drukken om Op OK drukken om te bevestigen te bevestigen Een PIEPTOON geeft het begin van de registratie aan REGISTREER WELKOM LUISTER NAAR WELKOM U heeft u 8 seconden de tijd om uw welkomsbericht te... -
Página 129: De Berichten Wissen
Polyx Memory Display 1.4.4 De berichten wissen 1.4.5 Instellingen Alle berichten tegelijkertijd wissen: Deze functie biedt u de mogelijkheid het Welkomsbericht te activeren/ deactiveren en de registratiewijze van de berichten te kiezen. De functie selecteren De functie selecteren WIS BOODSCHAPPEN INSTELLINGEN Op OK drukken om te bevestigen Kies voor de betref- Kies voor Exit om fende icoon en naar het menu terug WIS BOODSCHAPPEN? druk ter bevesti- te keren ging op OK om het >... - Página 130 1 Inleiding en Basisfuncties Het volgende videoscherm wordt weergegeven: Kies voor Exit om WIS BOODSCHAPPEN? Kies voor de betref- naar het menu terug fende icoon om de te keren > EXIT registratiewijze van BEVESTIG de berichten te kie- Kies voor Bevestig om alle berichten te MODALITEIT 1 FOTO wissen U kunt uit twee verschillende...
- Página 131 Polyx Memory Display Oplossing van eventuele inconveniënten Modaliteit Push to Talk...
-
Página 132: Oplossing Van Eventuele Inconveniënten
2 Oplossing van eventuele inconveniënten Modaliteit Push to Talk Ontvangst van een oproep vanuit het externe punt. De drukknop Verbinding indrukken om te antwoorden op de oproep. De led verbinding wordt verlicht. Tijdens het gesprek is het mogelijk de functie PUSH TO TALK te activeren. De drukknop van Verbinding gedurende minstens 2 seconden indruk- ken om met het externe punt te communiceren. De led blijft verlicht. - Página 133 Polyx Memory Display De toets loslaten om vanuit het externe punt te kunnen luisteren. De led wordt rood. Om de verbinding te beëindigen, eventjes de toets van verbinding indrukken. De led gaat uit.
- Página 134 2 Oplossing van eventuele inconveniënten INCONVENIËNT OPLOSSING Wanneer de toets Activering extern punt/Cyclusopvolging ( - het audio/video kanaal kan bezet zijn, wachten tot het vrijkomt (van wordt ingedrukt, verschijnt er geen enkel beeld 1 tot 3 minuten) en terug proberen. - het audio/video kanaal is bezet, wachten tot het vrijkomt (van 1 tot Wanneer de toets OK wordt ingedrukt, gaat het menu niet aan en het intern punt zendt een geluid van bezet uit 3 minuten) en terug proberen.
- Página 135 Polyx Memory Display 1 Введение и базовые функции 1.1 Общая информация 1.2 Polyx Memory Display: готов к работе 1.2.1 Кнопки функций видеодомофона 1.2.2 Кнопки навигации 1.2.3 Клавиша для функций автоответчика 1.3 Функции меню 1.3.1 Регулировка громкости 1.3.2 Настройка монитора (день/ночь) 1.3.3 Дата/Время 1.3.4 Поворот камеры 1.3.5 Настройка звонков 1.3.6 Оповещение 1.4 Автоответчик 1.4.1 Отображение сообщений 1.4.2 Запись сообщения 1.4.3 Запись приветственного сообщения...
- Página 136 ВАЖНОЕ ПРЕДУПРЕЖДЕНИЕ Относительно прав людей, занимающихся записью изображений и звуков. • Устройство «Polyx Memory Display» содержит технологические механизмы, позволяю- щие снимать фильмы. • Фильмы, звуки, голос и имена являются личными данными – иногда чувствительными – и могут являться объектами авторского права или других прав интеллектуальной соб- ственности со стороны третьих лиц. • В связи с этим все пользователи оборудования обязаны соблюдать: – законодательство, касающееся защиты личных данных; – обязательства в области безопасности данных; – права на изображение и портрет, а также нормы в области авторского права и интел- лектуальной и промышленной собственности • BTicino не несет ответственности за незаконное использование своего оборудования заказчиками.
- Página 137 Polyx Memory Display Введение и базовые функции Общая информация Polyx Memory Display: готов к работе Функции меню Автоответчик...
-
Página 138: Введение И Базовые Функции
Интеграция с системой My Home • Сценарии: Обеспечивает выполнение сценариев, сохраненных в моду- ле сценариев. • Сигналы тревоги: Извещает о последних поступивших сигналах и о запирании системы. • Акустическая система: Обеспечивает управление звуковым вещанием BTicino. • Термоконтроль: Обеспечивает отображение и регулировку температуры в раз- личных помещениях дома и состояния станции. Примечание относительно ЖК-экрана ЖК-экран был изготовлен с использованием высокоточной пе- редовой технологии. Однако на ЖК-экране могут постоянно по- являться 5 небольших черных и/или светящихся точек (красно- го, синего, зеленого цвета). Это нормальный результат произ- Микрофон... -
Página 139: Кнопки Функций Видеодомофона
Polyx Memory Display 1.2.1 Кнопки функций видеодомофона 1.2.2 Кнопки навигации Активация панели вызова/пролистывание Кнопка OK Включает сопряженную панель вызова, а также Обеспечивает доступ к меню; подтверждает сде- предназначена для пролистывания изображения ланный выбор. с других панелей вызова/камер при их наличии. Кнопки Обеспечивают выбор предыдущего или последую- щего пункта внутри меню. Кнопка открытия двери При соединении с панелью вызова открывает... -
Página 140: Функции Меню
1 Введение и базовые функции Функции меню СВЯЗЬ Кнопка ОК обеспечивает доступ к главному меню: Пример главного меню с программированием только команд СВЯЗИ. Автоответ. Интерком Освещение лестниц Настройки НАСТРОЙКИ АВТООТВЕТ. СИСТЕМА ДОМАШНЕЙ АВТОМАТИКИ С помощью кнопок можно выбрать необходимые функции из имеющихся: Пример главного меню с подменю связи и домашней автоматики. Подменю и команды Пиктограмма «настройки» обеспечивает доступ к регулировке/ сервису, описанным ниже Связь Сценарии Ниже приводятся три возможных решения композиции главно- Сигналы тревоги го меню: Акустическая система... - Página 141 Polyx Memory Display ПОЛЬЗОВАТЕЛЬСКОЕ МЕНЮ Пользовательское меню обеспечивает более произвольное ис- В приведенных ниже таблицах указана точная конфигурация ваше- пользование функций видеодисплея. Так, меню отображает толь- го видеодисплея. При отсутствии таблиц запросите их у компа- ко функции, присутствующие в конкретной системе My Home, а нии, выполнившей установку.
-
Página 142: Регулировка Громкости
1 Введение и базовые функции 1.3.1 Регулировка громкости ПРИМЕЧАНИЕ: Во время звонка по видеодомофону вы можете на- прямую войти в меню Регулировка, нажав кнопку или Позволяет выбрать один из пунктов Выберите внутри меню (На- Регулировки пример, Звонки) Позволяет отре- Нажмите ОК гулировать гром- для входа в меню кость до необходи- ЗВОНКИ РЕГУЛИРОВКИ мого уровня ЗВУК ПАН.ВЫЗ. = уровень громкости при соединении с па- нелью вызова. ИНТЕРКОМ = уровень громкости при разговоре по внутрен- Нажмите ОК для ней линии подтверждения ЗВОНКИ = уровень громкости для всех звонков ЗВУК... -
Página 143: Настройка Монитора (День/Ночь)
Polyx Memory Display 1.3.2 Настройка монитора (день/ночь) Доступны две настройки: дневной и ночной режимы подсветки; чтобы переключить с одного режима на другой, необходимо на- жать кнопку С во время звонка. ПРИМЕЧАНИЕ: Во время звонка по видеодомофону вы можете на- прямую войти в меню Регулировки, нажав кнопку - или +. Выберите Позволяет вы- Регулировки брать один из пун- ктов внутри меню (например, Кон- Нажмите ОК... -
Página 144: Дата/Время
1 Введение и базовые функции 1.3.3 Дата/Время Задает текущую дату и время. Нажать OK; две Выберите > ВРЕМЯ :17:36:50 первые цифры Регулировки начнут мигать ДАТА :12:03:10 Нажмите ОК Задать часы для входа в меню РЕГУЛИРОВКИ Нажмите ОК для подтверждения Выберите Задать минуты ВРЕМЯ :17:36:50 Дата/время > ДАТА :12:03:10 Нажать C Нажмите ОК для подтверждения Для настройки даты следует ДАТА/ВРЕМЯ выполнить такие же операции... -
Página 145: Поворот Камеры
Polyx Memory Display 1.3.4 Поворот камеры ПРИМЕЧАНИЕ: доступ к данному меню можно получить только при наличии соединения с панелью вызова , оборудованной поворот- ной камерой. Выберите Позволяет Регулировки отрегулировать правильный угол наклона Нажмите ОК телекамеры для входа в меню РЕГУЛИРОВКИ Выберите Поворот камеры Нажмите ОК для подтверждения ПОВОРОТ КАМЕРЫ... -
Página 146: Настройка Звонков
1 Введение и базовые функции 1.3.5 Настройка звонков Вы можете выбрать одну из шестнадцати мелодий для каждо- го вызова Выберите мелодию Отрегулируйте уровень громкости Выберите Звонки Выберите Подтвердить, на- жмите ОК для сохранения вы- бора и вернитесь на предыду- НАСТРОЙКА Нажмите ОК для щую страницу входа в меню ЗВОНКИ ЗВОНОК... -
Página 147: Оповещение
Polyx Memory Display 1.3.6 Оповещение Можно включить функцию оповещения напрямую, нажав на кноп- ку (если настроена наладчиком). При активации связи звук будет транслироваться во всей системе. -
Página 148: Автоответчик
1 Введение и базовые функции Автоответчик Эта функция позволяет сохранять, а затем отображать аудио- и ви- деосообщения, оставленные посетителями во время отсутствия пользователя; кроме того, можно сохранять аудиосообщения непо- средственно с помощью устройства «Polyx Memory Display» (функ- ция ЗАПИСАТЬ ЗАМЕТКА). При нажатии на клавишу M красный светодиод загорается, сигна- При отсутствии сообщений лизируя о включении автоответчика; для отключения автоответчи- доступ к подменю невозмо- ка следует вновь нажать на ту же кнопку; мигание красного свето- жен диода указывает на наличие новых сообщений. На вызов с внешнего блока можно отвечать и при включенном ав- тоответчике Выберите функцию 1.4.1 Отображение сообщений СООБЩЕНИЯ Нажмите ОК для Нажмите ОК для входа в главное подтверждения меню. Отображается список запи- >... -
Página 149: Запись Сообщения
Polyx Memory Display 1.4.2 Запись сообщения Эта функция позволяет записывать аудиосообщения непосред- ственно с помощью устройства «Polyx Memory Display». Нажать на клавишу OK. Видеосообще- Выберите функцию ние устанавливает- ся в режим паузы ЗАПИСАТЬ ЗАМЕТКА Сейчас можно уда- Нажмите ОК для лить видеосообще- подтверждения. ние, выбирая зна- ЗВУКОВОЙ СИГНАЛ указыва- чок Удалить, или ет на начало записи возобновить вос- произведение, вы- ЗАПИСАТЬ... -
Página 150: Запись Приветственного Сообщения
1 Введение и базовые функции 1.4.3 Запись приветственного сообщения Для записи приветственного сообщения: Сейчас можно прослушать записанное сообщение для проверки результата записи Выберите функцию Выберите функцию ЗАПИСЬ ПРИВ.СООБЩ. ПРОСЛУШ.ПРИВ.СООБЩ. Нажмите ОК для Нажмите ОК для подтверждения подтверждения ЗВУКОВОЙ СИГНАЛ указыва- ет на начало записи ЗАПИСЬ ПРИВ.СООБЩ. ПРОСЛУШ.ПРИВ.СООБЩ. Для записи приветственно- го сообщения пользователь Сообщение имеет в своем распоряже- воспроизводится... -
Página 151: Удаление Всех Сообщений
Polyx Memory Display 1.4.4 Удаление всех сообщений 1.4.5 Настройки Для одновременного удаления всех сообщений: Эта функция позволяет включать/отключать приветственное сооб- щение и выбирать режим записи сообщений Выберите функцию Выберите функцию СТЕРЕТЬ СООБЩЕНИЕ НАСТРОЙКИ Нажмите ОК для подтверждения. Для включения/от- Выбрать Выйти для ключения привет- возвращения в ме- ственного сообще- СТЕРЕТЬ СООБЩЕНИЕ? ню ния выбрать соот- > ВЫЙТИ ветствующий зна- или... - Página 152 1 Введение и базовые функции Отобразится следующая страница: Выбрать Выйти для возвращения в ме- СТЕРЕТЬ СООБЩЕНИЕ? Для выбора режи- ню ма записи сообще- > ВЫЙТИ ний выбрать соот- или ПОДТВЕРДИТЬ ветствующий зна- Выбрать Подтвер- чок дить для удаления 1 ФОТОРЕЖИМ всех сообщений Можно выбрать один из двух Если память перепол- режимов.
-
Página 153: Возможные Неисправности И Их Устранение
Polyx Memory Display Возможные неисправности и их устранение Режим «Нажми и говори»... -
Página 154: Режим «Нажми И Говори
2 Возможные неисправности и их устранение Режим «Нажми и говори» Поступление звонка с панели вызова Для ответа на звонок нажмите кнопку ответа. Загорится светодиод индикации соединения. Во время разговора можно включить функцию НАЖМИ И ГОВОРИ. Чтобы установить соединение с панелью вызова, нажмите и удер- живайте не менее 2 с кнопку ответа. Светодиод продолжает гореть. - Página 155 Polyx Memory Display Отпустите кнопку для обеспечения слышимости с панели вызова. Светодиод станет красного цвета. Для завершения соединения кратковременно нажмите кнопку ответа. Светодиод погаснет.
- Página 156 2 Возможные неисправности и их устранение НЕИСПРАВНОСТЬ УСТРАНЕНИЕ При нажатии кнопки активации панели вызова/пролистывания - возможно, аудио/видеоканал занят, дождитесь его освобожде- ) не появляется изображение ния (от 1 до 3 минут) и повторите попытку. При нажатии кнопки ОК меню не загорается, а внутренний блок - аудио/видеоканал занят, дождитесь его освобождения (от 1 до 3 подает сигнал «занято» минут) и повторите попытку.
- Página 157 Polyx Memory Display Note...
- Página 158 Note...
- Página 159 Polyx Memory Display Note...
- Página 160 BTicino SpA Via Messina, 38 20154 Milano - Italy www.bticino.com BTicino SpA reserves at any time the right to modify the contents of this booklet and to communicate in any form and modality, the changes brought to the same.