
Manuales relacionados para Fermax LOFT VISION 5


Resumen de contenidos para Fermax LOFT VISION 5
- Página 1 MANUAL KIT VIDEO LOFT VISION 5 LOFT VISION 5 VIDEO KIT MANUAL MANUEL DU KIT LOFT VISION 5 HANDBUCH LOFT VISION 5 VIDEO-SET MANUAL KIT VIDEO LOFT VISION 5...
- Página 2 Kit VIDEO LOFT VISION 5 Kit VIDEO LOFT VISION 5 «KIT VIDEO LOFT VISION 5» «LOFT VISION 5 VIDEO KIT MANUAL» «MANUEL DU KIT LOFT VISION 5» «HANDBUCH VISION 5 VIDEO-SET» «MANUAL KIT VIDEO LOFT VISION 5» - Kit 1 Línea...
-
Página 3: Tabla De Contenido
Kit VIDEO LOFT VISION 5 Kit VIDEO LOFT VISION 5 INDICE - INDEX - SOMMAIRE SECCION I - MANUAL DEL INSTALADOR ..............5 Instalación del Alimentador ................6 Instalación de la placa de calle ..............6 Ajustes finales de placa ................. 7 Instalación del monitor ................... - Página 4 Kit VIDEO LOFT VISION 5 Kit VIDEO LOFT VISION 5 INHALT - INDICE TEIL I – INSTALLATIONSANLEITUNG ................ 5 Installation des Netzgeräts ................6 Installation der Türstation ................6 Konfiguration und Einstellungen der Türstation .......... 7 Befestigung des Monitors ................8 Programmierung des Monitors ..............
-
Página 5: Seccion I - Manual Del Instalador
Kit VIDEO LOFT VISION 5 Kit VIDEO LOFT VISION 5 Sección I - Manual del Instalador Section I - Installer Manual Section I - Manuel d’installation Teil I - Installationsanleitung Secção I - Manual do instalador Pag 5... -
Página 6: Instalación Del Alimentador
Kit VIDEO LOFT VISION 5 Kit VIDEO LOFT VISION 5 INSTALACIÓN DEL ALIMENTADOR - POWER SUPPLY INSTALLATION - INSTALLATION DE L’ALIMENTATION - INSTALLATION DES NETZGERÄTS - INSTALAÇÃO DO TRANSFORMADOR Instalación en carril DIN - DIN rail Installation Fijación con tornillos - Fixing with screws... -
Página 7: Ajustes Finales De Placa
Kit VIDEO LOFT VISION 5 Kit VIDEO LOFT VISION 5 AJUSTES DE LA PLACA - PANEL ADJUSTMENT - RÉGLAGES DE LA PLATINE - EINSTELLUNGEN DER TÜRSTATION - AJUSTES DA PLACA - Ajuste audio - Adjust the audio - Réglez le volume - Audioeinstellung - Ajuste o áudio... -
Página 8: Instalación Del Monitor
Kit VIDEO LOFT VISION 5 Kit VIDEO LOFT VISION 5 INSTALACIÓN DEL MONITOR - MONITOR INSTALLATION - INSTALLATION DU MONITEUR BEFESTIGUNG DES MONITORS - INSTALAÇÃO DO MONITOR Montaje - Assembly - Montage - Einbau - Montagem Desmontaje - Disassembly - Démontage - Ansbau - Desmontagem 90º... -
Página 9: Selección Del Tono De Llamada
Kit VIDEO LOFT VISION 5 Kit VIDEO LOFT VISION 5 Selección tono de llamada- Selecting the call tone - Sélection de la tonalité d’appel Auswahl des Ruftons 1. Con el monitor conectado pulsar el botón de programación (se oirá un tono de confirmación). -
Página 10: Instalacion Básica
En las instalaciones de reposición, es necesario asegurarse que los cables no están pelados ni en contacto con ninguna parte metálica de la instalación. En el caso en el que el cableado de la instalación este muy deteriorado, Fermax le recomienda que lo cambie, siguiendo las especificaciones mostradas ante- riormente. -
Página 11: Basic Installation
In replacement installations you must ensure that the cables are not bare or in contact with any metallic part of the installation. If the installation wiring is very worn, Fermax recommend that you change it, following the previously shown specifications. -
Página 12: Installation De Base
Lors de travaux de remplacement, il faut s’assurer que les câbles ne sont pas dénudés ni en contact avec une partie métallique de l’installation. Si le câblage de votre installation est détérioré, Fermax vous recommande de le changer en suivant les instructions données précédemment. -
Página 13: Grundinstallation
Bei Austauschanlagen ist es erforderlich zu prüfen, dass die Kabel isoliert sind und der Draht nicht mit metallenen Bestandteilen der Anlage in Berührung gerät. Falls die Verkabelung der Installation stark beschädigt ist, empfiehlt Fermax die Verkabelung komplett auszutauschen und dabei die nachfolgenden Hinweise zu beachten. -
Página 14: Instalação Básica
Nas instalações de reposição é necessário assegurar-se de que os cabos não estão descarnados nem em contacto com nenhuma parte metálica da instalação. Caso a cablagem da instalação esteja muito deteriorada, a Fermax recomenda a sua substituição, seguindo as especificações apresentadas anteriormente. -
Página 15: Esquemas De Cableado
Kit VIDEO LOFT VISION 5 Kit VIDEO LOFT VISION 5 ESQUEMA DE CABLEADO - WIRING DIAGRAM - SCHEMA DE CABLAGE VERKABELUNGSSCHEMA - ESQUEMA DE CABLAGEM - KIT 1 L (*) IMPORTANTE - IMPORTANT - WICHTIG 10 Kohm 10 Khoms: 10 Kohm entre los bornes + y L del último monitor. - Página 16 Kit VIDEO LOFT VISION 5 Kit VIDEO LOFT VISION 5 ESQUEMA DE CABLEADO - WIRING DIAGRAM - SCHEMA DE CABLAGE VERKABELUNGSSCHEMA - ESQUEMA DE CABLAGEM - KIT 2 L 10 Kohm D. max. 50-60 50VA MAX. DI GI NT AC...
- Página 17 Kit VIDEO LOFT VISION 5 Kit VIDEO LOFT VISION 5 ESQUEMA DE CABLEADO - WIRING DIAGRAM - SCHEMA DE CABLAGE VERKABELUNGSSCHEMA - ESQUEMA DE CABLAGEM - KIT 3 L 10 Kohm D. max. 50-60 50VA MAX. AL IME NT AC...
-
Página 18: Ampliaciones
Kit VIDEO LOFT VISION 5 Kit VIDEO LOFT VISION 5 AMPLIACIONES - ENLARGEMENTS - EXTENSIONS - ERWEITERUNGEN - AMPLIAÇÕES Kits de 1 LÍNEA: el equipamiento básico por vivienda puede ser ampliado con 2 teléfonos o 1 monitor adicional sin necesidad de añadir fuentes de alimentación. - Página 19 Kit VIDEO LOFT VISION 5 Kit VIDEO LOFT VISION 5 Los KITS de 2 y 3 LINEAS pueden ser ampliados con 2 teléfonos o 1 monitor adicional sin necesidad de añadir fuentes de alimentación. 2 and 3 way Kits can be expanded with 2 telephones or 1 monitor without adding a second power supply.
-
Página 20: Conexión De Abrepuertas De Corriente Contínua Y Pulsador Zaguán
Kit VIDEO LOFT VISION 5 Kit VIDEO LOFT VISION 5 CONEXION DE ABREPUERTAS DE CORRIENTE CONTÍNUA - DC DOOR-OPENER CONNECTION - RACCORDEMENT DE LA GÂCHE À COURANT CONTINU - ANSCHLUSS DES GLEICHSTROMTÜRÖFFNERS - LIGAÇÃO DO TRINCO DE CORRENTE CONTÍNUA EXT. -
Página 21: Características Técnicas
Kit VIDEO LOFT VISION 5 Kit VIDEO LOFT VISION 5 CARACTERÍSTICAS TÉCNICAS - TECHNICAL FEATURES - CARACTERISTIQUES TECHNIQUES - TECHNISCHE EIGENSCHAFTEN - CARACTERÍSTICAS TÉCNICAS Alimentación - Power Supply - Alimentation - Stromversorgung - Alimentação 18 Vdc Consumo - Consumption - Consommation - Stromverbrauch - Consumo... - Página 22 Kit VIDEO LOFT VISION 5 Kit VIDEO LOFT VISION 5 Pag 22...
- Página 23 Kit VIDEO LOFT VISION 5 Kit VIDEO LOFT VISION 5 Anexo Attachment Annexe Anhang Apêndice Pag 23...
-
Página 24: Tabla De Incidencias Y Soluciones
Kit VIDEO LOFT VISION 5 Kit VIDEO LOFT VISION 5 TABLA INCIDENCIAS Y SOLUCIONES SINTOMA PUNTOS A VERIFICAR - Sección del negativo. Aumentar. - Distancia entre placa y monitor. Aumentar sección o • No entra en programación. añadir fuente adicional. -
Página 25: Events And Solutions Table
Kit VIDEO LOFT VISION 5 Kit VIDEO LOFT VISION 5 EVENTS AND SOLUTIONS TABLE SYMPTOM POINTS BE CHECKED - Negative wire cross-section. Increase. - Distance between panel and monitor. Increase cross-section • It does not enter programming or add additional power supplies. -
Página 26: Tableau De Depannage
Kit VIDEO LOFT VISION 5 Kit VIDEO LOFT VISION 5 TABLEAU DE DEPANNAGE SYMPTOME POINTS A VERIFIER - Section du fil négatif. Augmenter section. - Distance entre la platine et le moniteur. Augmenter la section • Pas de programmation possible. -
Página 27: Ereignistabelle Und Lösungen
Kit VIDEO LOFT VISION 5 Kit VIDEO LOFT VISION 5 EREIGNISTABELLE UND LÖSUNGEN SYMPTOM ZU PRÜFENDE PUNKTE - Querschnitt des Minuskabels vergrössern. - Abstand zwischen Türstation und Monitor. Erhöhen Sie den • Kein Zugang in den Programmier- Querschnitt oder installieren Sie ein zusätzliches Netzgerät. -
Página 28: Tabela De Incidências E Soluções
Kit VIDEO LOFT VISION 5 Kit VIDEO LOFT VISION 5 TABELA DE INCIDÊNCIAS E SOLUÇÕES SINTOMA PONTOS A VERIFICAR - Secção do negativo. Aumentar. - Distância entre placa e monitor. Aumentar secção ou • Não entra em programação. acrescentar fonte adicional. -
Página 29: Seccion Ii - Manual De Usuario
Kit VIDEO LOFT VISION 5 Kit VIDEO LOFT VISION 5 Sección II - Manual del Usuario Section II - User’s Manual Section II - Manuel d’’utilisation Teil II - Bedienungsanleitung Secção II - Manual do utilizador Pag 29... -
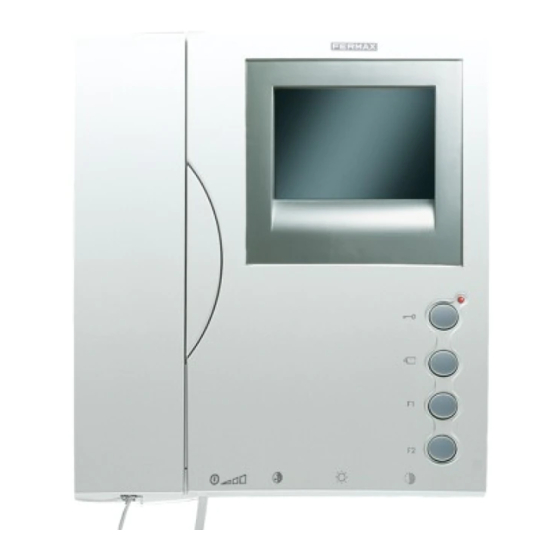
Página 30: Controles
Kit VIDEO LOFT VISION 5 Kit VIDEO LOFT VISION 5 EL MONITOR LOFT - THE LOFT MONITOR - LE MONITEUR LOFT - LOFT MONITOR O MONITOR LOFT BOTONES - BUTTONS - BOUTON - TASTE - BOTÃO - Botón de ABREPUERTAS. (Pulsar para abrir la puerta). -
Página 31: Funcionamiento
Kit VIDEO LOFT VISION 5 Kit VIDEO LOFT VISION 5 FUNCIONAMIENTO - OPERATION - FONCTIONNEMENT - FUNKTIONSELEMENTE - FUNCIONAMENTO • Llamada Call Appel Chamada H IG C C D E S O C A M L U T IO N... - Página 32 Publicación técnica de caracter informativo editada por FERMAX ELECTRONICA S.A.E. FERMAX ELECTRONICA S.A.E., en su política de mejora constante, se reserva el derecho a modificar el contenido de este documento así como las características de los productos que en él se refieren en cualquier momento y sin previo aviso.