Publicidad
Idiomas disponibles
Idiomas disponibles
Enlaces rápidos
Adhesive Top of Door
Lock
HS311 User Guide
DO NOT USE THIS PRODUCT ON EXTERIOR DOORS. DO NOT USE ON GLASS DOORS. DO NOT use this product to guard
against toxic and dangerous substances, or sharp-edged or pointed objects. Such materials should always be placed "high up"
or otherwise made completely inaccessible to children. ADULT INSTALLATION REQUIRED.
CAUTION: This product is only a deterrent. It is not a substitute for proper adult supervision. DO NOT use this product if damaged
or broken. These products are not toys. DO NOT allow children to play with them.
FOR INDOOR HOME USE ONLY.
Important Safety Information
• Discontinue use when your child becomes old enough to defeat it. Your child will eventually be able to defeat this product. To keep this product effective for
as long as possible, avoid letting children see how you operate child safety devices. Watching you disengage a lock, latch or cover could enable them to learn
sooner how to defeat it. Check for security after installation. This product is for one time installation only and it is not to be re-used.
• Adhesive bond is only as strong as the surface it is adhered to; adhesive strength cannot be guaranteed on surfaces including but not limited to: oily surfaces,
weakly bonded materials (such as uneven/cracked wood or old paint) or refinished surfaces. For best product strength, install using included hardware.
• When lock is not in use, be sure the lock is in the "non-use" position referenced in the instructions.
• Always have someone nearby who can disengage the child lock in the event of an emergency.
BEFORE YOU BEGIN:
• Read all instructions before installing.
• Keep these instructions for future use.
• Remove all contents from packaging and discard box, and/or poly bags.
• Lay out and identify all parts.
• Do not return this product to the place of purchase. If any parts are missing, email support@djgusa.zendesk.com, or chat with us at www.safety1st.com.
You can also call Consumer Care at (800) 544-1108. Have the model number ready (HS311) and date code (manufacture date) located on package.
• For hardware-mounted installation, power drill may be necessary.
TOOLS NEEDED: Pencil, hand drill or power drill, 1/8" drill bit and Phillips head screwdriver (not provided).
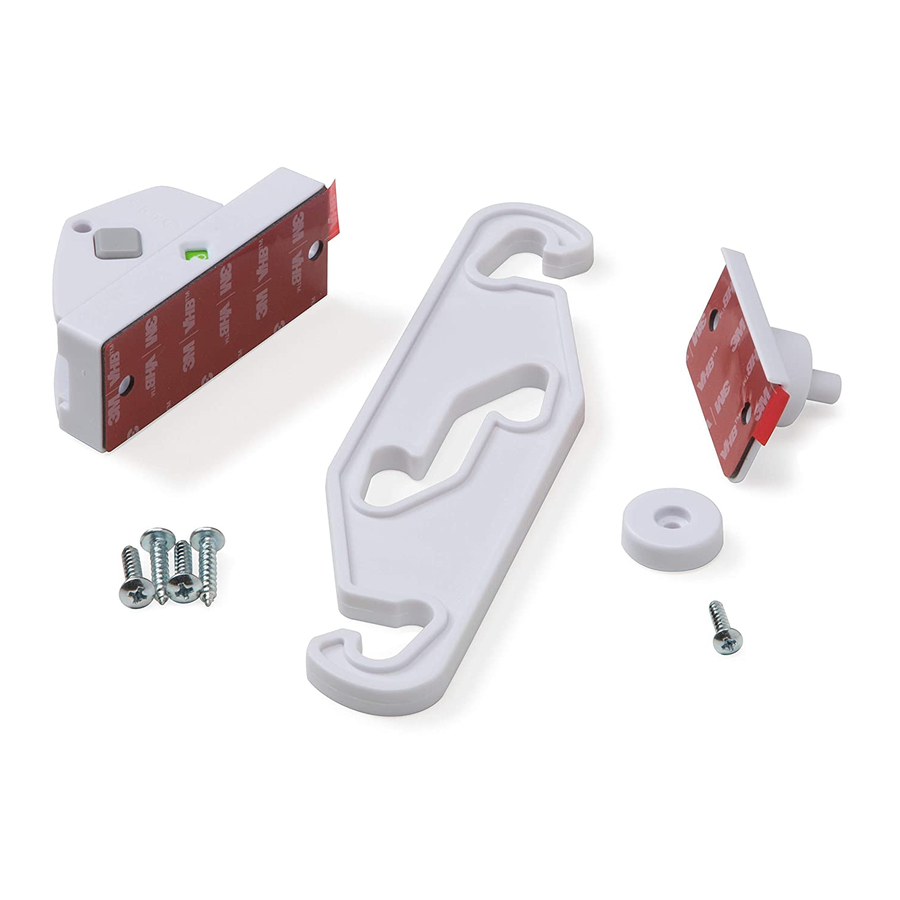
Parts & Features
A
Adhesive latch pivot
B
Latch hook
C
Cap (1)
D
Latch screw (1)
E
Adhesive catch
F
SecureTech
locking indicator
TM
G
Installation template
H
Mounting screws (4) (Optional.
Check Important Safety
Information section)
To Clean
Wipe with damp cloth and dry. DO NOT use cleaning chemicals near the adhesive.
To Remove
Carefully use fishing line or dental floss in a sawing motion to cut adhesive away from lock. Remaining adhesive residue can be rolled off the door.
Note: addition of heat from a hair dryer can help soften the adhesive and aid in removal.
©2018 Dorel Juvenile Group, Inc. Safety 1st™ and the Safety 1st logo and design are trademarks of Dorel Juvenile Group, Inc. Safety
1st™ y el logotipo de Safety 1st y su diseño son marcas comerciales de Dorel Juvenile Group, Inc. (800) 544-1108 www.safety1st.com.
Styles and colors may vary. Los estilos y los colores pueden variar. Made in CHINA. Hecho en CHINA. Distributed by (distribuido por) Dorel
Juvenile Group, Inc., 2525 State St.,Columbus, IN 47201-7494. Dorel Juvenile Canada, 2855 Argentia Road, Unit 4, Mississauga, ON, L5N
8G6. Importado y Distribuido en Chile por: Comercial e Industrial Silfa S.A. - San Ignacio 0201 / Parque Industrial Portezuelo Quilicura,
Santiago Chile. Fono (562) 2339 9000. En Perú por: Comexa S.A. - Los Libertadores 455 – San Isidro, Lima – Perú. Fono (511) 4469014.
En Centro América, Caribe y Ecuador por: Best Brands Group S.A. – Av. Balboa, Bay Mall Plaza, Planta Baja, local 9, Panamá. - Fono: (507)
300 2884. En Colombia por: Baby Universe S.A.S. - Vía 40 No. 77-29, Barranquilla, Colombia - Fono: (575) 353 1110 Importador: DJGM,
S.A. DE C.V. Gabriel Mancera No. 1041 Col. Del Valle Delegación Benito Juárez C.P. 03100 México, R.F.C. DJG140305GN9 Tel. (55)
67199202
04/23/18 4358-7513
WARNING:
D
E
A
C
B
G
Green = Locked
F
Red = Unlocked
1
H
Mark screw holes and pre-drill door and
door frame 3.4" deep for the catch and
latch. We recommend using an 1/8" drill
bit. Use a screwdriver to secure.
Publicidad

Manuales relacionados para Safety 1st HS311


Resumen de contenidos para Safety 1st HS311
- Página 1 • Do not return this product to the place of purchase. If any parts are missing, email support@djgusa.zendesk.com, or chat with us at www.safety1st.com. You can also call Consumer Care at (800) 544-1108. Have the model number ready (HS311) and date code (manufacture date) located on package.
- Página 2 Prepare to Install Install the lock on the side of the door with the widest part of the door frame exposed. Facing the door, check to see if your door knob is on the left or right. If your door knob is on the left, follow Figure 1a. If it’s on the right, follow Figure 1b. Close the door and release the door handle, allowing the door to settle to its natural closed position.
- Página 3 • No devuelva este producto al lugar donde lo compró. Si falta alguna pieza, mande un correo electrónico a support@djgusa.zendesk.com o chatee con nosotros en www.safety1st.com. Además, puede llamar a Atención al cliente al (800) 544-1108. Tenga a mano el número de modelo (HS311) y el código de fecha (fecha de fabricación), que se encuentran indicados en el producto.
- Página 4 Preparación para la instalación Instale la traba sobre el lateral de la puerta con la parte más ancha del marco expuesta. De frente a la puerta, mire si el picaporte está a la izquierda o a la derecha. Si está a la izquierda, siga la figura 1a. Si está a la derecha, siga la figura 1b. Cierre la puerta y suelte la manija de la puerta, para permitir que la puerta se acomode en su posición de cierre natural.