Tabla de contenido
Publicidad
Idiomas disponibles
Idiomas disponibles
Enlaces rápidos
Copyright Notice:
Copyright Notice:
Copyright Notice:
Copyright Notice:
Copyright Notice:
No part of this installation guide may be reproduced, transcribed, transmitted, or
translated in any language, in any form or by any means, except duplication of
documentation by the purchaser for backup purpose, without written consent of
ASRock Inc.
Products and corporate names appearing in this guide may or may not be registered
trademarks or copyrights of their respective companies, and are used only for
identification or explanation and to the owners' benefit, without intent to infringe.
Disclaimer:
Disclaimer:
Disclaimer:
Disclaimer:
Disclaimer:
Specifications and information contained in this guide are furnished for informational
use only and subject to change without notice, and should not be constructed as a
commitment by ASRock. ASRock assumes no responsibility for any errors or
omissions that may appear in this guide.
With respect to the contents of this guide, ASRock does not provide warranty of any
kind, either expressed or implied, including but not limited to the implied warranties or
conditions of merchantability or fitness for a particular purpose.
In no event shall ASRock, its directors, officers, employees, or agents be liable for
any indirect, special, incidental, or consequential damages (including damages for
loss of profits, loss of business, loss of data, interruption of business and the like),
even if ASRock has been advised of the possibility of such damages arising from any
defect or error in the guide or product.
This device complies with Part 15 of the FCC Rules. Operation is subject to the
following two conditions:
(1) this device may not cause harmful interference, and
(2) this device must accept any interference received, including interference that
may cause undesired operation.
ASRock Website: http://www.asrock.com
Copyright©2005 ASRock INC. All rights reserved.
ASRock P4V88/P4V88+ Motherboard
Published April 2005
1 1 1 1 1
Publicidad
Tabla de contenido

Manuales relacionados para ASROCK P4V88


Resumen de contenidos para ASROCK P4V88
- Página 1 ASRock. ASRock assumes no responsibility for any errors or omissions that may appear in this guide. With respect to the contents of this guide, ASRock does not provide warranty of any kind, either expressed or implied, including but not limited to the implied warranties or conditions of merchantability or fitness for a particular purpose.
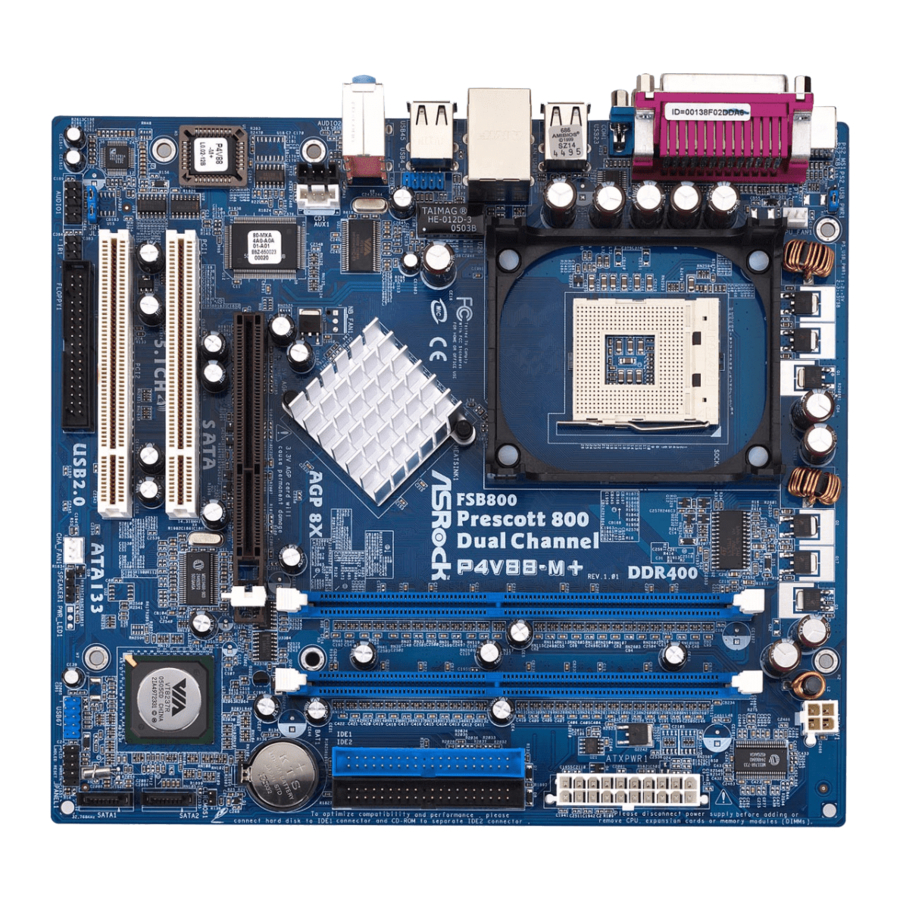
- Página 2 Secondary Serial ATA Connector (SATA2) Internal Audio Connector: CD1 (Black) Primary Serial ATA Connector (SATA1) Shared USB 2.0 Header (USB4_5, Blue) South Bridge Controller ATX Power Connector (ATXPWR1) Clear CMOS Jumper (CLRCMOS1) 2 2 2 2 2 ASRock P4V88/P4V88+ Motherboard...
- Página 3 RJ-45 Port USB 2.0 Ports (USB2, USB3) Line In (Light Blue) Serial Port: COM1 Line Out (Lime) PS/2 Keyboard Port (Purple) Microphone (Pink) PS/2 Mouse Port (Green) USB 2.0 Ports (USB4, USB5) 3 3 3 3 3 ASRock P4V88/P4V88+ Motherboard...
-
Página 4: Package Contents
1. Introduction 1. Introduction 1. Introduction 1. Introduction Thank you for purchasing ASRock P4V88/P4V88+ motherboard, a reliable mother- board produced under ASRock’s consistently stringent quality control. It delivers excellent performance with robust design conforming to ASRock’s commitment to quality and endurance. - Página 5 LAN: Speed: 802.3u (10/100 Ethernet), supports Wake-On-LAN Hardware Monitor: CPU temperature sensing, Chassis temperature sensing, CPU overheat shutdown to protect CPU life (ASRock U-COP)(see CAUTION 3), CPU fan tachometer, Chassis fan tachometer, Voltage monitoring: +12V, +5V, +3V, Vcore PCI slots: 5 slots with PCI Specification 2.2...
- Página 6 Although this motherboard offers stepless control, it is not recommended to perform over-clocking. Frequencies other than the recommended CPU bus frequencies may cause the instability of the system or damage the CPU. 6 6 6 6 6 ASRock P4V88/P4V88+ Motherboard...
- Página 7 STEP 5: Install CPU fan and heatsink. For proper installation, please kindly refer to the instruction manuals of your CPU fan and heatsink vendors. 7 7 7 7 7 ASRock P4V88/P4V88+ Motherboard...
- Página 8 2.2 Installation of Memory Modules (DIMM) 2.2 Installation of Memory Modules (DIMM) P4V88/P4V88+ motherboard provides four 184-pin DDR (Double Data Rate) DIMM slots, and supports Dual Channel Memory Technology. For dual channel configuration, you always need to install identical (the same brand, speed, size and chip-type) DDR DIMM pair in the slots of the same color.
- Página 9 DIMM if you force the DIMM into the slot at incorrect orientation. STEP 3: Firmly insert the DIMM into the slot until the retaining clips at both ends fully snap back in place and the DIMM is properly seated. 9 9 9 9 9 ASRock P4V88/P4V88+ Motherboard...
- Página 10 PCI slots: PCI slots are used to install expansion cards that have the 32-bit PCI interface. AGP slot: The AGP slot is used to install a graphics card. The ASRock AGP slot has a special design of clasp that can securely fasten the inserted graphics card.
- Página 11 CMOS. If you need to clear the CMOS when you just finish updating the BIOS, you must boot up the system first, and then shut it down before you do the clear-CMOS action. ASRock P4V88/P4V88+ Motherboard...
- Página 12 SATA1 interface allows up to 1.5 Gb/s data transfer rate. Serial ATA (SATA) Either end of the SATA data cable Data Cable can be connected to the SATA hard disk or the SATA connector on the motherboard. ASRock P4V88/P4V88+ Motherboard...
- Página 13 (AUX1: see p.2 No. 28) AUX1 tuner card, or MPEG card. Front Panel Audio Header This is an interface for the front panel audio cable that allows (9-pin AUDIO1) convenient connection and (see p.2 No. 27) control of audio devices. ASRock P4V88/P4V88+ Motherboard...
- Página 14 Please note that it is necessary to connect a power supply with (4-pin ATX12V1) ATX 12V plug to this connector (see p.2 No. 7) so that it can provides sufficient power. Failing to do so will cause the failure to power up. ASRock P4V88/P4V88+ Motherboard...
- Página 15 A HDDs A HDDs A HDDs A HDDs P4V88/P4V88+ motherboard supports Hot Plug and Hot Swap functions for SATA Devices. NOTE What is Hot Plug Function? If the SATA HDDs are NOT set for RAID configuration, it is called “Hot Plug”...
- Página 16 HDDs with RAID functions, please follow the below steps. STEP 1: Make a SATA Driver Diskette. A. Insert the ASRock Support CD into your optical drive to boot your system. B. During POST at the beginning of system boot-up, press <F11> key,and then a window for boot devices selection appears.
- Página 17 STEP 2: Install Windows 2000 / XP OS on your system. After setting up BIOS, you can start to install Windows 2000 / XP on your system. If you don’t want to set up RAID functions, there is no need to make a SATA driver diskette. ASRock P4V88/P4V88+ Motherboard...
- Página 18 Main Menu automatically if “AUTORUN” is enabled in your computer. If the Main Menu does not appear automatically, locate and double-click on the file “ASSETUP.EXE” from the BIN folder in the Support CD to display the menus. ASRock P4V88/P4V88+ Motherboard...
- Página 19 ASRock P4V88/P4V88+ Motherboard...
- Página 20 ® ® ® ASRock P4V88/P4V88+ Motherboard...
- Página 21 ® ® ASRock P4V88/P4V88+ Motherboard...
- Página 22 ASRock P4V88/P4V88+ Motherboard...
- Página 23 DDR1 DDR2 DDR3 DDR4 ASRock P4V88/P4V88+ Motherboard...
- Página 24 ASRock P4V88/P4V88+ Motherboard...
- Página 25 ASRock P4V88/P4V88+ Motherboard...
- Página 26 “ ” SATA2 SATA1 ASRock P4V88/P4V88+ Motherboard...
- Página 27 AUX1 ASRock P4V88/P4V88+ Motherboard...
- Página 28 ASRock P4V88/P4V88+ Motherboard...
- Página 29 ASRock P4V88/P4V88+ Motherboard...
- Página 30 ASRock P4V88/P4V88+ Motherboard...
- Página 31 ASRock P4V88/P4V88+ Motherboard...
- Página 32 ® ® ASRock P4V88/P4V88+ Motherboard...
- Página 33 1. Einführung 1. Einführung 1. Einführung Wir danken Ihnen für den Kauf des ASRock P4V88/P4V88+ Motherboard, ein zuverlässiges Produkt, welches unter den ständigen, strengen Qualitätskontrollen von ASRock gefertigt wurde. Es bietet Ihnen exzellente Leistung und robustes Design, gemäß der Verpflichtung von ASRock zu Qualität und Halbarkeit.
- Página 34 Wake-On-LAN Hardware Monitor: CPU Temperaturmessung, Messung der häuseinnentemperatur, CPU Shutdown bei Überhitzung, schützt die CPU vor dem Hitzetod (ASRock U-COP)(siehe VORSICHT 3), Rotationskontrolle für CPU-Lüfter, Rotationskontrolle für Gehäuse-Lüfter, Spannungsüberwachung: +12V, +5V, +3V, Vcore PCI-Slots: 5 Slots nach PCI-Spezifikation 2.2 AGP-Slot : 1x AGP-Slot, unterstützt 1.5V, 8X / 4X AGP-Karten...
- Página 35 Störungen kommen. Bitte lessen Sie hierzu das offizielle Microsoft-Dokument. Obwohl dieses Motherboard stufenlose Steuerung bietet, wird Over- clocking nicht empfohlen. Frequenzen, die über den für den jeweiligen Prozessor vorgesehenen liegen, können das System instabil werden lassen oder die CPU beschädigen. ASRock P4V88/P4V88+ Motherboard...
- Página 36 Hebel nach unten drücken, bis er hörbar einrastet. Schritt 5: Installieren Sie einen aktiven CPU-Kühler, der die gesamte Fläche der CPU abdeckt und eine ausreichende Wärmeableitung für den von Ihnen verwendeten CPU-Typ bietet. Weitere Hinweise finden Sie der Installationsanleitung für Ihren CPU-Kühler. ASRock P4V88/P4V88+ Motherboard...
- Página 37 2.2 Installation der Speichermodule (DIMM) Die Motherboards P4V88/P4V88+ bieten vier 184-pol. DDR (Double Data Rate) DIMM-Steckplätze und unterstützen die Dual-Kanal-Speichertechnologie. Für die Dual-Kanalkonfiguration dürfen Sie nur identische (gleiche Marke, Geschwindigkeit, Größe und gleicher Chiptyp) DDR DIMM-Paare in den Steckplätzen gleicher Farbe installieren. Mit anderen Worten, sie müssen ein identisches DDR DIMM-Paar im Dual-Kanal A (DDR1 und DDR3;...
- Página 38 Steckplätze zu zwingen, führt dies zu dauerhaften Schäden am Mainboard und am DIMM-Modul. Schritt 3: Drücken Sie die DIMM-Module fest in die Steckplätze, so dass die Halteklammern an beiden Enden des Moduls einschnappen und das DIMM-Modul fest an Ort und Stelle sitzt. ASRock P4V88/P4V88+ Motherboard...
- Página 39 2.3 Erweiterungssteckplätze (PCI und AGP-Slots): Es stehen 5 PCI- und 1 AGP-Slot auf dem P4V88/P4V88+- Motherboard zur Verfügung. PCI-Slots: PCI-Slots werden zur Installation von Erweiterungskarten mit dem 32bit PCI-Interface genutzt. AGP-Slot: Der AGP-Steckplatz dient zur Installation einer Grafikkarte. Der ASRock AGP-Steckplatz hat speziell entwickelte Klammern, die die eingefügte Grafikkarte sicher festhalten.
- Página 40 Bitte vergessen Sie nicht, den Jumper wieder zu entfernen, nachdem das CMOS gelöscht wurde. Wenn Sie den CMOS-Inhalt gleich nach dem Aktualisieren des BIOS löschen müssen, müssen Sie zuerst das System starten und dann wieder ausschalten, bevor Sie den CMOS- Inhalt löschen. ASRock P4V88/P4V88+ Motherboard...
- Página 41 (IDE1, blau) und das CD-ROM mit dem sekundären IDE-Anschluss (IDE2, schwarz). Seriell-ATA-Anschlüsse Diese beiden Serial ATA- SATA2 (SATA-)Verbínder (SATA1: siehe S.2 - No. 13) unterstützten SATA-Datenkabel (SATA2: siehe S.2 - No. 12) für interne SATA1 Massenspeichergeräte. Die aktuelle SATA-Schnittstelle ermöglicht eine Datenübertragungsrate bis 1,5 Gb/s. ASRock P4V88/P4V88+ Motherboard...
- Página 42 (siehe S.2 - No. 30) Verwendung der vorderseitigen USB-Anschlüsse durch Verbinden des vorseitigen USB- Kabels mit diesem Header (USB4_5) werden die USB- Anschlüsse 4,5 auf ASRock I/O Plus™ nicht funktionieren. Anschluss für Dieser Anschluss unterstützt Infrarot-Modul einen optionalen Infrarot- Sender/Empfänger.
- Página 43 Anschluss und passen Sie den (siehe S.2 - No. 19) schwarzen Draht dem Erdungsstift an. CPU-Lüfteranschluss Verbinden Sie das CPU - Lüfterkabel mit diesem (3-pin CPU_FAN1) Anschluss und passen Sie den (siehe S.2 - No. 2) schwarzen Draht dem Erdungsstift an. ASRock P4V88/P4V88+ Motherboard...
- Página 44 Beachten Sie bitte, dass Sie eine 12V-ATX-Netzteil Stromversorgung mit ATX 12- Volt-Stecker mit diesem (4-pin ATX12V1) Anschluss verbinden müssen, (siehe S.2 - No. 7) damit ausreichend Strom geliefert werden kann. Andernfalls reicht der Strom nicht aus, das System zu starten. ASRock P4V88/P4V88+ Motherboard...
- Página 45 Funktionalität auf lhren SATA-Festplatten möchten, gehen Sie bitte wie folgt vor: SCHRITT 1: SATA-Treiberdiskette erstellen. A. Legen Sie die ASRock Support-CD in Ihr optisches Laufwerk, um Ihr System hochzufahren. (Legen Sie zu diesem Zeitpunkt KEINE Diskette in das Diskettenlaufwerk ein!) B.
- Página 46 1. Unter Windows 98 / Windows ME wird die RAID-Funktionalität nicht unterstützt. 2. Wenn Sie das „VIA RAID Tool“ unter Windows benutzen möchten, installieren Sie die SATA-Treiber erneut von der Support-CD, so dass das „VIA RAID Tool“ ebenfalls auf Ihrem System installiert wird. ASRock P4V88/P4V88+ Motherboard...
- Página 47 Betriebsmodus) von [RAID] auf [non-RAID] (nicht-RAID) um. SCHRITT 2: Installieren Sie Windows 2000 / XP. Nach Einrichten des BIOS können Sie mit der Installation von Windows 2000 / XP beginnen. Falls Sie die RAID-Funktionalität nicht einrichten möchten, müssen Sie keine SATA-Treiberdiskette erstellen. ASRock P4V88/P4V88+ Motherboard...
- Página 48 ASSETUP.EXE im BIN-Verzeichnis der Support-CD, um die Menüs aufzurufen. Das Setup-Programm soll es Ihnen so leicht wie möglich machen. Es ist menügesteuert, d.h. Sie können in den verschiedenen Untermenüs Ihre Auswahl treffen und die Programme werden dann automatisch installiert. ASRock P4V88/P4V88+ Motherboard...
-
Página 49: Contenu Du Paquet
1. Introduction Merci pour votre achat d’une carte mère ASRock P4V88/P4V88+, une carte mère très fiable produite selon les critères de qualité rigoureux de ASRock. Elle offre des performances excellentes et une conception robuste conformément à l’engagement d’ASRock sur la qualité et la fiabilité au long terme. - Página 50 Mesure de la température CPU, Mesure de la température du châssis, Coupure auto du CPU en cas de surchauffe pour protéger le CPU (ASRock U-COP)(voir ATTENTION 3), Tachymètre de ventilateur CPU, Tachymètre de ventilateur de châssis, Surveillance du voltage: +12V, +5V, +3V, Vcore Slots PCI: 5 slots PCI spécification 2.2...
- Página 51 Même si cette carte mère offre un contrôle sans souci, il n’est pas recommandé d’y appliquer un over clocking. Des fréquences de bus CPU autres que celles recommandées risquent de rendre le système instable ou d’endommager le CPU et la carte mère. ASRock P4V88/P4V88+ Motherboard...
- Página 52 CPU. Le verrouillage du levier dans son encoche latérale est annoncé par un clic. Etape 5. Installez le ventilateur et le radiateur du CPU. Pour une installation correcte, reportez-vous aux manuels du fabricant du ventilateur et du radiateur de CPU. ASRock P4V88/P4V88+ Motherboard...
- Página 53 2.2 Installation des modules mémoire (DIMM) 2.2 Installation des modules mémoire (DIMM) La carte mère P4V88/P4V88+ dispose de quatre emplacements DIMM DDR (Double Data Rate) de 184-broches, et supporte la Technologie de Mémoire à Canal Double. Pour effectuer une configuration à canal double, vous devez toujours installer des paires de DIMM DDR identiques (de la même marque, de la même...
- Página 54 DIMM. Etape 3. Insérez fermement le module DIMM dans son emplacement jusqu’à ce que les clips de maintien situés aux deux extrémités se ferment complètement et que le module DIMM soit inséré correctement. ASRock P4V88/P4V88+ Motherboard...
- Página 55 2.3 Slot d’extension (Slots PCI et Slot AGP) 2.3 Slot d’extension (Slots PCI et Slot AGP) Il y a 5 slots PCI et 1 slot AGP sur les cartes mères P4V88/P4V88+. Slots PCI: Les slots PCI sont utilisés pour installer des cartes d’extension dotées d’une interface PCI 32 bits.
- Página 56 CMOS. N’oubliez pas de retirer le cavalier avant après avoir restauré le CMOS. Si vous devez effacer la CMOS juste après avoir terminé la mise à jour du BIOS, vous devrez d’abord démarrer le système puis l’arrêter avant d’effectuer l’effacement de la CMOS. ASRock P4V88/P4V88+ Motherboard...
- Página 57 ATA (SATA) prennent en (SATA1: voir p.2 No. 13) charge les câbles SATA pour (SATA2: voir p.2 No. 12) les périphériques de stockage SATA1 internes. L’interface SATA actuelle permet des taux transferts de données pouvant aller jusqu’à 1,5 Go/s. ASRock P4V88/P4V88+ Motherboard...
- Página 58 En-tête USB 2.0 partagé Cet en-tête USB4_5 est partagé avec les ports USB 2.0 (USB4_5 br.9) 4 et 5 sur ASRock I/O Plus™. (voir p.2 No. 30) Lorsque vous utilisez les ports USB du panneau frontal en connectant le câble USB du panneau frontal à...
- Página 59 (CPU_FAN1 br. 3) noir sur la broche de terre. (voir p.2 No. 2) Connecteur jeux Connectez un câble jeux sur connecteur si le support pour (GAME1 br. 15) port jeux est installée. (voir p.2 No. 22) ASRock P4V88/P4V88+ Motherboard...
- Página 60 ETAPE 2 : Connectez le câble d’alimentation SATA au disque dur SATA. ETAPE 3 : Connectez l’une des extrémités du câble de données SATA sur le connecteur SATA de la carte mère. ETAPE 4 : Connectez l’autre extrémité du câble de données SATA au disque dur SATA. ASRock P4V88/P4V88+ Motherboard...
- Página 61 Durs SA Durs SAT T T T T A A A A A Durs SA Durs SA La Carte Mère P4V88/P4V88+ supporte la fonction “Hot Plug” pour les périphériques SATA. REMARQUE Qu’est-ce que la fonction « Hot Plug »? Si les disques durs SATA ne sont pas en configuration RAID, l’action d’insérer et de retirer des disques SATA alors que le système est sous...
- Página 62 1. Windows 98 / Windows ME ne prennent pas en charge les fonctions RAID. 2. Si vous voulez utiliser “VIA RAID Tool” dans un environnement Windows, veuillez réinstaller les pilotes SATA à partir du CD d’assistance afin que “VIA RAID Tool” soit aussi installé dans votre système. ASRock P4V88/P4V88+ Motherboard...
-
Página 63: Installation De Windows 2000 / Xp Sans Fonctions Raid
Après avoir configuré le BIOS, vous pouvez commencer à installer Windows 2000 / XP sur votre système. Si vous ne voulez pas configurer les fonctions RAID, il n’est pas nécessaire de créer une disquette de pilotage SATA. ASRock P4V88/P4V88+ Motherboard... - Página 64 Pour utiliser le CD technique, insérez-le dans le lecteur de CD-ROM. Le Menu principal s’affiche automatiquement si “AUTORUN” est activé dans votre ordinateur. Si le Menu principal n’apparaît pas automatiquement, localisez dans le CD technique le fichier “ASSETUP.EXE” dans le dossier BIN et double-cliquez dessus pour afficher les menus. ASRock P4V88/P4V88+ Motherboard...
-
Página 65: Contenuto Della Confezione
Grazie per aver scelto una scheda madre ASRock P4V88/P4V88+, una scheda madre affidabile prodotta secondo i severi criteri di qualità ASRock. Le prestazioni eccellenti e il design robusto si conformano all’impegno di ASRock nella ricerca della qualità e della resistenza. - Página 66 Sensore per la temperatura del processore, Sensore per la temperatura dello Chassis, Chiusura automatica del processore in caso di surriscaldamento per proteggere la CPU (ASRock U-COP)(vedi ATTENZIONE 3), Indicatore di velocità per la ventola del processore, Indicatore di velocità per la ventola di raffreddamento,...
- Página 67 98/ME. Anche se questa motherboard offre il controllo stepless, non si consiglia di effettuare l’overclocking. Frequenze del bus del processore diverse da quelle raccomandate possono causare instabilità al sistema o danni al processore e alla scheda madre. ASRock P4V88/P4V88+ Motherboard...
- Página 68 Quando la leva fa clic sulla linguetta laterale significa che è bloccata. Step 5. Installare la ventola del processore e l’heatsink. Per una corretta installazione, per favore fare riferimento ai manuali di istruzione dei produttori della ventola e dell’heatsink del processore. ASRock P4V88/P4V88+ Motherboard...
- Página 69 2.2 Installazione dei moduli di memoria (DIMM) 2.2 Installazione dei moduli di memoria (DIMM) La scheda madre P4V88/P4V88+ fornisce quattro alloggiamenti DIMM DDR (Double Data Rate) a 184 pin, e supporta la tecnologia Dual Channel Memory. Per la configurazione a due canali, è necessario installare sempre coppie identiche (stessa marca, velocità, dimensioni e tipo di chip) di DIMM DDR negli alloggiamenti...
- Página 70 DIMM stessa. Step 3. Inserire saldamente la DIMM nello slot fino a far scattare completamente in posizione i fermagli di ritegno alle due estremità e fino ad installare correttamente la DIMM nella sua sede. ASRock P4V88/P4V88+ Motherboard...
- Página 71 2.3 Slot di espansione (PCI e slot AGP) 2.3 Slot di espansione (PCI e slot AGP) Esistono 5 slot PCI e 1 slot AGI su entrambe le schede madri P4V88/P4V88+. Slot PCI: Sono utilizzati per installare schede di espansione con Interfaccia PCI a 32-bit.
- Página 72 CMOS. Per favore ricordarsi di rimuovere il jumper cap dopo la pulizia della CMOS. Se si deve cancellare il CMOS non appena terminato l’aggiornamento del BIOS, prima di eseguire tale operazione di cancellazione è necessario riavviare innanzitutto il sistema, e quindi spegnerlo. ASRock P4V88/P4V88+ Motherboard...
-
Página 73: Collettori E Connettori Su Scheda
(SATA1: vedi p.2 Nr. 13) SATA per dispositivi di (SATA2: vedi p.2 Nr. 12) immagazzinamento interni. SATA1 ATA (SATA) supportano cavi SATA per dispositivi di memoria interni. L’interfaccia SATA attuale permette velocità di trasferimento dati fino a 1.5 Gb/s. ASRock P4V88/P4V88+ Motherboard... - Página 74 USB 2.0 aggiuntive. Collettore USB 2.0 Questo collettore USB4_5 è condiviso condiviso con le porte USB 2.0 4 e 5 su ASRock I/O Plus™. (9-pin USB4_5) Quando si utilizzano le porte (vedi p.2 Nr. 30) USB del pannello frontale,...
- Página 75 CPU a questo connettore e far (3-pin CPU_FAN1) combaciare il filo nero al pin (vedi p.2 Nr. 2) terra. Connettore porta giochi Connettere un cavo Game a questo connettore solo se la (15-pin GAME1) porta giochi è installata. (vedi p.2 Nr. 22) ASRock P4V88/P4V88+ Motherboard...
- Página 76 (vedi p.2 Nr. 31) Connettore ATX 12V È necessario collegare una alimentazione con spinotto da (4-pin ATX12V1) 12V ATX a questo connettore (vedi p.2 Nr. 7) in modo che possa fornire energia sufficiente. In caso contrario l’unità non si avvia. ASRock P4V88/P4V88+ Motherboard...
- Página 77 SAT T T T T A A A A A dischi rigidi SA dischi rigidi SA La scheda madre P4V88/P4V88+ supporta la funzione di collegamento e scambio a caldo per i dispositivi SATA. NOTA Che cosa è la funzione di collegamento a caldo? Se i dischi rigidi SATA NON sono impostati per una configurazione RAID, è...
- Página 78 RAID” contenuto nella cartella con percorso: .. \ SATA RAID BIOS e al documento del medesimo CD denominato “Guide to VIA RAID Tool - Guida al VIA RAID Tool ” contenuto nella cartella con percorso: .. \ VIA RAID Tool ASRock P4V88/P4V88+ Motherboard...
- Página 79 Passo 2: Installazione di Windows 2000 / XP sul sistema. Dopo la configurazione del BIOS, è possibile procedere all’installazione di Windows 2000 / XP sul sistema. Se non si desidera installare le funzioni RAID, non è necessario creare un dischetto driver SATA. ASRock P4V88/P4V88+ Motherboard...
- Página 80 Inserire il CD di supporto nel lettore CD-ROM. Se la funzione “AUTORUN” è attivata nel computer, apparirà automaticamente il Menù principale. Se il Menù principale non appare automaticamente, posizionarsi sul file “ASSETUP.EXE” nel CESTINO del CD di supporto e cliccare due volte per visualizzare i menù. ASRock P4V88/P4V88+ Motherboard...
-
Página 81: Introducción
1. Introducción 1. Introducción Gracias por su compra de ASRock P4V88/P4V88+ placa madre, una placa de confianza producida bajo el control de calidad estricto y persistente. La placa madre provee realización excelente con un diseño robusto conforme al compromiso de calidad y resistencia de ASRock. -
Página 82: Especificación
Monitor Hardware:Sensor para la temperature del procesador, Sensor para la temperatura del chasis, Corte automático en caso de temperatura sobre-elevada de CPU (ASRock U-COP)(ver ATENCIÓN 3), Taquímetro del ventilador del CPU,• Taquímetro del ventilador del chasis, Monitor Voltaje: +12 V, + 5V, + 3V, Vcore Slot PCI: 5 slot con PCI especificación 2.2... - Página 83 ® 98/ME. Aunque esta placa base ofrece un control complete, no es recomendable forzar la velocidad. Las frecuencias de bus de la CPU distintas a las recomendadas pueden causar inestabilidad en el sistema o dañar la CPU. ASRock P4V88/P4V88+ Motherboard...
-
Página 84: Instalación
CPU, examine su orientación o examine si los pins están ya encorvados. Paso 4. Encierre el zócalo bajando la palanca. Paso 5. Instale el disipador de calor con ventilador del CPU (consulte la documentación del disipador de calor). ASRock P4V88/P4V88+ Motherboard... -
Página 85: Instalación De Memoria
2.2 Instalación de Memoria 2.2 Instalación de Memoria La placa P4V88/P4V88+ ofrece cuatro ranuras DIMM DDR de 184 pines, y soporta Tecnología de Memoria de Doble Canal. Para la configuración de doble canal, necesitará instalar siempre pares DIMM DDR idénticos (de la misma marca, velocidad, tamaño y tipo) en las ranuras del mismo color. - Página 86 DIMM. Paso 3. Inserte la DIMM con firmeza dentro de la ranura hasta que los clips de sujeción de ambos lados queden completamente introducidos en su sitio y la DIMM se haya asentado apropiadamente. ASRock P4V88/P4V88+ Motherboard...
-
Página 87: Ranuras De Expansion (Ranuras Pci Y Agp)
2.3 Ranuras de Expansion (Ranuras PCI y AGP) 2.3 Ranuras de Expansion (Ranuras PCI y AGP) Hay 5 ranuras PCI y 1 ranura AGP sobre las placas mardres P4V88/P4V88+. Ranura PCI: Para instalar tarjetas de expansión que tienen 32-bit Interface PCI. -
Página 88: Configuración De Los Jumpers
COMS. Si necesita borrar la CMOS cuando acabe de finalizar la actualización de la BIOS, debe arrancar primero el sistema y, a continuación, apagarlo antes de realizar la acción de borrado de CMOS. ASRock P4V88/P4V88+ Motherboard... -
Página 89: Cabezales Y Conectores En Placas
La SATA1 interfaz SATA actual permite una velocidad de transferencia de 1.5 Gb/s. Cable de datos de Ambos extremos del cable serie ATA (SATA) pueden conectarse al disco duro SATA o la conexión de la placa base. ASRock P4V88/P4V88+ Motherboard... - Página 90 USB del panel (ver p.2, N. 30) frontal conectando el cable USB del panel frontal a este cabezal (USB4_5), los puertos USB 4 y 5 en el ASRock I/O Plus no funcionarán. Conector de módulo Infrared Soporta módulo Infrared de transmisión y recepción...
- Página 91 (3-pin CPU_FAN1) con el conector de tierra. (ver p.2, N. 2) Conexión de juegos Conecte un cable de juegos a esta conexión si se instala el (15-pin GAME1) soporte del puerto de juegos. (ver p.2, N. 22) ASRock P4V88/P4V88+ Motherboard...
- Página 92 Tenga en cuenta que es necesario conectar este (4-pin ATX12V1) conector a una toma de corriente (ver p.2, N. 7) con el enchufe ATX 12V, de modo que proporcione suficiente electricidad. De lo contrario no se podrá encender. ASRock P4V88/P4V88+ Motherboard...
-
Página 93: Instalación De Windows 2000 / Windows Xp Con Funciones Raid
SATA con funciones RAID, siga los pasos siguientes. PASO 1: Haga un disquete del controlador SATA. Inserte el CD de soporte de ASRock en la unidad óptica de la unidad para iniciar el sistema. (NO inserte ningún disquete en la unidad de disco en este momento) B. - Página 94 1. Windows 98 / Windows ME no admiten funciones RAID. 2. Si desea utilizar “VIA RAID Tool” en el entorno de Windows, instale de nuevo los controladores SATA del CD de soporte de forma que “VIA RAID Tool” se instale también en su sistema. ASRock P4V88/P4V88+ Motherboard...
-
Página 95: Instalación De Windows 2000 / Xp Sin Funciones Raid
PASO 2: Instale Windows 2000 / XP en su sistema. Tras configurar la BIOS, puede comenzar a instalar Windows 2000 / XP en su sistema. Si no desea configurar funciones RAID, no hay necesidad de realizar un disquete de controlador SATA. ASRock P4V88/P4V88+ Motherboard... -
Página 96: Bios Información
Para iniciar la instalación, ponga el CD en el lector de CD y se desplegará el Menú Principal automáticamente si «AUTORUN» está habilitado en su computadora. Si el Menú Principal no aparece automáticamente, localice y doble-pulse en el archivo “ASSETUP.EXE” para iniciar la instalación. ASRock P4V88/P4V88+ Motherboard...