Tabla de contenido
Publicidad
Idiomas disponibles
Idiomas disponibles
Enlaces rápidos
Publicidad
Tabla de contenido
Solución de problemas

Manuales relacionados para Alto Professional STEALTH WIRELESS


Resumen de contenidos para Alto Professional STEALTH WIRELESS
- Página 1 User Guide English ( 3 – 13 ) Guía del usuario Español ( 14 – 24 ) Guide d’utilisation Français ( 25 – 35 ) Guida per l’uso Italiano ( 36 – 46 ) Benutzerhandbuch Deutsch ( 47 – 57 ) Appendix English ( 59 )
-
Página 3: Important Safety Precautions
For additional product support, visit altoprofessional.com/support. Important Safety Precautions Please note: Alto Professional and inMusic are not responsible for the use of its products or the misuse of this information for any purpose. Alto Professional and inMusic are not responsible for the misuse of its products caused by avoiding compliance with inspection and maintenance procedures. -
Página 4: Quick Start
Assembly Note: If you require assistance, contact Alto Professional customer service at altoprofessional.com/support. Mounting the Receiver to the Loudspeaker Use the supplied M10 rigging bolts to connect the Stealth Wireless receiver to the powered speaker's fly point. M10 Rigging Bolt... -
Página 5: Connection Diagrams
To send mono signals through the Stealth Wireless transmitter to a single receiver: 1. Connect your mixer’s main output to an input on the Stealth Wireless transmitter and connect the receiver’s output to your loudspeaker’s input. Keep all mixer volume and transmitter volume controls at their minimum settings. - Página 6 To send stereo signals through the Stealth Wireless transmitter to two receivers: 1. Connect your mixer’s main outputs to the corresponding input channels on the Stealth Wireless transmitter and connect the receivers’ outputs to your loudspeakers’ inputs. Keep all mixer volume and transmitter volume controls at their minimum settings.
-
Página 7: Setting Up The Receiver
Operation To set up and use your Stealth Wireless, follow the steps in this chapter in order. If you are setting up a system using multiple receivers, set up each receiver one at a time, and keep each receiver powered on as you set up additional units. -
Página 8: Setting Up The Transmitter
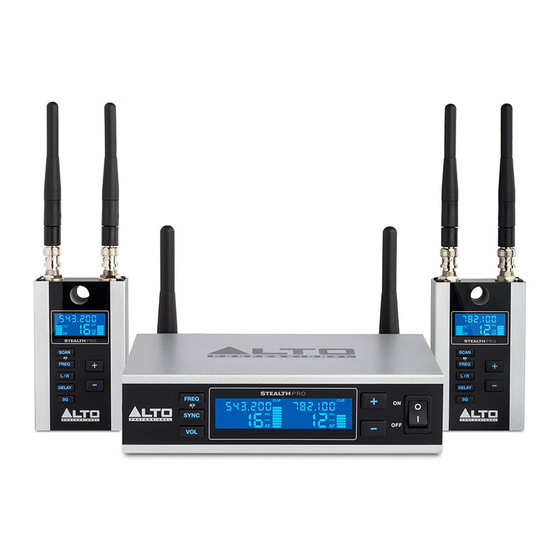
Setting Up the Transmitter 1. Use a standard XLR cable or 1/4” (6.35 mm) cable (not included) to connect your mixer or other audio source to the transmitter’s Combo Inputs. 2. Use the included power adapter to connect the transmitter’s power connector to your power source. - Página 9 Features Transmitter Front Panel 1. Power: Press this button to turn the transmitter on or off. 2. CH: Press this button to select the RF frequency and channel for each stereo channel. • Match channels on the transmitter and receiver to get a signal. •...
- Página 10 Display 1. AF: This meter shows the current audio signal level received from the Combo Inputs. 2. Channel (region specific): This is the current RF channel number. The number of available channels depends on your region. 3. Frequency: This is the current RF frequency in MHz. 4.
- Página 11 Receiver Top Panel 1. Antenna: The wireless receiver’s antenna receives the signal that is sent from the transmitter. Place the antenna in a vertical position for best results in transmitting the wireless signal. If the wireless signal quality is poor, change the position of the antenna. 2.
-
Página 12: Front Panel
Display 1. Channel (region specific): This is the current RF channel number. The number of available channels depends on your region. 2. Frequency: This is the current RF frequency in MHz. 3. L/R: Indicates which stereo channel the receiver is receiving from the transmitter. -
Página 13: Troubleshooting
Troubleshooting Problem Solution The receiver does not produce any Make sure the receiver’s power adapter is properly connected to sound. the power connector and a power source. Make sure the receiver’s audio output is properly connected to your mixer, amplifier system, etc. Also, make sure the volume controls on your mixer and speaker are turned up. -
Página 14: Introducción
Para soporte adicional del producto, visite altoprofessional.com/support. Precauciones importantes para la seguridad Para tener en cuenta: Alto Professional e inMusic no son responsables del uso de sus productos o el mal uso de esta información para cualquier propósito. Alto Professional e inMusic no son responsables del mal uso de sus productos causados por la omisión del cumplimiento de los... -
Página 15: Montaje
Nota: Si requiere asistencia, póngase en contacto con el servicio al cliente de Alto Professional ingresando a altoprofessional.com/support. Montaje del receptor en el altavoz Use el tornillo M10 suministrado para conectar el receptor Stealth Wireless al punto de conexión del altavoz alimentado. Tornillo M10 Punto de conexión... -
Página 16: Diagramas De Conexión
Para enviar señales mono del transmisor Stealth Wireless a un solo receptor: Conecte la salida principal de su mezclador a una entrada del transmisor Stealth Wireless y conecte la salida del receptor a la entrada de su altavoz. Mantenga todos los controles de volumen del mezclador y ajuste del transmisor en sus valores mínimos. - Página 17 Para enviar señales estéreo del transmisor Stealth Wireless a dos receptores: Conecte la salida principal de su mezclador a una entrada del transmisor Stealth Wireless y conecte la salida del receptor a la entrada de su altavoz. Mantenga todos los controles de volumen del mezclador y ajuste del transmisor en sus valores mínimos.
-
Página 18: Funcionamiento
Funcionamiento Para instalar y utilizar su Stealth Wireless, siga los pasos en este capítulo en orden. Si está instalando un sistema con múltiples receptores, instale cada receptor de a uno a la vez y mantenga cada receptor encendido a medida que instala los otros. -
Página 19: Preparación Del Transmisor
Preparación del transmisor 1. Utilice un cable XLR estándar o un cable de 6,35 mm (1/4 pulg.) estándar para conectar su mezclador u otra fuente de audio a las entradas combinadas. 2. Utilice el adaptador de corriente para conectar el conector de corriente del transmisor a su fuente de corriente. -
Página 20: Características
Características Transmisor Panel frontal 1. Encendido: Pulse este botón para encender o apagar el transmisor. 2. CH: Pulse este botón para seleccionar la frecuencia de RF y el canal de forma manual para cada canal estéreo. • Selecciona el mismo canal en el transmisor y el receptor para recibir la señal. •... -
Página 21: Panel Trasero
Pantalla 1. AF: Este medidor muestra el nivel de la señal de audio actual que se recibe por las entradas combinadas. 2. Channel (específico para cada región): El número del canal actual. La cantidad de canales disponibles depende de su región. 3. - Página 22 Receptor Panel superior 1. Antena: La antena del receptor inalámbrico recibe la señal que se envía desde el transmisor. Coloque la antena en posición vertical para lograr los mejores resultados en la transmisión de la señal inalámbrica. Si la calidad de la señal inalámbrica es pobre, cambie la posición de la antena.
-
Página 23: Panel Frontal
Pantalla 1. Canal (específico para cada región): El número del canal actual. La cantidad de canales disponibles depende de su región. 2. Frequency (Frecuencia): La frecuencia actual en MHz. 3. L/R (izquierdo/derecho): Indica el canal estéreo que el receptor recibe desde el transmisor. 4. -
Página 24: Solución De Problemas
Solución de problemas Problema Solución El receptor no produce Asegúrese de que el adaptador de corriente del receptor esté conectado ningún sonido. correctamente a la entrada de corriente y a la fuente de corriente. Asegúrese de que la salida de audio del receptor esté conectada correctamente a su mezclador, sistema de amplificación, etc. -
Página 25: Consignes De Sécurité Importantes
Pour de l’assistance supplémentaire, veuillez visiter le site altoprofessional.com/support. Consignes de sécurité importantes Veuillez noter : Alto Professional et inMusic ne sont pas responsables de la mauvaise utilisation de leurs produits ou de l’utilisation faite de ces informations. Alto Professional et inMusic ne sont pas responsables de la mauvaise utilisation de leurs produits causés par le non-respect des procédures... -
Página 26: Démarrage Rapide
Remarque : Pour de l’assistance, communiquez avec le service à la clientèle d’Alto Professional au altoprofessional.com/support. Montage de récepteur sur enceinte Utilisez les vis M10 fournies pour fixer le récepteur Stealth Wireless au point de suspension de l'enceinte amplifiée. Vis M10... - Página 27 Raccordez la sortie principale de votre console de mixage sur une des entrées de l'émetteur Stealth Wireless et raccordez la sortie du récepteur à l'entrée de l'enceinte. Réglez les niveaux du volume de la console de mixage et des commandes volume de l’émetteur au minimum.
- Página 28 Exemple 2 – Installation bicanal Pour transmettre des signaux stéréo par l'intermédiaire de l'émetteur Stealth Wireless vers deux récepteurs : Raccordez les sorties principales de votre console de mixage aux entrées de l'émetteur Stealth Wireless et raccordez les sorties des récepteurs aux entrées de l'enceinte. Réglez les niveaux du volume de la console de mixage et des commandes volume de l’émetteur au minimum.
-
Página 29: Installation Du Récepteur
Fonctionnement Pour configurer et utiliser le Stealth Wireless, veuillez suivre les étapes décrites dans ce chapitre dans l'ordre. Lors de la configuration d’un système qui utilise plusieurs récepteurs, vous devez procéder à l’installation d’un récepteur à la fois en vous assurant de garder chaque récepteur sous tension alors que vous configurez les autres. - Página 30 Installation de l’émetteur 1. Utilisez un câble XLR ou un câble 6,35 mm (non inclus) standard pour brancher une console de mixage ou autre source audio aux entrées combo de l’émetteur. 2. Utilisez le câble d’alimentation secteur inclus pour brancher l’entrée d’alimentation de l’émetteur à...
-
Página 31: Panneau Avant
Caractéristiques Émetteur Panneau avant 1. Touche d’alimentation : Appuyer sur cette touche permet de mettre l'émetteur sous et hors tension. 2. CH : Appuyer sur cette touche permet de sélectionner la fréquence RF et le canal pour chaque canal stéréo. •... -
Página 32: Écran D'affichage
Écran d’affichage 1. AF : Ce vumètre indique le niveau du signal provenant des entrées combo. 2. Canal (spécifique à la région) : Cet indicateur affiche le numéro du canal sélectionné. Le nombre de canaux disponibles dépend de la région. 3. - Página 33 Récepteur Panneau supérieur 1. Antenne : L'antenne du récepteur sans fil reçoit le signal envoyé par l'émetteur. Placez l'antenne en position verticale afin d’obtenir meilleurs résultats transmission sans fil. Si la qualité du signal sans fil est mauvaise, changez la position de l'antenne. 2.
- Página 34 Écran d’affichage 1. Canal (spécifique à la région) : Cet indicateur affiche le numéro du canal sélectionné. Le nombre de canaux disponibles dépend de la région. 2. Fréquence : Ceci indique la fréquence en MHz. 3. L/R : Ce témoin indique par quel canal stéréo le récepteur reçoit le signal de l'émetteur.
-
Página 35: Guide De Dépannage
Guide de dépannage Problème Solution Le récepteur ne produit Veuillez vous assurer que le câble d’alimentation secteur du récepteur est aucun son. correctement branché à l’entrée d’alimentation et à une prise secteur. Veuillez vous assurer que la sortie audio du récepteur est correctement branchée à... -
Página 36: Contenuti Della Confezione
2 cavi da TRS a XLR Istruzioni di sicurezza e garanzia 2 antenne BNC removibili Nota: il sistema Stealth Wireless mk2 non è compatibile con le versioni precedenti dei sistemi Alto Professional Stealth Wireless. Assistenza Per conoscere le ultime informazioni in merito a questo prodotto (i requisiti di sistema complete, compatibilità, ecc) e per la registrazione del prodotto, recarsi alla pagina altoprofessional.com. -
Página 37: Inizio Rapido
Nota bene: Per ottenere assistenza, contattare il servizio di assistenza clienti Alto Professional alla pagina altoprofessional.com/support. Montaggio del ricevitore a livello dell’altoparlante Servirsi della vite M10 in dotazione per collegare il ricevitore Stealth Wireless al punto di aggancio dell'altoparlante. Vite M10... -
Página 38: Schemi Dei Collegamenti
Esempio 1 – Configurazione canale singolo Per inviare segnali mono tramite il trasmettitore Stealth Wireless ad un singolo ricevitore: 1. Collegare l'uscita principale del mixer ad un ingresso del trasmettitore Stealth Wireless e collegare l'uscita del ricevitore all'ingresso dell'altoparlante. Mantenere tutti i comandi relativi al volume del mixer e al volume del trasmettitore al minimo. - Página 39 Per inviare segnali stereo tramite il trasmettitore Stealth Wireless a due ricevitori: 1. Collegare le uscite main del mixer ai canali di ingresso del trasmettitore Stealth Wireless e collegare le uscite dei ricevitori Stealth Wireless agli ingressi dell'altoparlante. Mantenere tutti i comandi relativi al volume del mixer e al volume del trasmettitore al minimo.
-
Página 40: Configurazione Del Ricevitore
Operazione Per configurare e utilizzare il Stealth Wireless, seguire le fasi illustrate nel presente capitolo in ordine. Se si sta configurando un impianto utilizzando più ricevitori, configurare ciascun ricevitore uno alla volta e mantenere acceso ciascuno di essi mentre si configurano gli altri. -
Página 41: Configurazione Del Trasmettitore
Configurazione del trasmettitore 1. Servirsi di un cavo standard XLR o da 1/4” (6,35 mm) (non in dotazione) per collegare il mixer o un'altra fonte audio agli ingressi Combo del trasmettitore. 2. Servirsi dell'adattatore di alimentazione in dotazione per collegare il connettore di alimentazione del trasmettitore alla fonte di alimentazione. -
Página 42: Caratteristiche
Caratteristiche Trasmettitore Pannello anteriore 1. Alimentazione (Power): premere questo tasto per accendere e spegnere il trasmettitore. 2. CH: premere questo tasto per selezionare la frequenza RF e il canale per ciascun canale stereo. • Abbinare i canali a livello del trasmettitore e del ricevitore per ottenere un segnale. •... -
Página 43: Pannello Posteriore
Display 1. AF: questo misuratore mostra il livello di segnale audio corrente ricevuto dagli ingressi combo. 2. Canale (specifico per regione): questo è il numero di canale corrente. Il numero di canali disponibili dipende dalla regione dell'utente. 3. Frequenza: è la frequenza corrente in MHz. 4. - Página 44 Ricevitore Pannello superiore 1. Antenna: l’antenna wireless del ricevitore riceve il segnale inviato dal trasmettitore. Collocare l'antenna in posizione verticale per ottenere i migliori risultati nella trasmissione del segnale wireless. Se la qualità del segnale wireless è scarsa, spostare l'antenna. 2.
-
Página 45: Pannello Anteriore
Display 1. Canale (specifico per regione): questo è il numero di canale corrente. Il numero di canali disponibili dipende dalla regione dell'utente. 2. Frequency: è la frequenza corrente in MHz. 3. L/R: indica quale canale stereo il ricevitore sta ricevendo dal trasmettitore. 4. -
Página 46: Risoluzione Di Problemi
Risoluzione di problemi Problema Soluzione ricevitore produce Assicurarsi che l'adattatore di alimentazione del ricevitore sia collegato alcun suono. adeguatamente all'ingresso di alimentazione e a una fonte di alimentazione. Assicurarsi che l'uscita audio del ricevitore sia collegata adeguatamente al mixer, all'amplificatore, ecc. Anche assicurarsi che i comandi di volume a livello di mixer e altoparlanti siano accesi. -
Página 47: Lieferumfang
Stealth Wireless (mk2) Empfänger (x2) Klettverschlüsse (x2) Netzteil (x3) Benutzerhandbuch TRS-auf-XLR-Kabel (x2) Sicherheitshinweise und Garantieinformationen Abnehmbare BNC Antennen (x6) Hinweis: Das Stealth Wireless mk2-System ist nicht mit früheren Versionen von Alto Professional Stealth Wireless-Systemen kompatibel. Kundendienst Für aktuelle Informationen diesem Produkt... -
Página 48: Empfänger-Anbringung Am Lautsprecher
Schnellstart Montage Hinweis: Wenn Sie Hilfe benötigen, wenden Sie sich an den Kundendienst von Alto Professional unter altoprofessional.com/support. Empfänger-Anbringung am Lautsprecher Verwenden Sie die mitgelieferte M10-Schraube, um den Stealth Wireless-Empfänger in die Fly-Points des Aktivlautsprechers zu schrauben. M10 Schraube Fly-Point... - Página 49 Minimaleinstellungen. 2. Schalten Sie den Stealth Wireless-Sender und den Empfänger ein. Stellen Sie ihre Kanäle so ein, dass die Nummern übereinstimmen. Weitere Informationen finden Sie in den Anweisungen zum Einrichten des Senders und Empfängers unter Betrieb. 3. Für eine ideale Übertragung des Funksignals, bringen Sie die Sende- und Empfangsantennen in eine vertikale Position.
- Página 50 Beispiel 2 – Zweikanal-Setup So senden Sie Stereo-Signale über den Stealth Wireless-Sender an zwei Empfänger: Verbinden Sie die Hauptausgänge Ihres Mixers mit den Eingangskanälen am Stealth Wireless- Sender und verbinden Sie die Ausgänge des Stealth Wireless-Empfängers mit den Lautsprecher- Eingängen.
-
Página 51: Einrichten Des Empfängers
Betrieb Um Ihren Stealth Wireless einzurichten und zu verwenden, führen Sie die Schritte in diesem Kapitel in dieser Reihenfolge aus. Wenn Sie ein System mit mehreren Empfängern einrichten, stellen Sie die einzelnen Empfänger einen nach dem anderen auf und halten Sie jeden Empfänger eingeschaltet, wenn Sie zusätzliche Einheiten einrichten. -
Página 52: Einrichten Des Senders
Einrichten des Senders 1. Verwenden Sie ein Standard-XLR-Kabel oder 1/4" (6,35 mm) Kabel (nicht im Lieferumfang enthalten), um Ihr Mischpult oder eine andere Audioquelle an die Combo-Eingänge des Senders anzuschließen. 2. Verwenden Sie das mitgelieferte Netzteil, um den Netzeingang des Senders an Ihre Stromquelle anzuschließen. - Página 53 Funktionen Sender Vorderseite 1. Power-Taste: Drücken Sie diese Taste, um den Transmitter ein- oder auszuschalten. 2. CH: Drücken Sie diese Taste, um manuell die HF-Frequenz und den Kanal für jeden Stereo-Kanal zu wählen. • Stellen Sie die gleichen Kanäle am Sender und am Empfänger ein, um ein Signal zu bekommen.
- Página 54 Display 1. AF: Diese Anzeige zeigt den aktuellen von den Combo-Eingängen empfangenen Audio-Signalpegel. 2. Kanal (regionsspezifisch): Dies ist die aktuelle Kanalnummer. Die Anzahl der verfügbaren Kanäle hängt von Ihrer Region ab. 3. Frequenz: Dies ist die aktuelle Frequenz in MHz. 4.
- Página 55 Empfänger Oberseite 1. Antenne: zwei Antennen drahtlosen Empfängers empfangen das Signal, das vom Sender übertragen wird. Für eine ideale Übertragung des Funksignals bringen Sie die Antennen in eine vertikale Position. Wenn das drahtlos schwach ist, verändern Sie die Position der Antenne. 2.
- Página 56 Display 1. Kanal (regionsspezifisch): Dies ist die aktuelle Kanalnummer. Die Anzahl der verfügbaren Kanäle hängt von Ihrer Region ab. 2. Frequenz: Dies ist die aktuelle Frequenz in MHz. 3. L/R: Legt fest, welchen Stereo-Kanal der Empfänger vom Sender empfängt. 4. SQ: Zeigt den aktuellen Squelch-Pegel an, entweder Niedrig, Mittel, Hoch oder Aus.
-
Página 57: Fehlerbehebung
Fehlerbehebung Problem Lösung Der Empfänger gibt keinen Ton Stellen Sie sicher, dass das Netzteil des Empfängers ordnungsgemäß mit dem aus. Netzeingang und einer Stromquelle verbunden ist. Stellen Sie sicher, dass der Audioausgang des Empfängers ordnungsgemäß mit dem Mixer, Verstärkersystem usw. verbunden ist. Auch achten Sie darauf, dass die Lautstärkeregler am Mixer und am Lautsprecher aufgedreht sind. -
Página 59: Technical Specifications
72 mm x 28 mm x 118 mm 0.36 lb. Weight 162.5 g Trademarks and Licenses Alto Professional is a trademark of inMusic Brands, Inc., registered in the U.S. and other countries. All other product or company names are trademarks or registered trademarks of their respective owners. - Página 60 altoprofessional.com Manual Version 1.2...
- Página 61 Important Safety Instructions & Warranty Information English ( 3 – 7 ) Instrucciones importantes de seguridad e información de la garantía Español ( 8 – 11 ) Instructions importantes de sécurité et informations de garantie Français ( 12 – 15 ) Istruzioni importanti di sicurezza e le informazioni della garanzia Italiano ( 16 –...
- Página 62 Alto Professional is a trademark of inMusic Brands, Inc., registered in the U.S. and other countries. ® NEMA is the registered trademark and service mark of the National Electrical Manufacturers Association. All other product names, company names, trademarks, or trade names are those of their respective owners.
-
Página 63: Product Warranty
What is covered and for how long? All Products: inMusic Brands, Inc. (“inMusic”) warrants to the original purchaser that Alto Professional (“Alto Pro”) products and all other accessories are free from defects in material and workmanship under normal use and service for the period commencing upon the date of purchase from an authorized Alto Pro dealer and continuing for the following period of time after that date for one (1) year. - Página 64 (for products purchased of the U.S.A.) 1. inMusic Brands, Inc. (“inMusic”) warrants to the original purchaser that Alto Professional (“Alto Pro”) products are free from defects in material and workmanship under normal use and service for the period commencing upon the date of purchase from an authorized Alto Pro dealer and continuing for the following period of time after that date for (1) Year.
- Página 65 Return Information A return merchant authorization number must be obtained from your local Alto Pro representative. For • your representative go to altoprofessional.com. A copy of the original sales receipt must also be included for the equipment to be repaired under warranty. •...
-
Página 66: Important Safety Instructions
Important Safety Instructions 1. Read and keep these instructions. Heed all warnings and follow all Instructions. 2. Do not use this apparatus near water. 3. Clean only with dry cloth. 4. Do not block any ventilation openings. Install in accordance with the manufacturer’s instructions. Do not install this equipment in a confined or “boxed-in”... - Página 67 NOTICE CONCERNING LASER PRODUCTS: DANGER: INVISIBLE LASER RADIATION WHEN OPEN AND INTERLOCK FAILED OR DEFEATED. AVOID DIRECT EXPOSURE TO BEAM. USE OF CONTROLS OR ADJUSTMENTS OTHER THAN THOSE SPECIFIED HEREIN MAY RESULT IN HAZARDOUS RADIATION EXPOSURE. NOTICE CONCERNING FCC REGULATIONS: You are cautioned that changes or modifications not expressly approved by the part responsible for compliance could void the user’s authority to operate the equipment.
-
Página 68: Garantía Del Producto
(para productos adquiridos de EE.UU.) inMusic Brands, Inc. (“inMusic”) garantiza al comprador original que todos los productos de Alto Professional (“Alto Pro”) están libres de defectos de material y de mano de obra bajo su uso y servicio normal por el período que comienza en la fecha de compra en un vendedor autorizado por Alto Pro y que continúa durante el tiempo... -
Página 69: Información Sobre Devoluciones
Información sobre devoluciones • Debe obtenerse un número de autorización de devolución (RMA) del representante local de su fabricante. Para información sobre su representante, visite altoprofessional.com. • Debe incluirse una copia del recibo original para que pueda repararse el equipo en garantía. •...