Tabla de contenido
Publicidad
Idiomas disponibles
Idiomas disponibles
Enlaces rápidos
Publicidad
Capítulos
Tabla de contenido

Manuales relacionados para Dometic RH 131


Resumen de contenidos para Dometic RH 131
- Página 1 RH 131 RH 141 Type: MF20-60 Operating Instructions Bedienungsanleitung Mode d'emploi Istruzioni per l'uso Handleiding Manual de Instrucciones Instruções de Utilização 207.5184.89...
- Página 2 Please read these operating instructions carefully before putting the refrigeration unit into operation. If you later sell or dispose of it, please ensure that the new owner receives these operating instructions. Please follow the installation details below carefully Guarantee is valid for products installed as described only.
-
Página 3: Tabla De Contenido
The warranty does not apply if the installing and operating instructions are not adhered to. When contacting Dometic Service Network, please state the model, product number and serial number. You will find this information on the data plate inside of the refrigerator. -
Página 4: Unpacking
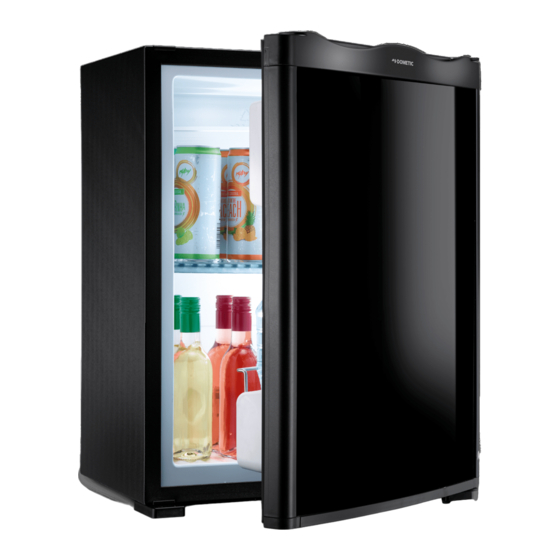
6. Thermostat knob 2. Door 7. Fixing foot 3. Lamp (if available) 4. Evaporator IN CASE IF YOUR REFRIGERATOR IS EQUIPPED WITH LOCK, DOMETIC ZRT. DO NOT ACCEPT LIABILITY FOR LOSS OR DAMAGE OF KEYS. HOWEVER A COMPLETE LOCK CAN BE SUPPLIED. -
Página 5: Cleaning
3. Cleaning 7. Ventilation grills, if used, must have an free openings of at least 200 cm² each Clean the refrigerator thoroughly at intervals, as necessary. Remove the shelves; these, the cabinet interior and the door should be washed with a warm solution of sodium bi-carbonate. -
Página 6: Using The Appliance
5. Using the appliance 8. Defrosting, cleaning and To start the refrigerator connect the plug into a maintenance properly earthed socket. Frost will gradually form on the cooling surfaces The cooling fins should show signs of cooling after and it must not be allowed to become too thick about 3 hours. -
Página 7: Replacing The Decorative Door Panel
Figure 7. 11. Replacing the decorative Figure 8. door panel, (Fig. 8-10) Remove the two screws (1) from the upper hinge of the door. Pull the door together with the hinge away from the housing and up off the lower hinge bolt (2-3). Remove screws (4) and pull off the frame edge (5). -
Página 8: Putting Into Operation
3 amp ASTA approved (BS 1362) fuse Dometic refrigerators bear this symbol on the must be used. Should the plug need to be replaced specifications plate (data plate) to be found in the for any reason, the wires in the mains lead are interior of the unit. - Página 9 Vor Inbetriebnahme des Kühlgerätes sollten Sie diese Bedienungsanleitung sorgfältig lesen. Beim Verkauf oder bei Weitergabe an einen neuen Besitzer muss auch die Bedienungsanleitung weitergeleitet werden. Beachten Sie die nachfolgend aufgeführten Installationshinweise. Die Garantie gilt nur für Produkte, die entsprechend dieser Beschreibung installiert wurden. Wir gratulieren Ihnen zum Erwerb unseres Produktes und hoffen, dass Sie mit der Funktion des Gerätes zufrieden sind.
- Página 10 Die Garantie erlischt, wenn das Gerät nicht gemäß den Anweisungen installiert und benutzt wird. Nennen Sie bitte das Modell sowie die Produkt- und die Seriennummer des Geräts, wenn Sie sich mit dem Dometic Servicenetzwerk in Verbindung setzen. Diese Informationen finden Sie auf dem Typenschild im Innern des Kühlgerätes.
-
Página 11: Auspacken
2. Tür 6. Thermostatregler 3. Beleuchtung (wo vorhanden) 7. Befestigungsfuß 4. Verdampferplatte FALLS IHR KÜHLGERÄT MIT EINEM TÜRSCHLOSS AUSGESTATTET IST, ÜBERNIMMT DOMETIC ZRT KEINE HAFTUNG FÜR VERLOREN GEGANGENE ODER BESCHÄDIGTE SCHLÜSSEL. SCHLÖSSER SIND ALS KOMPLETTE EINHEIT ALS ERSATZTEIL ERHÄLTLICH . -
Página 12: Reinigung
3. Reinigung Das Gerät ist von Zeit zu Zeit gründlich zu reinigen. Entfernen Sie hierzu die Ablagen. Die Ablagen, der Innenraum des Gerätes und die Tür sollten mit lau- warmem Wasser und einem milden Reinigungsmittel abgewaschen und anschließend mit einem feuchten Tuch nachgewischt trocken gerieben... -
Página 13: Einsatz Des Gerätes
5. Einsatz des Gerätes werden, dass diese Schicht nicht zu dick wird, denn sie wirkt isolierend und beeinträchtigt die Mit dem Anschluss des Steckers an die geerdete Kühlwirkung. Steckdose können Kühlschrank Die Reifbildung wird durch die in das Gerät einschalten. eingebaute FUZZY LOGIC reguliert, die das Gerät Die Kühlrippen sollten nach etwa drei Stunden eine alle 24 Stunden für zwei Stunden abschaltet. -
Página 14: Austauschen Der Zierfront
Abbildung 7. 11. Austauschen der Zierfront Abbildung 8. (Abb. 8-10) Entfernen Sie die beiden Schrauben (1) vom oberen Türscharnier. Ziehen Sie die Tür zusammen mit dem Scharnier aus dem Gehäuse und aus dem unteren Scharniergelenk (2-3). Entfernen Schrauben entsprechende Rahmenkante (5). Abbildung 9. -
Página 15: Anschluss An Das Stromnetz
Telefonbuch. elektronischen Geräten abgegeben werden. 13. Inbetriebnahme Dieses Produkt darf nicht über den normalen Technische Daten: Haushaltsabfall entsorgt werden. Kühlschränke von Dometic enthalten das Symbol Modell RH 131 RH 141 auf dem Datenschild (Typenschild) im Inneren des MF20-60 MF20-60 Gerätes. - Página 16 Veuillez lire ce mode d'emploi attentivement avant de mettre en service l'unité de réfrigération. Veuillez vous assurer que le nouveau propriétaire recevra ce mode d'emploi lors de la vente ou cession de l'unité. Veuillez respecter scrupuleusement les instructions d'installation ci-dessous. La garantie couvre uniquement les appareils installés conformément à...
- Página 17 Les dommages résultant d'un usage inapproprié de l'appareil ne sont pas couverts par la garantie. Les modifications apportées à l'appareil ou l'utilisation de pièces de rechange qui ne sont pas d'origine Dometic, ne sont pas couvertes par la garantie. Le non-respect des instructions d'installation ou du mode d'emploi, entraîne l'extinction totale de cette garantie.
-
Página 18: Déballage
7. Patte de fixation 3. Lampe (sur certains modéles) 4. Evaporateur AU CAS OÙ RÉFRIGÉRATEUR EST ÉQUIPÉ D'UNE SERRURE, DOMETIC ZRT N'ASSUME AUCUNE GARANTIE POUR DES CLÉS PERDUES OU ENDOMMAGÉES. VOUS POURREZ COMMANDER UNE NOUVELLE SERRURE SOUS FORME D'UNITÉ COMPLÈTE. -
Página 19: Nettoyage
3. Nettoyage garantie couvre uniquement les appareils installés conformément à ces instructions. Nettoyez le réfrigérateur à fond à intervalles 1. Le réfrigérateur doit être de niveau dans réguliers. Retirez les étagères. Nous vous les deux directions. recommandons de nettoyer ces étagères, ainsi 2. -
Página 20: Utilisation De L'appareil
7. Les grilles de ventilation doivent, le cas Pour retirer les glaçons du bac, passez-le sous échéant, comporter des ouvertures d'au l'eau. Vous pouvez à présent facilement retirer les moins 200 cm² chacune. glaçons. A travers de la patte de fixation le réfrigérateur 7. -
Página 21: Inversion Des Charnières
10. Inversion des charnières (fig. 7) Placez l'appareil sur le dos, face vers le haut. Dévissez les 8 vis (1). Retirez la porte, ainsi que les deux charnières (2), du corps de l'appareil. Retirez les deux embouts de couvercle (3) du corps de l'appareil, puis insérez-les dans les trous ouverts des charnières. -
Página 22: Service À La Clientèle
(consultez l'annuaire correspond à la tension indiquée sur la plaque téléphonique local). signalétique avant de mettre l'appareil en service. 13. Mise en service Données techniques : Modèle RH 131 RH 141 Type MF20-60 MF20-60 Volume total 31 litres 41 litres Tension d’alimentation... -
Página 23: Informations Sur La Protection De L'environnement
électriques et électroniques. Il est interdit de jeter ce produit dans les ordures ménagères. réfrigérateurs Dometic, symbole figure sur la plaque des caractéristiques (plaque signalétique) apposée à l'intérieur de l'appareil. Ce miniBar à usage professionel est conforma... - Página 24 Prima della messa in funzione dell'apparecchio si raccomanda di leggere attentamente le seguenti istruzioni per l'uso. In caso di vendita o neleggio dell'apparecchio fornire le istruzioni al nuovo proprietario. Seguire attentamente le istruzioni sull'installazione. La garanzia è valida solo per i prodotti installati come descritto.
- Página 25 Dometic. La garanzia decade in caso di inosservanza delle istruzioni di installazione e uso. Nel contattare Dometic Service Network occorre segnalare il modello, il codice prodotto e il numero di serie. Queste informazioni sono riportate sulla targhetta...
-
Página 26: Schema Dell'apparecchio
2. Porta 7. Piedino per fissaggio 3. Lampada (Se in dotazione) 4. Evaporatore SE IL FRIGORIFERO FOSSE DOTATO DI SERRATURA, DOMETIC ZRT. NON È RESPONSABILE DELL'EVENTUALE PERDITA O DANNEGGIAMENTO DELLE RELATIVE CHIAVI. TUTTAVIA POTRÀ ESSERE FORNITA UNA SERRATURA DI RICAMBIO COMPLETA. -
Página 27: Posizionamento Dell'apparecchio
3. Pulizia 1. Il frigorifero deve essere posto perfettamente in piano in entrambe le Provvedere regolarmente alla pulizia direzioni. completa dell'apparecchio, se necessario. 2. Lasciare almeno 20 mm di spazio libero Rimuovere i ripiani; lavare i ripiani, l'interno verso la parete. dell'armadietto e la porta con una soluzione calda 3. -
Página 28: Regolazione Della Temperatura
6. Non preriscaldare in alcun modo l'aria che Ricordarsi di riposizionare il termostato sulla circola nel passaggio di ventilazione. temperatura normale dopo aver ottenuto i cubetti di ghiaccio. 7. Se previste, le griglie di ventilazione Per rimuovere i cubetti, tenere il vassoio sotto devono presentare aperture di almeno 200 cm 2 ciascuna. - Página 29 La lampada a 10 Watt è disponibile presso ogni punto vendita. 10. Cambio direzione apertura porta fig.7 Posizionare il retro dell'apparecchio sul piano. Svitare le 8 viti (1). Rimuovere la porta, con le due cerniere (2) dal mobile. Rimuovere i due puntalini (3) dal mobile e inserirli nei fori aperti delle cerniere del corpo stesso.
-
Página 30: Servizio Assistenza Clienti
13. Messa in funzione responsabilità in caso di inosservanza delle Caratteristiche tecniche: presenti misure di sicurezza. Modello RH 131 RH 141 Requisiti elettrici Typo MF20-60 MF20-60 Prima di accendere, assicurarsi che la tensione Volume lordo 31 litre... - Página 31 Questo prodotto non deve essere smaltito con i normali rifiuti domestici. Il simbolo si trova sulla targhetta dei dati tecnici dei frigoriferi Dometic (targhetta del modello) all'interno dell'apparecchio. Il presente apparecchio è conforme alle seguenti direttive CEE:...
-
Página 32: Norme Di Garanzia
NORME DI GARANZIA Il periodo di garanzia per i nostri prodotti è di un anno dalla data di vendita. Durante il periodo di garanzia la Società si impegna a sostituire gratuitamente tutte le parti Che presentassero difetti di fabbricazione esclusi i pezzi ad usura. Le riparazioni in garanzia si intendono franco Electrolux Commerciale S.r.l. - Página 33 Lees aandachtig deze gebruiksaanwijzing voor u het koelapparaat in werking stelt. Als u het toestel later verkoopt of weggeeft, zorg er dan voor dat de nieuwe eigenaar de gebruiksaanwijzing ontvangt. Volg de onderstaande installatie-instructies. De garantie geldt alleen voor toestellen diegeïnstalleerd zijn volgens de beschrijving.
- Página 34 Niet onder de garantie valt schade veroorzaakt door verkeerd gebruik. Niet onder de garantie valt schade die het gevolg is van veranderingen aan het toestel of als gevolg van onderdelen die niet afkomstig zijn van Dometic. De garantie vervalt indien het toestel niet volgens de voorschriften geďnstalleerd en gebruikt wordt.
-
Página 35: Uitpakken
1. deurslot (indien aanwezig) 2. deur 6. thermostaatknop 7. bevestigingsplaatje 3. amp (indien aanwezig) 4. verdamper WANNEER U EEN KOELKAST MET SLOT HEEFT, IS DOMETIC NIET AANSPRAKELIJK VOOR VERLIES OF BESCHADIGING VAN SLEUTELS. SLOTEN KUNNEN ALS COMPLEET ONDERDEEL WORDEN VERVANGEN. -
Página 36: Schoonmaak
3. Schoonmaak 5. Alleen de volledige koeleenheid mag in het ventilatiekanaal blootgesteld zijn aan de Maak regelmatig en telkens wanneer nodig de ventilatielucht. koelkast grondig schoon. Verwijder de rekken die, net als de binnenwanden en de deur, met een warme oplossing van sodiumbicarbonaat kunnen worden afgewassen. -
Página 37: Gebruik Van Het Toestel
Gelieve bij het installeren er op te letten dat de De vorming van een ijslaag wordt vermeden door het ingebouwde FUZZY LOGIC-systeem, dat het stekker toegankelijk blijft. toestel 2 uur per etmaal uitschakelt. De ijslaag 5. Gebruik van het toestel smelt smeltwater drupt... -
Página 38: Een Ander Decoratief Deurpaneel Aanbrengen
11. Een ander decoratief deurpaneel aanbrengen, (Afb.8-10) Verwijder de 2 schroeven (1) uit het bovenste scharnier van de deur. Trek de deur en het scharnier weg van de behuizing door deze uit het onderste scharnier te heffen (2-3). Verwijder de schroeven (4) en de steun van het kader (5). -
Página 39: Inwerkingstelling
Model RH 131 RH 141 worden weggegooid. Type MF20-60 MF20-60 Bij koelkasten van Dometic staat het symbool op Bruto inhoud 31 liter 41 liter Elektriciteitsnet 220 - 240V (AC) 220 - 240V (AC) het typeplaatje aan de binnenkant van het Input apparaat. - Página 40 Rogamos que lea detenidamente este Manual de Instrucciones antes de poner en funcionamiento el frigorífico. Si, posteriormente, lo vende o se desprende de él, asegúrese de entregar este Manual de Instrucciones de utilización al nuevo propietario. Siga cuidadosamente las instrucciones de instalación que se indican a continuación. La garantía sólo es válida para los productos que se instalen según se describe aquí.
- Página 41 Indique por favor el nombre del modelo así como el número del producto y su número de serie al comunicarse con la Red de Servicio de Dometic. Hallará estos datos en la placa de características técnicas situada en el...
-
Página 42: Desembalaje
3. Bombilla (si esta disponible) 4. Evaporador EN EL CASO DE QUE SU REFRIGERADOR ESTÉ EQUIPADO CON UNA CERRADURA, DOMETIC ZRT NO ACEPTA NINGUNA RESPONSABILIDAD POR LA PÉRDIDA O EL DA?O DE LAS LLAVES. SE PUEDE SUMINISTRAR UNA CERRADURA COMPLETA. -
Página 43: Limpieza
3. Limpieza 1. El frigorífico debe estar nivelado en ambas direcciones. Debe limpiar el frigorífico a fondo y con 2. Debe quedar una holgura de 20 mm. regularidad, según sea necesario. Extraiga entre el frigorífico y la pared. las bandejas; estas bandejas, la cabina interior y 3. -
Página 44: Utilización De La Unidad
7. Si se usan rejillas de ventilación, cada una dial en su posición normal, cuando se hayan hecho los cubitos. debe tener una abertura de al menos 200 Para extraer los cubitos de la bandeja, manténgala unos momentos bajo el chorro del Mediante los soportes de fijación el frigorífico se agua. - Página 45 10. Cambio del sentido de apertura de la puerta, (Figura 7) Coloque la unidad apoyándola sobre su parte trasera. Extraiga los 8 tornillos (1). Extraiga la puerta, junto con los 2 bisagras (2). Extraiga los dos remates de la cubierta (3) y colóquelos en los agujeros de los bisagras de la carcasa.
-
Página 46: Servicio Al Cliente
13. Puesta en funcionamiento 14. Información relativa a la Datos técnicos: protección del medio ambiente Modelo RH 131 RH 141 Tipo MF20-60 MF20-60 Volumen bruto 31 litros 41 litros Esta unidad no contiene ningún CFCs/HCFCs. -
Página 47: Reciclaje
Este producto no debe desecharse en la basura doméstica convencional. Los refrigeradores de Dometic llevan el símbolo en la placa de datos (placa indicadora) situada en el interior del aparato. Esta unidad cumple con las siguientes directivas de la EEC: Directiva LVD 73/23/EEC con la modificación... - Página 48 Por favor leia estas instruções de utilização cuidadosamente antes de colocar a unidade de refrigeração em funcionamento. Se, posteriormente, vender ou ceder esta unidade de refrigeração, por favor certifique-se de que o novo dono recebe estas instruções de serviço. Por favor siga cuidadosamente os detalhes de instalação indicados abaixo. A garantia só...
- Página 49 A garantia não será aplicada, se as instruções de instalação e funcionamento não forem seguidas. Ao contactar o Serviço de Rede Dometic, mencione por favor, o modelo, número do produto e número de série. Encontrará esta informação na placa de dados, colocada na parte interior da geladeira.
- Página 50 6. Botăo do termostato 3. Lãmpada (se existir) 7. Suporte de fixaçăo 4. Evaporador EM CASO DA SUA MINIBAR SE ENCONTRAR EQUIPADA COM FECHAUDA, A DOMETIC ZRT NÃO SE RESPONSABILIZA POR PERDA OU DANOS DE CHAVES. PODE SER FORNECIDO UM FECHADURA COMPLETA.
- Página 51 3. Limpeza 2. A distância em relação à parede deverá ser de 20 mm. Limpe o frigorífico inteiramente com os 3. A ventilação deverá ser fornecida tal intervalos de tempo necessários. Remova como apresentado nas alternativas A,B, as prateleiras; estas, o interior do armário e a C ou D.
-
Página 52: Utilização Do Aparelho
7. Sugestão útil Não encha o aparelho demasiado. Ponha as bebidas e a comida no aparelho, somente quando os mesmos tiverem à temperatura ambiente. É aconselhável deixar algum espaço entre os produtos, no armário, para assegurar uma ventilação eficiente e uniforme. Se as Figura 4. - Página 53 10. Inversão da abertura da porta, (fig. 7) Deite o aparelho sobre as costas. Remova os 8 parafusos (1). Remova a porta da armação, juntamente com as duas dobradiças (2). Remova as duas tampas de cobertura (3) e coloque-as nos buracos abertos das dobradiças na armação.
-
Página 54: Assistência Ao Cliente
O aparelho não contém quaisquer CFC's/H 13. Colocação em funcionamento CFC's. Dados técnicos A amónia (composto natural de hidrogénio e nitrogénio) é usada na unidade de refrigeração Modelo RH 131 RH 141 Tipo MF20-60 MF20-60 como agente de refrigeração. Volume total... - Página 55 Este aparelho não deve ser jogado fora junto com o lixo doméstico normal! Os frigoríficos da Dometic levam um símbolo na placa de características técnicas (placa do tipo) no interior do aparelho. Este aparelho está de acordo com as seguintes...