Tabla de contenido
Publicidad
Idiomas disponibles
Idiomas disponibles
Enlaces rápidos
Radio Controlled Clock
Funkwecker
GB
Operating Instructions
D
Bedienungsanleitung
F
Mode d'emploiw
E
Instrucciones de uso
RUS
I
Istruzioni per l'uso
NL
Gebruiksaanwijzing
GR
PL
Instrukcja obs ugi
00186319
00186320
00113966
00136296
"RC 550"
Használati útmutató
Návod k použití
Návod na použitie
Manual de instruções
Manual de utilizare
Bruksanvisning
Käyttöohje
H
CZ
SK
P
RO
S
FIN
BG
Publicidad
Tabla de contenido

Manuales relacionados para Hama RC 550


Resumen de contenidos para Hama RC 550
- Página 1 00186319 00186320 00113966 00136296 Radio Controlled Clock ”RC 550“ Funkwecker Operating Instructions Használati útmutató Bedienungsanleitung Návod k použití Mode d‘emploiw Návod na použitie Instrucciones de uso Manual de instruções Manual de utilizare Istruzioni per l‘uso Bruksanvisning Gebruiksaanwijzing Käyttöohje Instrukcja obs ugi...
- Página 2 RESET RCC CLOCK ALARM ALARM...
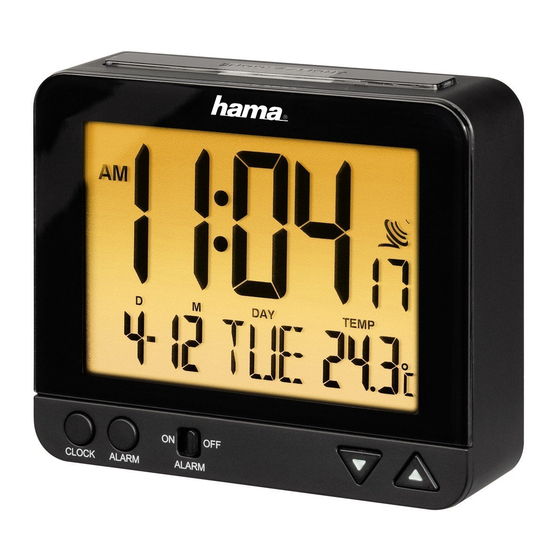
- Página 3 G Operating instruction Controls and Displays A Controls ON/ OFF slide switch = activates/ deactivates the twilight sensor Display 11. Battery compartment CLOCK button = sets the time ALARM button = displays alarm B Display icons time (approx. 5 seconds); used for Time setting alarm AM/PM (12-hour format)
- Página 4 2. Package Contents • RC 550 radio-controlled alarm clock • 2 AA batteries • These operating instructions 3. Safety Notes • The product is intended for private, non-commercial use only. • Protect the product from dirt, moisture and overheating, and only use it in a dry environment.
-
Página 5: Signal Strength
4. Getting Started • Open the battery compartment (11), insert two AA batteries with the correct polarity and close the battery compartment (11). • If nothing is shown on the LCD display after new batteries have been inserted, press the RESET button (8) with a pointed object to restart the device. 5. - Página 6 Display steady Successful - signal reception Not displayed Inactive – no signal reception Note – Time settings • If, during initial setup of the device, a DCF radio signal is not received within the rst few minutes, the search is aborted. The radio icon will go out. •...
- Página 7 • Set the following information in the order listed: • Year (B – 1) • Month (B – 4) • Day (B – 3) • 12/24 hour format (B – 1) • Hours Time (B – 1) • Minutes • Seconds (only zeros possible) •...
-
Página 8: Activating/Deactivating The Alarm
5.3. Alarm Setting the alarm time • Press and hold the ALARM button (3) for approx. 2 seconds until the hours display (B – 9) begins to ash. • Set the following information in the order listed: • Hours Alarm time (B – 9) •... -
Página 9: Replacing The Batteries
Note – Snooze function • While the alarm signal is sounding, press the SNOOZE/LIGHT button (7) to activate the snooze function. The alarm clock icon (B – 11) on the display (1) begins to ash. The alarm signal will be stopped for 5 minutes, after which it will sound again. - Página 10 7. Warranty Disclaimer Hama GmbH & Co KG assumes no liability and provides no warranty for damage resulting from improper installation/mounting, improper use of the product or from failure to observe the operating instructions and/or safety notes. 8. Technical Data RC 550 radio-controlled alarm clock 3.0 V...
- Página 11 D Bedienungsanleitung Bedienungselemente und Symbole A Bedienungselemente ON/ OFF-Schiebeschalter = Aktivierung/ Deaktivierung 1. Display Dämmerungssensor 2. CLOCK-Taste = Einstellung Uhrzeit 11. Batteriefach 3. ALARM-Taste = Anzeige Weckzeit (ca. 5 Sekunden) / Einstellung Wecker B Displaysymbole 4. ALARM ON/OFF-Schiebeschalter Uhrzeit = Aktivierung/ Deaktivierung Wecker AM/PM (12-Stunden-Format) -Taste = Verringerung des aktuellen Einstellungswerts...
-
Página 12: Sicherheitshinweise
2. Packungsinhalt • Funkwecker RC 550 • 2 AA Batterien • diese Bedienungsanleitung 3. Sicherheitshinweise • Das Produkt ist für den privaten, nicht-gewerblichen Haushaltsgebrauch vorgesehen. • Schützen Sie das Produkt vor Schmutz, Feuchtigkeit und Überhitzung und verwenden Sie es nur in trockenen Umgebungen. - Página 13 • Bewahren Sie Batterien außerhalb der Reichweite von Kindern auf. • Schließen Sie Akkus/Batterien nicht kurz und halten Sie sie von blanken Metallgegenständen fern. 4. Inbetriebnahme • Öffnen Sie das Batteriefach (11), legen Sie zwei AA Batterien polrichtig ein und schließen Sie das Batteriefach (11) wieder.
- Página 14 Anzeige Suche nach DCF-Signal Blinkende Anzeige Aktiv Dauerhafte Anzeige Erfolgreich – Signalempfang Keine Anzeige Inaktiv – Kein Signalempfang Hinweis – Uhrzeiteinstellung • Wird innerhalb der ersten Minuten während der Ersteinrichtung kein DCF- Funksignal empfangen, wird die Suche beendet. Das Funksymbol erlischt. •...
- Página 15 Hinweis – Sommerzeit • Die Uhrzeit stellt sich automatisch auf die Sommerzeit um. Solange die Sommerzeit aktiv ist, wird auf dem Display (B – 8) angezeigt. 5.2. Manuelle Einstellung Datum/ Uhrzeit • Drücken und halten Sie die CLOCK-Taste (2) für ca. 2 Sekunden, bis die Jahresanzeige zu blinken beginnt.
- Página 16 • Die Uhrzeit wird standardmäßig im 12-Stunden-Format angezeigt. Sobald Sie diese Anzeige auf das 24-Stunden-Format umstellen, erlischt das Symbol des Funksignals. Der Wecker sucht automatisch zum nächsten Zeitpunkt (meist nachts gegen 2:00/ 3:00 Uhr) erneut nach dem Funksignal. Bei erfolgreichem Empfang des Funksignals wird das Symbol wie gewohnt angezeigt.
- Página 17 Wecker beenden/ Schlummerfunktion • Ist der Wecker aktiviert, wird dieser zur entsprechenden Uhrzeit ausgelöst und es ertönt für eine Minute ein Wecksignal. Danach wird der Wecker automatisch beendet und am nächsten Tag zur eingestellten Weckzeit wieder ausgelöst. • Um den Wecker vorzeitig zu beenden, schieben Sie den ALARM ON/OFF- Schiebeschalter (4) nach rechts auf die Position OFF, bis die Fläche hinter dem Schiebeschalter schwarz ist.
-
Página 18: Konformitätserklärung
Sie keine aggressiven Reiniger. Achten Sie darauf, dass kein Wasser in das Produkt eindringt. 7. Haftungsausschluss Die Hama GmbH & Co KG übernimmt keinerlei Haftung oder Gewährleistung für Schäden, die aus unsachgemäßer Installation, Montage und unsachgemäßem Gebrauch des Produktes oder einer Nichtbeachtung der Bedienungsanleitung und/oder der Sicherheitshinweise resultieren. -
Página 19: Éléments De Commande Et D'affichage
F Mode d‘emploi Éléments de commande et d'affichage A Éléments de commande du signal radio / commutation entre °C et °F Écran 10. Sélecteur ON/ OFF = activation / Touche CLOCK = réglage de l‘heure désactivation du capteur de luminosité Touche ALARM = a chage de l’heure 11. - Página 20 2. Contenu de l‘emballage • Réveil radio-piloté RC 550 • 2 piles LR03 (AA) • Mode d‘emploi 3. Consignes de sécurité • Ce produit est destiné à une installation domestique non commerciale • Protégez le produit de toute saleté, humidité, surchauffe et utilisez-le uniquement dans des locaux secs •...
- Página 21 4. Mise en service • Ouvrez le compartiment à piles (11), Insérez deux piles LR03/AA conformément aux indications de polarité, puis refermez le compartiment (11). • Si, après l’insertion des piles, aucun a chage n’apparaît à l’écran, appuyez avec un objet pointu sur le bouton RESET (8) a n de provoquer un redémarrage du réveil.
- Página 22 Recherche aboutie - A chage permanent réception du signal Recherche inactive - Aucun a chage aucune réception de signal Remarque concernant le réglage de l‘heure • Le réveil interrompt la recherche en cas d'échec de réception du signal horaire DCF pendant la minute suivant la première con guration. Le symbole radio s'éteint.
- Página 23 5.2. Réglage manuel de la date / de l'heure • Appuyez sur la touche CLOCK (2) pendant env. 2 secondes jusqu’à ce que les chiffres de l’année se mettent à clignoter. • Vous pouvez régler successivement les valeurs suivantes : •...
- Página 24 5.3. Réveil Réglage de l‘heure de réveil • Appuyez sur la touche ALARM (3) pendant env. 2 secondes jusqu’à ce que les chiffres de l’heure (B – 9) se mettent à clignoter. • Vous pouvez régler successivement les valeurs suivantes : •...
-
Página 25: Remplacement Des Piles
Remarque concernant la fonction de répétition de l‘alarme • Appuyez sur la touche SNOOZE / LIGHT (7) pendant la sonnerie a n d'activer la fonction de répétition de l’alarme. Le symbole de réveil (B – 11) se met à clignoter à l’écran. La sonnerie s'interrompt pendant 5 minutes, puis retentit à... - Página 26 7. Exclusion de garantie La société Hama GmbH & Co KG décline toute responsabilité en cas de dommages provoqués par une installation, un montage ou une utilisation non conformes du produit ou encore provoqués par un non respect des consignes du mode d‘emploi et/ ou des consignes de sécurité.
- Página 27 E Instrucciones de uso Elementos de manejo e indicadores A Elementos de manejo radiofrecuencia/conmutación entre °C y °F 1. Pantalla 10. Interruptor corredizo ON/ OFF 2. Tecla CLOCK = Ajuste de la hora Activación/desactivación del sensor de 3. Tecla ALARM = Visualización de la atenuación hora programada para el despertador (5 11.
- Página 28 2. Contenido del paquete • Despertador por radiofrecuencia RC 550 • 2 pilas AA • Estas instrucciones de manejo 3. Instrucciones de seguridad • El producto es para el uso doméstico privado, no comercial. • Proteja el producto de la suciedad, la humedad y el sobrecalentamiento y utilícelo sólo en recintos secos.
-
Página 29: Ajuste Automático De La Fecha/Hora Según La Señal De Radiofrecuencia Dcf
4. Puesta en funcionamiento • Abra el compartimento para pilas (11), coloque dos pilas AA prestando atención a que la polaridad sea correcta y vuelva a cerrar el compartimento para pilas (11). • Si tras colocar una pila nueva no se visualiza nada en la pantalla LCD, pulse, con un objeto puntiagudo, el botón RESET (8) para reiniciar el dispositivo. - Página 30 Visualización del símbolo de Búsqueda de señal de radiofrecuencia radiofrecuencia DCF Parpadea Activa La búsqueda ha nalizado con Visualización permanente éxito, se recibe la señal Ninguna visualización Inactivo Nota – Ajuste de hora • Su durante el primer minuto del ajuste inicial no se recibe señal de radiofrecuencia DCFalguna, la búsqueda naliza.
-
Página 31: Ajuste Manual De Fecha/Hora
Nota – Horario de verano • La hora se ajusta automáticamente al horario de verano. Durante el horario de verano se muestra (B – 8) en la pantalla. 5.2. Ajuste manual de fecha/hora • Pulse y mantenga pulsada la tecla CLOCK (2) durante aprox. 2 segundos hasta que comience a parpadear la visualización del año. -
Página 32: Despertador
Nota – Formato de 12/24 horas • De manera estándar, la hora se muestra en formato de 12 horas. Si reajusta dicha visualización al formato de 24 horas, el símbolo de la señal de radiofrecuencia se apaga. El despertador vuelve a buscar automáticamente la señal de radiofrecuencia llegado el siguiente momento establecido para ello (generalmente en torno a las 2:00/3:00 de la madrugada). - Página 33 Apagar el despertador/función de repetición de alarma • Si el despertador está activado, se disparará a la hora correspondiente, sonando una señal durante un minuto. Seguidamente, la alarma del despertador naliza automáticamente, volviéndose a disparar al día siguiente, a la hora ajustada. •...
-
Página 34: Cambio De La Pila
7. Exclusión de responsabilidad Hama GmbH & Co KG no se responsabiliza ni concede garantía por los daños que surjan por una instalación, montaje o manejo incorrectos del producto o por la no observación de las instrucciones de manejo y/o de las instrucciones de seguridad. - Página 35 RCC = CLOCK = ON/ OFF = ALARM = ( . 5 ALARM ON/OFF AM/PM (12- SNOOZE / LIGHT / 10. AM/PM (12- RESET =...
- Página 36 • RC 550 • 2 • • • • • • • • • • • • • (+ -). • • • •...
- Página 37 • (11), (11). • RESET (8), • (6). 5.1. DCF. • DCF. •...
- Página 38 • • • DCF, • • RCC (9), • 6 - 12 • RCC (9) • RCC (9).
- Página 39 • (B – 8). 5.2. • CLOCK (2) , • • (B – 1) • (B – 4) • (B – 3) • 12/24 - • (B – 1) • • «00») • (B – 5) • (6), CLOCK (2). •...
- Página 40 12/24- • 2:00 3:00). • 5.3. • (3) , (B – 9). • • (B – 9) • • (6), ALARM (3) • • ALARM (3). • ALARM ON/OFF (4) (B – 11). • ALARM ON/OFF (4) OFF. (B – 11)
- Página 41 • • ALARM ON/ OFF (4) OFF, ALARM ON/ OFF (4) n ON, • SNOOZE / LIGHT (7), (B – 11). • 5.4. • RCC (9), (B – 6) (°C °F). 5.5. • SNOOZE / LIGHT (7), (1). • (7), (1).
- Página 42 . 4. • Hama GmbH & Co KG RC 550 3,0 , 2 0°C – +45°C, 32°F – 113°F Hama GmbH & Co KG [00186319, 00186320, 00113966, 00136296] 2014/53/ . www.hama.com -> 00186319, 00186320, 00113966, 00136296 -> Downloads. 77,5 kHz...
- Página 43 I Istruzioni per l‘uso A Elementi di comando Interruttore scorrevole ON/OFF = attivazione / disattivazione sensore Display crepuscolare Tasto CLOCK = impostazione dell’ora 11. Vano batterie Tasto ALARM = indicazione ora sveglia (ca. 5 secondi) / regolazione B Simboli sul display sveglia Interruttore scorrevole ALARM ON/ AM/PM (formato da 12 ore)
- Página 44 2. Contenuto della confezione • Sveglia con segnale orario via radio RC 550 • 2 batterie AA • Queste istruzioni per l’uso 3. Indicazioni di sicurezza • Il prodotto è concepito per l’uso domestico privato, non commerciale. • Proteggere il prodotto da sporcizia, umidità e surriscaldamento e utilizzarlo solo in ambienti asciutti.
- Página 45 4. Messa in esercizio • Aprire il vano batterie (11), introdurre due batterie AAA osservandone la giusta polarità e richiudere il vano batterie (11). • Se dopo aver inserito una nuova batteria non appare nulla sul display LCD, premere con un oggetto appuntito il pulsante RESET (8) per generare un riavvio. 5.
- Página 46 Ricerca riuscita - il segnale Indicazione ssa viene ricevuto Nessuna indicazione Non attivo Nota – Impostazione dell'ora • La ricerca viene terminata se non si riceve un segnale radio DCF. Il simbolo della radio si spegne. • In caso di disturbi di ricezione, si consiglia di lasciare accesa la radio tutta la notte, poiché, in linea di massima, i segnali di disturbo di notte sono minori.
- Página 47 • Impostare in sequenza le seguenti informazioni: • Anno (B – 1) • Mese (B – 4) • Giorno (B – 3) • Formato 12/24 ore (B – 1) • Ore Ora (B – 1) • Minuti • Secondi (possibili solo gli zeri) •...
- Página 48 5.3. Sveglia Impostazione ora sveglia • Tenere premuto il tasto ALARM (3) per ca. 2 secondi nché non inizia a lampeggiare l’indicazione dell’ora (B – 9). • Impostare in sequenza le seguenti informazioni: • Ore Ora sveglia (B – 9) •...
-
Página 49: Sostituzione Della Batteria
Nota – Funzione snooze • Quando suona la sveglia, premere il tasto SNOOZE / LIGHT (7) per attivare la funzione snooze. Il simbolo della sveglia (B – 11) sul display (1) inizia a lampeggiare. La sveglia viene disattivata per 5 minuti, quindi suona nuovamente. •... - Página 50 7. Esclusione di garanzia Hama GmbH & Co KG non si assume alcuna responsabilità per i danni derivati dal montaggio o l‘utilizzo scorretto del prodotto, nonché dalla mancata osservanza delle istruzioni per l‘uso e/o delle indicazioni di sicurezza. 8. Dati tecnici...
- Página 51 Wordt gebruikt voor veiligheidsinstructies of om de aandacht te trekken op bijzondere gevaren en risico‘s. Aanwijzing Wordt gebruikt voor extra informatie of belangrijke informatie. 2. Inhoud van de verpakking • Radiogra sch gestuurde wekker RC 550 • 2 AA batterijen • deze bedieningsinstructies...
-
Página 52: Veiligheidsinstructies
3. Veiligheidsinstructies • Het product is bedoeld voor niet-commercieel privegebruik in huiselijke kring. • Bescherm het product tegen vuil, vocht en oververhitting en gebruik het alleen in droge omgevingen. • Gebruik het product niet binnen omgevingen, waarin elektronische apparatuur niet is toegestaan. - Página 53 • Indien na het plaatsen van nieuwe batterijen niets op de LCD-display wordt weergegeven, druk dan met een spits voorwerp op de RESET-knop (8), teneinde een nieuwe start in werking te stellen. 5. Gebruik en werking Aanwijzing – invoeren • Houd de -toets (5) of de -toets (6) ingedrukt teneinde de waarden sneller te kunnen selecteren.
- Página 54 Succesvol – Continu brandende indicator signaal wordt ontvangen Geen indicator Inactief – geen signaalontvangst Aanwijzing – instellen van de tijd • Word binnen de eerste minuten tijdens de eerste inbedrijfstelling geen DCF- radiogra sch tijdsignaal ontvangen, dan wordt het zoeken beëindigd. Het zendsymbool gaat uit.
- Página 55 5.2. Handmatige instelling datum/ tijd • Houd de CLOCK-toets (2) gedurende ca. 2 seconden ingedrukt totdat de jaarweergave begint te knipperen. • Stel de volgende informatie achter elkaar in: • Jaar (B – 1) • Maand (B – 4) • Dag (B – 3) •...
- Página 56 5.3. Wekker Instellen van de wektijd • Houd de ALARM-toets (3) gedurende ca. 2 seconden ingedrukt totdat de urenweergave (B – 9) begint te knipperen. • Stel de volgende informatie achter elkaar in: • Wektijd Wektijd (B - 9) • Minuten •...
-
Página 57: Batterijen Vervangen
Aanwijzing – snooze-functie • Druk tijdens het weksignaal op de SNOOZE / LIGHT-toets (7) teneinde de snooze-functie te activeren. Op de display (1) begint het wekkersymbool (B – 11) te knipperen. Het weksignaal wordt gedurende 5 minuten onderbroken en dan opnieuw in werking gesteld. - Página 58 Temperatuur 32°F – 113°F 9. Conformiteitsverklaring Hierbij verklaar ik, Hama GmbH & Co KG, dat het type radioapparatuur [00186319, 00186320, 00113966, 00136296] conform is met Richtlijn 2014/53/EU. De volledige tekst van de EU-conformiteitsverklaring kan worden geraadpleegd op het volgende internetadres: www.hama.com ->...
- Página 59 °C °F Πλήκτρο CLOCK = ON/ OFF = Πλήκτρο ALARM = ALARM ON/OFF = . ./ . . (12 SNOOZE / LIGHT . ./ . . RESET = RCC =...
- Página 60 • RC 550 • 2 • • • • • • • • • • • • • • • •...
- Página 61 • • (11), (11). • RESET (8), – • 5.1. • DCF. •...
- Página 62 • • • • DCF. • RCC (9) DCF. • 6 – 12 • RCC (9) • RCC (9)
- Página 63 – • (B – 8). 5.2. • CLOCK (2) • • (B – 1) • (B – 4) • (B – 3) • 12/24 • (B–1) • • • (B – 5) • CLOCK (2). • CLOCK (2) • – •...
- Página 64 • , WLAN 5.3. • ALARM (3) (B – 9). • • (B–9) • • ALARM (3). • • ALARM (3), • (4) ALARM ON/OFF (4) (B – 11). ALARM ON/OFF (4) (B – 11) (1). • • ALARM ON/OFF (4)
- Página 65 ALARM ON/OFF(4) • SNOOZE / LIGHT (7) (B – 11) • 5.4. • (B – 6) °C °F. 5.5. • SNOOZE / LIGHT (7), • (7), (1). (1). • ON/ OFF (10) ON OFF, (7). – • • 5.6.
- Página 66 • Hama GmbH & Co KG RC 550 3,0 V, 2 x 0°C – +45°C, 32°F – 113°F / Hama GmbH & Co KG, [00186319, 00186320, 00113966, 00136296] 2014/53/ . www.hama.com -> 00186319, 00186320, 00113966, 00136296 -> Downloads. 77,5 kHz...
- Página 67 P Instrukcja obs ugi A Elementy obs ugi Przycisk RCC = w czanie/ wy czanie r cznego odbioru sygna u radiowego Wy wietlacz / zmiana mi dzy °C i °Fh Przycisk CLOCK = ustawianie ON/ OFF 10. Prze cznik suwakowy godziny = w czanie / wy czanie czujnika Przycisk ALARM = wy wietlanie...
- Página 68 2. Zawarto opakowania • Budzik radiowy RC 550 • 2 baterie AA • niniejsza instrukcja obs ugi 3. Wskazówki bezpiecze stwa • Produkt jest przeznaczony do prywatnego, niekomercyjnego u ytku domowego. • Chroni produkt przed zanieczyszczeniem, wilgoci i przegrzaniem oraz stosowa go tylko w suchym otoczeniu.
- Página 69 4. Uruchamianie • Otworzy schowek na baterie (11), w o y dwie baterie AA, zwracaj c uwag na w a ciw biegunowo i ponownie zamkn schowek na baterie (11). • Je eli po w o eniu nowych baterii na ekranie LCD nie pojawi si aden komunikat, nacisn za pomoc spiczastego przedmiotu przycisk RESET (8), aby wykona restart.
- Página 70 Proces powiód si - Sta y wska nik sygna jest odbierany Proces nie powiód si – Brak wska nika wstrzymane wyszukiwanie sygna u Wskazówka – ustawianie zegara • Je eli w trakcie pierwszych minut podczas pierwszej kon guracji nie zostanie odebrany sygna radiowy DCF , wyszukiwanie zostanie zako czone.
- Página 71 • Po kolei ustawi nast puj ce informacje: • Rok • Miesi c (B-4) • Dzie (B-3) • Format 12/24-godzinny • Godziny Godzina (B-1) • Minuty • Sekundy (tylko zera mo liwe) • J zyk, dzie tygodnia (B-5) • Aby wybra poszczególne warto ci, nacisn przycisk (5) lub (6) i potwierdzi wybór przyciskiem CLOCK (2).
- Página 72 5.3. Budzik Ustawianie czasu budzenia • Nacisn i trzyma wci ni ty przez ok. 2 sekundy przycisk ALARM (3), a zacznie miga wska nik godzin (B - 9). • Po kolei ustawi nast puj ce informacje: • Godziny Czas budzenia (B - 9) •...
-
Página 73: Wymiana Baterii
Wskazówka – funkcja drzemki • W trakcie sygna u alarmowego nacisn przycisk SNOOZE / LIGHT (7), aby w czy funkcj drzemki. Na ekranie (1) zaczyna miga symbol budzika (B – 11). Sygna budzika jest przerywany na 5 minut, a nast pnie ponownie wyzwalany. •... - Página 74 7. Wy czenie odpowiedzialno ci Hama GmbH & Co KG nie udziela gwarancji ani nie odpowiada za szkody wskutek niew a ciwej instalacji, monta u oraz nieprawid owego stosowania produktu lub nieprzestrzegania instrukcji obs ugi i/lub wskazówek bezpiecze stwa. 8. Dane techniczne...
- Página 75 H Használati útmutató A Kezel elemek vételének be- és kikapcsolása/váltás °C és °F között Kijelz ON/OFF tolókapcsoló = Az CLOCK gomb = Az id pont Szürkületi érzékel aktiválása/ beállítása kikapcsolása ALARM gomb = ébresztési id 11. Elemtartó kijelzése (kb. 5 másodperc)/ Ébreszt beállítása B Kijelz ikonok ALARM ON/OFF tolókapcsoló...
- Página 76 2. A csomag tartalma • Rádióvezérlés ébreszt óra RC 550 • 2 x AA elem • ez a kezelési útmutató 3. Biztonsági el írások • A termék a magánháztartási, nem üzleti célú alkalmazásra készül. • Óvja meg a terméket szennyez dést l, nedvességt l és túlmelegedést l, és kizárólag zárt környezetben használja.
- Página 77 4. Üzembe vétel • Nyissa ki az elemtartót (11), helyezzen bele két AAA elemet a megfelel irányban, majd zárja be az elemtartót (11). • Amennyiben a behelyezés után az LCD kijelz n nem jelenik meg egy új elem, egy hegyes vég tárggyal a RESET gombot (8) megnyomva indítsa újra a rendszert. 5.
-
Página 78: Dátum / Pontos Id Manuális Beállítása
Nincs kijelzés Inaktív Hivatkozás – A pontos id beállítása • Ha az els bekapcsolás során az els pár percben a készülék nem talál DCF- rádiójelet, a keresés befejez dik. A rádió szimbólum (6) kialszik. • Vételzavar esetén ajánlatos az órát egy éjszakára állva hagyni, mert olyankor a zavaró... - Página 79 • 12/24 órás formátum (B – 1) • óra Id pont (B-1) • erc • Másodperc (csak nullákat adhat meg) • Nyelv A hét napja (B – 5) • Az egyes értékek kiválasztásához nyomja meg a -gombot (5) vagy a -gombot (6), és er sítse meg az adott kiválasztást a CLOCK gomb (2) megnyomásával.
- Página 80 • Adja meg egymás után a következ információkat: • Óra Ébresztési id (B-9) • Perc -gombot (6) vagy a -gombot • Az egyes értékek kiválasztásához nyomja meg a (6), és er sítse meg az adott kiválasztást az ALARM gomb (3) megnyomásával. •...
- Página 81 Ügyeljen arra, hogy ne jusson be víz a termékbe. 7. Szavatosság kizárása A Hama GmbH & Co KG semmilyen felel sséget vagy szavatosságot nem vállal a termék szakszer tlen telepítéséb l, szereléséb l és szakszer tlen használatából, vagy a kezelési útmutató és/vagy a biztonsági el írások be nem tartásából ered károkért.
-
Página 82: Megfelel Ségi Nyilatkozat
H mérséklet 32°F – 113°F 9. Megfelel ségi nyilatkozat Hama GmbH & Co KG igazolja, hogy a [00186319, 00186320, 00113966, 00136296] típusú rádióberendezés megfelel a 2014/53/EU irányelvnek. Az EU-megfelel ségi nyilatkozat teljes szövege elérhet a következ internetes címen: www.hama.com -> 00186319, 00186320, 00113966, 00136296 ->... - Página 83 Tento symbol ozna uje bezpe nostní upozorn ní, které poukazuje na ur itá rizika a nebezpe í. Poznámka Tento symbol ozna uje dodate né informace nebo d ležité poznámky. 2. Obsah balení • Rádiový budík RC 550 • 2 ks. baterie typu AA • Tento návod k použití...
- Página 84 3. Bezpe nostní pokyny • Výrobek je ur en k nekomer nímu použití v domácnosti. • Výrobek chra te p ed zne išt ním. Nepoužívejte ve vlhkém prost edí a zabra te styku s vodou. Používejte pouze v suchých prostorách. •...
- Página 85 5. Provoz Poznámka – zadání • Pro rychlejší zvolení hodnot držte stisknuto tla ítko - (5) nebo tla ítko - (6). 5.1. Automatické nastavení data/ asu podle signálu DCF • Po vložení baterie se zapne displej, zazní akustický signál a budík za ne automaticky hledat rádiový...
- Página 86 Poznámka – nastavení asu • Pokud b hem prvních minut b hem prvního nastavení nedojde k p íjmu rádiového signálu DCF, vyhledávání se ukon í. Rádiový symbol zhasne. • V p ípad poruchy p íjmu doporu ujeme nechat hodiny p es noc ustálit, protože nyní...
- Página 87 • Postupn nastavte tyto informace: • rok (B – 1) • m síc (B – 4) • den (B – 3) • 12/24hodinový formát (B – 1) • hodiny as (B – 1) • minuty • Sekundy (možné jen nuly) •...
- Página 88 • Postupn nastavte tyto informace: • Hodiny Doba buzení (B–9) • Minuty • Pro výb r jednotlivých hodnot stiskn te tla ítko (5) nebo tla ítko (6) a každý výb r potvr te stisknutím tla ítka ALARM (3). • Pokud po dobu 30 sekund neprob hne žádné zadání, režim nastavení se automaticky zav e a provedené...
- Página 89 Dbejte na to, aby se do výrobku nedostala voda. 7. Vylou ení záruky Hama GmbH & Co KG nep ebírá žádnou odpov dnost nebo záruku za škody vzniklé neodbornou instalací, montáží nebo neodborným použitím výrobku nebo nedodržováním návodu k použití a/nebo bezpe nostních pokyn .
- Página 90 32 °F – 113 °F 9. Megfelel ségi nyilatkozat Tímto Hama GmbH & Co KG prohlašuje, že typ rádiového za ízení [00186319, 00186320, 00113966, 00136296] je v souladu se sm rnicí 2014/53/EU. Úplné zn ní EU prohlášení o shod je k dispozici na této internetové...
- Página 91 1. Vysvetlenie výstražných symbolov a upozornení Upozornenie Tento symbol ozna uje bezpe nostné upozornenie, ktoré poukazuje na ur ité riziká a nebezpe enstva. Poznámka Tento symbol ozna uje dodato né informácie, alebo dôležité poznámky. 2. Obsah balenia • Budík riadený rádiovým signálom RC 550...
- Página 92 • 2 AA batérie • Tento návod na použitie 3. Bezpe nostné upozornenia • Výrobok je ur ený na nekomer né použitie v domácnosti. • Výrobok chrá te pred zne istením. Nepoužívajte vo vlhkom prostredí a zabrá te styku s vodou. Používajte iba v suchých priestoroch. •...
- Página 93 • Ak sa po vložení novej batérie nezobrazia na LCD displeji žiadne údaje, stla te pomocou ostrého predmetu tla idlo RESET (8) na opätovné spustenie zariadenia. 5. Prevádzka Poznámka – zadávanie hodnôt • Podržte stla ené tla idlo (5) alebo tla idlo (6), umožní...
- Página 94 Poznámka – nastavenie asu • Ak po as prvých minút v priebehu prvého nastavenia nebude prijatý žiadny rádiový signál DCF, ukon í sa vyh adávanie. Symbol rádiového spojenia zhasne. • Pri problémoch s príjmom signálu odporú ame necha hodiny cez noc ustáli ,, pretože v tomto ase sú...
- Página 95 • Nastavte po sebe nasledujúce informácie: • Rok (B – 1) • Mesiac (B – 4) • De (B – 3) • 12/24-hodinový formát asu (B – 1) • Hodiny as (B – 1) • Minúty • Sekundy (je možné nastavi len nuly) •...
-
Página 96: Aktivácia/Deaktivácia Budíka
• Nastavte postupne nasledujúce informácie: • Hodiny as budenia (B – 9) • Minúty • Na zvolenie jednotlivých hodnôt stla te tla idlo (5) alebo tla idlo (6) a príslušnú vo bu potvr te stla ením tla idla ALARM (3). •... -
Página 97: Výmena Batérií
žiadne agresívne istiace prostriedky. Dbajte na to, aby do výrobku nevnikla voda. 7. Vylú enie záruky Firma Hama GmbH & Co KG neru í/nezodpovedá za škody vyplývajúce z neodbornej inštalácie, montáže alebo neodborného používania výrobku alebo z nerešpektovania návodu na používanie a/alebo bezpe nostných pokynov. - Página 98 32 °F – 113 °F 9. Vyhlásenie o zhode Hama GmbH & Co KG týmto vyhlasuje, že rádiové zariadenie typu [00186319, 00186320, 00113966, 00136296] je v súlade so smernicou 2014/53/EÚ. Úplné EÚ vyhlásenie o zhode je k dispozícii na tejto internetovej adrese: www.hama.com ->...
- Página 99 O Manual de instruções A Elementos de comando e indicadores 9. Botão RCC = ativação/desativação da captação 1. Visor manual do sinal de rádio/mudança 2. Botão CLOCK = de nição da hora entre °C e °F 3. Botão ALARM = indicação da hora de 10.
- Página 100 2. Conteúdo da embalagem • Rádio despertador RC 550 • 2 pilhas AA • Estas instruções de utilização 3. Indicações de segurança • O produto está previsto apenas para utilização doméstica e não comercial. • Proteja o produto contra sujidade, humidade e sobreaquecimento e utilize-o somente em ambientes secos.
- Página 101 4. Colocação em funcionamento • Abra o compartimento das pilhas (11), insira duas pilhas AAA com a polaridade correta e volte a fechar o compartimento das pilhas (11). • Se, após a colocação de pilhas novas, o visor LCD não apresentar nada, prima o botão RESET (8) com um objeto pontiagudo para executar uma reinicialização.
- Página 102 Efetuada com sucesso – Indicação permanentemente acesa o sinal é captado Sem indicação Falhou – procura de sinal suspensa Nota – De nição da hora • Se, dentro dos primeiros minutos aquando da con guração inicial, não for recebido qualquer sinal de rádio DCF, a procura é terminada. O símbolo de rádio apaga-se.
- Página 103 5.2. Definição manual da data/hora • Prima e mantenha o botão CLOCK (2) premido durante cerca de 2 segundos até que a indicação do ano comece a piscar. • De na as seguintes informações pela ordem indicada: • ano (B – 1) •...
- Página 104 5.3. Despertador Definição da hora de despertar • Prima e mantenha o botão ALARM (3) premido durante cerca de 2 segundos até que a indicação da hora (B – 9) comece a piscar. • De na as seguintes informações pela ordem indicada: •...
-
Página 105: Substituição Das Pilhas
Nota – Função snooze • Enquanto o sinal de despertar estiver a tocar, prima o botão SNOOZE / LIGHT (7) para ativar a função snooze. No visor, o símbolo (B – 11) começa a piscar. O sinal de despertar é interrompido durante 5 minutos e depois volta a ser acionado. - Página 106 7. Exclusão de garantia A Hama GmbH & Co KG não assume qualquer responsabilidade ou garantia por danos provocados pela instalação, montagem ou manuseamento incorrectos do produto e não observação do das instruções de utilização e/ou das informações de segurança.
-
Página 107: M Manual De Utilizare
M Manual de utilizare A Elemente de deservire Tasta RCC = Activare / Dezactivare recep ie Display manual a semnalului radio / Tasta CLOCK alternan între °C i °F = Setare or exact Tasta glisant ON / OFF Tasta ALARM = Aktivierung/ Deaktivierung = A aj or de teptare (cca 5 Dämmerungssensor... - Página 108 2. Con inutul pachetului • ceas de tept tor radio comandat RC 550 • 2 baterii AA • acest manual de utilizare 3. Instruc iuni de siguran • Produsul este conceput numai pentru utilizare privat i nu profesional . • Proteja i produsul de impurit i, umiditate, supraînc lzire i utiliza i-l numai în mediu uscat.
- Página 109 4. Punere în func iune • Deschide i (11) compartimentul bateriilor, introduce i dou baterii AA cu polaritatea corect i închide i (11) compartimentul bateriilor. • Dac dup introducerea unei noi baterii nu se a eaz nimic pe display-ul LCD, ap sa i cu un obiect ascu it butonul (8) RESET pentru generarea unui nou start.
- Página 110 C utare reu it – A are permanent se recep ioneaz semnal C utare e uat – c utarea semnalului a icio a are fost oprit Instruc iune – Setare ora exact • Dac în cursul primelor minute pe parcursul primei regl ri nu se recep ioneaz nici un semnal radio DCF, c utarea se întrerupe.
- Página 111 5.2. Setare manual dat / Or exact • Ap sa i cca 2 secunde tasta (2) CLOCK pân când a ajul anului începe s lumineze intermitent. • Seta i urm toarele informa ii succesiv: • An (B – 1) • Lun (B – 4) •...
-
Página 112: Ceas De Tept Tor
5.3. Ceas de tept tor Setare or de teptare • Ap sa i cca 2 secunde tasta (3) ALARM pân când a ajul ore (B - 9) începe s lumineze intermitent. • Seta i succesiv urm toarele informa ii: • Ore Or de de teptare (B - 9) •... -
Página 113: Înlocuirea Bateriilor
Instruc iune – Func ie de repetare a de tept rii • Pentru activarea func iei de repetare a de tept rii, în timpul semnalului acustic ap sa i tasta (7) SNOOZE / LIGHT. Pe display încep s lumineze intermitent simbolurile de tept torului (B –... - Página 114 7. Excludere de garan ie Hama GmbH & Co KG nu î i asum nici o r spundere sau garan ie pentru pagube cauzate de montarea, instalarea sau folosirea necorespunz toare a produsului sau nerespectarea instruc iunilor de folosire sau/ i a instruc iunilor de siguran .
- Página 115 °C och °F 1. Förklaring av varningssymboler och hänvisningar Varning Används för att markera säkerhetshänvisningar eller för att rikta uppmärksamheten mot speciella faror och risker. Hänvisning Används för att markera ytterligare information eller viktiga hänvisningar. 2. Förpackningsinnehåll • Radiostyrd väckarklocka RC 550...
- Página 116 • 2 AA-batterier • Denna bruksanvisning 3. Säkerhetsanvisningar • Produkten är avsedd för privat hemanvändning, inte yrkesmässig användning. • Skydda produkten mot smuts, fukt och överhettning och använd den bara i inomhusmiljöer. • Använd inte produkten inom områden där elektroniska apparater inte är tillåtna. •...
- Página 117 • Om det inte visas något mer på LCD-displayen när man har satt in ett nytt batteri ska man, med hjälp av ett spetsigt föremål, trycka på RESET-knappen (8) för att aktivera omstart. 5. Användning Hänvisning – Eingabe • Håll -knappen (5) eller -knappen (6) intryckt för att kunna välja värdena snabbare.
- Página 118 Hänvisning – Inställning av tid • Om ingen DCF-radiosignal tas emot under de första minuterna avslutas sökningen. Radiosymbolen slocknar. • Vid störningar i mottagningen rekommenderas att låta klockan stå över natten eftersom störningssignalerna i normalfallet är lägre då. • Istället kan en manuell sökning efter DCF-radiosignalen startas på en annan uppställningsplats, eller ställa in tid och datum manuellt.
- Página 119 • Ställ i tur och ordning in följande uppgifter: • år (B – 1) • månad (B – 4) • dag (B – 3) • 12/24-timmars format (B – 1) • timmar Tid (B-1) • minuter • Sekunder (endast nollor) •...
- Página 120 • Ställ i tur och ordning in de nedanstående uppgifterna: • Timmar Väckningstid (B-9) • Minuter • Tryck på -knappen (5) eller -knappen (6) för att välja enskilda värden och bekräfta respektive val genom att trycka på ALARM-knappen (3). • Om det inte sker någon inmatning på 30 sekunder lämnar enheten automatiskt inställningsläget och de gjorda inställningarna sparas.
- Página 121 Var noga med att det inte tränger in vatten i produkten. 7. Garantifriskrivning Hama GmbH & Co KG övertar ingen form av ansvar eller garanti för skador som beror på olämplig installation, montering och olämplig produktanvändning eller på att bruksanvisningen och/eller säkerhetshänvisningarna inte följs.
- Página 122 0°C – +45°C Temperatur 32°F – 113°F 9. Försäkran om överensstämmelse Härmed försäkrar Hama GmbH & Co KG, att denna typ av radioutrustning [00186319, 00186320, 00113966, 00136296] överensstämmer med direktiv 2014/53/EU. Den fullständiga texten till EU-försäkran om överensstämmelse nns på följande webbadress: www.hama.com ->...
- Página 123 RCC-painike = manuaalisen 12. Herätyskellon näyttösymboli radiosignaalin vastaanoton aktivointi/ 1. Varoitusten ja ohjeiden selitykset Varoitus Käytetään turvaohjeiden merkitsemiseen ja huomion kiinnittämiseen erityisiin vaaroihin ja riskeihin. Ohje Käytetään lisätietojen tai tärkeiden ohjeiden merkitsemiseen 2. Pakkauksen sisältö • Radioherätyskello RC 550 • 2 AA-paristoa...
- Página 124 • Tämä käyttöohje 3. Turvaohjeet • Tuote on tarkoitettu yksityiseen, ei-kaupalliseen kotikäyttöön. • Suojaa tuote lialta, kosteudelta ja ylikuumenemiselta ja käytä tuotetta vain kuivassa ympäristössä. • Älä käytä tuotetta alueilla, joilla elektroniikkalaitteet eivät ole sallittuja. • Älä sijoita tuotetta häiriökenttien lähelle, metallikehykset, tietokoneet ja televisiot yms.
- Página 125 5. Käyttö Ohje – syöttö • Pidä - painiketta (5) tai -painiketta (6) painettuna voidaksesi valita arvot nopeammin. 5.1. Päivämäärän/kellonajan automaattinen asetusten teko DCF-signaalin mukaan • Näyttö kytketään päälle pariston sisäänasettamisen jälkeen. Laitteesta kuuluu akustinen signaali ja herätyskello alkaa hakemaan DCG-signaalia automaattisesti. Radioaaltosymboli syttyy palamaan haun aikana.
- Página 126 Ohje – Kellonaika-asetus • Mikäli DCF-signaalia ei vastaanoteta ensiasetusten ensimmäisten minuuttien aikana, haku lopetetaan. Radioaaltosymboli sammuu. • Mikäli vastaanotossa esiintyy häiriöitä, on suositeltavaa antaa kellon seistä yön yli, sillä häiriösignaalit ovat silloin yleensä heikompia. • Voit käynnistää sillä aikaa DCF-signaalin manuaalisen haun toisessa pystytyspaikassa tai tehdä...
- Página 127 • Aseta seuraavat tiedot peräkkäin: • vuosi (B – 1) • kuukaus (B – 4) • päivä (B – 3) • 12/24 tunnin formaatti (B – 1) • minuutit Kellonaika (B-1) • tunnit • Sekunnit (vain nollaus mahdollinen) • Viikonpäivän kieli (B – 5) •...
- Página 128 5.3. Herätyskello Herätysajan asetukset • Paina ja pidä ALARM-painiketta (3) painettuna n. kaksi sekuntia, kunnes tuntinäyttö (B - 9) alkaa vilkkua. • Aseta seuraavat tiedot peräkkäin: • Tunnit Herätysaika (B-9) • Minuutit • Paina yksittäisten arvojen valitsemiseksi -painiketta (5) tai -painiketta (6) ja vahvista valinta painamalla ALARM-painiketta (3).
-
Página 129: Paristojen Vaihto
Ohje – Torkkutoiminto • Paina herätyssignaalin aikana SNOOZE / LIGHT-painiketta (7) torkkutoiminnon aktivoimiseksi. Näytössä alkaa vilkkumaan (B – 11) . Herätyssignaali keskeytetään kahdeksaksi minuutiksi, minkä jälkeen herätyssignaali laukaistaan uudelleen. • Torkkutoiminnon voi laukaista neljä kertaa peräkkäin. 5.4. Lämpötilan näyttö • Paina RCC-painiketta (9) vaihtaaksesi lämpötilanäyttöä (B - 6) arvojen °C ja °F välillä. 5.5. -
Página 130: Vaatimustenmukaisuusvakuutus
7. Vastuun rajoitus Hama GmbH & Co KG ei vastaa millään tavalla vahingoista, jotka johtuvat epäasianmukaisesta asennuksesta tai tuotteen käytöstä tai käyttöohjeen ja/tai turvaohjeiden vastaisesta toiminnasta. 8. Tekniset tiedot Radioherätyskello RC 550 3,0 V Virransyöttö 2 AA-paristoa Mittausalue 0°C – +45°C Lämpötila... - Página 131 °C °F CLOCK = OFF = ALARM = ALARM ON/OFF = AM/PM (12- SNOOZE/LIGHT / 10. AM/PM (12- RESET = „ “ RCC = „ “...
- Página 132 • RC 550 • 2 • • • • • • • • • • • • • • • • •...
- Página 133 • (11), (11). • RESET (8), – • (6), 5.1. • „ “ • Kun radiosignaali vastaanotetaan, päivämäärä ja kellonaika asetetaan automaattisesti. „ “...
- Página 134 “ „ – – • „ “ • • • • RCC (9) – • 6-12 • RCC (9) • RCC (9)
- Página 135 – • (B – 8). 5.2. • CLOCK (2) • • (B – 1) • (B – 4) • (B – 3) • 12/24- (B – 1) • (B-1) • • • (B – 5) • – (6) CLOCK (2), •...
- Página 136 • , WLAN . .). 5.3. • ALARM (3) (B – 9) • • (B-9) • • ALARM (3). • • ALARM (3), • ALARM ON/OFF (4) „ “ (B – 11). • ALARM ON/OFF (4) OFF, „ “ (B – 11) „...
- Página 137 • ALARM ON/OFF (4) – „ “ • SNOOZE / LIGHT (7), „ “. (B – 11). • „ “ 5.4. • RCC (9), (B – 6) °C °F. 5.5. • SNOOZE/LIGHT (7), • (7), (1). • (1). • ON/OFF (10) OFF, (7).
- Página 138 • & RC 550 3,0 V AA Batterie 0°C – +45°C 32°F – 113°F Hama GmbH & Co KG [00186319, 00186320, 00113966, 00136296] 2014/53/ . www.hama.com -> 00186319, 00186320, 00113966, 00136296 -> Downloads. 77,5 kHz...
-
Página 139: Service & Support
Hama GmbH & Co KG 86652 Monheim / Germany Service & Support www.hama.com +49 9091 502-115 www.hama.com/nep All listed brands are trademarks of the corresponding companies. Errors and omissions excepted, and subject to technical changes. Our general terms of delivery and payment are applied.