Tabla de contenido

Manuales relacionados para Hisense RB338N4AG2


Resumen de contenidos para Hisense RB338N4AG2
- Página 2 Dieses Gerät entspricht den folgenden EU-Richtlinien: 2014/35/EU und 2014/30/EU und 2009/125/EC und (EC) No 643/2009 2011/65/EU...
- Página 13 Vorsicht! Quetschen Sie bitte die Türablage von zwei Seiten zur Mitte und Innenseite der Türablage, und dann bewegen Sie sie beim Herausnehmen nach oben. 2. Nehmen Sie die rechte obere Scharnierabdeckung ① auf der Linker Türstopper Linke Scharnierabdeckung Oberseite des Schrankes aus. Entfernen Sie die 3 Schrauben ②, die zur Befestigung des rechten oberen Scharnierteils verwendet...
- Página 14 der linken Seite mit Schraube 3. Lösen Sie die Scharnieachse ④ ③. Halten Sie das Teil ① mit mit Schraubenschlüssel und dem Gerät für zukünftige ändern Sie sie zur umgekehrten Referenzzwecke. Lochseite, und dann ziehen Sie sie fest. Nehmen Sie die Dichtung ⑤ ab und ändern Sie sie zur ①...
- Página 15 ⑤ auf dem unteren ①Türstopper ②Anschlagblock Scharnierbolzen . ③Schneidschraube 12. Entfernen Sie das Teil ③ aus dem Teil②ab, lösen Sie dann die Schrauben④, und schrauben Sie ① ② ③ das Teil ③ auf der umgekehrten Lochstelle an . ② ③ ④...
- Página 16 16. Montieren Sie die gelieferte linke Scharnierabdeckung (im Plastikbeutel), um auf das Scharnier zu passen. Installieren Hinweis: Die Scheibe Sie die Türregale und den kann auf der unteren Tür Scheibe kleben. Wassertank in die ursprüngliche Position. Halten Sie die rechte 15.
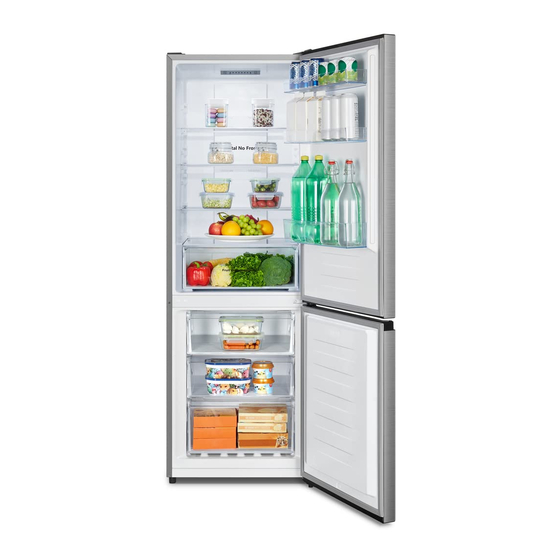
- Página 17 Geräteansicht 1 1. Obere Scharnierabdeckung 2.Teil des Bedienfelds 3.Glasregal 4. Gemüsefachabdeckung 5.Obst- und Gemüsefach 6. Eiswürfelschale 7. Gefriertablett 8. Oberes Glasregal 9. Oberes Gefrierfach 10. Mittleres Gefrierfach 11. Unteres Gefrierfach-Glasregal 12. Unteres Gefrierfach 13.Einstellbare Fußteile 14. Kühlschranktür 15. Oberes Fach 16.Eierfach(innen) 17.Mittleres Fach 18.Kühlschrank-Türdichtung...
- Página 28 Safety and warning information_ _ _ _ _ 2 Helpful and hints and tips _ _ _ _ _ _ _ Installing your new appliance_ _ _ _ _ _ Cleaning and care _ _ _ _ _ _ _ _ _ _ _ Description of the appliance _ _ _ _ Troubleshooting_ _ _ _ _ _ _ _ _ _ _ _ _...
- Página 29 If you are discarding the -catering and similar non- appliance, pull the plug retail applications out of the socket, cut the WARNING - Do not store connection cable (as explosive substances close to the appliance as such as aerosol cans with you can) and remove the a flammable propellant in door to prevent children...
- Página 30 blowing gas are Any damage to the cord flammable. may cause a shortcircuit, When disposing of the fire, and/or electric shock. appliance, do so only at Electrical safety an authorized waste disposal centre. Do not 1.The power cord must expose to flame. not be lengthened.
- Página 31 sure to apply A.C. manufactures storage Automatic voltage recommendations regulator of more than should be strictly adhered 350W to the fridge. The to.Refer to relevant fridge must employ a instructions for storage. special power socket Do not place carbonated instead of common one or fizzy drinks in the freeze compartment as it with other electric...
- Página 32 hands are damp/wet,as appliance. Use a plastic this could cause skin scraper. abrasions or frost/freezer Installation Important! burns. For electrical connection Never use the base, carefully, follow the drawers, doors etc. to instructions given in this stand on or as supports. manual.
- Página 33 relevant to installation. The appliance must not be locate close to radiators or cookers. Make sure that the mains plug is accessible after the installation of the appliance. Service Any electrical work required to do the servicing of the appliance should be carried out by qualified electrician or competent person.
-
Página 34: Installing Your New Appliance
Installing your new appliance Note: Before using the appliance This appliance performs ● for the first time, you should well within the climate class review the following tips. from SN to T showed in the Ventilation of appliance table below. In order to improve It may not work properly if efficiency of the cooling... - Página 35 To allow the doors to self- Note: If required you may ● lay the refrigerator on its close, tilt the top backwards back in order to gain by about 10mm. access to the base, you ≤10mm should rest it on soft foam packaging or similar material to avoid damaging the backboard of the...
- Página 36 2. Remove right upper 5. Remove the upper door hinge cover ① on top of the from the middle hinge by cabinet.remove the 3 carefully lifting the door screws② which are used straight up. for fixing the right upper hinge part (see the picture below) and take down the upper hinge parts③...
- Página 37 7. Loosen screws used to 9. Change screw hole fix the middle hinge and covers and screw on middle remove middle hinge. Then cover plate from left to right remove the lower door. (as shown in figure below). 10. Tip the refrigerator back ③...
- Página 38 13. Replace the items door, then fit the hinge pin remount in step 11 and step into the hinge hole at the top 12, change part ① to left or the door to secure the and part ② to right and door in place.
-
Página 39: Description Of The Appliance
Description of the appliance View 1 of the appliance 1. Upper hinge cover 2. Control panel part Glass shelf Crisper drawer cover Fruit and vegetables crisper 6. Ice tray Freezer tray . Upper glass shelf 9. Upper freezer drawer 10. Middle freezer drawer 11. -
Página 40: Control Panel
Control panel Use your appliance according to the following guidelines, your appliance has functions as the control panel shown in the pictures below. Controlling the temperature depending on how much food you store and where We recommend that when you place them. Ambient you start your refrigerator temperature may also affect for the first time, the... - Página 41 2. Freezer pressing the middle part of Press the middle part of button and the freezer button to set fridge temperature setting will temperature between -16℃ revert back to the previous and -24℃ as needed, and setting. control panel will display 4.
-
Página 42: Using Your Appliance
Using your appliance Your appliance has the accessories as the "Description of the appliance”showed in general, with this part instruction you can have the right way to use them. Door rack Shelf in Refrigerator chamber It is suitable for the storage ●... - Página 43 airtight foil or plastic film Hints for fresh food wrap. refrigeration Do not place hot food Milk bottles: ● ● directly into the refrigerator Should have a lid and be or freezer, the internal stored in the door racks. temperature will increase Hints for freezing resulting in the compressor When first starting-up or...
-
Página 44: Cleaning And Care
It is recommended to label Switching off your ● and date each frozen appliance package in order to keep If the appliance needs to be track of the storage time. switched off for an extended Hints for the storage of period, the following steps frozen food should be taken prevent... - Página 45 Interior cleaning Caution! Don't use sharp You should clean the objects to remove frost from appliance interior regularly. the freezer compartment. Wipe the inside of the fridge Only after the interior is freezer with a weak solution completely dry should the of bicarbonate of soda, and appliance be switched back then rinse with warm water...
- Página 46 Replacing the LED light: 1. Unplug your appliance. Warning: The LED light 2. Remove light cover by should be replaced by a pushing up and out. 3. Hold the LED cover with competent person. If the LED light is damaged, one hand and pull it with the contact the customer other hand while pressing...
- Página 47 It is normal that the refrigerator is not operating during the automatic defrost Appliance working cycle, or for a short time after the correctly appliance is switched on to protect the compressor. The interior may need to be cleaned. Odours from the compartments Some food, containers or wrapping cause odours.
- Página 48 ● After your installing the appliance or it The motor runs continuously has been switched off for a long time. Check that the air outlets are not blocked by food and ensure food is placed within A layer of frost the appliance to allow sufficient occurs in the ventilation.
- Página 49 Correct Disposal of this product This marking indicates that this product should not be disposed with other household wastes throughout the EU. To prevent possible harm to the environment or human health from uncontrolled waste disposal, r e c y c l e i t r e s p o n s i b l y t o p r o m o t e t h e sustainable reuse of material resources.
- Página 50 Español...
- Página 51 Este electrodoméstico cumple con las siguientes pautas de la UE: 2014/35/EU, 2014/30/EU, 2009/125/EC, (EC) No 643/2009 2011/65/EU...
- Página 61 ¡Precaución! Presione suavemente el estante de la puerta desde ambos lados hacia el centro y el interior del estante y luego mueva hacia arriba para quitarlo. 2. Quite el cobertor de la bisagra derecha ① en la superficie del gabinete. Quite los 3 tornillos ②...
- Página 62 4. Quite el cobertor del tornillo del rincón delantero izquierdo del gabinete con un destornillador de punta plana e instálelo en el rincón delantero derecho. 5. Quite la puerta superior desde la bisagra del medio levantando la puerta hacia arriba con cuidado. 8.
- Página 63 ① ② ③ ④ ⑤ ① Parte bisagra inferior (derecha) ② Pie delantero del tablero fijo ③ Parte de las patas del fondo ajustables Nota: la arandela podría ④ Tornillos autorroscantes adherirse a la puerta. ⑤ Parte de las patas del fondo ajustables Arandela 11.
-
Página 64: Vista 1 Del Electrodoméstico
Vista 1 del electrodoméstico 1. Cobertor de la bisagra superior 2. Parte del panel de control 3. Estante de vidrio 4. Cubierta del cajón Crisper 5. Cajón para frutas y verduras 6. Bandeja de hielo 7. Bandeja del congelador 8. Estante de vidrio superior 9. - Página 76 Cet appareil est conforme aux Directives Européennes: 2014/35/EU, 2014/30/ EU, 2009/125/EC, (EC) No 643/2009 2011/65/EU...
- Página 86 Attention! Ramenez délicatement l’étagère de porte des deux côtés en direction du centre et l‘intérieur de l’étagère de porte, puis extrayez-la, en la dirigeant vers le haut. 2. Retirez la charnière du côté droit supérieur ①. Retirez les 3 vis② utilisées pour fixer la charnière supérieure droite (voir illustration ci- dessous) et retirez les éléments③...
- Página 87 4. Retirez la protection de vis du coin gauche central au moyen d’un tournevis à tête plate, et installez-la au niveau du coin droit supérieur. 5. Retirez la porte supérieure de la charnière centrale, en soulevant 8. Placez la porte inférieure sur une légèrement la porte vers le haut.
- Página 88 ① ② ③ ④ ⑤ Élément charnière inférieure (droite) ① Panneau fixe avant bas ② Élément pied ajustable inférieur bas ③ Remarque : il se peut que le Vis auto-taraudeuse ④ joint adhère à la porte Élément pied ajustable inférieur bas ⑤...
- Página 89 Vue 1 de l’appareil 1. Cache de protection de la charnière supérieure 2. Panneau de commandes 3. Étagère en verre 4. Cache du bac à légumes 5. Bac à fruits et légumes 6. Bac à glaçons 7. Étagère du congélateur 8.
- Página 100 Quest’apparecchio è conforme alle seguenti direttive UE: 2014/35/EU, 2014/30/EU, 2009/125/CE, (EC) No 643/2009 2011/65/EU...
- Página 109 Attenzione! Premere leggermente il supporto della porta dai due lati verso il centro e la parte interna del supporto della porta, dopodiché spingere verso l'alto quando si estrae. 2. Rimuovere la copertura del cardine superiore ① dalla parte superiore dell'apparecchio. Rimuovere le 3 viti ② utilizzate per fissare il cardine superiore (fare riferimento all'immagine Fermo della porta sinistra...
- Página 110 Attenzione! Sostenere la porta 7. Allentare le viti utilizzate per fissare il cardine centrale e rimuovere quest'ultimo. superiore in posizione durante la fase 3 Quindi rimuovere la porta inferiore. per evitarne la caduta. 4. Rimuovere il coperchio della vite dall'angolo sinistro anteriore dell'apparecchio con un cacciavite a lama sottile e installarlo nell'angolo anteriore destro.
- Página 111 ① ② ③ ④ ⑤ ① Cardine inferiore (destro) ② Piastra fissa dei piedi anteriori ③ Piedini inferiori regolabili Nota: la rondella può ④ Viti autofilettanti aderire alla porta inferiore. ⑤ Piedini inferiori regolabili Rondella 11. Rimuovere il componente ⑤ dal 15.
- Página 112 Descrizione 1 dell'apparecchio 1. Copertura del cardine superiore 2. Pannello di controllo 3. Ripiano di vetro Coperchio del vano centrale 5. Vano per verdura e ortaggi 6. Vaschetta del ghiaccio 7. Vaschetta del congelatore 8. Ripiano di vetro superiore 9. Cassetto superiore del congelatore 10.
- Página 123 Dit apparaat is in overeenstemming met de volgende EU-richtlijnen: 2014/35/EU en 2014/30/EU en 2009/125/EC en (EC) No 643/2009 2011/65/EU...
- Página 133 Let op! Gelieve het deurschap voorzichtig aan beide zijden indrukken naar het midden en naar de binnenkant van het schap, en beweeg deze vervolgens naar boven bij het uitnemen. 2. Verwijder de rechter bovenscharnierkap①bovenaan de behuizing. verwijder de 3 schroeven②die worden gebruikt voor het bevestigen van de rechter bovenscharnierkap (zie de onderstaande afbeelding) en verwijder de...
- Página 134 tegenovergesteld opening. Let op! Houd de bovenste deur op ① Deurstopper zijn plaats tijden stap 3 teneinde te Stopblok ② ③ Zelftappende schroef voorkomen dat de deur kan vallen. 4. Verwijder de schroefdeksel met ① ② ③ een dunne schroevendraaier van de linker-voorste hoek van de behuizing en installeer het op de rechter voorhoek.
- Página 135 12. Verwijder deel③ van deel ②, ①Deurstopper en vervolgens de schroeven ②Stopblok ③Zelftappende schroef verwijderen④,deel ③ vastschroeven in de opening aan de tegenovergestelde zijde. ① ② ③ ② ③ ④ ② Voorvoet vaste board ③ Verstelbare stelvoetjes ④ Zelftappende schroeven 13.
- Página 136 15. Voorzichtig de bovenste deur 16. Monteer de linker op de middelste scharnierpen scharnierkap, meegeleverd (in de bevestigen en deze in positie plastic zak) die past bij het houden. Verplaats de bovenste scharnier, installeer de deur naar een geschikte positie, deurschappen en de watertank in de bovenste scharnier en de oorspronkelijke positie.
- Página 137 Overzicht 1 van het apparaat 1. Bovenste scharnierkap 2. Bedieningspaneel 3. Glasplaat 4.Verslade deksel 5. Groenten en fruitschap 6. Ijslade 7. Vriesplateau 8. . Bovenste glasplaat 9. Bovenste vrieslade 10. Middelste vrieslade 11. Onderste vrieslade 12. Onderste vrieslade schap 13.Verstelbare stelvoetjes 14.
- Página 147 Português...
- Página 148 Este aparelho está em conformidade com as seguintes disposições da UE: 2014/35/UE e 2014/30/UE e 2009/125/CE e 2011/65/EU. (EC) No 643/2009...
- Página 157 à direita ① no topo do armário. Remova os 3 parafusos ② que são usados para fixar a parte superior da dobradiça direita (veja a foto abaixo) e retire as partes ③ da dobradiça superior ①Tampa da dobradiça ②Parafuso autorroscante Partes da dobradiça superior ③...
- Página 158 fornecido (no saco plástico) e a parte ② 9. Mude as tampas de furos de (bloco de parada) para o lado esquerdo parafuso e fixe-as na placa de cobertura com parafuso ③. Mantenha a parte ① média da esquerda para a direita (como com o aparelho para referência futura.
- Página 159 Parte da dobradiça inferior (à esquerda) 14. Coloque o refrigerador verticalmente e encaixe cuidadosamente o pino da dobradiça inferior e mantenha-a na posição. Mude a dobradiça do meio por 180 °, altere a arruela no eixo para o lado inferior, ajuste a dobradiça do meio para a posição apropriada e, em seguida, instale-a, garantindo a porta inferior no lugar seguro.
- Página 160 Vista 1 do aparelho 1. Tampa da dobradiça superior 2. Parte do painel de controle 3. Prateleira de vidro 4. Tampa da gaveta Gaveta de frutas e vegetais 6. Bandeja de gelo 7. Bandeja de congelação 8. Prateleira de vidro superior 9.