Tabla de contenido
Publicidad
Idiomas disponibles
Idiomas disponibles
Enlaces rápidos
Publicidad
Capítulos
Tabla de contenido

Manuales relacionados para Bartscher C5230


Resumen de contenidos para Bartscher C5230
- Página 1 C5230 / 206782 C4430 / 206873 C6640 / 206797 V1/1212...
-
Página 3: Instrukcja Obsługi
Bedienungsanleitung Elektrische Heißluftöfen D/A/CH Seiten 1 bis 28 Instruction manual Electric convection ovens GB/UK from page 29 to 56 Mode d’emploi Fours électriques à convection F/B/CH de page 57 à page 84 Manuale di utilizzo Forni elettrici a convezione I/CH de la página 85 a la 112 Manual de instrucciones Horno de convección eléctrico... -
Página 5: Tabla De Contenido
5.2.2 Erste Inbetriebnahme ................17 5.2.3 Gewöhnliche Wartung ................18 5.2.4 Außergewöhnliche Wartung ..............20 5.3 Bedienblenden ....................23 6. Entsorgung ......................28 Bartscher GmbH Franz-Kleine-Str. 28 D-33154 Salzkotten Tel.: +49 (0) 5258 971-0 Germany Fax: +49 (0) 5258 971-120... -
Página 6: Allgemeines
1. Allgemeines 1.1 Informationen zur Bedienungsanleitung Diese Bedienungsanleitung beschreibt die Installation, Bedienung und Wartung des Gerätes und dient als wichtige Informationsquelle und Nachschlagewerk. Die Kenntnis aller in ihr enthaltenen Sicherheitshinweise und Handlungsanweisungen schafft die Voraussetzung für das sichere und sachgerechte Arbeiten mit dem Gerät. Darüber hinaus sind die für den Einsatzbereich des Gerätes geltenden örtlichen Unfallverhütungsvorschriften und allgemeinen Sicherheitsbestimmungen einzuhalten. -
Página 7: Haftung Und Gewährleistung
WARNUNG! Verbrennungsgefahr! Wenn Behälter mit Flüssigkeit oder sich während des Garens verflüssigendem Gargut gefüllt sind, sollten keine höheren Einschubebenen benutzt werden als solche, bei denen der Bediener in den eingeschobenen Behälter schauen kann. 1.3 Haftung und Gewährleistung Alle Angaben und Hinweise in dieser Bedienungsanleitung wurden unter Berücksichtigung der geltenden Vorschriften, des aktuellen ingenieurtechnischen Entwicklungsstandes sowie unserer langjährigen Erkenntnisse und Erfahrungen zusammengestellt. -
Página 8: Konformitätserklärung
1.5 Konformitätserklärung Das Gerät entspricht den aktuellen Normen und Richtlinien der EU. Dies bescheinigen wir in der EG-Konformitätserklärung. Bei Bedarf senden wir Ihnen gern die entsprechende Konformitätserklärung zu. 2. Sicherheit Dieser Abschnitt bietet einen Überblick über alle wichtigen Sicherheitsaspekte. Zusätzlich sind in den einzelnen Kapiteln konkrete Sicherheitshinweise zur Abwendung von Gefahren gegeben und mit Symbolen gekennzeichnet. -
Página 9: Bestimmungsgemäße Verwendung
ACHTUNG! o Dieses Gerät ist nicht bestimmt, durch Personen (einschließlich Kinder) mit eingeschränkten physischen, sensorischen oder geistigen Fähigkeiten oder mangels Erfahrung und/oder mangels Wissen benutzt zu werden, es sei denn, sie werden durch eine für die Sicherheit zuständige Person beaufsichtigt oder erhielten von ihr Anweisungen, wie das Gerät zu benutzen ist. -
Página 10: Transport, Verpackung Und Lagerung
3. Transport, Verpackung und Lagerung 3.1 Transportinspektion Lieferung bei Erhalt unverzüglich auf Vollständigkeit und Transportschäden prüfen. Bei äußerlich erkennbarem Transportschaden Lieferung nicht oder nur unter Vorbehalt entgegen nehmen. Schadensumfang auf Transportunterlagen/Lieferschein des Transporteurs vermerken. Reklamation einleiten. Verdeckte Mängel sofort nach Erkennen reklamieren, da Schadensersatzansprüche nur innerhalb der geltenden Reklamationsfristen geltend gemacht werden können. -
Página 11: Technische Daten
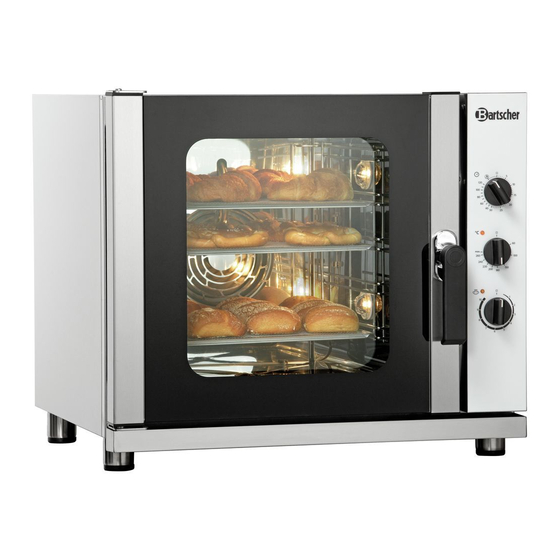
4. Technische Daten 4.1 Baugruppenübersicht ② ① ③ ④ ⑩ ⑤ ⑨ ⑥ ⑧ ⑦ ① ⑥ Lüfter Stellfüße, höhenverstellbar ② ⑦ Gehäuse Garraum ③ ⑧ Garraumbeleuchtung Auflageschienen ④ ⑨ Bedienblende Ofentür ⑤ ⑩ Sicherheitssystem der Ofentür Ofentürgriff Sicherheitsvorrichtungen Das Sicherheitssystem der Gerätetür (Mikroschalter) unterbricht den Betrieb des Gerätes beim Öffnen: es werden sowohl das Heizsystem als auch das Gebläse abgeschaltet. -
Página 12: Technische Angaben
4.2 Technische Angaben Bezeichnung Elektrische Heißluftöfen C 5230 C 6640 Modell: C 4430 Artikel-Nr.: 206873 206782 206797 mit Grill und Ausführung: Beschwadung Beschwadung Beschwadung Einschübe: 4 (442 x 325 mm) 5 x 2/3 GN 6 x 600 x 400 mm Abstand zwischen 75 mm 70 mm... -
Página 13: Installation Und Bedienung
5. Installation und Bedienung 5.1 Anweisungen für den Installateur ACHTUNG! Alle Installations-, Anschluss- und Wartungsarbeiten des Gerätes müssen nur von einem qualifizierten und befugten Techniker gemäß den geltenden internationalen, nationalen und lokalen Vorschriften des Installationslandes vorgenommen werden. Hinweise Lesen Sie aufmerksam die folgende Anleitung, bevor Sie mit den Installationsarbeiten und der Inbetriebnahme des Gerätes beginnen. -
Página 14: Intallationsort
ACHTUNG: Während des Transportes des Gerätes kann es zum Kippen desselben kommen, wodurch weitere Beschädigungen und Beeinträchtigungen an Gegenständen und Personen auftreten können. Verwenden Sie auch unter Beachtung des Gewichts des Gerätes geeignete Mittel. Ziehen und kippen Sie das Gerät aus keinem Grund, sondern heben Sie es senkrecht vom Boden an und bewegen es horizontal. -
Página 15: Vorbereitung Für Die Installation
Das Gerät niemals in der Nähe von Wärmequellen, Fritteusen oder anderen Quellen von heißen Flüssigkeiten aufzustellen; falls dies nicht möglich sein sollte, betragen die Sicherheitsabstände: seitlich und über dem Gerät 50 cm und von der Rückseite des Gerätes 70 cm. ... -
Página 16: Elektroanschluss
Befestigung der Abtropfschale Die Abtropfschale wird verwendet, um Flüssig- keiten aufzufangen, die von der Vorderseite des Ofens abfließen können. Stellen Sie die Schale in den vorderen unteren Bereich des Ofens und sichern ihre Befestigung durch Schrauben, die sich in der Tüte im Inneren der Verpackung befinden. - Página 17 Achten Sie darauf, dass es während des Verrückens nicht zu Beschädigungen am Netzkabel kommt. Dies ermöglicht den Anschluss an das Stromnetz mit Leichtigkeit und größerer Sicherheit. Positionieren Sie das Kabel so, dass kein Punkt eine höhere Umgebungstemperatur als 50 °C erreicht. Heißluftöfen mit Einphasen-Kabel und –Stecker (206873) ...
-
Página 18: Wasseranschluss
Potentialausgleichsanschluss Dieser Anschluss muss zwischen verschiedenen Geräten mit der durch folgendes Symbol gekennzeichneten Klemmleiste erfolgen. Die Anschlussklemme befindet sich auf der Rückseite des Gerätes. Diese Klemme ermöglicht den Anschluss eines Verbindungskabels der Farbe gelb/grün mit einem Durchmesser zwischen 2,5 und 10 mm ² . ... -
Página 19: Wasserabfluss (206782, 206797)
5.1.6 Wasserabfluss (206782, 206797) Das aus dem Ablauf des Heißluftofens austretende Wasser kann hohe Temperaturen (90 °C) erreichen. Die für den Wasserablauf verwendeten Schläuche müssen in der Lage sein, solche Temperaturen auszuhalten. Der Wasserablauf befindet sich auf der hinteren Unter- seite der Rückseite des Heißluftofens und muss mit einem geeigneten starren Rohr oder flexiblen Schlauch angeschlossen und zu einem geöffneten Abfluss geführt... -
Página 20: Anweisungen Für Den Benutzer
5.2 Anweisungen für den Benutzer ACHTUNG! Lesen Sie die folgende Bedienungsanleitung sorgfältig, da sie Hinweise zur Sicherheit und zum Gebrauch des Heißluftofens liefert. Bewahren Sie die Bedienungsanleitung für einen späteren Gebrauch sorgfältig auf. Eine falsche Installation, Bedienung, Wartung und Reinigung sowie etwaige Veränderungen und Modifizierungen können zu Fehlfunktionen, Beschädigungen und Verletzungen führen. -
Página 21: Erste Inbetriebnahme
5.2.2 Erste Inbetriebnahme Stellen Sie sicher, dass sich nichts im Garraum befindet (Zubehör, Verpackungsfolien, Bedienungsanleitungen und ä.). Kontrollieren Sie vor der Inbetriebnahme die korrekte Installation, Stabilität, Nivellierung des Gerätes, sowie die Ausführung des elektrischen Anschlusses und des Anschlusses an die Kaltwasserversorgung. ... -
Página 22: Gewöhnliche Wartung
5.2.3 Gewöhnliche Wartung ACHTUNG! Vor dem Ausführen jeglicher Reinigungsarbeiten ist es notwendig, die Strom- versorgung des Gerätes zu unterbrechen und das vollständige Abkühlen des Heißluftofens abzuwarten. Der Benutzer ist zur gewöhnlichen Wartung angehalten. Für die außergewöhnliche Wartung ist der Kundendienst zu kontaktieren und das Eingreifen eines spezialisierten und befugten Technikers anzufordern. - Página 23 o Im Falle von Schmutzablagerungen verwenden Sie nur einen Kunststoffspachtel oder einen in Essig oder warmes Wasser eingeweichten Schwamm. o Achtung: falls sich Fett oder Speisereste im Garraum befinden, entfernen Sie sie sofort, da diese sich während der Verwendung des Heißluftofens entzünden können. Außenreinigung o Verwenden Sie nur ein mit lauwarmem Wasser befeuchtetes Tuch für die Reinigung der Außenflächen des Gerätes.
-
Página 24: Außergewöhnliche Wartung
Auswechseln der Lampe o ACHTUNG: Halten Sie genau die folgende Vorgehensweise ein, um Stromschläge oder Personenschäden zu vermeiden: Unterbrechen Sie die Stromversorgung des Heißluftofens und lassen ihn abkühlen. Lösen Sie die Schrauben, mit denen die seitlichen Auflageschienen befestigt sind. Entfernen Sie diese aus dem Garraum. - Página 25 o Wenn sich das Gerät auf einem System, das mit Rollen ausgestattet ist, befindet, müssen Sie überprüfen, dass während seiner Verlagerung die elektrischen Leitungen, Rohrleitungen oder anderes nicht beschädigt werden. o Vermeiden Sie das Aufstellen des Geräts in der Nähe von Wärmequellen (z.
- Página 26 Störung Ursache Behebung Die Wasserzufuhr ist Die Wasserzufuhr öffnen geschlossen Bei Aktivierung der Der Anschluss an das Prüfen Sie den Anschluss Beschwadung wird kein Wasser von Wassernetz ist nicht an das Wassernetz den Schläuchen richtig ausgeführt abgegeben ...
-
Página 27: Bedienblenden
5.3 Bedienblenden 206782 206797 206873 Zeitdrehregler Beschwadungstaste Temperaturdrehregler Aufheizkontrolllampe (orange) Beschwadungsdrehregler Kontrolllampe Beschwadung (orange) Funktionsdrehregler Betriebskontrolllampe (grün) - Página 28 Einstellungen Funktionsdrehregler 200873 AUS-Position Beleuchtung Grill Zirkulieren des Ventilators Nur Ventilator 200797 AUS-Position Nur Ventilato Beleuchtung Mit dem Funktionsdrehregler können (je nach Modell) folgende Funktionen gewählt werden: Gerät ausschalten; Beleuchtung einschalten; Nur Ventilator Zirkulieren des Ventilators Grill. 1. Wenn der Funktionsdrehregler auf die AUS-Position eingestellt ist, ist der Heißluftofen in jeder Hinsicht ausgeschaltet.
- Página 29 Betriebskontrolllampe Wenn sie leuchtet, bedeutet dies, dass die Beleuchtung des Garraumes eingeschaltet ist und die Heizelemente je nach ausgewählter Funktion betriebsbereit sind. Zeitdrehregler Bei der Einstellung des Zeitdrehreglers auf Dauerbetrieb bleibt der Heißluftofen solange eingeschaltet, bis der Bediener eingreift. Wenn ein bestimmter Wert im Bereich bis 120 Minuten ausgewählt wurde, bleibt der Heißluftofen stets für diesen Zeitraum eingeschaltet.
- Página 30 ACHTUNG: Damit die Beschwadung auf zufriedenstellende Weise funktioniert, ist es notwendig, dass die Temperatur auf mindestens 80-100°C eingestellt ist. Bei niedrigeren Temperaturen wird nur schwer Dampf erzeugt und der größte Teil des Wassers fließt auf den Boden des Heißluftofens oder in den Abfluss. Außerdem ist für ein gutes Garen das Vorheizen des Heißluftofens auf die gewünschte Temperatur notwendig, bevor die Beschwadung aktiviert wird.
- Página 31 Hinweise und Tipps Beim Garen mit Grill von Lebensmitteln, die besonders fett sind, wie Braten oder Geflügel, ist es empfehlenswert, einen Behälter auf den Boden des Garraums zum Auffangen von Fett, das im Laufe des Garens abtropft, zu stellen. ...
-
Página 32: Entsorgung
Netzversorgung trennen und das Netzanschlusskabel vom Gerät entfernen. HINWEIS! Für die Entsorgung des Gerätes beachten Sie die in Ihrem Land und in Ihrer Kommune geltenden Vorschriften. Bartscher GmbH Franz-Kleine-Str. 28 D-33154 Salzkotten Tel.: +49 (0) 5258 971-0 Germany Fax: +49 (0) 5258 971-1... - Página 33 First use....................45 5.2.3 Standard maintenance ................46 5.2.4 Special maintenance ................48 5.3 Control panels ..................... 51 6. Waste disposal ......................56 Bartscher GmbH Franz-Kleine-Str. 28 D-33154 Salzkotten phone: +49 (0) 5258 971-0 Germany fax: +49 (0) 5258 971-120...
-
Página 34: General Information
1. General information 1.1 Information about the instruction manual This instruction manual contains information about the installation, operation and maintenance of the device and should be consulted as an important source of information and reference guide. Awareness of the safety instructions and instructions for use in this manual will ensure the safe and correct use of the device. -
Página 35: Liability And Warrantees
WARNING! The container holds hot liquid! When containers hold liquid or products that turn liquid during cooking, do not higher shelves to place the containers so that the operator can always look into the container inside. 1.3 Liability and Warrantees All the information and instructions in this manual take into account standard safety regulations, current levels of technical engineering as well as the expertise and experience we have developed over the years. -
Página 36: Declaration Of Conformity
1.5 Declaration of conformity The device complies with the current standards and directives of the EU. We certify this in the EC declaration of conformity. If required we will be glad to send you the according declaration of conformity. 2.Safety This section provides an overview of all important safety aspects. -
Página 37: Intended Use
CAUTION! o The device is not intended for use by individuals (including children) with physical or mental disabilities, insufficient experience, and/or insufficient knowledge unless such persons are under the care of a person responsible for their safety or have received instructions regarding appropriate use of the device. -
Página 38: Transport, Packaging And Storage
3. Transport, packaging and storage 3.1 Delivery check Please check the delivery upon completeness and transport damage immediately after receipt. In case of visible damage do not accept or accept the delivery with reservation only. Note the extent of damage on the carrier’s bill of delivery. Trigger off the complaint. Hidden damages should be reclaimed immediately after notice, as claims for damages can only be asserted within the effective period for complaints. -
Página 39: Technical Data
4. Technical data 4.1 Overview of parts ② ① ③ ④ ⑩ ⑤ ⑨ ⑥ ⑧ ⑦ ① ⑥ Height adjustable feet ② ⑦ Housing Cooking chamber ③ ⑧ Cooking chamber lighting Shelves for GN containers ④ ⑨ Control panel Convection oven door ⑤... -
Página 40: Technical Specification
4.2 Technical specification Name Electric convection ovens Model: Model: C 4430 C 4430 Article No. 206873 Article No. 206873 with grill and with grill and direct steam direct steam Version Version injection injection Capacity: Capacity: 4 (442 x 325 mm) 4 (442 x 325 mm) The distance between 75 mm... -
Página 41: Installation And Operation
5. Installation and operation 5.1 Instructions for the installer CAUTION! Any works related to the installation, connection and maintenance of the device may only be carried out by a qualified and licensed technician in accordance with the applicable international, national and local regulations. Instructions ... -
Página 42: Place Of Installation
Make sure that you will have access to the installation site and will not have problems to pass through doors, corridors, or other passages. NOTE: During its shipment the unit may get overturned which may cause damage to property or people as well as pose some difficulties. -
Página 43: Preparing To Install
Never place the oven near combustible materials or containers made of flammable materials (such as walls, furniture, partitions, gas cylinders) since it could lead to a fire hazard. In case it is not possible to meet this requirement, cover the flammable components with non-flammable thermo-insulating material, and follow the fire regulations strictly. -
Página 44: Power Supply Connection
Attaching the drip tray The drip tray is used to collect liquids which may flow out through the front door of the oven. Place the tray in front of the oven and fasten it with screws found in a bag provided in the package. - Página 45 Make sure the power cord does not get damaged when moving the oven. This way the oven will be connected to the power supply without difficulty and in a more safety manner. The power cord shall be placed so that it does not reach the ambient temperature higher than 50°C at no point.
-
Página 46: Water Connection
Connection to the equipotential bonding system This connection should be made between different devices with the use of a plug-in terminal marked with this symbol. The connection terminals are found at the back of the device. The terminals allow connecting a yellow/green connection cord with a cross section between 2.5 and 10 mm²... -
Página 47: Water Outlet (206782, 206797)
5.1.6 Water outlet (206782, 206797) The water at the outlet of the convection oven may reach high temperatures (90°C). The hoses used to drain this water out should be resistant to such temperatures. The water outlet is placed in lower part of the back of the convection oven and it should be connected to a rigid pipe or flexible hose discharging into an open drain. -
Página 48: User's Instruction
5.2 User’s instruction CAUTION! Please read this manual carefully as it contains safety instructions and instructions for the use of the convection oven. Please keep this manual for future use. Improper installation, operation, maintenance or cleaning, and any changes or modifications may lead to malfunction, damage or injuries. -
Página 49: First Use
5.2.2 First use Make sure there are no items (accessories, packaging film, manuals, etc.) in the cooking chamber. Prior to the first use, make sure the installation was properly completed in terms of the stability and levelling of the device, and power and cold water supply connection. ... -
Página 50: Standard Maintenance
5.2.3 Standard maintenance CAUTION! Before carrying out any cleaning disconnect the device and wait until the convection oven cools down completely. The user may perform standard maintenance. For emergency maintenance, please contact customer service and request assistance of a qualified licensed technician. Regular cleaning of the heating chamber o To ensure trouble-free operation, hygiene and efficiency of the device, it should be cleaned at the end of every working day. - Página 51 Cleaning the external surfaces o To clean external surfaces of the device, use a cloth dampened in warm water only. o With the exception of special cleaning agents for stainless steel, the use improper cleaning agents to clean external surfaces may cause corrosion of the device. o Do not use products containing chlorine (bleach hydrochloric acid, etc.).
-
Página 52: Special Maintenance
Replacing the lamp o NOTE: Strictly follow the instructions below to avoid electric shock or injury: Cut off the power supply and allow the convection oven to cool down. Unscrew the bolts with which the side container rails are secured to the walls. Remove them from the cooking chamber. - Página 53 o If the device has wheels make sure that electrical wires, tubes or other attachments are not damaged in the process. o Avoid placing the unit near heat sources (such as fryers, etc.). o After the operation and position the device in its place of normal installation, and make sure that all the electrical and water connections are made in accordance with the standards before starting the unit.
- Página 54 Fault Reason Solution Water supply is closed. Open water supply. The water supply Check water supply. When steam connection has not been injection is water made properly. leaks from the tube Clean the inlet water filter. ...
-
Página 55: Control Panels
5.3 Control panels 206782 206797 206873 Timer dial Steam injection button Temperature control dial Heating sensor (orange) Humidity control dial Humidity sensor (orange) Function selection dial In use indicator (green) - Página 56 Setting Function dial 200873 Turn off position Light Grill WYŁ. Fan only Fan circulation 200797 Turn off position WYŁ. Fan only Light Use the dial to select the function; you may (depending on model) select the following functions: Turn off the device; Switch the light on;...
- Página 57 ON/OFF LED When it is on, it indicates that the cooking compartment lighting is switched on and the heating elements are ready to use, depending on the selected function. Timer dial If you set the dial to constant mode the convection oven will remain on until the user does not intervene.
- Página 58 NOTE: To humidify work in a satisfactory manner, it is necessary that the temperature was set to at least 80-100 ° C. For lower temperatures arises only serious couple, and a large part of the water flows to the bottom of the convection oven or drain. In addition, the required proper cooking convection oven pre-heated to the desired temperature before it is activated humidification.
- Página 59 Hints and Tips Cooking extremely fat foods with the use of the grill, such as roasts or poultry, we recommend placing a container on the bottom of the cooking chamber in order to catch the dripping fat. Cooking in containers filled with liquids be particularly careful to avoid spilling the liquids out of the containers both during cooking and removing containers from the oven convection.
-
Página 60: Waste Disposal
NOTE! For the disposal of the device please consider and act according to the national and local rules and regulations. Bartscher GmbH Franz-Kleine-Str. 28 D-33154 Salzkotten phone: +49 (0) 5258 971-0 Germany fax:... - Página 61 L'entretien de routine ................74 5.2.4 Entretien extraordinaire ................76 5.3 Panneaux de commande ..................79 6. Elimination des éléments usés ................84 Bartscher GmbH Franz-Kleine-Str. 28 D-33154 Salzkotten Tél.: +49 (0) 5258 971-0 Germany Fax: +49 (0) 5258 971-120...
-
Página 62: Généralités
1. Généralités 1.1 Informations concernant la notice d´utilisation La présente notice d´utilisation décrit l´installation, la manipulation et la maintenance de l´appareil, elle sert de source d´informations et d´ouvrage de référence. La connaissance et l´observation de toutes les consignes de sécurité et des instructions mentionnées dans le mode d´emploi sont la condition sine qua non d´une utilisation sûre et correcte de l´appareil. -
Página 63: Responsabilité Et Garantie
AVERTISSEMENT ! Liquide bouillant dans le récipient ! Si les récipients sont remplis de liquide ou de matériel de cuisson liquéfié après cuisson, ne pas les entreposer sur une étagère au-dessus du niveau de l’œil, afin de pouvoir en vérifier le contenu. 1.3 Responsabilité... -
Página 64: Déclaration De Conformité
1.5 Déclaration de conformité L´appareil correspond aux normes et directives actuelles de l´Union européenne. Nous l´attestons dans la déclaration de conformité CE. Nous vous ferons volontiers parvenir sur demande la déclaration de conformité correspondante. 2. Sécurité Ce chapitre donne un aperçu de tous les aspects importants de la sécurité. De plus, des consignes concrètes de sécurité... -
Página 65: Utilisation Conforme
ATTENTION ! o L’appareil n’est pas destiné à être utilisé par des personnes (y compris les enfants) aux moyens physiques, sensoriels ou intellectuels limités, ou sans expérience suffisante et/ou sans connaissances suffisantes, à moins que ces personnes se trouvent sous la surveillance d’une personne responsable de leur sécurité ou qu’elles obtiennent de cette personne les indications pour utiliser l’appareil. -
Página 66: Transport, Emballage Et Stockage
3. Transport, emballage et stockage 3.1 Inspection suite au transport Vérifier l´intégralité et l´absence de dommages dus au transport dès réception du produit. En cas de dommages identifiables extérieurement dus au transport, refuser ou accepter le produit livré uniquement sous réserve. Noter l´étendue du dommage sur les documents de transport/le bon de livraison du transporteur. -
Página 67: Données Techniques
4. Données techniques 4.1 Aperçu des composants ② ① ③ ④ ⑩ ⑤ ⑨ ⑥ ⑧ ⑦ ① ⑥ Ventilateur Pieds, réglables en hauteur ② ⑦ Boîtier Chambre de cuisson ③ ⑧ Eclairage Rails de support ④ ⑨ Panneau de commande Porte du four ⑤... -
Página 68: Indications Techniques
4.2 Indications techniques Désignation Fours électriques à convection C 5230 C 6640 Modèle : C 4430 No. d'article : 206873 206782 206797 avec grill et avec avec Version : humidificateur humidificateur humidificateur Capacité : 4 (442 x 325 mm) 5 x 2/3 GN 6 x 600 x 400 mm Distance entre 75 mm... -
Página 69: Installation Et Utilisation
5. Installation et utilisation 5.1 Instructions pour l'installateur ATTENTION! Toute l'installation, le raccordement et l'entretien de l'appareil ne doivent être effectuées que par un technicien qualifié et autorisé conformément aux lois internationales, nationales et locales du pays d'installation. Conseils Lisez attentivement les instructions suivantes avant de commencer les travaux d'installation et de mise en service de l'appareil. -
Página 70: Place De L'installation
Assurez-vous qu’il y a accès au site d'installation et il n’ya pas des problèmes d'espace pour le passage à travers les portes, couloirs et autres passages. ATTENTION: Pendant le transport des appareils peuvent basculer, ce qui peut entraîner des dommages aux biens et aux personnes. Utilisez les moyens de transport appropriés en tenant compte du poids de l'appareil. -
Página 71: Préparation De L'installation
Ne jamais placer l'appareil à proximité de sources de chaleur, des friteuses ou autres sources de fluides chauds, si ce n'est pas possible assurez des distances de sécurité: 50 cm des côtés et le dessus de l'appareil et 70 cm de l'arrière. ... -
Página 72: Raccordement Électrique
Fixation du bac de récupération Le bac de récupération est utilisé pour absorber les liquides, qui peuvent s'écouler à partir de l'avant du four. Placer le bac dans la partie inférieure avant du four et assurez sa fixation par des vis, qui sont dans le sac à l'intérieur de l'emballage. - Página 73 Assurez-vous que pendant le déplacement de l’appareil il n’y a pas des mouvements inattendus qui pourraient endommager le câble d'alimentation. Cela permet la connexion au réseau avec une facilité et une plus grande confiance. Positionnez le câble de manière à ce qu'aucun point n’atteint une température ambiante supérieure à...
-
Página 74: Raccordement À L'eau
Connexion équipotentielle Cette connexion doit être établie entre les appareils différents en utilisant le bornier marqué par ce symbole . Les bornes sont situées à l'arrière de l'appareil. Les bornes permettent le raccordement d'un câble de la couleur jaune / vert avec un diamètre compris entre 2,5 et 10 mm². -
Página 75: Evacuation D'eau (206782, 206797)
Evacuation d’eau (206782, 206797) 5.1.6 L’eau, qui se produise à la sortie du four, peut atteindre des températures élevées (90 ° C). Les tuyaux utilisés pour le drainage de l'eau doivent être capables de résister à de telles températures. ... -
Página 76: Instructions Pour L'utilisateur
5.2 Instructions pour l’utilisateur ATTENTION! Lisez attentivement les instructions suivantes, car elles fournissent des informations sur la sécurité et l'utilisation du four à convection. Conservez ces instructions pour une utilisation ultérieure. Une mauvaise installation, exploitation, entretien et nettoyage, ainsi que tout changement ou modification peut entraîner des dysfonctionnements, des dommages ou des blessures 5.2.1... -
Página 77: Mise En Service Initiale
5.2.2 Mise en service initiale Assurez-vous qu'il n'y a rien à l'intérieur du four (accessoires, films d'emballage, manuels, etc.). Avant la mise en service, vérifiez l'installation correcte, la stabilité, le nivellement de l'appareil, et le raccordements électrique et d'eau froide. ... -
Página 78: L'entretien De Routine
5.2.3 L'entretien de routine ATTENTION Avant d'effectuer toute opération d'entretien, il est nécessaire d'interrompre l'alimentation électrique de l'appareil et attendre le refroidissement complet du four. L'utilisateur doit effectuer l'entretien régulier. Pour les travaux d'entretien d'urgence, contactez le service clientèle et demandez l'intervention d'un technicien spécialisé et agréé. - Página 79 o Dans le cas de la saleté utilisez uniquement une spatule en plastique ou une éponge trempée dans du vinaigre ou de l'eau chaude. o Remarque: s'il ya de la graisse ou des particules alimentaires dans le four, retirez- les immédiatement, car ils peuvent s'enflammer pendant l'utilisation du four. Nettoyage à...
-
Página 80: Entretien Extraordinaire
Remplacement de la lampe o REMARQUE: Suivez strictement la procédure suivante, afin d’éviter un choc électrique ou de blessure: Coupez l'alimentation électrique du four à convection et laisser le refroidir. Dévisser les boulons par lesquels les rails latéraux sont fixés à la plaque. Retirez-les du four. - Página 81 o Si l'appareil dispose d'un système de rouleaux, assurez-vous que lors de déplacement des fils électriques, tubes ou autres ne sont pas endommagés. o Évitez de placer l'appareil à proximité de sources de chaleur (comme les friteuses, etc.) o Après avoir terminé cette opération et reposé l'appareil à sa place, assurez-vous que tous les raccordements électriques et hydrauliques ont été...
- Página 82 Trouble Cause Remède L'alimentation en eau est Ouvrez l'alimentation en fermée L'eau ne sort pas Le raccordement au réseau Vérifiez la connexion au des tuyaux lorsque d'eau ne fonctionne pas réseau d'eau l’humidification est correctement activée ...
-
Página 83: Panneaux De Commande
5.3 Panneaux de commande 206782 206797 206873 Bouton humidificateur Minuteur Bouton de réglage L'indicateur de chauffage (orange) de la température Bouton de réglage L'indicateur de vapeur (orange) de la vapeur Sélecteur de mode L'indicateur de fonctionnement (vert) - Página 84 Réglages Sélecteur de mode 200873 Position d'arrêt Eclairage Gril Circultation du ventilateur Ventilateur seul 200797 Position d'arrêt Ventilateur seul Eclairage A l’aide du sélecteur de mode vous pouvez sélectionner les fonctions suivantes (selon le modèle) : Debrancher l'appareil; Allumer l'éclairage; Ventilation seule Circulation du ventilateur Gril...
- Página 85 L'indicateur de fonctionnement Lorsqu'il est allumé, il indique que l'éclairage de la chambre de cuisson est allumé et les éléments chauffants sont utilisables selon la fonction sélectionnée. Minuteur Lorsque le minuteur est en position de fonctionnement continu , le four à convection reste branché jusqu'à ce que l'utilisateur n’intervient pas.
- Página 86 REMARQUE : Pour que l'injection de vapeur fonctionne de manière satisfaisante, il est nécessaire que la température est réglée à 80-100 ° C au moins. À des températures plus basses, la vapeur est produite avec difficulté et la plus grande partie de l'eau s'écoule vers le fond du four, ou dans la canalisation.
- Página 87 Trucs et astuces Lors de la cuisson avec le gril des aliments, qui sont particulièrement gras, comme les rôtis ou de la volaille, il est conseillé de placer un récipient sur le fond de la chambre de cuisson pour recueillir la graisse qui s'écoule pendant la cuisson. ...
-
Página 88: Elimination Des Éléments Usés
REMARQUE ! Pour l’élimination de l’appareil veuillez respecter les prescriptions en vigueur dans votre pays et votre commune. Bartscher GmbH Franz-Kleine-Str. 28 D-33154 Salzkotten Tél.: +49 (0) 5258 971-0 Germany Fax: +49 (0) 5258 971-120... - Página 89 Primo avvio .................... 101 5.2.3 Manutenzione ordinaria ................. 102 5.2.4 Manutenzione straordinaria ..............104 5.3 Pannelli operativi ....................107 6. Smaltimento ......................112 Bartscher GmbH Franz-Kleine-Str. 28 D-33154 Salzkotten Tél.: +49 (0) 5258 971-0 Germany Fax: +49 (0) 5258 971-120...
-
Página 90: Informazioni Generali
1. Informazioni generali 1.1 Informazioni riguardanti il manuale di utilizzo Il presente manuale di utilizzo contiene la descrizione dell'installazione dell'apparecchiatura, il suo funzionamento e la manutenzione, ed è una fonte importante di informazioni e consigli. Per usare correttamente e in piena sicurezza l'apparecchiatura è necessario conoscere e rispettare tutte le indicazioni sulla sicurezza e sul funzionamento in esso contenute. -
Página 91: Responsabilità Del Produttore E Garanzia
ATTENZIONE! Recipiente con liquido caldo! Qualora i recipienti siano riempiti con liquidi o con materiale liquido sorto in seguito alla cottura, non utilizzare i ripiani superiori per il loro posizionamento. Usare unicamente i ripiani situati ad un’altezza tale da permettere all’utente di vedere il contenuto del recipiente. -
Página 92: Dichiarazione Di Conformità
1.5 Dichiarazione di conformità L'apparecchiatura rispetta le norme ed indicazioni dell'Unione Europea attualmente in vigore. Confermiamo quanto sopra nella Dichiarazione di Conformità CE. In caso di necessità Vi inviamo volentieri l'opportuna Dichiarazione di Conformità. 2. Sicurezza Il presente capitolo contiene un compendio delle informazioni riguardanti tutti gli aspetti essenziali legati alla sicurezza. -
Página 93: Utilizzo Secondo La Destinazione D'uso
AVVERTENZA! o L’apparecchio non è destinato all’utilizzo da parte di persone (compresi i bambini) con limitata agilità fisica, sensoriale o mentale, oppure con esperienza insufficiente e/o conoscenza insufficiente, a meno che le tali persone non si trovino sotto la vigilanza di una persona responsabile per la loro sicurezza o abbiano ottenuto delle indicazioni, di come bisogna utilizzare l’apparecchio. -
Página 94: Trasporto, Imballaggio E Stoccaggio
3. Trasporto, imballaggio e stoccaggio 3.1 Controllo della fornitura Alla ricezione della fornitura va immediatamente controllato che l'apparecchiatura sia completa e che non sia stata danneggiata durante il trasporto. Nel caso si rilevino danneggiamenti visibili dovuti al trasporto, va rifiutata l'accettazione dell'apparecchiatura, o va eseguita un'accettazione condizionale. -
Página 95: Parametri Tecnici
4. Parametri tecnici 4.1 Presentazione dei sottogruppi dell’impianto ② ① ③ ④ ⑩ ⑤ ⑨ ⑥ ⑧ ⑦ ① ⑥ Ventola Piedini regolabili in altezza ② ⑦ Corpo Cavità di cottura ③ ⑧ Illuminazione della cavità del forno Guide per teglie ④... -
Página 96: Dati Tecnici
4.2 Dati tecnici Nome Forni elettrici a convezione C 5230 C 6640 Modello: C 4430 No articolo: 206873 206782 206797 con grill e con umidificatore Versione: umidificatore umidificatore Capacità: 4 (442 x 325 mm) 5 x 2/3 GN 6 (600 x 400 mm) Distanza tra le teglie: 75 mm 70 mm... -
Página 97: Installazione E Utilizzo
5. Installazione e utilizzo 5.1 Indicazioni per l’installazione ATTENZIONE! Tutte le operazioni d’installazione, allacciamento e manutenzione dell’apparecchio devono essere eseguite esclusivamente dal personale qualificato, in conformità alla legislazione internazionale, nazionale e locale vigente. Indicazioni Prima di procedere alle operazioni di installazione e messa in funzione dell’apparecchio leggere attentamente il presente manuale. -
Página 98: Luogo D'installazione
Assicurarsi che il luogo di montaggio sia accessibile e non ci saranno i problemi di passaggio prendendo in considerazione le porte, corridoi o altri passaggi. ATTENZIONE: Durante il trasporto, l’apparecchio può ribaltarsi, il che può provocare ulteriori danni a cose o persone e difficoltà. Si devono usare i mezzi di trasporto adeguati prendendo in considerazione il peso dell’apparecchio. -
Página 99: Preparazione All'istallazione
E' vietato collocare l'apparecchiatura in prossimità di fonti di calore, di friggitrici o altri fonti di liquidi caldi, se questo non è possibile la distanza minima di sicurezza da mantenere è di 50 cm ai lati e dall’alto, e di 70 cm da dietro. ... -
Página 100: Allacciamento Elettrico
Fissaggio del gocciolatoio Il gocciolatoio si applica per raccogliere i liquidi che possono colare dalla parte anteriore del forno. Collocare il gocciolatoio sulla parte anteriore del forno e fissarlo con le viti in dotazione poste all’interno del sacchetto. Le viti si avvitano negli inerti filettati posti sulla parte anteriore, inferiore del forno (disegno a destra). - Página 101 Si deve fare attenzione a non danneggiare il cavo di alimentazione durante lo spostamento. Perciò l’allacciamento alla rete di alimentazione avverrà senza difficoltà e in modo sicuro. Disporre il cavo in modo che in nessun punto raggiunga la temperatura superiore a 50 °C. Forno a convezione con cavo e spina monofase (206873) ...
-
Página 102: Allacciamento Dell'acqua
Collegamento di compensazione del potenziale Questo collegamento deve essere effettuato tra diversi dispositivi tramite una morsettiera segnata con il simbolo . Le morse di collegamento si trovano dietro dell’apparecchio. Le morse consentono un collegamento del cavo di allacciamento di colore giallo/verde con un diametro tra 2,5 e 10 mm ². -
Página 103: Scarico Dell'acqua (206782, 206797)
5.1.6 Scarico dell’acqua (206782, 206797) L’acqua presente nello scarico del forno a convezione può raggiungere alte temperature (90 °C). I tubi flessibili per lo scarico dell’acqua devono resistere a tali temperature. Lo scarico dell’acqua è situato in basso, nella parte posteriore del forno a convezione e deve essere collegato tramite un tubo rigido o un tubo flessibile allo scarico aperto. -
Página 104: Indicazioni Per L'utente
5.2 Indicazioni per l’utente ATTENZIONE! Leggere accuratamente la presente istruzione d’uso, perché comprende le indicazioni riguardanti la sicurezza e l’utilizzo del forno a convezione. La presente istruzione deve essere conservata con cura per un successivo utilizzo. Un montaggio improprio, servizio, manutenzione, pulizia e qualsiasi modifica possono provocare un funzionamento irregolare, danneggiamenti e lesioni. -
Página 105: Primo Avvio
5.2.2 Primo avvio o Assicurarsi che nella camera di cottura non vi sia alcun oggetto (accessori, pellicola di imballaggio, istruzioni d’uso, ecc). o Prima dell’avvio, controllare la correttezza dell’installazione, la stabilità, il livellamento dell’apparecchio e la realizzazione dell’allacciamento elettrico e dell’acqua fredda. -
Página 106: Manutenzione Ordinaria
5.2.3 Manutenzione ordinaria ATTENZIONE! Prima di eseguire qualsiasi lavoro riferito alla pulizia, staccare l’apparecchio dall’alimentazione di corrente e attendere finché il forno a convezione sia completamente freddo. L’utente deve eseguire le operazioni di manutenzione ordinaria. Per i lavori straordinari collegati alla manutenzione, contattare l’ufficio servizio clienti per prenotare la visita di un tecnico specializzato abilitato. - Página 107 Attenzione: se nella camera di cottura è rimasto il grasso o residui di cibi, devono essere immediatamente eliminati, perché durante il funzionamento del forno possono prendere fuoco. Pulizia all’esterno o Per la pulizia delle superfici esterne, utilizzare solo un panno inumidito con acqua tiepida.
-
Página 108: Manutenzione Straordinaria
Sostituzione della lampadina o ATTENZIONE: rispettare strettamente la seguente procedura, per evitare scosse elettriche e lesioni. Interrompere l'alimentazione del forno a convezione e lasciarlo raffreddare. o Svitare le viti, tramite le quali vengono fissate le barre laterali con le piastre di lamiera. Estrarle dalla camera di cottura. - Página 109 o Evitare il posizionamento dell’apparecchio nelle vicinanze di fonti di calore (friggitrici, ecc). o Una volta terminata l’operazione e dopo aver posizionato l’apparecchio al suo posto di lavoro, prima di avviare l’apparecchio accertarsi che gli allacciamenti elettrici siano realizzati in conformità alle norme vigenti. Manutenzione in caso di guasto Nel caso di un guasto, staccare l’apparecchio dall’alimentazione e chiudere l’approvvigionamento idrico.
- Página 110 Problema Causa Soluzione Approvvigionamento Aprire approvvigionamento idrico chiuso. idrico. L’allacciamento Controllare l’allacciamento All’attivazione dell’alimentazione alla rete idrica. dell’umidificazione dell’acqua non è stato i tubi non fatto bene. scaricano l’acqua Il filtro d’ingresso Pulire il filtro d’ingresso dell’acqua.
-
Página 111: Pannelli Operativi
5.3 Pannelli operativi 206782 206797 206873 Manopola per l’impostazione Pulsante dell’umidificazione del tempo Manopola per l’impostazione Spia di riscaldamento (arancione) della temperatura Manopola per ’impostazione Spia dell’umidificazione (arancione) dell’umidificazione Manopola delle funzioni Spia di funzionamento (verde) - Página 112 Impostazioni Manopola delle funzioni 200873 Posizionamento Illuminazione Griglia Solo Circolazione della ventilazione ventilatore 200797 Posizionamento WYŁ. Solo ventilatore Illuminazione Tramite la manopola delle funzioni è possibile selezionare (a seconda del modello) le seguenti funzioni: Disattivazione dell’apparecchio Attivazione dell’illuminazione; Solo il ventilatore Circolazione della ventilazione Griglia 1.
- Página 113 Spia di funzionamento Quando è accesa, significa che l’illuminazione della camera di cottura è attiva e gli elementi di riscaldamento sono pronti a lavorare, secondo la funzione scelta. Manopola per l’impostazione del tempo Impostando la manopola del tempo al modo continuo il forno a convezione rimarrà...
- Página 114 ATTENZIONE: Per ottenere un’umidificazione soddisfacente, è necessario che la temperatura sia impostata almeno a 80-100°C. Con le temperature inferiori si forma solo un vapore pesante, e la maggior parte dell’acqua viene scaricata sul fondo del forno a convezione o allo scarico. Inoltre, per una cottura corretta è...
- Página 115 Suggerimenti e indicazioni Realizzando la cottura tramite la griglia, dei prodotti estremamente grassi, tipo arrosti o pollame, si consiglia di posizionare il contenitore sul fondo della camera di cottura per raccogliere il grasso che gocciola durante la cottura. Cucinando i prodotti nei contenitori riempiti di liquido, bisogna prestare una particolare attenzione alla possibilità...
-
Página 116: Smaltimento
A tal fine va sconnessa l'apparecchiatura dall'alimentazione e va tagliato il cavo di alimentazione. INDICAZIONE! Durante lo smaltimento dell'apparecchiatura, vanno rispettate le opportune norme statali o regionali. Bartscher GmbH Franz-Kleine-Straße 28 D-33154 Salzkotten Tel.: +49 (0) 5258 971-0 Germania Fax: +49 (0) 5258 971-120... - Página 117 Puesta en funcionamiento por primera vez ........... 129 5.2.3 Mantenimiento común ................130 5.2.4 Trabajos de mantenimiento extraordinarios .......... 132 5.3 Panel de control ....................135 6. Recuperación ......................140 Bartscher GmbH Franz-Kleine-Straße 28 D-33154 Salzkotten Tel.: +49 (0) 5258 971-0 Alemania Fax: +49 (0) 5258 971-120...
-
Página 118: Informaciones Generales
1. Informaciones generales 1.1 Informaciones sobre las instrucciones de servicio La presente instrucción de servicio describe la instalación del dispositivo, su servicio y su conservación, además sirve como fuente de información importante, así como de guía. El conocimiento y el cumplimiento de todas sus indicaciones de seguridad y servicio garantizan el trabajo correcto y seguro del dispositivo. -
Página 119: Responsabilidad Del Fabricante Y La Garantía
¡ATENCIÓN! ¡Líquido caliente en el recipiente! Si los recipientes están llenos de líquido o de material cocinado licuado durante la preparación, no se debe utilizar los niveles superiores para colocar recipientes excepto aquellos que el operador puda ver cuando el recipiente esté metido. 1.3 Responsabilidad del fabricante y la garantía Todas las informaciones contenidas en estas instrucciones se han presentado conforme a los reglamentos vigentes, conocimientos actuales de fabricación e... -
Página 120: Declaración De Compatibilidad
1.5 Declaración de Compatibilidad El dispositivo actualmente cumple las normas vigentes y las directrices de la Unión Europea. Esto está confirmado en la Declaración de Compatibilidad WE. A petición del cliente podemos enviar dicha Declaración de Compatibilidad WE. 2. Seguridad Esta sección contiene un compendio de información de los aspectos esenciales relacionados con la seguridad. -
Página 121: Explotación Conforme A Su Diseño
¡ADVERTENCIA! o El dispositivo no está indicado para el uso de personas (incluidos niños) con alguna disfunción física, sensorial o mental, o que no tengan la suficiente experiencia y/o conocimiento, a menos que estas personas estén bajo la supervisión de un adulto responsable de su seguridad o que hubieran recibido de él indicaciones de cómo debe ser utilizado el dispositivo. -
Página 122: Transporte, Embalaje Y Almacenaje
3. Transporte, embalaje y almacenaje 3.1 Control de entregas Tras la entrega, hay que revisar inmediatamente si el dispositivo está completo y si no sufrió daños durante el transporte. En caso de confirmar daños de transporte visibles no hay que aceptar el dispositivo, o bien recibirlo condicionalmente. Los daños hay que detallarlos en los documentos de transporte / o en la lista de entrega del agente expedidor. -
Página 123: Datos Técnicos
4. Datos técnicos 4.1 Presentación de las partes del dispositivo ② ① ③ ④ ⑩ ⑤ ⑨ ⑥ ⑧ ⑦ ① ⑥ Ventilador Pies de regulación de altura ② ⑦ Carcasa Cámara de cocción Iluminación de la cámara de ③ ⑧... -
Página 124: Datos Técnicos
4.2 Datos técnicos Denominación Horno de convección eléctrico C 5230 C 6640 Modelo: C 4430 N° de referencia: 206873 206782 206797 con grill y Versión: humidificación humidificación humidificación Capacidad: 4 (442 x 325 mm) 5 x 2/3 GN 6 (600 x 400 mm) Separación entre 75 mm 70 mm... -
Página 125: Instalación Y Servicio
5. Instalación y servicio 5.1 Indicaciones de instalación ¡ADVERTENCIA! Todos los trabajos relativos a la instalación, conexión y mantenimiento del aparato deben ser realizados únicamente por personal cualificado y autorizado, de acuerdo con las normas internacionales, nacionales y locales. Indicaciones ... -
Página 126: Lugar De La Instalación
Debe asegurarse de que el lugar de instalación es accesible y no haya problemas en el sitio para transitar, teniendo en cuenta puertas, pasillos y otros accesos. ATENCIÓN: durante el transporte del aparato se le puede haber dado la vuelta, lo que puede provocar daños personales y materiales y dificultades. -
Página 127: Preparación Para La Instalación
El aparato nunca se debe colocar cerca de fuentes de calor, freidoras u otras fuentes de líquidos calientes. Si esto no fuese posible, debe dejar una distancia de seguridad de 50 cm por los laterales y la parte superior del aparato, y 70 cm por la parte posterior. -
Página 128: Conexión Eléctrica
Fijación de la bandeja para líquidos La bandeja para líquidos se emplea para recoger los líquidos que puedan salir por la parte delantera del horno. Se debe instalar la bandeja en la parte delantera del horno y fijarla utilizando el tornillo que se encuentra en una bolsita en el interior del paquete de la entrega. - Página 129 Debe prestar atención a que durante el desplazamiento del aparato no se estropee el cable de red. Gracias a ello, la conexión a la red se efectuará sin dificultades y de forma más segura. Debe colocar el cable de tal forma que en ningún punto la temperatura de los alrededores supere los 50 °C.
-
Página 130: Conexión Del Agua
Conexión para igualar el potencial Esta conexión debe realizarse entre los diferentes dispositivos utilizando la regleta de bornes señalizada con el siguiente símbolo . Los bornes de conexión se encuentran en la parte posterior del aparato. Los bornes permiten el empalme del cable de conexión verde/amarillo con un diámetro de 2,5 a 10 mm ². -
Página 131: Salida Del Agua (206782, 206797)
5.1.6 Salida del agua (206782, 206797) El agua que sale del horno de convección puede llegar a tener una temperatura muy alta (90 °C). Los tubos empleados para la salida del agua tienen que poder soportar estas temperaturas. La salida del agua se encuentra abajo en la parte trasera del horno de convección y debe estar conectada con un tubo rígido o un tubo elástico a un... -
Página 132: Indicaciones De Uso
5.2 Indicaciones de uso ¡ADVERTENCIA! Se deben leer cuidadosamente las instrucciones de empleo, ya que contienen indicaciones relativas a la seguridad y a la utilización del horno de convección. Se deben conservar cuidadosamente estas instrucciones de empleo para un uso posterior. -
Página 133: Puesta En Funcionamiento Por Primera Vez
5.2.2 Puesta en funcionamiento por primera vez Se debe asegurar de que en la cámara de cocción no se encuentre ningún objeto (accesorios, material de embalaje, manual de instrucciones, etc.). Antes de poner en funcionamiento se debe comprobar la corrección de la instalación, la estabilidad, el nivelado del aparato así... -
Página 134: Mantenimiento Común
5.2.3 Mantenimiento común ¡ADVERTENCIA! Antes de realizar cualquier tarea de limpieza, se debe desconectar el aparato de la red eléctrica y esperar a que el horno de convección se enfríe en su totalidad. El usuario debería realizar las tareas de mantenimiento normales. Para realizar tareas de mantenimiento excepcionales debe contactar con el servicio de atención al cliente y encargar ayuda especializada de un técnico con autorizaciones. - Página 135 o En el caso de que los restos se peguen, se debe emplear únicamente una espátula de material plástico o una esponja bañada en vinagre o en agua caliente. o Atención: si en la cámara de cocción se encuentra grasa o restos de alimentos, se deben eliminar inmediatamente, ya que durante el funcionamiento del horno de convección se pueden quemar.
-
Página 136: Trabajos De Mantenimiento Extraordinarios
Cambio de la bombilla o ATENCIÓN: Se debe seguir la siguiente forma de actuar al pie de la letra, para evitar electrocuciones por choque eléctrico y heridas: o Desconectar la corriente eléctrica del horno de convección y dejarlo enfriar. o Desatornillar los tornillos con los que están fijadas las guías laterales para las bandejas. - Página 137 o Evitar colocar el aparato cerca de fuentes de calor (por ejemplo, freidoras, etc.) o Después de efectuar estas operaciones y de colocar el aparato en su lugar de montaje, debe asegurarse de que todas las conexiones eléctricas e hidráulicas estén de acuerdo a la normativa antes de ponerlo en funcionamiento.
- Página 138 Fallo Causa Solución Toma de agua cerrada. Abrir la toma de agua. La conexión a la toma de Comprobar la conexión a la Al activar la toma de agua. agua no ha sido realizada humidificación no de manera correcta.
-
Página 139: Panel De Control
5.3 Panel de control 206782 206797 206873 Regulador de la programación Botón de humidificación del tiempo Regulador de la temperatura Piloto de calentamiento (naranja) Regulador de la humidificación Piloto de humidificación (naranja) Regulador de funciones Piloto de funcionamiento (verde) - Página 140 Ajustes Regulador de funciones 200873 Posición de APAGADO Iluminación Grill Circulación del ventilador Sólo ventilador 200797 Posición de APAGADO Solo ventilador Iluminación Utilizando el regulador de funciones se pueden elegir (dependiendo del modelo) las siguientes funciones: Apagar el aparato; Encender la iluminación; Sólo el ventilador;...
- Página 141 Piloto de funcionamiento Cuando se enciende, significa que la iluminación de la cámara de cocción se encuentra encendida, y los elementos calefactores se encuentran preparados para funcionar, dependiendo de la función elegida. Regulación de tiempo Al ajustar el regulador de tiempo en un modo continuo horno de convención se mantiene encendido hasta el momento en el que el usuario interviene.
- Página 142 ATENCIÓN: para que la humidificación funcione de manera satisfactoria, es necesario que la temperatura programada sea al menos de 80-100°C. En el caso de programar temperaturas más bajas, se produce sólo un vapor muy tenue, y bastante parte del agua se verte en la parte inferior del horno o por el desagüe. Además, para una cocción apropiada, es necesario precalentar el horno de convección hasta alcanzar la temperatura deseada, antes de activar la humidificación.
- Página 143 Consejos e indicaciones Al cocinar al grill alimentos que son especialmente grasos, como el asado o el pollo se recomienda colocar un recipiente en el fondo de la cámara de cocción para recoger la grasa, que gotea durante la cocción. ...
-
Página 144: Recuperación
¡INDICACIÓN! Durante la recuperación del dispositivo, siga al pie de la letra las leyes estatales o regionales. Bartscher GmbH Franz-Kleine-Straße 28 D-33154 Salzkotten Tel.: +49 (0) 5258 971-0... - Página 145 Aanwijzingen voor veilig gebruik ............156 5.2.2 Eerste ingebruikneming ................. 157 5.2.3 Normaal onderhoud ................158 5.2.4 Bijzonder onderhoud ................160 Bedieningspanelen ..................163 6. Afvalverwijdering ....................168 Bartscher GmbH Franz-Kleine-Str. 28 D-33154 Salzkotten Tel.: +49 (0) 5258 971-0 Germany Fax: +49 (0) 5258 971-120...
-
Página 146: Algemeen
1. Algemeen 1.1 Informatie over de gebruiksaanwijzing Deze gebruiksaanwijzing bevat de beschrijving van de installatie, de bediening en het onderhoud van het apparaat en dient als belangrijke informatiebron en naslagwerk. De kennis en het in acht nemen van alle hier beschreven veiligheidsvoorschriften en instructies is een voorwaarde voor veilig en juist gebruik van het apparaat. -
Página 147: Aansprakelijkheid En Vrijwaring
WAARSCHUWING! Hete vloeistof in de container! Wanneer de containers zijn gevuld met vloeistof of tijdens de bereiding vloeibaar geworden gerechten, gebruik dan niet de hogere inschuifniveaus voor containers, met uitzondering van de niveaus waarop de bediener in de uitgeschoven container kan kijken. 1.3 Aansprakelijkheid en vrijwaring Alle gegevens en tips die zijn opgenomen in deze gebruiksaanwijzing zijn samengesteld rekening houdend met de geldende voorschriften, de actuele technische stand van zaken... -
Página 148: Verklaring Van Conformiteit
1.5 Verklaring van Conformiteit Het apparaat beantwoordt aan de actuele EU-normen en richtlijnen. Dit bevestigen we in de EG-verklaring van Conformiteit. Indien gewenst, sturen we u graag de betreffende Verklaring van Conformiteit toe. 2. Veiligheid In dit gedeelte wordt een overzicht gegeven van alle belangrijke veiligheidsaspecten. Bovendien zijn er in de onderstaande hoofdstukken concrete veiligheidsvoorschriften opgenomen (aangeduid met symbolen) om risico’s te voorkomen. -
Página 149: Reglementair Gebruik
OPGELET! o Het toestel is niet bestemd voor gebruik door personen (inclusief kinderen) met een fysieke, sensorische of geestelijke handicap en/of met onvoldoende ervaring en/of onvoldoende kennis, tenzij deze personen onder toezicht staan van een voor hun veiligheid verantwoordelijke persoon of van die persoon voldoende uitleg hebben gekregen betreffende het gebruik maken van het apparaat. -
Página 150: Transport, Verpakking En Bewaring
3. Transport, verpakking en bewaring 3.1 Controle bij aflevering Als het apparaat afgeleverd is, onmiddellijk controleren of het compleet en zonder transportschade is. Als er duidelijk zichtbare transportschade is, het geleverde apparaat niet of alleen onder voorbehoud aannemen. De schade opschrijven op de transportdocumenten/ het leveringsdocument van de leverancier. -
Página 151: Specificaties
4. Specificaties 4.1 Overzicht van onderdelen ② ① ③ ④ ⑩ ⑤ ⑨ ⑥ ⑧ ⑦ ① ⑥ Ventilator In hoogte verstelbare voetjes ② ⑦ Behuizing Ovenruimte ③ ⑧ Ovenruimteverlichting Oplegrails ④ ⑨ Bedieningspaneel Ovendeur ⑤ ⑩ Ovendeurbeveiliging Deurgreep Beveiliging De ovendeurbeveiliging (microschakelaar) onderbreekt de werking van het apparaat wanneer de deur opengaat: zowel het verwarmingssysteem, als de ventilator worden uitgeschakeld. -
Página 152: Technische Gegevens
4.2 Technische Gegevens Naam Elektrische heteluchtovens C 5230 C 6640 Model: C 4430 Artikelnr.: 206873 206782 206797 met grill en met vochtinjectie met vochtinjectie Versie: vochtinjectie Inhoud: 4 (442 x 325 mm) 5 x 2/3 GN 6 (600 x 400 mm) Afstand tussen de 75 mm 70 mm... -
Página 153: Installatie En Bediening
5. Installatie en bediening 5.1 Aanwijzingen voor de installateur OPGELET! Alle werkzaamheden in verband met de installatie, aansluiting en het onderhoud van het apparaat mogen uitsluitend worden uitgevoerd door een gekwalificeerd en erkend installateur en in overeenstemming met de geldende internationale, nationale en lokale voorschriften. -
Página 154: Installatieplaats
Zorg ervoor dat de installatieplaats goed toegankelijk is en er geen problemen zijn met het transport door deuren, gangen of andere doorgangen. OPGELET: Het apparaat kan tijdens het transport omvallen, waardoor verdere materiële schade en persoonlijk letsel kan ontstaan. Gebruik een geschikt transportmiddel, rekening houdend met het gewicht van het apparaat. -
Página 155: Voorbereiding Van De Installatie
Plaats het apparaat nooit in de buurt van warmtebronnen, frituurpannen of andere bronnen van hete vloeistoffen. Wanneer dit niet mogelijk is, zorg dan voor een veilige afstand van 50 cm aan de zijkanten en de bovenkant en 70 cm aan de achterkant van het apparaat. -
Página 156: Elektrische Aansluiting
Bevestiging van de opvangschaal U gebruikt de opvangschaal om vloeistoffen op te vangen die van de voorkant van de oven kunnen druipen. Plaats de opvang- schaal aan de voorkant van de oven en maak hem vast met de schroeven uit het meegele- verde zakje. - Página 157 Wanneer het apparaat niet is uitgerust met een wielgestel dat verplaatsing vereenvoudigt, bevelen wij aan om het apparaat eerst aan te sluiten op het lichtnet en het vervolgens op zijn plaats te zetten. Let erop dat bij het verplaatsen van het apparaat de voedingskabel niet beschadigd raakt.
-
Página 158: Wateraansluiting
Potentiaalvereffeningsaansluiting Maak deze aansluiting tussen verschillende apparaten met behulp van een klemmenblok dat is gemerkt met het symbool . De aansluitklem bevindt zich op de achterkant van het apparaat. Deze klem maakt aansluiting van een geel/groene verbindingskabel met een doorsnede tussen 2,5 en 10 mm²... -
Página 159: Waterafvoer (206782, 206797)
Om probleemloze werking van het apparaat te waarborgen en kalkaanslag in de ovenruimte te voorkomen, moet het water een hardheid van maximaal 5 °F hebben. Installeer bij hogere waarden een wateronthardingsinrichting vóór het apparaat. 5.1.6 Waterafvoer (206782, 206797) Het water dat uit de afvoer van de heteluchtoven komt kan hoge temperaturen bereiken (90 °C). -
Página 160: Aanwijzingen Voor De Gebruiker
5.2 Aanwijzingen voor de gebruiker OPGELET! Lees deze gebruiksaanwijzing zorgvuldig door. Zij bevat aanwijzingen voor de veiligheid en het gebruik van de heteluchtoven. Bewaar deze gebruiksaanwijzing zorgvuldig voor later gebruik. Onjuiste installatie, bediening, onderhoud en reiniging, alsmede eventuele wijzigingen of modificaties kunnen leiden tot verwondingen en onjuiste werking en beschadiging van het apparaat. -
Página 161: Eerste Ingebruikneming
5.2.2 Eerste ingebruikneming Zorg ervoor dat er zich in de ovenruimte geen voorwerpen bevinden (accessoires, verpakkingsfolie, gebruiksaanwijzing etc.). Controleer voordat u het apparaat in gebruik neemt de installatie en de stabiliteit van het apparaat, of het waterpas staat en de uitvoering van de elektrische aansluiting en de wateraansluiting. -
Página 162: Normaal Onderhoud
5.2.3 Normaal onderhoud OPGELET! Koppel het apparaat los van de stroomvoorziening en wacht tot de heteluchtoven volledig is afgekoeld, voordat u begint met schoonmaakwerkzaamheden. De gebruiker is verantwoordelijk voor de normale onderhoudswerkzaamheden. Neem voor bijzondere onderhoudswerkzaamheden contact op met de klantenservice en verzoek om de hulp van een gespecialiseerde, bevoegde technicus. - Página 163 o Gebruik bij aangekoekt vuil slechts een plastic spatel of een in azijn of warm water gedrenkt sponsje. o Attentie: wanneer er zich vet of etensresten in de ovenruimte bevinden, moet u die onmiddellijk verwijderen, omdat deze bij het gebruik van de heteluchtoven kunnen ontbranden.
-
Página 164: Bijzonder Onderhoud
Vervanging van het lampje o OPGELET: Houd u strikt aan de onderstaande procedure om elektrische schokken en letsel te voorkomen: o Onderbreek de stroomvoorziening van de heteluchtoven en laat hem afkoelen. o Maak de schroeven los waarmee de oplegrails aan de zijkanten zijn bevestigd. Haal de rails uit de ovenruimte. - Página 165 o Wanneer het apparaat zich op een wielgestel bevindt, controleert u of tijdens het verplaatsen de elektrische leidingen, pijpleidingen of andere leidingen niet beschadigd zijn. o Zet het apparaat nooit in de buurt van warmtebronnen (bij.v frituurpannen etc.). Wanneer deze handelingen zijn uitgevoerd en het apparaat op zijn nieuwe plaats staat, controleert u voor de ingebruikname of alle elektrische aansluitingen en wateraansluitingen volgens de normen zijn uitgevoerd.
- Página 166 Storing Oorzaak Oplossing De watertoevoerkraan is Open de watertoevoer. dicht. Er komt geen De aansluiting op de Controleer de aansluiting op water uit de watervoorziening is niet de waterleiding. stoomslang bij juist uitgevoerd. activering van de ...
-
Página 167: Bedieningspanelen
5.3 Bedieningspanelen 206782 206797 206873 Draaiknop voor tijdinstelling Vochtinjectieknop Draaiknop voor Controlelampje voor verwarming temperatuurinstelling (oranje) Draaiknop voor de regeling van Controlelampje voor vochtinjectie de vochtinjectie (oranje) Functiedraaiknop Controlelampje werking (groen) - Página 168 Instellingen Functiedraaiknop 200873 Positie UIT Verlichting Grill Draaien van de ventilator Alleen ventilator 200797 Positie UIT Alleen ventilator Verlichting Met behulp van de functiedraaiknop kunt u (afhankelijk van het model) de volgende functies kiezen: Uitschakelen van het apparaat; Inschakelen van de verlichting; Alleen ventilator;...
- Página 169 Controlelampje werking Wanneer dit lampje brandt, betekent dit dat de ovenruimteverlichting is ingeschakeld en de verwarmingselementen klaar zijn om te functioneren, afhankelijk van de gekozen functie. Draaiknop voor tijdinstelling Wanneer u de tijdregelaar instelt op continuwerking blijft de heteluchtoven ingeschakeld totdat de gebruiker ingrijpt. Wanneer u een bepaalde waarde kiest binnen het bereik van 120 minuten dan blijft de heteluchtoven gedurende die tijd ingeschakeld.
- Página 170 OPGELET: De temperatuur moet op minimaal 80-100°C zijn ingesteld om de vochtinjectie goed te laten werken. Bij lagere temperaturen ontstaat slechts zware damp en het grootste deel van het water loopt naar de bodem van de heteluchtoven of in de afvoer. Bovendien is het voor het beste bereidingsresultaat noodzakelijk om de heteluchtoven voor te verwarmen tot de gewenste temperatuur, voordat u de vochtinjectie activeert.
- Página 171 Adviezen en tips Wij bevelen aan om bij het bereiden onder de grill van voedingsmiddelen die veel vet bevatten, zoals gebraad of gevogelte, een container op de bodem van de ovenruimte te plaatsen om het vet dat tijdens de bereiding vrijkomt, op te vangen. ...
-
Página 172: Afvalverwijdering
AANWIJZING! Bij de verwijdering van het apparaat dient u de in uw land geldende voorschriften in acht te nemen. Bartscher GmbH Franz-Kleine-Str. 28 D-33154 Salzkotten Tel.: +49 (0) 5258 971-0 Germany Fax: +49 (0) 5258 971-120... - Página 173 Pierwsze uruchomienie ................. 185 Zwykła konserwacja ................186 5.2.3 5.2.4 Nadzwyczajne prace konserwacyjne ............. 188 5.3 Panele obsługi ....................191 6. Utylizacja ........................ 196 Bartscher GmbH Franz-Kleine-Straße 28 D-33154 Salzkotten Tel.: +49 (0) 5258 971-0 Niemcy Faks: +49 (0) 5258 971-120...
-
Página 174: Informacje Ogólne
1. Informacje ogólne 1.1 Informacje dotyczące instrukcji obsługi Niniejsza instrukcja obsługi zawiera opis instalacji urządzenia, jego obsługi oraz konserwacji i służy jako ważne źródło informacji oraz poradnik. Znajomość i przestrzeganie wszystkich zawartych w niej wskazówek dotyczących bezpieczeństwa i obsługi stanowi warunek bezpiecznej i prawidłowej pracy z urządzeniem. Ponadto należy przestrzegać... -
Página 175: Odpowiedzialność I Gwarancja
UWAGA! Gorący płyn w pojemniku! Jeżeli pojemniki wypełnione są płynem lub powstającym podczas gotowania upłynnionym materiałem gotowanym, nie należy wykorzystywać wyższych poziomów do umiejscawiania pojemników poza tymi, przy których obsługujący będzie mógł zajrzeć do wsuniętego pojemnika. 1.3 Odpowiedzialność i gwarancja Wszystkie informacje zawarte w niniejszej instrukcji obsługi zostały zestawione przy uwzględnieniu obowiązujących przepisów, aktualnej wiedzy konstruktorskiej i inżynierskiej oraz naszej wiedzy, a także naszych wieloletnich doświadczeń. -
Página 176: Deklaracja Zgodności
1.5 Deklaracja zgodności Urządzenie spełnia aktualnie obowiązujące normy oraz wytyczne Unii Europejskiej. Powyższe potwierdzamy w Deklaracji Zgodności WE. W razie potrzeby chętnie prześlemy Państwu odpowiednią Deklarację Zgodności. 2. Bezpieczeństwo Niniejszy rozdział zawiera zarys informacji, dotyczących wszystkich istotnych aspektów związanych z bezpieczeństwem. Ponadto poszczególne rozdziały zawierają... -
Página 177: Użytkowanie Zgodnie Z Przeznaczeniem
OSTRZEŻENIE! o Urządzenie nie jest przeznaczone do użytkowania przez osoby (w tym także dzieci) o ograniczonej sprawności fizycznej, sensorycznej czy umysłowej lub z niedostatecznym doświadczeniem i/lub niedostateczną wiedzą, chyba że osoby te znajdują się pod nadzorem osoby odpowiedzialnej za ich bezpieczeństwo lub otrzymały od niej wskazówki, jak należy używać... -
Página 178: Transport, Opakowanie I Magazynowanie
3. Transport, opakowanie i magazynowanie 3.1 Kontrola dostawy Po dotarciu dostawy należy niezwłocznie sprawdzić, czy urządzenie jest kompletne i czy nie zostało uszkodzone podczas transportu. W przypadku stwierdzenia widocznych uszkodzeń transportowych, należy odmówić przyjęcia urządzenia lub dokonać przyjęcia warunkowego. Zakres szkody należy wpisać do dokumentów przewozowych / listu przewozowego spedytora. -
Página 179: Parametry Techniczne
4. Parametry techniczne 4.1 Zestawienie podzespołów urządzenia ② ① ③ ④ ⑩ ⑤ ⑨ ⑥ ⑧ ⑦ ① ⑥ Stopki o regulowanej wysokości Wentylator ② ⑦ Obudowa Komora gotowania ③ ⑧ Podświetlenie komory gotowania Szyny na blachy ④ ⑨ Panel obsługi Drzwiczki pieca konwekcyjnego System zabezpieczający ⑤... -
Página 180: Dane Techniczne
4.2 Dane techniczne Nazwa Elektryczne piece konwekcyjne C 5230 C 6640 Model: C 4430 Nr artykułu: 206873 206782 206797 z grillem i z nawilżaniem z nawilżaniem Wersja: nawilżaniem Pojemność: 4 (442 x 325 mm) 5 x 2/3 GN 6 (600 x 400 mm) Odstęp pomiędzy 75 mm 70 mm... -
Página 181: Instalacja I Obsługa
5. Instalacja i obsługa 5.1 Wskazówki dla instalatora OSTRZEŻENIE! Wszelkie prace związane z instalacją, przyłączeniem oraz konserwacją urządzenia mogą być dokonywane wyłącznie przez wykwalifikowanego i uprawnionego technika, zgodnie z obowiązującymi przepisami międzynarodowymi, krajowymi i lokalnymi. Wskazówki Przed rozpoczęciem prac związanych z instalacją oraz uruchomieniem urządzenia należy uważnie przeczytać... -
Página 182: Miejsce Instalacji
Należy upewnić się, że będzie dostęp do miejsca instalacji i nie będzie problemów z miejscem na przejazd uwzględniając drzwi, korytarze lub inne przejścia. UWAGA: Podczas transportu urządzenia może dojść do jego wywrócenia, co może spowodować dalsze szkody rzeczowe i na osobach, a także utrudnienia. Należy zastosować... -
Página 183: Przygotowanie Do Instalacji
Urządzenia nigdy nie wolno ustawiać w pobliżu źródeł ciepła, frytkownic lub innych źródeł gorących cieczy, gdyby okazało się to niemożliwe, to bezpieczny odstęp wynosi 50 cm z boku i z góry urządzenia, zaś 70 cm z tyłu urządzenia. Nie wolno nigdy ustawiać... -
Página 184: Przyłącze Elektryczne
Przymocowanie tacki ociekacza Tackę ociekacza stosuje się w celu zbierania cieczy, które mogą spływać z przodu pieca. Należy ustawić tackę z przodu pieca i przymocować ją za pomocą śrub, znajdujących się w torebce we wnętrzu opakowania. Śruby wkręca się w gwintowane wkładki w przedniej, dolnej części pieca (rys. - Página 185 Należy zwrócić uwagę ,aby w trakcie przemieszczania urządzenia nie doszło do uszkodzenia kabla sieciowego. Dzięki temu przyłączenie do sieci zasilania będzie mieć miejsce bez trudności i w bardziej bezpieczny sposób. Należy ułożyć kabel tak, aby żaden punkt nie osiągnął temperatury otoczenia wyższej niż 50 °C. Piec konwekcyjny z kablem i wtykiem jednofazowym (206873) ...
-
Página 186: Przyłącze Wody
Przyłącze do wyrównania potencjału To przyłącze powinno być wykonane pomiędzy różnymi urządzeniami za pomocą listwy zaciskowej oznaczonej następującym symbolem . Zaciski przyłączeniowe znajdują się z tyłu urządzenia. Zaciski umożliwiają podłączenie kabla przyłączeniowego w kolorze żółtym/zielonym o średnicy pomiędzy 2,5 a 10 mm ² . ... -
Página 187: Odpływ Wody (206782, 206797)
5.1.6 Odpływ wody (206782, 206797) Występująca na wylocie pieca konwekcyjnego woda może osiągać wysokie temperatury (90 °C). Węże zastosowane do odpływu wody powinny być w stanie wytrzymać takie temperatury. Odpływ wody znajduje się na dole z tyłu pieca konwekcyjnego i powinien on być... -
Página 188: Wskazówki Dla Użytkownika
5.2 Wskazówki dla użytkownika OSTRZEŻENIE! Należy starannie przeczytać niniejszą instrukcję obsługi, gdyż zawiera ona wska- zówki dotyczące bezpieczeństwa oraz użytkowania pieca konwekcyjnego. Należy starannie przechowywać niniejszą instrukcję obsługi do późniejszego użytku. Nieprawidłowa instalacja, obsługa, konserwacja, czyszczenie oraz jakiekolwiek zmiany i modyfikacje mogą doprowadzić do nieprawidłowego działania, uszkodzeń i obrażeń. -
Página 189: Pierwsze Uruchomienie
5.2.2 Pierwsze uruchomienie Należy upewnić się, że w komorze gotowania nie znajdują się żadne przedmioty (akcesoria, folia z opakowań, instrukcje obsługi i in.). Przed uruchomieniem sprawdzić prawidłowość instalacji, stabilność, niwelację urząd- zenia oraz wykonanie przyłącza elektrycznego oraz przyłącza dopływu zimnej wody. ... -
Página 190: Zwykła Konserwacja
5.2.3 Zwykła konserwacja OSTRZEŻENIE! Przed wykonaniem wszelkich prac związanych z czyszczeniem należy odłączyć urządzenie od zasilania prądem i zaczekać aż piec konwekcyjny całkowicie wystygnie. Użytkownik powinien wykonywać zwykłe prace konserwacyjne. W celu nadzwyczajnych prac związanych z konserwacją należy skontaktować się z działem obsługi klienta i zamówić... - Página 191 o W przypadku osadów brudu należy zastosować jedynie szpachelkę z tworzywa sztucznego albo gąbkę zanurzoną w occie lub ciepłej wodzie. o Uwaga: jeżeli w komorze gotowania znajduje się tłuszcz albo resztki potraw, należy je natychmiast usunąć, gdyż podczas korzystania z pieca konwekcyjnego mogą one się zapalić.
-
Página 192: Nadzwyczajne Prace Konserwacyjne
Wymiana lampki o UWAGA: Należy ściśle przestrzegać poniższego sposobu postępowania, aby uniknąć porażenia prądem i obrażeń: o Odciąć zasilanie prądem od pieca konwekcyjnego i pozostawić go do wystygnięcia. o Odkręcić śruby, za pomocą których przymocowane są boczne szyny na blachy. Usunąć... -
Página 193: Sposób Usunięcia
o Jeżeli urządzenie posiada system rolek, wówczas należy sprawdzić, czy w trakcie jego przemieszczania przewody elektryczne, rurowe lub inne nie ulegną uszkodzeniu. o Unikać stawiania urządzenia w pobliżu źródeł ciepła (np. frytownic itp.). o Po wykonaniu danej operacji i ustawieniu urządzenia w jego miejscu montażu należy upewnić... - Página 194 Sposób usunięcia Usterka Przyczyna Zamknięty dopływ wody. Otworzyć dopływ wody. Przy aktywacji Przyłącze zasilania wodą Sprawdzić przyłącze do nawilżania z nie zostało wykonane we sieci wodnej. wężyków nie właściwy sposób. wydostaje się Filtr wejściowy wody ...
-
Página 195: Panele Obsługi
5.3 Panele obsługi 206782 206797 206873 Pokrętło ustawiania czasu Przycisk nawilżania Pokrętło ustawiania Kontrolka nagrzewania (pomarańczowa) temperatury Pokrętło regulacji nawilżania Kontrolka nawilżania (pomarańczowa) Pokrętło funkcji Kontrolka pracy (zielona) - Página 196 Ustawienia Pokrętło funkcji 200873 Pozycja WYŁ. Oświetlenie Grill Cyrkulacja wentylatora Tylko wentylator 200797 Pozycja WYŁ. Oświetlenie Tylko wentylator Za pomocą pokrętła funkcji można wybrać (w zależności od modelu) następujące funkcje: Wyłączanie urządzenia; Włączanie oświetlenia; Tylko wentylator Cyrkulacja wentylatora Grill 1. Kiedy pokrętło funkcji jest ustawione w pozycji WYŁ., wówczas piec konwekcyjny jest całkowicie wyłączony.
- Página 197 Kontrolka pracy Kiedy się świeci, oznacza to, że oświetlenie komory gotowania jest włączone, a elementy grzejne są gotowe do pracy, w zależności od wybranej funkcji. Pokrętło ustawiania czasu Przy ustawieniu pokrętła czasu na tryb ciągły piec konwekcyjny pozostanie włączony do momentu, aż użytkownik nie interweniuje.
- Página 198 UWAGA: Aby nawilżanie działało w zadowalający sposób, konieczne jest, by temperatura była ustawiona na przynajmniej 80-100°C. W przypadku niższych temperatur powstaje tylko ciężka para, a spora część wody odpływa na spód pieca konwekcyjnego bądź do odpływu. Oprócz tego, do właściwego gotowania wymagane jest ogrzanie wstępne pieca konwekcyjnego do pożądanej temperatury, zanim aktywuje się...
- Página 199 Porady i wskazówki Przy gotowaniu za pomocą grilla artykułów spożywczych, które są wyjątkowo tłuste, takich jak pieczeń czy drób, zaleca się ustawienie pojemnika na dnie komory gotowania w celu wyłapania tłuszczu, skapującego w trakcie gotowania. Przy gotowaniu artykułów w pojemnikach wypełnionych płynem, należy szczególnie uważać...
-
Página 200: Utylizacja
W tym celu należy odłączyć urządzenie od zasilania i odciąć kabel zasilający. WSKAZÓWKA! Podczas utylizacji urządzenia należy postępować zgodnie z właściwymi przepisami państwowymi lub regionalnymi. Bartscher GmbH Franz-Kleine-Straße 28 D-33154 Salzkotten Tel.: +49 (0) 5258 971-0 Niemcy Faks: +49 (0) 5258 971-120... - Página 201 5.2.2 처음 사용하기 전 ................213 5.2.3 정기 점검 ..................214 5.2.4 특별 점검 ..................216 5.3 조작부 ....................219 6. 폐기처분..................... 224 Bartscher GmbH Franz-Kleine-Str. 28 D-33154 Salzkotten Tel.: +49 (0) 5258 971-0 Germany Fax: +49 (0) 5258 971-120...
-
Página 202: 일반사항
1. 일반사항 1.1사용설명서에 대한 각종 정보 본 사용설명서는 기구의 설치, 사용법 및 보전에 대한 내용이며 필요시 사용될 수 있는 중요한 정보를 제공한다. 사용설명서에 기입된 안전지시사항과 사용법은 기구조작시의 안전과 동시에 규정에 합당한 사용을 위한 기본지시에 속한다. 이와 동시에 사용자는 기구가 직접 사용되는 각 지역과 국가에 해당되는 사고방지규정 및... -
Página 203: 책임 및 보증권한
경고! 화상 위험! 액체류가 들어 있거나 또는 조리 과정에 녹는 음식물이 들어 있는 용기는 사용자가 용기 안을 들여다 볼 수 있는 높이 이상의 오븐 선반에는 넣지 마세요. 1.3 책임 및 보증권한 본 사용설명서의 모든 기술내용과 정보는 현재 적용되는 각종 규정을 준수한 내용이며 현재... -
Página 204: 생산자 표준부합신고서
1.5 생산자 표준부합신고서 본 항목에서는 중요한 모든 안전에 대해 설명되어있다. 추가적으로 안전예방을 위한 구체적인 안전지시사항과 안전표지가 기입되어있다. 기구자체에 부착된 픽토그램, 품목판 및 기입내용을 참고하며 또한 언제든지 읽을 수 있도록 이 부분을 청결하게 관리한다. 본 기구는 유럽공동위원회의 기준 및 규정에 합당한 제품이다. 본 기업은 EC- 표준부합신고서를... -
Página 205: 규정에 합당한 사용
주의 o 본 기구는 신체적이나 감각적인 또는 정신적 장애를 가진 사람이나 (미성년자 포함) 무경험자 또는 경험부족한 작업자가 사용할 수 없다는 규정을 갖고있다. 그러나 안전관련자가 직접 참여하거나 기구사용법에 대해 이미 연수를 받아 사용허락을 소유한 경우는 예외이다. o 어린이들이 기구 가까이에 머물거나 작동할 수 없도록 안전조치한다. o 본... -
Página 206: 운송, 포장 및 보관
3. 운송, 포장 및 보관 3.1 운송관리 기구가 납품되면 즉시 기구상태의 완벽성과 운송과정의 손상이 있는지 점검한다. 외부에 나타난 운송상의 손상 시 인수거부가 가능하며 상황에 따라 임시납품임을 확실히 기록하여 문서로 남긴다. 손상내용을 납품서류에 기록하여 운송업체에 제시한다 손해배상처리를 이행한다. 납품 시 쉽게 발견하지못한 결점이 차후에 확인되었을 경우 즉시 신고한다, 손해배상기간, 또는... -
Página 207: 기술사양
4. 기술사양 4.1제품군 개요 ② ③ ① ④ ⑩ ⑤ ⑨ ⑥ ⑧ ⑦ ① ⑥ 컨벡션 팬 다리 받침대(높이 조절 가능) ② ⑦ 기기 케이스 조리실 ③ ⑧ 오븐 램프 측면 가이드 레일 ④ ⑨ 조작부 오븐 도어 ⑤ ⑩... -
Página 208: 기술사양
4.2 기술사양 컨벡션 전기 오븐 명칭 모델명 C 5230 C 6640 C 4430 제품 번호 206873 206782 206797 그릴 기능과 스팀 기능 스팀 기능 스팀 기능 기능 오븐 선반 4(442x325mm) 5x2/3GN 6x600x400mm 오븐 선반 간격 75mm 70mm 80mm 온도 설정 범위 0°C–280°C 시간... -
Página 209: 설치 및 사용법
5. 설치 및 사용법 5.1 서비스 기사를 위한 설치 안내 주의! 전문 교육을 받은 서비스 기사만이 기기의 모든 설치, 연결 및 점검 관련 작업을 설치 국가의 국내/외 및 현지의 유효한 규정에 따라 실행해야 합니다. 안내 사항 기기의 설치 작업 및 작동을 하기 전에 사용설명서를 꼼꼼히 읽으시기 바랍니다. ... -
Página 210: 설치 장소
문, 복도 등을 통해 설치 장소로 이동하는 중간에 공간 문제가 있는지 확인하세요. 주의: 기기를 운반할 때 기기가 넘어져 사물과 사람에게 손상 및 해를 끼칠 수 있습니다. 기기의 자체 무게를 고려해 이에 적절한 운반 도구를 사용하세요. 기기를 끌거나 기울이지 말고, 바닥에서 수직으로 들어 올려, 수평으로 옮기세요. 5.1.2 설치... -
Página 211: 설치 준비
기기를 열원, 튀김기 또는 뜨거운 액체가 들어 있는 곳 가까이에 절대로 설치하지 마세요. 부득이한 경우에는 기기의 좌우, 윗면과 약 50cm, 뒷면과 약 70cm의 안전 간격을 두고 설치하세요. 화재의 위험이 있으니 기기를 화기성 재질 또는 화기성 재질로 된 용기(예: 벽, 가구, 분리벽, 유리병) 근처에... -
Página 212: 전원 플러그 연결
물받이 고정하기 물받이는 오븐의 앞쪽에서 흘러나오는 액체류가 바닥에 떨어지지 않도록 하는데 사용됩니다. 물받이를 기기의 밑면 앞쪽에 놓고, 포장 안쪽의 비닐에 들어 있는 나사로 고정하세요. 나사를 기기 밑면 앞쪽에 있는 스레드 인서트에 고정하세요(오른쪽 그림 참조). 물받이 배수구 고정 플라스틱 클립과 포장 안쪽에 들어 있는 흰색 배수... - Página 213 기기를 옮길 때 전원 케이블이 손상되지 않도록 주의하세요. 이렇게 전원 플러그를 쉽고 더 안전하게 연결할 수 있습니다. 케이블 전체 부분을 주위 온도가 50도 이상 올라가지 않는 곳에 배치하세요. 단상 케이블과 플러그가 제공되는 컨벡션 전기 오븐(206873) 케이블과 플러그(230V 단상)를 제공하는 기기에서는 플러그를 해당 전기 콘센트에 연결하면...
-
Página 214: 급수 연결
등전위 접지 연결 등전위 접지 연결은 여러 기기 간에 표시가 되어 있는 단자판을 통해서 이루어져야 합니다. 연결 클램프는 기기의 뒷면에 있습니다. 이 클램프를 이용해 2.5와 10mm² 사이의 지름으로 된 노란색/녹색의 연결 케이블을 연결할 수 있습니다. 기기를 등전위 접지 시스템에 연결해야 하고, 이 시스템의 효력이 유효한 규정에 상응하는지... -
Página 215: 배수(206782, 206797)
5.1.6 배수(206782, 206797) 오븐 작동으로 인해 발생하는 물은 고온(90 °C)일 수 있기 때문에 배수용으로 사용되는 호스는 이러한 고열을 견딜 수 있어야 합니다. 배수구는 오븐 뒷면 아랫쪽에 있으며, 이에 적합한 고정된 관 또는 유연한 호스로 연결해, 오픈된 배수구로 이어지도록 해야... -
Página 216: 사용자를 위한 지시사항
5.2 사용자를 위한 지시사항 주의! 안전에 대한 안내 사항과 컨벡션 전기 오븐의 사용 방법을 담고 있는 아래 사용 설명서를 반드시 읽어 보시기 바랍니다. 그리고 나서 언제라도 쉽게 찾을 수 있는 장소에 잘 보관하세요. 잘못된 설치, 작동, 점검, 청소 및 개조는 고장, 손상 및 부상을 야기시킬 수 있습니다. 5.2.1 안전에... -
Página 217: 처음 사용하기 전
5.2.2 처음 사용하기 전 조리실 내부에 아무것도(부속품, 안내 책자 및 포장용 비닐 등) 들어 있지 않은지 확인하세요. 오븐을 처음으로 사용하기 전에 올바른 설치, 안정성, 기기의 수평 및 전원 연결과 냉수 공급 연결을 점검하세요. 환기구는 열려 있어야 하며, 장애물이 놓여 있지 않아야 합니다. ... -
Página 218: 정기 점검
5.2.3 정기 점검 주의! 기기를 청소하기 전에는 항상 전원 플러그를 뽑고, 본체가 충분히 식을때까지 기다려야 합니다. 오븐을 정기적으로 점검하세요. 특별 점검을 할 때는 서비스 센터에 연락해서 전문 기술자의 도움을 받으세요. 정기적인 내부 청소 원활한 작동, 위생과 성능을 보장하기 위해 하루 작업 일과가 끝난 후, 기기를 청소하세요. 기기... - Página 219 이물질이 낀 경우에는 플라스틱 스크래퍼나 식초 또는 따뜻한 물을 적신 스펀지를 사용하세요. 주의: 기름이나 음식 찌꺼기가 조리실에 묻은 경우에는 오븐 작동 중, 이에 불이 붙을 수 있으니, 즉시 제거하세요. 오븐 외부 청소 기기의 외부 청소시에는 미지근한 물을 적신 헹주만 사용하세요. 기기...
-
Página 220: 특별 점검
오븐 램프 교체 주의: 아래의 수칙을 잘 지켜, 전기 감전이나 인명 피해를 피하세요. 오븐의 전원 플러그를 뽑고, 본체를 식히세요. 측면 선반 가이드 레일이 고정되어 있는 나사를 풀어 조리실에서 분리하세요. 유리 덮개(A)를 나사를 돌려 분리하세요. 이때 패킹(C) 부분에 주의하세요. 그리고 나서 램프(B)를 동일한... - Página 221 기기가 바퀴가 달린 시스템 위에 설치되어 있는 경우에는 기기를 옮길 때 전기 케이블, 호스 등이 손상되지 않도록 컨트롤해야 합니다. 기기를 열원 근처(예: 튀김기 등)에 설치하지 마세요. 이러한 작업을 실행하고 기기를 새 장소로 옮기고 난 후에는 기기를 작동하기 전에 전기 및 급수 연결이 규정에 맞게 이루어졌는지 확인해야 합니다. 기기에...
- Página 222 고장 원인 조치 수도꼭지가 잠겨 있습니다. 수도꼭지를 트세요. 스팀 기능이 상수도관망의 연결이 상수도관망의 연결을 작동하면 호스에서 점검하세요. 제대로 이루어지지 물이 공급되지 않았습니다. 않아요. 물유입 필터가 이물질로 물유입 필터를 세척하세요. 막혀 있습니다. 더러워진 개스켓 젖은...
-
Página 223: 조작부
5.3 조작부 206782 206797 206873 시간 다이얼 버튼 스팀 기능 버튼 온도 다이얼 버튼 가열 컨트롤 램프(오렌지색) 스팀 기능 다이얼 버튼 스팀 기능 컨트롤 램프(오렌지색) 기능 다이얼 버튼 작동 컨트롤 램프(녹색) - Página 224 설정 기능 다이얼 버튼 200873 조명 그릴 팬 팬 순환 200797 팬 조명 기능 다이얼 버튼으로 (모델 사양에 따라) 다음 기능을 선택할 수 있습니다. 기기 전원 끄기 조명 켜기 팬 팬 순환 그릴 1. 기능 다이얼 버튼이 Off 위치에 있으면 오븐의 전원은 꺼집니다. 2.
- Página 225 작동 컨트롤 램프 작동 컨트롤 램프에 불이 들어오면 조리실 내에 있는 오븐 램프가 켜지며, 열선이 선택한 기능에 따라 작동 대기 상태에 있다는 것을 뜻합니다. 시간 다이얼 버튼 시간 다이얼 버튼이 장시간 작동( )으로 설정되어 있으면 사용자가 개입할 때까지 오븐은 계속 작동하게 됩니다. 최대...
- Página 226 주의: 스팀 기능의 만족스런 사용을 위해 요리 온도를 최소 80-100도로 설정해야 합니다. 저온에서는 스팀 생성이 힘들기 때문에 물의 대부분이 오븐의 바닥이나 배수구로 흘러 내리게 됩니다. 그 밖에도 음식물이 잘 익을 수 있도록 스팀 기능을 작동하기 전에 오븐을 원하는 온도로 예열해야 합니다. 스팀...
- Página 227 안내 사항및 팁 고기를 굽거나 닭류와 같이 기름기가 많은 음식을 그릴 기능을 이용해 조리하고자 할 때에는 조리중 기름이 새어나오기 때문에 이를 받을 수 있는 용기를 조리실 바닥에 두는게 좋습니다. 액체가 들어 있는 용기에 음식물을 조리할 때에는 조리 중은 물론 용기를 오븐에서 꺼낼...
-
Página 228: 폐기처분
위험을 줄 수도 있다. 그러므로 폐기처분하기 전 우선 어떠한 방식으로도 기구가 더 이상 사용될 수 없도록 안전조처한다 전원에서 전선이나 쇼켓을 뺀 후 처분한다 지시 기구 폐기처분시 반드시 각 국가나 지역에 규정된 처리법 적용에 주목한다. Bartscher GmbH Franz-Kleine-Str. 28 D-33154 Salzkotten Tel.: +49 (0) 5258 971-0 Germany Fax: +49 (0) 5258 971-120...