Tabla de contenido
Publicidad
Idiomas disponibles
Idiomas disponibles
Enlaces rápidos
Dräger Alcotest 3820
WARNING
!
Strictly follow the Instructions for Use.
The user must fully understand and strictly observe the instructions.
Use the product only for the purposes specified in the Intended use
section of this document.
i
Instructions for use
enUS
3
Notice d'utilisation
fr
19
Instrucciones de uso
es
35
Publicidad
Tabla de contenido
Solución de problemas

Manuales relacionados para Dräger Alcotes 3820


Resumen de contenidos para Dräger Alcotes 3820
- Página 1 Instructions for use enUS 3 Notice d’utilisation 19 Instrucciones de uso 35 Dräger Alcotest 3820 WARNING Strictly follow the Instructions for Use. The user must fully understand and strictly observe the instructions. Use the product only for the purposes specified in the Intended use section of this document.
- Página 2 For description of device parts, please refer to page 4 Pour obtenir une description des pièces, consultez page 20 Para la descripción de las piezas del aparato, consulte pagina 36...
-
Página 3: Safety-Related Information
Safety-related information Safety-related information Before using this product, carefully read the Instructions for Use. Strictly follow the Instructions for Use. The user must fully understand and strictly observe the intended instructions. Use the product only for the purposes specified in the Intended use section of this document. -
Página 4: Typographical Conventions
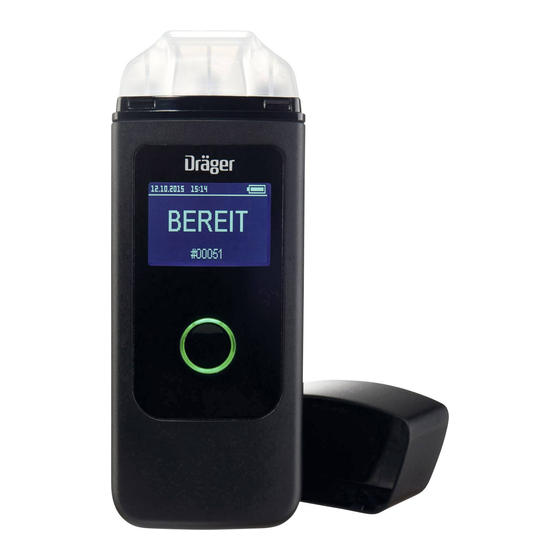
Description Typographical conventions This symbol indicates information which facilitates the use of the product. Description Product overview Breath-alcohol analyzer LED ring Button Grip zone on mouthpiece Mouthpiece Safety cap Mouthpiece receptacle Display USB connection (Important: Not for charging the device, for Service only) 10 Loudspeaker (Important: No reset button) Intended Use... - Página 5 WARNING Small parts of the device can come loose and be swallowed. ► Keep the device out of reach of children under the age of 3. Prerequisites The instrument is factory-calibrated when delivered. If the calibration date has exceeded 12 months, the instrument should be professionally adjusted, e.g.
-
Página 6: Initial Start-Up
Initial start-up A quick setup process (wizard) starts when the instrument is switched on for the first time. The following settings are accessible using the wizard: Language Date format Date Time format Time Measuring unit ... -
Página 7: Carrying Out A Breath Sample
the minutes in the same way: short press to change and long press to confirm. Measurement unit A cursor pre-selects a measurement unit in the list. Press briefly on the button to change the position of the cursor in order to select your needed measurement unit. -
Página 8: Switching Off The Instrument
3. If the device is switched off, keep the button pressed for approx.1 second until the startup screen is displayed. 4. After approx. 4 seconds, a READY screen is displayed. The instrument is ready to use. 5. Take a deep breath and blow evenly and without interruption into the mouthpiece. -
Página 9: Removing The Mouthpiece
Removing the mouthpiece 1. Pull the mouthpiece upwards out of the mouthpiece receptacle by holding it on the grip zones on the left and right side. 2. Dispose of the mouthpiece in accordance with local regulations. Settings To enter the device menu, the device has to be switched on and has to show READY. - Página 10 Menu option Description Interaction instruction Results Overview of the last 10 Briefly press the tests performed on the button to navigate device (incl. result, date, through the test result time, test ID). There is list. one test displayed per Hold the button for 2 ...
- Página 11 Menu option Description Interaction instruction Date & Time Date, time as well as Select an option by date format (yyyy/mm/ moving the cursor to dd, yyyy-mm-dd, mm/dd/ the option by briefly yyyy, dd.mm.yyyy) and pressing the button. time format (12h, 24h) Afterwards, enter this can be adjusted.
- Página 12 Menu option Description Interaction instruction Language The language of the Change the set display can be adjusted. language by briefly pressing the button. Hold the button for 2 seconds to confirm the setting and leave the submenu. Measurement The measurement unit Change the ...
-
Página 13: Troubleshooting
Troubleshooting Troubleshooting An error message is displayed in the event of an instrument fault. The number that appears below the message is used for service functions. If the fault remains after switching the instrument on and off several times, contact DrägerService or your dealer. Fault / message Cause Remedy... - Página 14 Troubleshooting Fault / message Cause Remedy Fault number Instrument fault Switch the instrument off and on again. If the fault remains, contact DrägerService or dealer. In … days next service Contact DrägerService … DAYS is needed. or dealer for device service.
- Página 15 Maintenance Maintenance Calibration Dräger recommends a device calibration every 12 months, because of the sensor drift the uncertainty of measurement increases over months. Instrument calibration and maintenance should only be carried out by authorized persons, e.g. DrägerService. The last 30 days before next service is needed, a day count down will be shown as information in the display after switching on the device.
-
Página 16: Technical Data
Technical data Technical data Measuring principle Electrochemical sensor Measuring range Breath alcohol 0.000 to 0.500 g/210L Blood alcohol concentration 0.000 to 0.500% BAC Small values will be shown as 0.000 to 0.0063 g/210L 0.000 Ethanol mass per blood volume or mass at 20°C / 68 °F and 1013 hPa. - Página 17 Technical data Measurement accuracy Standard deviation of the repeatability with ethyl alcohol standard up to 0.50 mg/L 0.008 mg/L ≥0.50 mg/L 1.7% of the measured value up to 0.100 % BAC 0.0017 % BAC or ≥ 0.100 % BAC 1.7% of the measured value whichever value is higher Sensitivity drift Typically 0.4 % of the measured value per month...
- Página 18 Technical data Power supply 1 x 3 V CR123A The battery is designed for the service life of the instrument with average use. Protection class IP 52 CE markings Electromagnetic compatibility (Directive 2014/30/EU). Configuration possible, see name plate Note: This equipment has been tested and found to comply with the limits for a Class B digital device, pursuant to part 15 of the FCC Rules.
-
Página 19: Consignes De Sécurité
Consignes de sécurité Consignes de sécurité Veuillez lire attentivement la notice d'utilisation du produit avant de l'utiliser. Veuillez respecter exactement les instructions de la notice d'utilisation. L'utilisateur devra parfaitement comprendre ces instructions et les exécuter très précisément. Le produit ne peut être utilisé... -
Página 20: Conventions Typographiques
Description Conventions typographiques Ce symbole précède une information destinée à faciliter l'utilisation de l'appareil. Description Aperçu du produit Alcootest Anneau LED Touche Zone de préhension sur l'embout buccal Embout buccal Capot de protection Logement de l'embout buccal Écran Port USB (important: réservé au service, ne sert pas à recharger l'appareil) 10 Haut-parleur (important: pas de touche réinitialisation) Domaine d'application... -
Página 21: Conditions D'utilisation
Utilisation Utilisation AVERTISSEMENT Les petits composants de l'appareil peuvent se détacher et être avalés. ► Tenez l’appareil hors de la portée des enfants de moins de 3 ans. Conditions d'utilisation L'appareil est livré calibré en usine. Si le calibrage remonte à plus de 12 moins, l'appareil devrait être recalibré... -
Página 22: Première Mise En Service
Utilisation Première mise en service L'assistant de configuration s'affiche à la première mise en service de l'appareil. L'assistant de configuration vous aide à effectuer les réglages suivants : Langue Format de la date Date Format de l'heure ... - Página 23 Utilisation Unité de mesure Un curseur présélectionne une unité de mesure dans la liste. Appuyez brièvement sur la touche pour déplacer le curseur et sélectionner l’unité de mesure de votre choix. Si le curseur sélectionne l’unité de mesure adéquate, maintenez la touche enfoncée pendant environ 2 secondes pour confirmer.
- Página 24 Utilisation 3. Si l’appareil est éteint, veuillez appuyer sur la touche pendant env. 1 seconde jusqu'à ce que l'écran de démarrage s'affiche. 4. Le message READY s'affiche après env. 4 secondes. L'appareil est prêt pour la mesure. 5. Veuillez souffler régulièrement et sans interruption dans l'embout buccal.
-
Página 25: Arrêt De L'appareil
Utilisation Arrêt de l'appareil Veuillez maintenir la touche enfoncée, l’appareil s'arrêtera au bout de 3 secondes. Un compte à rebours s’affiche jusqu’à l’arrêt. Si l’écran est éteint, cessez d’appuyer sur la touche. À défaut, l’appareil se remettrait en marche. L'appareil s'arrête automatiquement au bout de 120 secondes d’inactivité. - Página 26 Utilisation menu jusqu’à l’emplacement souhaité. Maintenez la touche enfoncée pendant environ 2 secondes pour accéder au sous-menu. Le tableau suivant offre un aperçu des options et explique comment les utiliser : Option de Description Instruction menu Mesure Option permettant de quitter Maintenez la touche ...
- Página 27 Utilisation Option de Description Instruction menu Date et La date, l’heure, le format Sélectionnez une option heure de date (aaaa/mm/jj, en déplaçant le curseur aaaa-mm-jj, mm/jj/aaaa, sur l’option et en jj.mm.aaaa) et le format appuyant brièvement sur d‘heure (12h, 24h) sont la touche.
- Página 28 Utilisation Option de Description Instruction menu Haut- Les signaux sonores de Modifiez le réglage en parleur l’appareil peuvent être appuyant brièvement désactivés ou réglés sur un sur la touche. volume de 50 % ou 100 %. Maintenez la touche ...
-
Página 29: Élimination Des Pannes
Élimination des pannes Élimination des pannes En cas de panne de l'appareil, le système affiche un message d'erreur. Le numéro apparaissant sous le message est destiné au service technique. Veuillez contacter DrägerService ou votre revendeur si la panne persiste même après plusieurs mises en marche / arrêts. Panne / défaut Cause Solution... - Página 30 Élimination des pannes Panne / défaut Cause Solution Interruption de Expiration irrégulière, Veuillez recommencer l'échantillonnage fin soudaine ou le test. inspiration Numéro de défaut Défaut de l'appareil Veuillez éteindre et rallumer l’appareil. Veuillez contacter DrägerService ou votre revendeur si le défaut persiste.
- Página 31 Maintenance Maintenance Calibrage Dräger recommande le calibrage de l’appareil tous les 12 mois en raison de la dérive du capteur. L’incertitude des mesures augmente au fil des mois. Veuillez réserver les interventions de calibrage et de maintenance à des personnes autorisées, par ex. DrägerService. Au cours des 30 jours précédant l’entretien suivant, un compte à...
-
Página 32: Caractéristiques Techniques
Caractéristiques techniques Caractéristiques techniques Principe de mesure Capteur électrochimique Plage de mesure Concentration d'alcool dans 0,000 à 0,500 g/210 l l'haleine Concentration d'alcool dans 0,000 à 0,500 % BAC le sang Les valeurs faibles s'affichent 0,000 à 0,0063 g/210 l sous la forme 0,000 Masse d'éthanol par volume sanguin à... - Página 33 Caractéristiques techniques Précision de mesure Écart par défaut de la reproductibilité avec un étalon d'éthanol Jusqu'à 0,50 mg/l 0,008 mg/l ≥0,50 mg/l 1,7 % de la valeur mesurée Jusqu'à 0,100 % BAC 0,0017 % BAC ou ≥0,100 % BAC 1,7 % de la valeur mesurée suivant la valeur la plus élevée Dérive de la sensibilité...
- Página 34 Caractéristiques techniques Indice de protection IP 52 Sigle CE Compatibilité électromagnétique (directive 2014/30/UE) Configuration possible, voir plaque signalétique Remarque : Cet appareil a été testé et déclaré conforme aux limites des appareils numériques de classe B, selon la section 15 des règlements de la FCC.
-
Página 35: Información Relativa A La Seguridad
Información relativa a la seguridad Información relativa a la seguridad Antes de utilizar este producto, leer las instrucciones de uso con atención. Seguir estrictamente las instrucciones de uso. El usuario deberá entender completamente y observar estrictamente las instrucciones específicas. -
Página 36: Convenciones Tipográficas
Descripción Convenciones tipográficas Este símbolo identifica información que facilita el uso del producto. Descripción Vista general del producto Analizador de alcohol en el aliento Aro de LED Botón Zona de agarre para boquilla Boquilla Tapa de seguridad Alojamiento para la boquilla Pantalla Conexión USB (Importante: no para cargar el aparato, solo para servicio) - Página 37 ADVERTENCIA Existe la posibilidad de que piezas pequeñas del aparato se suelten y se ingieran. ► Manténgase el aparato lejos del alcance de niños menores de 3 años. Requisitos El instrumento se suministra calibrado de fábrica. Si la fecha de calibración ha superado los 12 meses, el instrumento deberá...
-
Página 38: Primer Encendido
Primer encendido Cuando el instrumento se enciende por primera vez, se inicia un proceso de configuración rápida con un asistente. Es posible acceder a los siguientes ajustes a través del asistente: Idioma Formato de fecha Fecha Formato de hora ... -
Página 39: Realizar Una Prueba De Aliento
Hora Un cursor preselecciona la hora del día. Pulsar brevemente el botón para cambiar la hora hasta que aparezca la actual. Mantener el botón presionado aprox. 2 segundos para confirmar la hora. Realizar el mismo proceso con los minutos: pulsar brevemente para cambiar y prolongadamente para confirmar. -
Página 40: Procedimiento
Procedimiento 1. Quitar la tapa de seguridad del extremo superior del aparato. 2. Introducir una nueva boquilla (referencia 83 25 250) en el alojamiento de la boquilla (véase la sección 3.1 en la página 36). Por razones de higiene, sujetar la boquilla solo por las zonas de agarre. -
Página 41: Apagar El Instrumento
Apagar el instrumento El aparato se apagará después de pulsar el botón durante aprox. 3 segundos. Se mostrará también una cuenta atrás de apagado. Cuando la pantalla se apague, dejar de pulsar el botón. En caso contrario, el aparato se volverá a encender. El instrumento se apaga automáticamente después de estar aprox.120 segundos sin ninguna actividad. -
Página 42: Opción Del Menú
Pulsar brevemente el botón varias veces, hasta cambiar la posición del cursor a la posición deseada. Después, mantener el botón presionado 2 segundos para entrar en el submenú. La siguiente tabla muestra una lista de las opciones del menú y cómo usarlas: Opción del Instrucción de... - Página 43 Opción del Instrucción de Descripción menú interacción Fecha y hora Aquí se ajustan la fecha, la Seleccionar una hora y también el formato opción moviendo el de fecha (aaaa/mm/dd, cursor a la opción y aaaa-mm-dd, mm/dd/ pulsando brevemente aaaa, dd.mm.aaaa) y el el botón.
- Página 44 Opción del Instrucción de Descripción menú interacción Altavoz Se puede desactivar o Cambiar la cambiar el volumen al configuración pulsando 50 o 100% de cualquier brevemente el botón. Mantener el botón señal acústica del aparato. presionado 2 segundos para confirmar la configuración y dejar el submenú.
-
Página 45: Solución De Problemas
Solución de problemas Solución de problemas Se muestra un mensaje de error en caso de producirse un fallo del instrumento. El número que aparece debajo del mensaje se utiliza para funciones de servicio. Si el fallo se mantiene después de encender y apagar el instrumento varias veces, contactar con DrägerService o con el distribuidor. - Página 46 Solución de problemas Fallo / mensaje Causa Solución Interrupción de Expulsión de aliento Repetir la prueba de toma de muestra irregular, inhalación o aliento. finalización abruptas Número de error Fallo del instrumento Apagar y encender de nuevo el instrumento. Si el fallo se mantiene, contactar con DrägerService o con el distribuidor.
-
Página 47: Mantenimiento
Mantenimiento Mantenimiento Calibración Dräger recomienda una calibración del aparato cada 12 meses, ya que debido a la desviación del sensor, la inexactitud de la medición aumenta con los meses. La calibración y el mantenimiento del instrumento deben llevarse a cabo solo por personas autorizadas, p. -
Página 48: Datos Técnicos
Datos técnicos Datos técnicos Principio de medición Sensor electroquímico Rango de medición Alcohol en el aliento 0,000 a 0,500 g/210L Concentración de alcohol en 0,000 a 0,500% CAS la sangre Los valores bajos aparecen 0,000 a 0,0063 g/210L como 0,000 Masa de etanol por volumen de sangre o masa a 20 °C / 68 °F y 1013 hPa. -
Página 49: Dimensiones
Datos técnicos Precisión de medición Desviación estándar de la repetibilidad con estándar de alcohol etílico Hasta 0,50 mg/L 0,008 mg/L ≥0,50 mg/L 1,7 % del valor medido Hasta 0,100 % CAS 0,0017 % CAS o ≥ 0,100 % CAS 1,7 % del valor medido el valor más alto Desviación de sensibilidad Habitualmente, 0,4 % del valor medido por mes... - Página 50 Datos técnicos Alimentación eléctrica 1 x 3 V CR123A La pila está diseñada para la vida útil del instrumento con un uso medio. Índice de protección IP 52 Marcados CE Compatibilidad electromagnética (Directiva 2014/30/CE). Configuración posible, véase la placa de identificación Nota: Este equipo ha sido comprobado y ha demostrado su conformidad con los límites de un aparato digital de clase B, de acuerdo con las normas FCC, parte 15.
- Página 52 Distributed by Manufactured by Dräger, Inc. Dräger Safety AG & Co. KGaA 3135 Quarry Road Revalstraße 1 Telford, PA 18969 23560 Lübeck, Germany 1.800.437.2437 +49 451 882 0 +49 451 882 20 80 90 33 598 - GA 4754.540 enUS, fr, es ©...