Tabla de contenido
Publicidad
Idiomas disponibles
Idiomas disponibles
Enlaces rápidos
Operating and Training Guide
Manuel d'utilisation et de dressage
Gebruiksaanwijzing en trainingshandleiding
Manual de adiestramiento y funcionamiento
Guida all'uso e all' addestramento
Betriebsanleitung und Trainingsanleitung
PIF17-13478
PIF45-13479
Stay + Play Wireless Fence™
Système anti-fugue sans fil
Draadloos omheiningssysteem
Limitador de zona sin cable
Sistema di contenimento wireless
Drahtloses Rückhaltesystem
Please read this entire guide before beginning
Veuillez lire ce manuel en entier avant de commencer
Gelieve deze gids volledig door te lezen voordat u begint
Por favor, lea detenidamente este manual antes de empezar
Si prega di leggere attentamente la guida all'uso prima di utilizzare il collare
Bitte lesen Sie die gesamte Betriebsanleitung vor dem Trainingsbeginn
Publicidad
Capítulos
Tabla de contenido
Solución de problemas

Manuales relacionados para Petsafe PIF45


Resumen de contenidos para Petsafe PIF45
- Página 1 Manuel d’utilisation et de dressage Gebruiksaanwijzing en trainingshandleiding Manual de adiestramiento y funcionamiento Guida all’uso e all’ addestramento Betriebsanleitung und Trainingsanleitung PIF17-13478 PIF45-13479 Stay + Play Wireless Fence™ Système anti-fugue sans fil Draadloos omheiningssysteem Limitador de zona sin cable Sistema di contenimento wireless Drahtloses Rückhaltesystem...
-
Página 2: Important Safety Information
Hereinafter Radio Systems Corporation, Radio Systems PetSafe Europe Ltd., Radio Systems Australia Pty Ltd. and any other affiliate or Brand of Radio Systems Corporation may be referred to collectively as “We” or “Us”. IMPORTANT SAFETY INFORMATION Explanation of Attention Words and Symbols used in this guide This is the safety alert symbol. - Página 3 • Do not place anything on the top of the Transmitter or cover any ventilation holes. This may overheat the Transmitter and cause early transmit failure. • Do not place Transmitter in a closet or any other confined, unventilated area. • Do not place Transmitter on or near a metal surface. www.petsafe.net...
-
Página 4: Tabla De Contenido
To get the most protection out of your warranty, please register your product within 30 days at www.petsafe.net. By registering and keeping your receipt, you will enjoy the product’s full warranty and should you ever need to call the Customer Care Centre, we will be able to help you faster. -
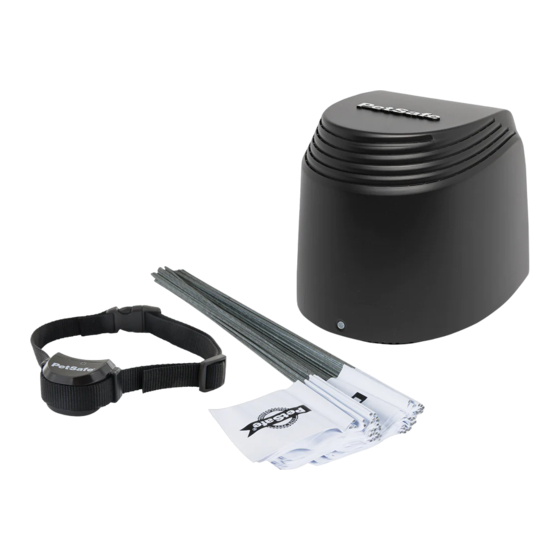
Página 5: Components
Operating and Long Test Light Training Guide Contact Points Tool Other Items You May Need • Screwdriver • Scissors • Lighter • Drill & mounting hardware • Tape measure • Non-metallic collar and lead Set up and training help: www.petsafe.net www.petsafe.net... -
Página 6: How The System Works
How the System Works The PetSafe Stay + Play Wireless Fence™ system has been proven safe, comfortable, and effective for all pets ® over 2.3 kg. The system works by transmitting a radio signal up to 32 m in all directions. You temporarily define the Pet Area with Boundary Flags for a visual aid in training your pet. - Página 7 Metal Interference Alarm: Disables the Transmitter radio signal to protect the Transmitter from damage if placed too close to metal objects. Transmission Failure Alarm: Continuous tone which indicates a Transmitter problem. Transmitter Alarm Disable Button ALARM ALARM Power Power Jack Light Boundary Boundary HIGH Switch Control Dial www.petsafe.net...
-
Página 8: Operating Guide
If the Metal Interference Alarm sounds, your pet is no longer contained. You must relocate the Transmitter away from metal or the alarm will continue to sound and the transmission from the Transmitter will remain disabled. www.petsafe.net... -
Página 9: Charge The Receiver Collar
2. Press the Alarm Disable Button for 5 seconds then release. • The Transmission Failure Alarm makes a continuous tone indicating a Transmitter problem. In this situation, your pet can no longer be contained. Contact the Customer Care Centre or visit our website at www.petsafe.net for a replacement Transmitter. -
Página 10: Prepare The Receiver Collar
The red Receiver Indicator Light will then turn off and all Receiver Indicator Lights Mode Button will stay off indicating that the unit is turned off. To extend the time between charging the Receiver Collar, consider turning off the Receiver Collar when it is not in use. www.petsafe.net... - Página 11 (3 flashes per second) Fast pulsating red Tone for duration of Static Stimulation being (3 flashes per second) Static Stimulation delivered up to 15 seconds Continuous green Over Stimulation Protection; No tone (10 seconds) collar locked for 10 seconds www.petsafe.net...
-
Página 12: Indicator Light
Stimulation duration to 15 seconds. While the system locks out further Static Simulation, the green light will remain on for 10 seconds. In the unlikely event that your pet leaves the Pet Area, he will not receive a Static Stimulation upon return to the Pet Area. www.petsafe.net... -
Página 13: Adjust The Pet Area To Desired Size
AC outlet. Two-Person Method Hold the Receiver Collar at your pet’s neck height (4E) with the Petsafe logo facing away from the Transmitter. Walk to the edge ® of the desired Pet Area. Facing away from the Transmitter, hold the Receiver Collar at the edge of the desired Pet Area (4F). -
Página 14: Transmitter Range Chart
0.6 m to 1 m of the Boundary Flags. 1. Using the Test Light, with the Static Stimulation Level set at 2 or greater, hold the Receiver Collar at your pet’s neck height with the PetSafe logo facing away from ®... -
Página 15: Fit The Receiver Collar
1. Make sure Transmitter is not plugged in, and the receiver is turned off. 2. Start with your pet standing comfortably (6A). 3. To make it easier to hear the warning beep, place the Receiver Collar on your pet with the PetSafe logo side of the Receiver facing your pet’s chin. ®... -
Página 16: To Re-Thread The Collar
To Re-Thread the Collar Slide Buckle The slide buckle prevents the collar from becoming loose around your pet’s neck. Ridges The ridges must be facing up; the collar will slip if it is not properly threaded. www.petsafe.net... -
Página 17: Training Guide
Important: Proper training of your pet is essential to the success of the PetSafe Stay + Play Wireless Fence™ ® system. Read this section completely before beginning to train your pet. Remember that the PetSafe Stay + Play ® Wireless Fence™ system is not a solid barrier. -
Página 18: Day 1 - Boundary Awareness
4. Repeat this process at the same Boundary Flag until your pet resists going into the Boundary Zone. 5. Aim to master 3 to 4 Boundary Flags per session. Make this FUN! Praise if your pet quickly retreats or resists going into the Boundary Zone. www.petsafe.net... -
Página 19: Days 2 Thru 4 - Continue Boundary Awareness
• Program the Static Stimulation level on the Receiver Collar to level 2 or higher depending on your pet’s response to days 2 through 4. • Put a separate non-metallic collar on your pet’s neck ABOVE the Receiver Collar and attach a lead. Be sure the extra collar does not put pressure on the Contact Points. www.petsafe.net... -
Página 20: Days 9 Thru 14 - Supervision Off The Lead
1. Enter the Pet Area with your pet wearing the Receiver Collar. 2. Walk around the garden and play with your pet, staying within the Pet Area at all times. 3. Preoccupy yourself with another task in the garden while watching your pet. www.petsafe.net... -
Página 21: Days 15 Thru 30 - Pet Monitoring
Accessories To purchase additional accessories for your PetSafe Stay + Play Wireless Fence™ system, visit our website at ® www.petsafe.net to locate a retailer near you and for a listing of Customer Care Centre telephone numbers in your area. www.petsafe.net... -
Página 22: Frequently Asked Questions
Stay + Play Wireless Fence™. You must purchase an Wireless Fence™? additional Receiver Collar for each pet. Contact the Customer Care Centre or visit our website at www.petsafe.net to locate a retailer near you. Will the Stay + Play Wireless Fence™... - Página 23 Receiver Collar. Why does my Receiver Collar have a • The beep only mode can be used in training your pet to his boundary or for well-trained pets that no longer require beep only mode? Static Stimulation. www.petsafe.net...
-
Página 24: Troubleshooting
Power Light is on, and the Transmitter controls are set at your desired settings. • Bring Receiver Collar within 3 m of the Transmitter to reset. • Make sure no continuous alarm is sounding on the Transmitter. www.petsafe.net... - Página 25 • Make sure the Power Light on the Power Adaptor is on when plugged into a Light is not on. working standard AC wall outlet. • If Power Adaptor Light is not on, contact the Customer Care Centre for a replacement Power Adaptor. www.petsafe.net...
- Página 26 Receiver Collar battery to leak onto your pet’s neck. Please review and follow the important safety information on page 2, and the instructions in Step 6 under the heading “Fit the Receiver Collar”. www.petsafe.net...
-
Página 27: Terms Of Use And Limitation Of Liability
Radio Systems Corporation reserves the right to change the terms, conditions and notices governing this Product from time to time. If such changes have been notified to you prior to your use of this Product, they shall be binding on you as if incorporated herein. Covered by US Patent 6,879,300; 7,142,167. www.petsafe.net... -
Página 28: Important Recycling Advice
Three Year Non-Transferrable Limited Warranty This Product has the benefit of a limited manufacturer’s warranty. Complete details of the warranty applicable to this Product and its terms can be found at www.petsafe.net and/or are available by contacting your local Customer Care Centre. - Página 29 You are also entitled to have the goods repaired or replaced if the goods fail to be of acceptable quality and the failure does not amount to a major failure. Should you have any queries or require any further information, please contact our Customer Care Centre on 1800 786 608 (Australia) or 0800 543 054 (New Zealand). www.petsafe.net...
- Página 30 Radio Systems Corporation, Radio Systems PetSafe Europe Ltd., Radio Systems Australia Pty Ltd. et tout autre filière ou marque de Radio Systems Corporation peuvent-être collectivement désignées par « nous » à partir de la lecture de ce document. INFORMATIONS IMPORTANTES SUR LA SÉCURITÉ...
- Página 31 • Ne posez rien sur l’émetteur et ne couvrez pas les aérations. Ceci pourrait provoquer une surchauffe de l’émetteur et causer une défaillance prématurée de celui-ci. • Ne placez pas l’émetteur dans un placard ou dans d’autres endroits confinés et non aérés. • Ne pas placer l’émetteur sur une surface métallique ou à proximité. www.petsafe.net...
- Página 32 Web, www.petsafe.net. Pour bénéficier pleinement de votre garantie, veuillez enregistrer votre article dans les 30 jours sur le site www.petsafe. net. En enregistrant et conservant votre preuve d’achat, vous disposerez de la garantie complète sur le produit. Nous serons également en mesure de vous assister plus efficacement si vous avez besoin d’appeler notre service clientèle.
-
Página 33: Contenu Du Kit
Autres articles dont vous pourriez avoir besoin • Tournevis • Ciseaux • Briquet • Foreuse et matériel de montage • Ruban à mesurer • Collier non métallique et laisse Conseils de configuration et de dressage : www.petsafe.net www.petsafe.net... -
Página 34: Fonctionnement Du Système
Fonctionnement du système Le systéme anti-fuge sans fil Stay + Play Wireless Fence™ de PetSafe est fiable, confortable et efficace avec tout type ® d’animaux de compagnie pesant plus de 2,3 kg. Le système fonctionne en transmettant un signal radio jusqu’à 32 mètres dans toutes les directions. - Página 35 Alarme d’échec de transmission : signal continu qui indique un problème d’émetteur. Emetteur Alarme Désactivation Bouton ALARM ALARM Voyant Connecteur d’alimentation d'alimentation Molette de Sélecteur contrôle du de limite du HIGH périmètre périmètre www.petsafe.net...
-
Página 36: Manuel D'utilisation
à proximité. Si l’alarme d’interférence métallique se déclenche, votre animal de compagnie n’est plus protégé par le système anti-fugue. Vous devez déplacer l’émetteur à l’écart du métal ou l’alarme continuera à se déclencher et la transmission de l’émetteur restera désactivée. www.petsafe.net... -
Página 37: Chargement Du Collier-Récepteur
• L’alarme de défaillance de l’émission émet un signal sonore continu indiquant un problème au niveau de l’émetteur. Dans ce cas, il se peut que votre animal ne soit plus confiné. Pour remplacer l’émetteur, veuillez contacter notre service clientèle ou visitez notre site www.petsafe.net. ÉTAPE 2 Chargement du collier-récepteur... -
Página 38: Préparation Du Collier-Récepteur
Le voyant lumineux rouge du récepteur s’éteint et tous les voyants lumineux du sélection du récepteur restent éteints indiquant que l’appareil est hors tension. mode Pour rallonger la durée entre chaque recharge du collier-récepteur, éteignez le collier-récepteur quand il n’est pas utilisé. www.petsafe.net... - Página 39 (3 clignotements par seconde) Rouge clignotement rapide Signal sonore durant la Stimulation électrostatique en cours (3 clignotements par seconde) stimulation électrostatique jusqu'à 15 secondes Vert continu Protection contre la stimulation excessive ; Pas de signal sonore (10 secondes) collier bloqué pendant 10 secondes www.petsafe.net...
- Página 40 électrostatique à 15 secondes. Alors que le système bloque l’administration d’une nouvelle stimulation électrostatique, le voyant vert reste allumé pendant 10 secondes. Dans le cas improbable où votre animal quitte la zone autorisée, il ne recevra pas de stimulation électrostatique à son retour dans la zone autorisée. www.petsafe.net...
-
Página 41: Réglage De La Zone Autorisée À La Dimension Souhaitée
Méthode à deux personnes Tenez le collier-récepteur à hauteur du cou de votre animal (4E) avec le logo PetSafe dirigé dans la direction opposée à l’émetteur. ® Marchez jusqu’à la limite de la zone autorisée. Dos à l’émetteur, tenez le collier-récepteur au bord de la zone autorisée désirée (4F). -
Página 42: Tableau Des Portées De L'émetteur
1. Tout en utilisant la clé multifonctions avec le niveau de stimulation électrostatique réglé sur 2 au minimum, tenez le collier-récepteur à hauteur du cou de votre animal avec le logo PetSafe dirigé dans la direction opposée à l’émetteur. ®... -
Página 43: Ajustement Du Collier-Récepteur
1. Assurez-vous que l’émetteur n’est pas branché et que le récepteur est hors tension. 2. Votre animal doit être en position debout (6A). 3. Pour que le signal d’avertissement soit plus facile à entendre, placez le collier- récepteur sur votre animal avec le côté logo PetSafe du récepteur orienté vers la ®... - Página 44 La boucle coulissante La boucle coulissante empêche le collier de se desserrer autour du cou de l'animal. Les bords dentelés Les bords dentelés doivent être dirigés vers le haut ; le collier se desserrera s'il n'est pas correctement enfilé dans la boucle. www.petsafe.net...
-
Página 45: Manuel De Dressage
PetSafe . Lisez cette section dans son intégralité avant de commencer le dressage de votre animal. Souvenez vous ® que le Stay + Play Wireless Fence™ de PetSafe n’est pas une barrière solide. ® • Amusez-vous avec votre animal pendant le dressage. Le dressage doit être amusant, juste, ferme et cohérent. -
Página 46: Jour 1 - Apprentissage Des Limites De La Zone Autorisée
4. Renouvelez cette opération au même fanion de délimitation jusqu’à ce que votre animal ne veuille plus entrer dans la limite de la zone. 5. Essayez de couvrir 3 à 4 fanions par séance. Veillez à ce que cet apprentissage soit AMUSANT ! Félicitez votre animal s’il refuse vigoureusement d’aller dans la limite de la zone. www.petsafe.net... -
Página 47: Jours 2 À 4 Inclus - Poursuite De L'apprentissage Des Limites De La Zone Autorisée
• Réglez le niveau de stimulation électrostatique du collier-récepteur sur le niveau 2 ou plus selon la réaction de votre animal lors des jours 2 à 4. • Mettez un autre collier, non métallique, PAR-DESSUS le collier-récepteur et attachez-y une longe. Vérifiez que le collier supplémentaire ne fait pas pression sur les contacteurs. www.petsafe.net... -
Página 48: Jours 9 À 14 - Surveillance Sans Laisse
1. Entrez dans la zone autorisée avec votre animal après lui avoir mis le collier-récepteur. 2. Marchez et jouez avec votre animal, en restant toujours dans la zone autorisée. 3. Occupez-vous à faire quelque chose d’autre tout en regardant la réaction de votre animal. www.petsafe.net... -
Página 49: Jours 15 À 30 - Surveillance De L'animal
Pour vous procurer des accessoires supplémentaires pour votre Stay + Play Wireless Fence™ PetSafe , visitez ® notre site web www.petsafe.net pour trouver un détaillant près de chez vous et pour obtenir la liste des numéros de téléphone des services clientèles de votre région. www.petsafe.net... -
Página 50: Questions Fréquemment Posées
Y a-t-il un collier-récepteur plus • Non. Contactez notre Service clientèle ou visitez notre site web petit ou un autre collier-récepteur à l'adresse www.petsafe.net pour obtenir des solutions et idées compatible avec l'émetteur sans fil ? supplémentaires. Où puis-je m'adresser pour obtenir •... - Página 51 Puis-je fixer une longe au • Non. Les contacteurs risqueraient alors d’exercer une pression collier-récepteur ? trop forte sur le cou de votre animal de compagnie. Mettez un autre collier, non métallique, par-dessus le collier-récepteur et attachez-y la longe. www.petsafe.net...
-
Página 52: Dépannage
• Placez le collier-récepteur dans un rayon de 3 m du récepteur pour la réinitialisation. • Assurez-vous qu'aucune alarme continue n'est émise par l'émetteur. www.petsafe.net... - Página 53 état de fonctionnement. • Si le voyant d'alimentation de l'adaptateur n'est pas allumé, contactez le service clientèle pour remplacer l'adaptateur d'alimentation. www.petsafe.net...
- Página 54 Consultez et respectez les consignes de sécurité importantes de la page 28, ainsi que les instructions de l'étape 6 présentées sous la rubrique « Ajustement du collier-récepteur ». www.petsafe.net...
-
Página 55: Conditions D'utilisation Et Limitation De Responsabilité
à ce produit. Si de telles modifications vous ont été communiquées avant que vous n’utilisiez ce Produit, elles ont une valeur contractuelle et s’appliquent comme si elles faisaient partie du présent document. Protégé par des brevets américains 6,879,300; 7,142,167. www.petsafe.net... -
Página 56: Conformité
Radio Systems Corporation déclare par la présente que ce Stay + Play Wireless Fence™ est conforme aux exigences essentielles et autres dispositions pertinentes de la directive 1999/5/EC. Vous trouverez la déclaration de conformité à l’adresse : http://www.petsafe.net/customercare/eu_docs.php. Le présent appareil est conforme aux CNR d’Industrie Canada applicables aux appareils radio exempts de licence. -
Página 57: Garantie
Trois ans de garantie limitée non transférable Ce produit est soumis à une garantie limitée du fabricant. Pour une description détaillée de la garantie concernant ce produit et de ses modalités d’application, consultez notre site www.petsafe.net et/ou contactez notre Service clientèle. -
Página 58: Belangrijke Veiligheidsinformatie
Hiernavolgend worden aan Radio Systems Corporation, Radio Systems PetSafe Europe Ltd., Radio Systems Australia Pty Ltd. en andere zustermaatschappijen of merken van Radio Systems Corporation gerefereerd met de woorden “we” of “wij”. BELANGRIJKE VEILIGHEIDSINFORMATIE Uitleg van in deze handleiding gebruikte belangrijke woorden en symbolen Dit is het symbool voor een veiligheidsalarm. - Página 59 • Plaats niets bovenop de zender en bedek de ventilatiegaten niet. Hierdoor kan de zender oververhit raken en voortijdig defect kunnen raken. • Plaats de zender niet in een kast of andere afgesloten, niet-geventileerde ruimte. • Plaats de zender niet op of in de buurt van een metalen oppervlak. www.petsafe.net...
- Página 60 Als u optimaal wilt profiteren van uw garantie, verzoeken wij u uw product binnen 30 dagen te registreren via www.petsafe.net. Registreer uw product en bewaar de aankoopbon om maximaal te profiteren van de garantie. We kunnen u dan ook beter helpen als u contact opneemt met de klantenservice. Belangrijk: uw waardevolle informatie wordt nooit aan derden gegeven of verkocht.
-
Página 61: Onderdelen
Gebruiksaanwijzing en Lange Testlampje trainingshandleiding contactpunten Ander materiaal dat u mogelijk nodig hebt • Schroevendraaier • Schaar • Aansteker • Boormachine en bevestigingsgereedschap • Rolmaat • Niet-metalen halsband en riem Hulp bij het instellen en bij de training: www.petsafe.net www.petsafe.net... -
Página 62: Zo Werkt Het Systeem
Zo werkt het systeem Het PetSafe Stay + Play Wireless Fence™ Draadloos omheiningssysteem is veilig, comfortabel en effectief voor alle huisdieren ® zwaarder dan 2,3 kg. Het systeem werkt door middel van het uitzenden van een radiosignaal tot 32 m in alle richtingen. - Página 63 Metaalinterferentiealarm: Schakelt het radiosignaal van de zender uit om de zender te beschermen tegen beschadiging als deze te kort bij metalen voorwerpen is geplaatst. Transmissiestoringsalarm: Aanhoudend geluidssignaal wat wijst op een probleem met de zender. Zender Alarm- uitschakel- knop ALARM ALARM Stroomaan- Stroomverklikkerlampje sluiting Grensschakelaar HIGH Grenscontroleknop www.petsafe.net...
-
Página 64: Gebruiksaanwijzing
Als het metaalinterferentiealarm klinkt, staat uw huisdier niet meer onder controle. Als u de zender niet uit de buurt van metaal verplaatst, blijft het alarm klinken en blijft de transmissie van de zender uitgeschakeld. www.petsafe.net... -
Página 65: De Ontvangerhalsband Opladen
• Bij het alarm bij een zendstoring klinkt een doorlopende geluidssignaal om aan te geven dat er een zendprobleem is. In deze situatie wordt uw huisdier niet meer ingesloten. Neem contact op met de klantenservice of bezoek onze website www.petsafe.net voor een vervangende zender. STAP 2... -
Página 66: Voorbereiden Van De Ontvangerhalsband
Modusknop Het rode verklikkerlampje van de ontvanger schakelt uit en alle lampjes blijven uit, wat aangeeft dat de ontvanger is uitgeschakeld. Om de ontvangerhalsband niet te vaak te hoeven opladen, kunt u deze uitschakelen als hij niet wordt gebruikt. www.petsafe.net... - Página 67 (3 keer per seconde) Snel knipperend rood Toon tijdens de duur van de Er wordt maximaal 15 seconden (3 keer per seconde) statische stimulans een statische stimulans afgegeven Bescherming tegen overstimulans; Doorlopend groen Geen toon halsband gedurende 10 seconden (10 seconden) vergrendeld www.petsafe.net...
-
Página 68: Tabel Met Functies En Reacties
10 seconden branden. Mocht het gebeuren dat uw huisdier de vrije ruimte voor het huisdier verlaat (wat onwaarschijnlijk is), dan krijgt hij geen statische stimulans op het moment dat hij terugkeert naar de vrije ruimte voor het huisdier. www.petsafe.net... -
Página 69: De Gewenste Afmeting Van De Vrije Ruimte Voor Het Huisdier Instellen
Methode met twee personen Houdt de ontvangerhalsband op de hoogte van de nek van uw huisdier (4E) met het Petsafe -logo afgekeerd van de zender. Loop tot de rand van de ®... -
Página 70: Zenderbereiktabel
0,6 tot 1 m afstand van de grensvlaggetjes. 1. Met het testlampje en het correctieniveau op stand 2 of hoger houdt u de ontvangerhalsband op de hoogte van de nek van uw huisdier met het PetSafe -logo afgekeerd ®... -
Página 71: Aanpassen Van De Ontvangerhalsband
2. Begin met uw huisdier rustig voor u te laten staan (6A). 3. Om het makkelijker te maken om de waarschuwingspieptoon te horen, plaatst u de ontvangerhalsband om uw huisdier met het PetSafe -logo gericht naar de kin van uw huisdier. - Página 72 De halsband opnieuw in elkaar zetten Schuifgesp De schuifgesp voorkomt dat de halsband los rond de nek van uw huisdier komt te zitten. Randen De randen moeten naar boven wijzen; de halsband gaat glijden als de gesp niet correct bevestigd is. www.petsafe.net...
-
Página 73: Trainingshandleiding
Belangrijk: een juiste training van uw huisdier is essentieel voor het succes van het PetSafe Stay + Play Wireless ® Fence™-systeem. Lees dit hoofdstuk in zijn geheel door voordat u met de training begint. Het PetSafe Stay + Play ®... -
Página 74: Dag 1 - Bewust Worden Van De Grens
4. Herhaal dit proces bij dezelfde grensvlag totdat uw huisdier tegenwerkt bij het binnengaan van het grensgebied. 5. Probeer per sessie 3 tot 4 grensvlaggen te behandelen. Zorg dat dit LEUK is! Prijs uw huisdier als hij snel teruggaat of niet het grensgebied in wil gaan. www.petsafe.net... -
Página 75: Dag 2 T/M 4 - Doorgaan Met Bewust Worden Van De Grens
2 tot en met 4. • Plaats een andere, niet-metalen halsband om de nek van uw huisdier BOVEN de ontvangerhalsband en bevestig hier een riem aan. Zorg ervoor dat de extra halsband geen druk op de contactpunten uitoefent. www.petsafe.net... -
Página 76: Dag 9 T/M 14 - Supervisie Zonder Riem
1. Ga samen met uw huisdier, dat de ontvangerhalsband draagt, de vrije ruimte voor het huisdier in. 2. Loop rond in de tuin en speel met uw huisdier, waarbij u te allen tijde binnen de vrije ruimte voor het huisdier blijft. 3. Kijk naar uw huisdier terwijl u een ander klusje in de tuin uitvoert. www.petsafe.net... -
Página 77: Dag 15 T/M 30 - Uw Huisdier Controleren
50 Watt of meer. Accessoires Neem contact op met de klantenservice of ga naar de website op www.petsafe.net om een winkel bij u in de buurt te vinden als u meer accessoires voor het PetSafe Stay + Play Wireless Fence™-systeem wilt aanschaffen of voor ®... -
Página 78: Veel Gestelde Vragen
Neem contact op met de klantendienst of ga naar onze Play Wireless Fence™-systeem? website op www.petsafe.net om een winkel bij u in de buurt te vinden. Is er een kleinere ontvangerhalsband • Nee. Neem contact op met de klantenservice of bezoek of een andere compatibele onze website www.petsafe.net voor aanvullende ideeën... - Página 79 Kan ik een riem aan de • Nee. Hierdoor zouden de contactpunten te strak tegen de nek ontvangerhalsband vastmaken? aan kunnen komen. Bevestig de riem aan een afzonderlijke, niet- metalen halsband die u boven de ontvangerhalsband plaatst. www.petsafe.net...
-
Página 80: Probleemoplossing
• Breng de ontvangerhalsband binnen 3 m van de zender om deze te resetten. • Controleer of er geen doorlopend alarm klinkt bij de zender. www.petsafe.net... - Página 81 • Controleer of het stroomverklikkerlampje op de adapter brandt als deze is stroomverklikkerlampje aangesloten op een werkend standaard stopcontact. brandt niet. • Als het stroomverklikkerlampje op de adapter niet brandt, neem dan contact op met de klantenservice voor een vervangende adapter. www.petsafe.net...
- Página 82 Raadpleeg en volg de aanwijzingen in de belangrijke veiligheidsinformatie op pagina 66 en de aanwijzingen in stap 6 onder de kop “Aanpassen van de ontvangerhalsband”. www.petsafe.net...
-
Página 83: Gebruiksvoorwaarden En Beperking Van Aansprakelijkheid
Radio Systems Corporation behoudt zich het recht voor om de voorwaarden, bepalingen en kennisgevingen voor dit product van tijd tot tijd te wijzigen. Indien u voorafgaand aan het gebruik van dit product over dergelijke wijzigingen bent geïnformeerd, zijn deze wijzigingen bindend alsof zij hierin opgenomen waren. Gedekt door VS octrooien 6,879,300; 7,142,167. www.petsafe.net... -
Página 84: Conformiteit
Drie jaar niet-overdraagbare beperkte garantie Dit product heeft het voordeel van een beperkte fabrieksgarantie. Alle informatie over de garantie die geldt voor dit product en de voorwaarden ervan vindt u op www.petsafe.net en/of zijn verkrijgbaar bij de klantenservice van uw regio. - Página 85 www.petsafe.net...
- Página 86 A partir de ahora en este documento, Radio Systems Corporation, Radio Systems PetSafe Europe Ltd., Radio Systems Australia Pty Ltd. y cualquier otra afiliación a la marca de Radio Systems Corporation se referirá en forma colectiva como “nosotros” o “con nosotros”.
- Página 87 • No coloque el transmisor en un armario ni en ninguna otra área cerrada y exenta de ventilación. • No coloque el transmisor cerca de una superficie de metal ni sobre ella. www.petsafe.net...
- Página 88 Para obtener la mayor protección de su garantía, por favor registre su producto dentro de los 30 días posteriores a la compra en www.petsafe.net. Al registrar el producto y guardar el recibo, tendrá derecho a la garantía completa del producto. También estaremos en disposición de ayudarle de forma más eficiente en caso de que deba llamar al Centro de atención al cliente.
-
Página 89: Componentes
Otros artículos que puede necesitar • Destornillador • Tijeras • Encendedor • Taladradora y herramientas de montaje • Cinta métrica • Collar y correa no metálicos Ayuda para la configuración y el adiestramiento: www.petsafe.net www.petsafe.net... -
Página 90: Cómo Funciona El Sistema
Cómo funciona el sistema El limitador de zona sin cable Stay + Play Wireless Fence™ de PetSafe ha demostrado su efectividad, ® comodidad y seguridad en mascotas de más de 2,3 kg. El sistema funciona mediante la transmisión de una señal de radio a una distancia de 32 metros en todas las direcciones. - Página 91 Alarma de fallo de transmisión: tono continuo que indica un problema con el transmisor. Transmisor Botón de desconexión de la alarma ALARM ALARM Luz indicadora Toma de de alimentación alimentación Interruptor de Selector de control selección del HIGH del límite límite www.petsafe.net...
-
Página 92: Manual De Funcionamiento
Si suena la alarma de interferencias por metal, su mascota no estará controlada. Debe volver a ubicar el transmisor lejos del metal, de lo contrario la alarma seguirá sonando y se desactivará la transmisión del transmisor. www.petsafe.net... -
Página 93: Carga Del Collar Receptor
• La alarma de fallo de transmisión emite una señal acústica continua que indica un problema en el transmisor. En este caso, la mascota ya no se encuentra confinada. Contacte con el Centro de atención al cliente o visite nuestro sitio web en www.petsafe.net para obtener un transmisor de repuesto. PASO 2 Carga del Collar receptor El cargador del collar receptor está... -
Página 94: Preparación Del Collar Receptor
A continuación la luz indicadora roja del receptor se apagará y no todas las luces indicadores del receptor estarán apagadas, lo que indica que la unidad está apagada. Para ampliar el periodo entre cargas del collar receptor, puede apagarlo cuando no se utilice. www.petsafe.net... -
Página 95: Indicadores De Estado Del Collar Receptor
Señal acústica para la Destello rápido en rojo Estimulación estática suministrada duración (3 destellos por segundo) durante un máximo de 15 segundos de la estimulación estática Verde permanente Protección contra sobreestimulación; Sin señal acústica (10 segundos) collar bloqueado durante 10 segundos www.petsafe.net... -
Página 96: Ajuste Del Nivel De Estimulación Estática
15 segundos. La luz verde se mantendrá encendida durante 10 segundos mientras dure el bloqueo por parte del sistema de la administración de estimulación estática. En el hipotético caso de que su mascota salga de la zona autorizada, no recibirá una estimulación estática al regresar a esta zona. www.petsafe.net... -
Página 97: Ajuste Del Área Permitida Al Tamaño Deseado
Método para dos personas Sostenga el collar receptor a la altura del cuello de su mascota (4E) con el logotipo PetSafe en posición opuesta al transmisor. Camine hasta el borde ® de la zona autorizada deseada. De espaldas al transmisor, sostenga el collar receptor en el borde de la zona autorizada deseada (4F). -
Página 98: Tabla De Alcance Del Transmisor
1. Con ayuda de la llave multiusos y con el nivel de estimulación estática en la posición 2 o superior, sostenga el collar receptor a la altura del cuello de su mascota con el logotipo PetSafe en posición opuesta al transmisor. ®... -
Página 99: Ajuste Del Collar Receptor
Quizás tenga que recortar el pelo de la zona de los puntos de contacto. No afeite nunca el cuello del perro, eso podría ocasionar una erupción o una infección. www.petsafe.net... -
Página 100: Para Volver A Cerrar El Collar Con La Hebilla
Para volver a cerrar el collar con la hebilla Hebilla deslizante La hebilla deslizante evita que el collar acabe quedando suelto alrededor del cuello de la mascota. Dientes Los dientes deben estar mirando hacia arriba; el collar se deslizará si no está adecuadamente abrochado. www.petsafe.net... -
Página 101: Manual De Adiestramiento
MANUAL DE ADIESTRAMIENTO Sea paciente con su mascota Importante: el correcto adiestramiento de su mascota es vital para el éxito del PetSafe Stay + Play Wireless ® Fence™. Lea esta sección en su totalidad antes de comenzar el adiestramiento de su mascota. Recuerde que el PetSafe Stay + Play Wireless Fence™... -
Página 102: Día 1 - Reconocimiento De Los Límites
5. Intente que su mascota aprenda este adiestramiento en 3 o 4 banderines por sesión. ¡Procure que esta actividad sea DIVERTIDA! Elogie a su mascota si retrocede rápidamente o se resiste a entrar en el límite de la zona. www.petsafe.net... -
Página 103: Días 2 A 4 - Continuación Del Proceso De Reconocimiento De Límites
• Ponga un collar metálico adicional en el cuello de su mascota POR ENCIMA del collar receptor y engánchelo a una correa. Asegúrese de que el collar adicional no ejerza presión sobre los puntos de contacto del collar receptor. www.petsafe.net... -
Página 104: Días 9 A 14 - Supervisión Sin Correa
1. Entre en la zona autorizada con su mascota con el collar receptor puesto. 2. Camine por el jardín y juegue con su mascota, sin salir de la zona autorizada. 3. Realice otra tarea en el jardín mientras vigila a su mascota. www.petsafe.net... -
Página 105: Días 15 A 30 - Supervisión De La Mascota
Stay + Play Wireless Fence™, visite nuestro sitio web en ® www.petsafe.net para encontrar un comercio minorista cerca de usted y para obtener un listado de los números de teléfono de los Centro de atención al cliente en su zona. -
Página 106: Preguntas Frecuentes
Póngase en contacto con el Centro de del Stay + Play Wireless Fence™? atención al cliente o visite nuestro sitio web, www.petsafe.net, para localizar el distribuidor más cercano a usted. ¿Hay disponible algún collar receptor •... - Página 107 • No. De lo contrario podría hacer que los puntos de contacto collar receptor? presionaran demasiado el cuello de su perro. Ponga un collar metálico adicional en el cuello de su mascota POR ENCIMA del collar receptor y engánchelo a una correa. www.petsafe.net...
-
Página 108: Resolución De Problemas
• Acerque el collar receptor a menos de 3 m del transmisor para reiniciarlo. • Asegúrese de que no el transmisor no emite ninguna alarma continua. www.petsafe.net... - Página 109 • Si la luz del adaptador de corriente está encendida, contacte con el Centro de atención al cliente para obtener un adaptador de corriente de repuesto. www.petsafe.net...
- Página 110 Le rogamos lea y observe la información de seguridad importante descrita en la página 80 y las instrucciones del Paso 6 con el encabezamiento “Ajuste de collar receptor”. www.petsafe.net...
-
Página 111: Términos De Uso Y Limitación De Responsabilidad
Si dichos cambios se le hubieran notificado con anterioridad a su uso de este producto, éstos serán vinculantes para usted, como quedan incorporados en este documento. Cubierto por patentes americanas 6,879,300; 7,142,167. www.petsafe.net... -
Página 112: Conformidad
Este producto cuenta con el beneficio de una garantía limitada del fabricante. Puede encontrar toda la información de la garantía aplicable a este producto, así como sus términos, en www.petsafe.net y también estarán disponibles poniéndose en contacto con el centro de atención al cliente local. - Página 113 www.petsafe.net...
- Página 114 Di seguito useremo le espressioni “ Noi” faccendo riferimento a Radio Systems Corporation, Radio Systems PetSafe Europe Ltd., Radio Systems Australia Pty Ltd. e tutte le altre succursali o marchi di Radio Systems Corporation. INFORMAZIONI IMPORTANTI PER LA SICUREZZA Spiegazione dei termini e dei simboli di attenzione utilizzati in questa guida È...
- Página 115 • Non posizionare il trasmettitore in un armadio, uno sgabuzzino o altra area confinata e priva di ventilazione. • Non porre il trasmettitore su una superficie metallica o nelle vicinanze di essa. www.petsafe.net...
- Página 116 Per domande sui nostri prodotti o sull’ addestramento del vostro cane, visitare il nostro sito all’indirizzo www.petsafe.net o rivolgersi al nostro Centro di assistenza clienti. Per un elenco del numeri di telefono del Centro di assistenza clienti, visitare il nostro sito web: www.petsafe.net.
-
Página 117: Componenti
Test di luce e di addestramento contatto lunghi Strumento Altro occorrente eventualmente necessario • Cacciavite • Forbici • Accendisigari • Trapano e occorrente per montaggio • Metro • Collare e guinzaglio non metallici Aiuto per l’addestramento e l’impostazione: www.petsafe.net www.petsafe.net... -
Página 118: Come Funziona Il Systema
Come funziona il systema È stato dimostrato che la sistema contenimento wireless PetSafe Stay + Play Wireless Fence™ è sicura, efficace ® e non provoca alcun disagio a tutti i cani di peso superiore a 2,3 kg. Il sistema funziona trasmettendo un segnale radio fino a una distanza di 32 m in tutte le direzioni. - Página 119 Allarme di problemi relativi alla trasmissione: segnale acustico che indica un problema relativo al trasmettitore. Trasmettitore Pulsante di disattivazione dell'allarme ALARM ALARM Indicatore luminoso di Connettore di alimentazione alimentazione Quadrante Interruttore di di controllo HIGH delimitazione delimitazione www.petsafe.net...
-
Página 120: Guida All Uso
2. Scollegare l’adattatore di corrente del trasmettitore dalla presa di alimentazione situata nella parte inferiore del trasmettitore. 3. Tenere premuto il pulsante di disattivazione dell’allarme per 5 secondi, quindi rilasciarlo. Vengono emessi tre brevi segnali acustici a indicare che l’allarme è stato disattivato. www.petsafe.net... -
Página 121: Caricamento Del Collare Ricevitore
• L’allarme di mancata trasmissione emette un segnale acustico continuo a indicare un problema relativo al trasmettitore. In questa situazione, l’animale non può più essere contenuto. Contattare il nostro Centro di assistenza clienti o visitare il nostro sito web all’indirizzo www.petsafe.net per un trasmettitore di ricambio. PUNTO 2 Caricamento del collare ricevitore Il caricatore del collare ricevitore è... -
Página 122: Preparazione Del Collare Ricevitore
Quindi, l’indicatore luminoso rosso del ricevitore si spegne e tutti gli indicatori Selettore della modalità di luminosi del ricevitore rimangono spenti a indicare che l’unità è spenta. funzionamento Per prolungare il tempo tra le ricariche del collare ricevitore, si consiglia di spegnere il collare ricevitore quando non viene utilizzato. www.petsafe.net... - Página 123 (3 lampeggi al secondo) avvertimento Rosso pulsante rapido Segnale acustico per durata Stimolazione statica erogata (3 lampeggi al secondo) della stimolazione statica per massimo 15 secondi Verde continuo Protezione da stimolazione eccessiva; Nessun segnale acustico (10 secondi) collare bloccato per 10 secondi www.petsafe.net...
- Página 124 15 secondi. Mentre il sistema blocca l’ulteriore erogazione di simulazione statica, la spia verde rimane attiva per 10 secondi. Nell’improbabile eventualità che abbandoni la zona autorizzata, al ritorno al suo interno l’animale non riceverà una stimolazione statica. www.petsafe.net...
-
Página 125: Regolazione Delle Dimensioni Desiderate Della Zona Autorizzata
CA. Metodo a due persone Tenere il collare ricevitore all’altezza del collo dell’animale (4E) con il logo PetSafe rivolto in direzione opposta a quella del trasmettitore. ® Camminare fino al bordo della zona autorizzata. Rivolti in direzione opposta a quella del trasmettitore, tenere il collare ricevitore sul bordo della zona autorizzata desiderata (4F). -
Página 126: Prospetto Delle Ampiezze Di Campo Del Trasmettitore
1. Utilizzando la spia della chiave di prova con il livello di stimolazione statica impostato su un valore pari o superiore a 2, tenere il collare ricevitore all’altezza del collo dell’animale con il logo PetSafe rivolto in direzione ® opposta a quella del trasmettitore. -
Página 127: Aggiustare Il Collare Ricevitore
1. Verificare che il trasmettitore non sia collegato e che il ricevitore sia spento. 2. Iniziare mettendo l’animale comodo sulle quattro zampe (6A). 3. Per avvertire più facilmente il segnale di avvertimento, posizionare il collare ricevitore sull’animale con il lato con il logo PetSafe del ricevitore rivolto verso il mento del cane. ®... - Página 128 Per re-infilare il collare Fibbia scorrevole La fibbia scorrevole evita l'allentamento del collare intorno al collo dell'animale. Rilievi I rilievi devono essere rivolti verso l'alto; il collare scivola se non è infilato correttamente. www.petsafe.net...
-
Página 129: Guida All'addestramento
GUIDA ALL’ADDESTRAMENTO Mostrarsi pazienti con l’ animale Importante: il corretto addestramento del cane è fondamentale per il successo della recinzione PetSafe Stay + ® Play Wireless Fence™. Leggere integralmente questa sezione prima di iniziare l’addestramento. Ricordare che questa recinzione PetSafe Stay + Play Wireless Fence™... -
Página 130: Giorno 1 - Riconoscimento Delle Bandierine
4. Ripetere la procedura presso la stessa bandierina finché l’animale non oppone resistenza a varcare il perimetro della zona delimitata. 5. Puntare alla padronanza di 3-4 bandierine per sessione. Fare in modo che sia DIVERTENTE! Lodare l’animale se si ritira subito o se oppone resistenza a varcare il perimetro della zona delimitata. www.petsafe.net... -
Página 131: Giorni 2-4 - Continuare Con Il Riconoscimento Delle Bandierine
2 al giorno 4. • Applicare sul collo del cane un altro collare non metallico, posizionandolo DOPO il collare ricevitore e attaccarvi il guinzaglio. Verificare sempre che il secondo collare non eserciti pressione sui punti di contatto. www.petsafe.net... -
Página 132: Giorni 9-14 - Supervisione Senza Guinzaglio
1. Entrare nella zona autorizzata con il cane dopo aver applicato il collare ricevitore. 2. Girellare in giardino e giocare con il cane, facendo attenzione a non oltrepassare mai la zona autorizzata. 3. Fare finta di occuparsi di altro senza perdere però di vista l’animale. www.petsafe.net... -
Página 133: Giorni 15-30 - Monitoraggio Dell'animale
Per acquistare ulteriori accessori per il sistema PetSafe Stay + Play Wireless Fence™, visitare il nostro sito web ® all’indirizzo www.petsafe.net per individuare il rivenditore più vicino e per l’elenco completo dei numeri di telefono dei Centro di assistenza clienti nella propria zona. www.petsafe.net... -
Página 134: Domande Frequenti
Rivolgersi al Centro di assistenza clienti collare ricevitore Stay + Play Wireless o visitare il nostro sito web all'indirizzo www.petsafe.net per Fence™? informazioni sui rivenditori della propria zona. È disponibile un collare ricevitore più... - Página 135 Posso agganciare un guinzaglio al • No, per evitare di premere troppo i punti di contatto contro il collare ricevitore? collo. Applicare un altro collare non metallico, posizionandolo DOPO il collare ricevitore e attaccarvi il guinzaglio. www.petsafe.net...
-
Página 136: Individuazione E Risoluzione Dei Guasti
• Portare il collare trasmettitore entro 3 m dal trasmettitore per farlo ripristinare. • Assicurarsi che il trasmettitore non emetta un segnale acustico di allarme continuo. www.petsafe.net... - Página 137 è inserito in una normale presa trasmettitore non di alimentazione CA nel muro. è illuminato. • Se la spia dell'adattatore elettrico non è illuminata, contattare il Centro di assistenza clienti per richiedere un adattatore elettrico di ricambio. www.petsafe.net...
- Página 138 è utilizzata in modo improprio o con negligenza, che si verifichino perdite dalla batteria del collare ricevitore sul collo del cane. Leggere attentamente e osservare le importanti informazioni sulla sicurezza a pagina 106 e le istruzioni del punto 6, sotto il titolo “Aggiustare il collare ricevitore”. www.petsafe.net...
-
Página 139: Limitazione Di Responsabilità E Condizioni Di Utilizzo
Radio Systems Corporation si riserva il diritto di modificare in qualsiasi momento condizioni generali e note che regolano l’uso di questo prodotto. La notifica all’utilizzatore di dette modifiche, prima che egli utilizzi questo prodotto, le rende vincolanti parimenti a quelle qui espressamente indicate. Protetto da brevetti USA 6,879,300; 7,142,167. www.petsafe.net... -
Página 140: Conformità
Tre anni di garanzia limitata non trasferibile Questo prodotto è coperto da una garanzia limitata del produttore. Informazioni esaurienti sulla garanzia di questo prodotto e le sue condizioni sono disponibili sul sito Web www.petsafe.net e/o possono essere richieste al Centro assistenza clienti di zona. -
Página 141: Wichtige Sicherheitsinformation
Hinfort werden Radio Systems Corporation, Radio Systems PetSafe Europe Ltd., Radio Systems Australia Pty Ltd. sowie jede andere Konzerngesellschaft oder Marke von Radio Systems Corporation zusammen als “Wir” oder “Uns” bezeichnet. WICHTIGE SICHERHEITSINFORMATION Erklärung der in dieser Anleitung verwendeten Warnhinweise und Symbole Das ist das Sicherheitswarnsymbol. - Página 142 • Legen Sie nichts auf die Oberfläche des Sendegerätes, und bedecken Sie keine der Lüftungsöffnungen. Dies könnte zu Überwärmung und Fehlfunktion des Sendegerätes führen. • Platzieren Sie das Sendegerät nicht in einem Schrank oder an einem geschlossenen, nicht gelüfteten Ort. • Sendegerät nicht auf oder in der Nähe von Metalloberflächen platzieren. www.petsafe.net...
- Página 143 Um den größten Schutz für Ihre Garantie zu erhalten, registrieren Sie bitte Ihr Produkt innerhalb von 30 Tagen auf www.petsafe.net. Bitte registrieren Sie sich und bewahren Sie den Kaufbeleg auf, damit die Gewährleistung für das Produkt in vollem Umfang in Kraft treten kann. Wir können Ihnen dann auch gezielter helfen, wenn Sie unser Kundenservicezentrum anrufen.
-
Página 144: Bestandteile
Ladegerät Begrenzungsfähnchen - 50 Kontaktstifte Schraubenschlüssel Gebrauchsanweisung Lange Testleuchte und Trainingsanleitung Kontaktstifte Anderes Material, das Sie eventuell benötigen • Schraubendreher • Schere • Feuerzeug • Bohrmaschine und Befestigungsmaterial • Maßband • Nicht-metallisches Halsband und Leine Einrichtung und Trainingshilfe: www.petsafe.net www.petsafe.net... -
Página 145: So Funktioniert Das System
So funktioniert das System Das PetSafe Drahtloses Rückhaltesystem Stay + Play Wireless Fence™ hat sich für alle Haustiere über 2,3 kg als sicher, ® bequem und effektiv erwiesen. Das System gibt ein Funksignal bis zu 32 m in alle Richtungen ab. Sie definieren den erlaubten Aufenthaltsbereich für das Haustier vorübergehend mit Begrenzungsfähnchen als visuelle Hilfe für Ihr Haustier. - Página 146 Metallinterferenz-Alarm: Deaktiviert das Funksignal des Transmitters, um das Sendegerät vor Schaden zu schützen, der entstehen kann, wenn ers zu nah an Metallobjekten platziert wird. Übertragungsfehler-Alarm: Andauerndes Tonsignal, das ein Problem mit dem Sendegerät anzeigt. Sendegerät Alarm- Deaktivierungsknopf ALARM ALARM Laderan- Betriebsanzeige schluss Wählrad zur Begren- Eingrenzungs- zungsschalter HIGH kontrolle www.petsafe.net...
-
Página 147: Gebrauchsanweisung
1. Den Netzadapter in eine Standard- Platte Wechselstromsteckdose einstecken. 2. Den Netzadapter des Sendegerätes von der Anschlussstelle am Boden des Sendegerätes abziehen. 3. Den Alarm-Deaktivierungsknopf 5 Sekunden gedrückt halten und dann loslassen. Es erklingen drei kurze Töne, die anzeigen, dass der Alarm ausgeschaltet wurde. www.petsafe.net... -
Página 148: Anpassen Des Empfängerhalsbands
• Der Alarm für die Fehlfunktion am Sendegerät gibt einen Dauerton, der anzeigt, dass ein Problem am Sendegerät vorliegt. In dieser Situation ist der Aufenthaltsbereich Ihres Haustieres nicht länger beschränkt. Kontaktieren Sie den Kundenservicezentrum oder besuchen Sie unsere Website auf www.petsafe.net, um ein Ersatz-Sendegerät zu bestellen. -
Página 149: Empfängerhalsband Vorbereiten
Anschließend geht die rote Leuchtanzeige des Empfängerhalsbands aus, und es bleiben auch sämtliche anderen Leuchtanzeigen des Empfängerhalsbands ausgeschaltet, um anzuzeigen, dass die Einheit ausgeschaltet wurde. Sie sollten in Erwägung ziehen, das Empfängerhalsband bei Nichtgebrauch auszuschalten, um die Zeiten zwischen dem Aufladen zu verlängern. www.petsafe.net... - Página 150 (3 Lichtblitze pro Sekunde) Pulsiert schnell rot Tonsignal für Dauer des Statischer Reizimpuls wird (3 Lichtblitze pro Sekunde) statischen Reizimpulses bis zu 15 Sekunden lang abgegeben Durchgehend grün Schutz vor Überstimulierung; Kein Tonsignal (10 Sekunden) Halsband für 10 Sekunden gesperrt www.petsafe.net...
- Página 151 Dauer des statischen Reizimpulses auf 15 Sekunden. Während des Zeitraums, in dem das System keine weiteren Reizimpulse zulässt, leuchtet das grüne Licht 10 Sekunden lang. In dem unwahrscheinlichen Fall, dass Ihr Haustier seinen erlaubten Aufenthaltsbereich verlässt, erhält es so lange keinen statischen Reizimpuls, bis es in den erlaubten Aufenthaltsbereich zurückkehrt. www.petsafe.net...
-
Página 152: Anleitungen Zur Testleuchte
Begrenzungsschalter auf „Hoch“ und das Wählrad zur Begrenzungskontrolle auf „8“ (4C und 4D). Stecken Sie den Netzadapter in eine funktionstüchtige Standard-Wechselstromsteckdose. Zwei-Personen-Methode Halten Sie das Empfängerhalsband so auf Nackenhöhe Ihres Haustieres (4E), dass sich das Petsafe Logo auf der vom Sendegerät ® abgewandten Seite befindet. Gehen Sie an den Rand des gewünschten Aufenthaltsbereiches für Ihr Haustier. -
Página 153: Tabelle Reichweite Des Sendegerätes
Das Empfängerhalsband wird in einem Bereich von 0,6 m bis 1 m von den Begrenzungsfähnchen aktiviert. 1. Nehmen Sie die Testleuchte, stellen Sie die Stufe des statischen Reizimpulses auf 2 oder größer, und halten Sie das Empfängerhalsband so auf Nackenhöhe Ihres Haustiers, dass sich das Petsafe Logo auf der vom ® Sendegerät abgewandten Seite befindet. -
Página 154: Empfängerhalsband Anpassen
Empfänger ausgeschaltet ist. 2. Lassen Sie Ihr Haustier am Anfang bequem stehen (6A). 3. Platzieren Sie das Empfängerhalsband so, dass die Seite des Empfängers mit dem Petsafe ® Logo zum Kinn Ihres Haustieres zeigt, um ihm das Hören des Warnpiepstons zu erleichtern. -
Página 155: Halsband Wieder Einfädeln
Halsbands, indem Sie eine Flamme entlang dem ausgefransten Ende bewegen. Halsband wieder einfädeln Gleitschnalle Die Gleitschnalle verhindert, dass das Halsband sich um den Hals des Haustiers lockert. Rillen Die Rillen müssen nach oben zeigen; das Halsband wird verrutschen, wenn es nicht richtig eingefädelt ist. www.petsafe.net... -
Página 156: Trainingsanleitung
TRAININGSANLEITUNG Haben Sie Geduld mit Ihrem Haustier Wichtig: Ein geeignetes Training ist unerlässlich für den erfolgreichen Einsatz des PetSafe Stay + Play Wireless ® Fence™. Lesen Sie diesen Abschnitt vollständig durch, bevor Sie mit dem Trainieren Ihres Haustiers beginnen. Bedenken Sie, dass PetSafe Stay + Play Wireless Fence™... -
Página 157: Tag 1 - Wahrnehmung Der Begrenzungsfähnchen
Begrenzungsbereich zu gehen. 5. Als Ziel sollten in jeder Sitzung 3 bis 4 Begrenzungsfähnchen gelernt werden. Machen Sie es mit SPASS! Loben Sie Ihr Haustier, wenn es schnell zurückgeht oder sich dagegen wehrt, in den Begrenzungsbereich zu gehen. www.petsafe.net... -
Página 158: Tage 2 Bis 4 - Weiter Mit Der Wahrnehmung Der Begrenzungsfähnchen
Reaktion Ihres Haustieres in den Tagen 2 bis 4. • Legen Sie ein separates nicht metallisches Halsband an den Hals Ihres Haustiers ÜBER das Empfängerhalsband und befestigen Sie eine Leine daran. Stellen Sie sicher, dass das zusätzliche Halsband keinen Druck auf die Kontaktstifte ausübt. www.petsafe.net... -
Página 159: Tage 9 Bis 14 - Überwachung Ohne Leine
1. Gehen Sie in den erlaubten Aufenthaltsbereich für das Haustier, wobei Ihr Haustier das Empfängerhalsband trägt. 2. Gehen Sie im Garten herum und spielen Sie mit dem Haustier, bleiben Sie dabei stets im erlaubten Aufenthaltsbereich für das Haustier. 3. Beschäftigen Sie sich mit anderen Aufgaben im Garten, während Sie Ihr Haustier beaufsichtigen. www.petsafe.net... -
Página 160: Tage 15 Bis 30 - Haustierüberwachung
Zubehör Um weiteres Zubehör für Ihr PetSafe Stay + Play Wireless Fence™ zu erwerben, besuchen Sie unsere Website unter ® www.petsafe.net, um einen Händler in Ihrer Nähe und eine Liste der Telefonnummern des Kundenservicezentrum in Ihrem Gebiet zu finden. www.petsafe.net... -
Página 161: Häufig Gestellte Fragen
Stay + Play Wireless Fence™ verwenden? Sie müssen für jedes Haustier ein zusätzliches Empfängerhalsband kaufen. Kontaktieren Sie den Kundenservicezentrum oder besuchen Sie unsere Website auf www.petsafe.net, um einen Einzelhandel in Ihrer Gegend zu finden. Hält das PetSafe Stay + Play Wireless ®... - Página 162 Hautzustand genau. Kann ich eine Leine am • Nein. Dies kann dazu führen, dass die Kontaktpunkte zu fest an Empfängerhalsband befestigen? den Hals Ihres Haustieres gedrückt werden. Befestigen Sie eine Leine an einem separaten, nicht-metallischen Halsband über dem Empfängerhalsband. www.petsafe.net...
-
Página 163: Fehlerbehebung
Betriebsanzeige an ist, und die Steuerung wie von Ihnen beabsichtigt eingestellt ist. • Bringen Sie das Empfängerhalsband in einen Abstand von weniger als 3 m zum Sendegerät, um es neu einzustellen. • Stellen Sie sicher, dass das Sendegerät keinen kontinuierlichen Alarmton abgibt. www.petsafe.net... - Página 164 Die Betriebsanzeige des • Stellen Sie sicher, dass die Betriebsanzeige auf dem Stromadapter leuchtet, wenn Sendegerätes leuchtet nicht. dieser in einer betriebstüchtigen Wechselstrom-Wandsteckdose steckt. • Sollte die Betriebsanzeige nicht leuchten, kontaktieren Sie bitte unser Kundenservicezentrum, um einen Ersatz-Stromadapter zu bestellen. www.petsafe.net...
- Página 165 Auslaufen der Batterie Ihres Empfängerhalsbands auf den Hals Ihres Haustiers praktisch unmöglich, sofern keine unsachgemäße oder missbräuchliche Verwendung stattfindet. Bitte sehen Sie die wichtigen Sicherheitsinformationen auf Seite 132 und die Anweisungen in Schritt 6 unter der Überschrift „Empfängerhalsband anpassen“ durch und befolgen Sie diese. www.petsafe.net...
-
Página 166: Nutzungsbedingungen Und Haftungsbeschränkung
Produkt unterliegt, gelegentliche Änderungen vorzunehmen. Wurden Sie über derartige Änderungen vor Gebrauch des Produkts in Kenntnis gesetzt, sind diese in der gleichen Form bindend, als wären sie im vorliegenden Dokument enthalten. Durch US-Amerikanisches Patent geschützt 6,879,300; 7,142,167. www.petsafe.net... -
Página 167: Wichtige Recyclinghinweise
Dieses Produkt besitzt eine eingeschränkte Herstellergarantie. Alle Einzelheiten zu der für dieses Produkt geltenden Garantie und ihren Bestimmungen erhalten Sie auf www.petsafe.net und / oder bei Ihrer Kundenbetreuung vor Ort. • Radio Systems PetSafe Europe Ltd., 2nd Floor, Elgee Building, Market Square, Dundalk, Co. Louth, Ireland www.petsafe.net... - Página 168 PetSafe Produkte sind darauf ausgelegt, die Beziehung zwischen Ihnen und ®...
- Página 169 DO NOT PRINT THIS PAGE RSC Part #: 400-1632-19 Description: MANUAL PIF17-13478 & PIF45-13479 The world leader in pet training products Created by: TL Updated by: RC Material: 80g woodfree paper Initial Creation Date: 9/21/12 Color: White Approved by: LB...