Tabla de contenido
Publicidad
Enlaces rápidos
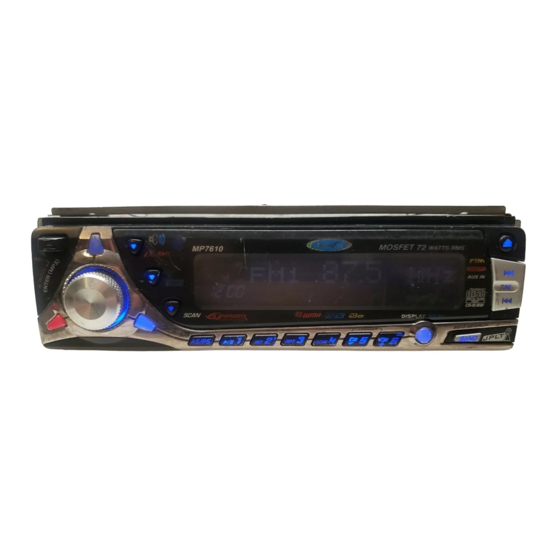
MP7610
Owner's Manual
MOSFET POWERED
Thank You!
Thank you for choosing a Jensen product. We hope you will find the instructions in this owner's
manual clear and easy to follow. If you take a few minutes to look through it, you'll learn how to
use all the features of your new Jensen receiver for maximum enjoyment. Technical assistance is
available by phone at 1-800-323-4815.
Preparation . . . . . . . . . . . . . . . . . . . . . . . . . . . . . . . . . . . . . . . . . . . . . . . . . . . . . . . . . . . . . . 1
Wiring. . . . . . . . . . . . . . . . . . . . . . . . . . . . . . . . . . . . . . . . . . . . . . . . . . . . . . . . . . . . . . . . . . . 3
Installation . . . . . . . . . . . . . . . . . . . . . . . . . . . . . . . . . . . . . . . . . . . . . . . . . . . . . . . . . . . . . . . 5
Basic Operation . . . . . . . . . . . . . . . . . . . . . . . . . . . . . . . . . . . . . . . . . . . . . . . . . . . . . . . . . . 6
Tuner Operation . . . . . . . . . . . . . . . . . . . . . . . . . . . . . . . . . . . . . . . . . . . . . . . . . . . . . . . . . . 13
CD Player Operation . . . . . . . . . . . . . . . . . . . . . . . . . . . . . . . . . . . . . . . . . . . . . . . . . . . . . . . 15
CD Changer Operation . . . . . . . . . . . . . . . . . . . . . . . . . . . . . . . . . . . . . . . . . . . . . . . . . . . . . 16
Remote Control . . . . . . . . . . . . . . . . . . . . . . . . . . . . . . . . . . . . . . . . . . . . . . . . . . . . . . . . . . . 16
MP3/WMA Operation. . . . . . . . . . . . . . . . . . . . . . . . . . . . . . . . . . . . . . . . . . . . . . . . . . . . . . . 17
Troubleshooting . . . . . . . . . . . . . . . . . . . . . . . . . . . . . . . . . . . . . . . . . . . . . . . . . . . . . . . . . . 19
Specifications . . . . . . . . . . . . . . . . . . . . . . . . . . . . . . . . . . . . . . . . . . . . . . . . . . . . . . . . . . . . 19
Warranty . . . . . . . . . . . . . . . . . . . . . . . . . . . . . . . . . . . . . . . . . . . . . . . . . . . . . . . . . . . . . . . . 19
MOSFET 72
WATTS RMS
/
PTM
TEXT
/
MENU
AUX IN
Preparation
Getting Started
It's a good idea to read all of the instructions before beginning the installation.
Tools and Supplies
The following tools and supplies are needed to install the radio.
•
Torx type, Flat-head and Philips screwdrivers
•
Wire cutters and strippers
•
Tools to remove existing radio (screwdriver, socket wrench set or other tools)
•
Electrical tape
•
Crimping tool
•
Volt meter/test light
•
Crimp connections
•
18 gauge wire for power connections
•
16-18 gauge speaker wire
Speaker Requirements: Only connect speakers rated in the load impedance of 4 ohms.
Speakers with a load impedance less than 4 ohms could damage the unit.
Disconnect Battery
Before you begin, always disconnect the battery negative terminal.
Remove Radio from Sleeve
Lift latches on both sides of sleeve to remove half-sleeve from radio.
Remove Radio from Sleeve
Remueva el Radio de la Manga
Enlever la radio du manchon
Publicidad
Tabla de contenido

Manuales relacionados para Jensen MP7610


Resumen de contenidos para Jensen MP7610
- Página 1 Enlever la radio du manchon Thank you for choosing a Jensen product. We hope you will find the instructions in this owner’s manual clear and easy to follow. If you take a few minutes to look through it, you’ll learn how to use all the features of your new Jensen receiver for maximum enjoyment.
-
Página 2: Tabla De Contenido
à suivre . Prenez quelques minutes à le consulter, todas las funciones de su nuevo radio Jensen para su máximo entretenimiento. La asistencia vous apprendrez à utiliser toutes les fonctions de votre nouvelle radio Jensen pour en tirer une técnica está disponible por el teléfono en 1-800-323-4815. -
Página 3: Install Half-Sleeve
When replacing a fuse, make sure the new fuse is the correct type and amperage. Using an White/Black (-) Gray/Black (-) incorrect fuse could damage radio. The MP7610 uses one 15 amp fuse located below the Blanco/Negro (-) Gris / Negro (-) -
Página 4: Préparation
L’utilisation d’un fusible non approprié pourrait endommager la rápido). radio. Le MP7610 est doté d’un fusible de 15 A, situé sous le connecteur du câblage (15 A à Reconexión de la Batería fusion rapide, type ATO). -
Página 5: Instalación
MP7610 Installation Final Installation Final Installation Instalación Finale Installation Finale Connect wiring adapter to existing wiring harness. Connect antenna lead. Slide radio chassis into half-sleeve. Secure radio to bracket using nut (if possible). Replace any items you removed from the dashboard. -
Página 6: Operación
MP7610 Operation Operación 1. Potencia 1. Power Presione el botón de potencia (1) o cualquier otro botón en el frente del radio (excepto el botón de Press the power button (1) or any other button on the front of the radio (except Open/Eject) to expulsar) para encender la unidad. -
Página 7: Operación Básica
MP7610 Operation (continued) Operación (continuado) 4. Volume / Audio Control (continued) 4. Volumen / Regulador Audio (continuado) Subwoofer Subwoofer Press the volume control twice, then rotate it clockwise or counterclockwise to adjust the Presione la perilla de control de volumen dos veces, y rótelo hacia el lado de las agujas del reloj o al subwoofer level from 0 to 12. -
Página 8: Equalizer Selector
MP7610 Operation (continued) Operación (continuado) 5. iX-Bass 5. iX-Bass Press iX-BASS (5) momentarily to activate the iX-BASS feature. When listening to music at Presione iX-BASS (5) momentáneamente para activar la función de iX-BASS. Cuando escuche low volume levels, this feature will boost the bass and treble ranges to compensate for the música en niveles de volumen bajo, esta función potenciará... -
Página 9: Animation / Menu Operation
MP7610 Operation (continued) Operación (continuado) 7. Animation / Menu Operation 7. Animación / Operación del Menú Press DISPLAY/MENU (7a) momentarily to navigate through the following animation options: DISPLAY/MENU Presione (7a) por unos momentos para navegar por las siguientes opciones de EQ animation, Animation 1, Animation 2, personal text message and back to the default animación: Animación EQ, Animación 1, Animación 2, mensaje personal del texto y nuevamente a la... - Página 10 MP7610 Operation (continued) Operación (continuado) 7. Animation / Menu Operation (continued) 7. Animación / Operación del Menú (continuado) Clock Format Formato del Reloj Esta opción permite la selección del formato del reloj en 12 horas o 24 horas. El reloj está...
- Página 11 MP7610 Operation (continued) Selección de Reloj en Pantalla Cuando la función de reloj en pantalla está activa, el reloj y el saludo predeterminado aparecerán en 7. Animation / Menu Operation (continued) pantalla cuando el radio esté apagado pero aún conectado al cable de ignición. La opción predeterminada que aparecerá...
- Página 12 "Radio Off, Visit us at feature is activated: Radio Off, Visit us at Jensen.com, Enjoy Driving and Have a Safe Trip. Jensen.com, Enjoy Driving and Have a Safe Trip." (Radio Apagada, Visítenos en Jensen.com, disfrute su paseo y tenga usted un buen viaje).
-
Página 13: Tuner Operation
MP7610 Tuner Operation Operación de la radio 13. Selección de Banda 13. Select a Band Pulse BAND (13) para sintonizar la radio entre las tres bandas FM y dos bandas AM. Cada banda Press BAND (13) to change between three FM bands and two AM bands. Each band stores almacena la selección de hasta seis emisoras. - Página 14 MP7610 Tuner Operation (continued) Operación de la radio (continuado) 16. Preset Stations (continued) 16. Preselección de Emisoras (continuado) Cómo llamar una emisora Recall a Station Seleccione una banda, (si fuera necesario). Pulse un botón de preselección (16) para Select a band (if needed). Press a preset button (16) to select the corresponding stored station.
-
Página 15: Cd Player Operation
MP7610 CD Player Operation Operación del Reproductor de CD 19. Inserte y Quite CDs 19. Insert and Eject CD Presione el botón de quite (19) y deje el panel delantero motorizado hacen pivotar-abajo para exhibir la ranura Press the eject button (19) and let the motorized front panel swing-down to display the CD slot. Insert del CD. -
Página 16: Operación Del Cambiador De Cd
Refiérase a la sección de Operación del Equipo de CD de este manual si desea más detalles. Remote Control Control remoto The remote control will allow you to control the basic functions of the MP7610. El control remoto le permitirá controlar las funciones básicas del MP7610. Fonctionnement de changeur de CD Remote Control Prêt à... -
Página 17: Mp3/Wma Operation
CD-R/RW using the buttons on the receiver (or optional remote) as described below. Many types control remoto opcional) como se describe abajo. Muchos tipos de programas están disponibles of software are available for converting audio files into MP3/WMA formats. Jensen recommends para convertir archivos de audio en formatos MP3/WMA. Jensen recomienda Nero, Music Match, Nero, MusicMatch Jukebox or Roxio Easy CD Creator. -
Página 18: Ingresando Etiquetas Id3
MP7610 MP3/WMA Operation (continued) Configuración del Codificador de MP3/WMA y del Grabador de CD Utilice la siguiente configuración cuando comprima datos de audio en datos MP3 con el Up to 200 characters can be displayed in the long file name format. For a list of available codificador de MP3. - Página 19 MP7610 Operación de MP3/WMA (continuado) MP3/WMA Operation (continued) Archivos de Escritura en un Medio Writing Files into a Medium Cuando se carga un medio conteniendo datos MP3 o WMA, la unidad verifica todos los datos. Si el When a medium containing MP3/WMA data is loaded, the unit checks all data. If the medium contains medio contiene muchas carpetas o archivos que no sean MP3 o WMA, la reproducción de MP3 o WMA...
- Página 20 MP7610 32. Selección de Pista MP3/WMA Operation (continued) Presione el botón de Sintonía Hacia Arriba o Sintonía Hacia Abajo (32a o 32b) por menos de un Languages segundo para avanzar a la próxima pista en el disco o por más de un segundo para pasar rápidamente The unit supports playback of the following seven languages: English, French, German, hacia adelante o hacia atrás a través del disco.
- Página 21 MP7610 MP3/WMA Operation (continued) Búsqueda de Navegación: Presione BAND (37a) dos veces. La pantalla mostrará "Navigate" y la iluminación alrededor del botón de seleccionar (37b) destellará. Rote el botón para navegar por todas 35. Repeat (RPT) las carpetas y subcarpetas en el disco, y los nombres de carpetas se mostrarán en el LCD. Presione el botón de seleccionar por más de tres segundos para ejecutar el primer archivo en la carpeta.
-
Página 22: Auxiliary Input
MP7610 Specifications Troubleshooting Problem Cause Corrective Action Does not operate No power to yellow wire; no Check connection with test light; (display does not light) power to red wire check vehicle fuse with test light Inline fuse blown Replace fuse... -
Página 23: Corrección De Problemas
MP7610 Especificationes Corrección de Problemas Problema Causa Correccion El equipo no funciona (el No hay corriente en el cable amarillo. Revise la conexi n con la luz de prueba. ó visualizador no se enciende) No hay corriente en el cable rojo Revise el fusible del veh’culo con la luz de prueba... -
Página 24: Dépannage
MP7610 Caractéristiques Dépannage Probl me è Cause Mesure à prendre L’appareil ne fonctionne pas Aucune alimentation au fil jaune V rifiez la connexionet les fusibles au moyen é (l’affichage ne s’allume pas) Aucune alimentation au fil rouge de l’ampoule d’essai Fusible grill é... - Página 25 Audiovox Electronics Corporation 150 Marcus Boulevard Hauppauge, NY 11788 1-800-323-4815 www.jensen.com © 2004 Audiovox v.071004...