Tabla de contenido
Publicidad
Idiomas disponibles
Idiomas disponibles
Enlaces rápidos
Publicidad
Capítulos
Tabla de contenido
Solución de problemas

Manuales relacionados para Jensen MP1524BT


Resumen de contenidos para Jensen MP1524BT
- Página 1 MP1524BT OWNER’S MANUAL Mobile Audio System watts peak 40W x 4...
-
Página 3: Tabla De Contenido
Thank you for choosing a Jensen product. We hope you will find the instructions in this owner’s manual clear and easy to follow. If you take a few minutes to look through it, you’ll learn how to use all the features of your new Jensen MP1524BT Mobile Audio System for maximum enjoyment. -
Página 4: General
WARNING! Never use irregular discs. GENERAL Congratulations on your purchase of the Jensen MP1524BT Mobile Audio System. It’s a good idea to read all of the instructions before beginning the installation. We recommend having your Jensen MP1524BT installed by a reputable installation shop. -
Página 5: Installation
MP1524BT INSTALLATION Location • Choose the mounting location where the unit will not interfere with the normal driving function of the driver. • Before finally installing the unit, connect the wiring temporarily and make sure the unit and the system work properly. -
Página 6: Din Front Mount (Method A)
MP1524BT DIN Front Mount (Method A) The unit can be installed in any dashboard having an opening as shown below: Installing the unit Be sure you test all connections first, and then follow these steps to install the unit. 1. Make sure the ignition is turned off, and then disconnect the cable from the vehicle battery’s negative (-) terminal. - Página 7 MP1524BT (1) Dashboard; (2) Tabs 6. Reconnect the wire harness and the antenna being careful not to pinch any wires or cables. 7. Slide the unit into the sleeve until it locks into place. 8. To further secure the unit, use the supplied metal strap to secure the back of the unit in place.
-
Página 8: Removing The Unit
MP1524BT Removing the unit Make sure the ignition is turned off, and then disconnect the cable from the vehicle battery’s negative (-) terminal. 2. Remove the metal strap attached to the back of the unit (if attached). 3. Press the release button to remove the front panel. -
Página 9: Rear Panel Connectors
MP1524BT REAR PANEL CONNECTORS ISO Sockets A and B Connector A Connector B 1. No Connection 1. REAR RIGHT SPEAKER (+) (VIOLET) 2. No Connection 2. REAR RIGHT SPEAKER (-) (VIOLET/BLACK) 3. No Connection 3. FRONT RIGHT SPEAKER (+) (GRAY) 4. -
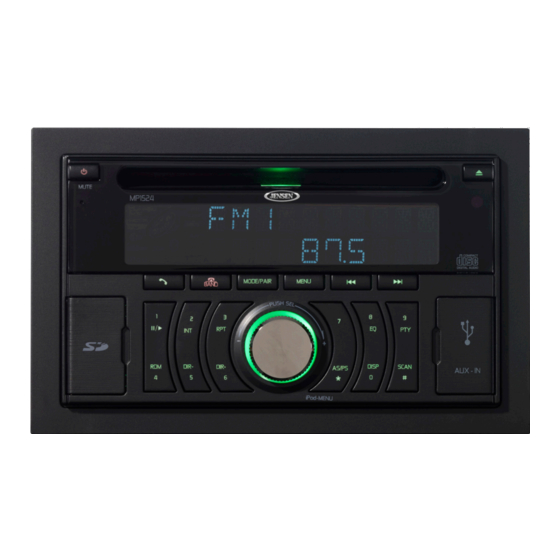
Página 10: Controls And Indicators
MP1524BT CONTROLS AND INDICATORS Power On/Off ( )/MUTE Button Press to turn the unit ON. Press and hold to turn the unit OFF. When listening to audio, press this button momentarily to mute the volume from the unit. (MUTE will appear on the display). Pressing the button again or adjusting the volume knob will return the audio to the volume level setting in use before the mute function was activated. -
Página 11: Menu Button
MP1524BT 5. MODE/PAIR Button This button enables selection of either the radio, disc play, USB device, SD Card, auxiliary input or the Bluetooth® function. When a CD is loaded, pressing this button will switch to the radio function; the disc icon ( ) will still be displayed, indicating a disc is still loaded in the unit. - Página 12 MP1524BT 11. Remote Control Sensor Accepts infrared signals from the remote control. 12. Auxiliary Input Connector Accepts a 3.5mm jack through which signals from various audio/video devices can be applied to the unit. 13. USB Port Connector Allows for the connection of a USB device.
- Página 13 MP1524BT 20. 7 (ST/MO) Button Press and hold this button to change radio reception to either mono or stereo. 21. Volume Knob Rotate to increase or decrease the volume. When pressed the knob also performs the Select function. This is used to select audio functions (volume, bass, treble, balance or fade) and adjustment of the front panel color.
-
Página 14: Remote Control
MP1524BT 29. RESET Button The reset button is located behind the SD cover on the front panel. Press to reset the unit’s settings to factory default. 30. SD Card Interface Connector The connector is located behind the SD cover on the front panel. The connector is used to accept an SD card for playback of audio files. -
Página 15: Remote Control Functions
MP1524BT Remote Control Functions MODE/PAIR Button This button enables selection of either the radio, auxiliary device, SD Card, USB device, CD disc play or Bluetooth® modes. 2. SEL Button This is used to select the audio function (volume, bass, treble, balance or fade) and adjustment of the front panel color. - Página 16 MP1524BT 3 (RPT) Button When playing an audio CD, press this button to continuously repeat the same track. Press the button again to turn the repeat function off. The icon will appear on the display. When playing MP3/WMA discs, press and hold the button to repeat all the tracks in the current folder.
- Página 17 MP1524BT 16. 4 (RDM) Button During disc play, press this button to play the tracks on the disc in a random or shuffled order. RDM and the icon will appear on the display panel. 17. Numeric Keys Numeric keys used to enter numbers to implement various functions.
-
Página 18: Operation
MP1524BT OPERATION Basic Operation Switching On/Off The Unit Press the Power On/Off /MUTE button (1) to turn the unit ON. When the unit is ON, press and hold the Power On/Off /MUTE button (1) to turn the unit OFF. Sound Adjustment Press the volume knob (21) briefly to select the desired adjustment mode. - Página 19 MP1524BT Mute Press the Power On/Off ( )/MUTE button (1) momentarily to mute the audio volume from the unit. MUTE will appear on the display. Pressing the Power On/ Off ( )/MUTE button (1) again or adjusting the volume level will return to the volume level setting in use before the mute function was activated.
-
Página 20: Auxiliary Input
MP1524BT Auxiliary Input Open the front panel cover (14) to access the 3.5mm stereo auxiliary input connector (12). An external device can be connected to the unit using the auxiliary input connector (12). Plug the cable into the jack. Press the MODE/PAIR button (5) on the front panel to switch to the AUX mode to access external devices. -
Página 21: Rds Operation
MP1524BT 4. Repeat the above procedure for the remaining 5 pre-sets on that band and for the other 4 bands on the unit Mono/Stereo Press and hold the 7 (ST/MO) button (20) to select either the mono or stereo radio reception mode. -
Página 22: Cd/Mp3/Wma Operation
MP1524BT CD/MP3/WMA Operation Switching to CD Mode If there is no CD/MP3/WMA disc inserted in the CD player: Gently insert the disc with the printed side up into the disc slot until you feel some resistance. The disc will be drawn into the player automatically. Disc playback will begin. -
Página 23: Ejecting A Disc
MP1524BT Ejecting A Disc Press the button (10) to stop disc playback and eject the disc from the disc slot (6). Special Functions For MP3/ WMA Discs 1. Selecting a Directory When selected for play, files and folders are accessed in the order they were written by the CD writer. -
Página 24: Usb Operation
MP1524BT USB Operation The unit contains a USB interface (16). The USB interface is located on the front panel of the unit beneath the protective cover (13). You can connect an USB memory device using this interface. Front Panel Cover... -
Página 25: Disc Notes
MP1524BT Disc Notes Notes on discs: • Attempting to use non-standard shape discs (e.g.; square, start, heart) may damage the unit. Be sure to use round-shape CDs only in this unit. CD-Rs (Recordable CDs)/CD-RWs (Rewriteable CDs): 1. Be sure to use discs with the following marks only for play in this unit: 2. -
Página 26: Ipod®/Iphone® Operation
MP1524BT iPod®/iPhone® Operation An iPod® or iPhone® device can be connected to the unit through USB interface on the front panel. Once connected, if the unit is in another mode of operation press the MODE/PAIR button (5) to select iPod® mode. -
Página 27: Bluetooth® Operation
MP1524BT Bluetooth® Operation Bluetooth® technology has the capability to wirelessly synchronize and transfer data among devices. The Bluetooth® audio capabilities can be used for mobile phones hands free applications. Bluetooth® has many profiles and the unit is compatible with most Bluetooth® enabled mobile phones. Before attempting to use the Bluetooth®... - Página 28 MP1524BT 5. A prompt to pair or bond should appear on your mobile phone. Accept the request and initiate the process. NOTE: Some mobile phones require a “pass key” or pairing code to connect. If your phone requires a pass key or pairing code, you will need to enter this number. The default pairing code for many mobile phones is “0000”...
- Página 29 MP1524BT T-MENU When the unit is paired with a mobile phone briefly pressing the MENU button (7) will access the telephone menu. Pressing this button or pressing the button (8) button (9) will scroll through the menu. The menu items will be displayed in the following sequence: PRE NUM, RECEIVED, DIALED, MISSED, MANU ANSER, TALK XX.
- Página 30 MP1524BT DIALED The dialed menu item displays the last call the mobile phone has dialed. Use the volume knob (21) to scroll through the dialed numbers. As dialed calls are displayed you can briefly press the button (4) and the number will be dialed.
-
Página 31: Bluetooth® Audio (A2Dp) Operation
MP1524BT BLUETOOTH AUDIO (A2DP FUNCTON) The unit supports Bluetooth® audio functions. If your mobile phone can play music, when the phone and the unit are paired, you can select an audio file on the mobile phone. Set the mobile phone to play the file and it will be heard on the unit. -
Página 32: Troubleshooting
MP1524BT TROUBLESHOOTING Before going through the checklist, the check wiring connections. If any of the problems persist after checking the list, contact your nearest service dealer. Symptom Cause Solution No power. • The car ignition switch is • If the power supply is not on. -
Página 33: Specifications
MP1524BT SPECIFICATIONS Power output: 13 watts RMS X 4 channels into 4-ohms @ < 1% THD+N Signal to noise ratio: 70dBA below reference. (Reference: 1 watt, 4-ohms) Frequency response: 20Hz to 20kHz (-3dB), Auxiliary input used as source reference Reference supply voltage: 14.4VDC CD Player Signal-to-noise ratio: >90dBA... -
Página 34: Notes
MP1524BT NOTES... - Página 35 MP1524BT NOTES...
- Página 36 MP1524BT Audiovox Electronics Corporation Hauppauge, NY 11788 Technical Assistance: 1-800-323-4815 www.mobile.jensen.com © 2012 Audiovox Printed in China MP1524BT Common Replacement Parts Owner’s Manual, Install Manual and Quick Start Guide 30613690 Microphone 34413690 Wire Harness 30313670 Trim Ring 30413690 Main Sleeve...
-
Página 37: Sistema De Audio Móvil
MP1524BT MANUAL DEL PROPIETARIO DE Sistema de audio móvil vatios de potencia máxima 40W x 4... - Página 39 Si dedica unos minutos a su lectura, aprenderá a utilizar todas las funciones de su nuevo sistema de audio móvil Jensen MP1524BT, lo cual le permitirá disfrutar de él al máximo. Información general Características...
-
Página 40: Información General
¡ADVERTENCIA! Nunca utilice discos irregulares. INFORMACIÓN GENERAL Enhorabuena por la compra del Sistema de audio móvil Jensen MP1524BT. Conviene que lea todas las instrucciones antes de comenzar la instalación. Le recomendamos que encargue la instalación del sistema Jensen MP1524BT a un establecimiento de reconocida reputación. -
Página 41: Instalación
MP1524BT INSTALACIÓN Ubicación • Elija la ubicación de montaje donde la unidad no interfiera con la función normal de conducción del conductor. • Antes de instalar la unidad de forma permanente, conecte los cables temporalmente y asegúrese de que la unidad y el sistema funcionen correctamente. -
Página 42: Montaje Desde La Parte Delantera Según La Norma Din (Método A)
MP1524BT Montaje desde la parte delantera según la norma DIN (Método A) La unidad puede instalarse en cualquier salpicadero que tenga una abertura como la que se muestra a continuación: Instalación de la unidad Asegúrese de probar todas las conexiones, y luego siga estos pasos para instalar la unidad. - Página 43 MP1524BT (1) Salpicadero; (2) Pestañas 6. Vuelva a conectar el mazo de cables y la antena procurando que ninguno de los cables o alambres quede pinzado. Deslice la unidad hacia el interior de la abrazadera hasta que quede trabada en posición.
-
Página 44: Extracción De La Unidad
MP1524BT Extracción de la unidad 1. Asegúrese de que el motor está apagado, luego desconecte el cable terminal negativo (-) de la batería del vehículo. 2. Saque el fleje metálico fijado a la parte trasera de la unidad (si está instalado). -
Página 45: Conectores Del Panel Trasero
MP1524BT CONECTORES DEL PANEL TRASERO MICRÓFONO FUSIBLE DE 15 A CANAL CONECTOR ISO DERECHO ROJO TOMAS DE CONEXIÓN PARA CANAL LÍNEAS DE SALIDA IZQUIERDO BLANCO ANTENA DE LA RADIO Ranuras ISO A y B Conector A Conector B 1. Sin conexión 1. -
Página 46: Controles E Indicadores
MP1524BT CONTROLES E INDICADORES 1. Botón de Encendido/Apagado ( )/SILENCIAR Presiónelo para ENCENDER la unidad. Manténgalo presionado para APAGAR la unidad. Al escuchar audio, presione este botón por un instante para silenciar el volumen de la unidad. (Aparecerá MUTE (SILENCIAR) en la pantalla). Al presionar el botón nuevamente o ajustar la perilla de volumen, el audio volverá... -
Página 47: Botón Expulsión De Disco
MP1524BT 5. Botón MODALIDAD/CONECTAR Este botón permite la selección de la función de radio, la reproducción de discos, de un dispositivo USB, de una tarjeta SD, de una entrada auxiliar o de la función Bluetooth®. Cuando hay un CD cargado, al presionar este botón se pasará a la función de radio, el ícono del disco (... -
Página 48: Botón Eq (Ecualizador)
MP1524BT 11. Sensor del control remoto Acepta señales infrarrojas del control remoto. 12. Conector de entrada auxiliar Acepta un conector de 3.5 mm a través del cual pueden aplicarse señales procedentes de varios dispositivos de audio/video a la unidad. 13. Conector del Puerto USB Permite la conexión de un dispositivo USB. - Página 49 MP1524BT presione este botón para ingresar en el menú del iPod®/iPhone®. 20. 7 Botón (ESTÉREO/MONO) Presione y sostenga este botón para cambiar la recepción de la radio a mono o estéreo. 21. Control del Volumen Gírelo para subir o bajar el volumen. Cuando se pulsa, también realiza la función Select.
-
Página 50: Control Remoto
MP1524BT RESET (REINICIO) Botón El botón de reinicio se encuentra detrás de la tapa de tarjetas SD en el panel frontal. Pulse este botón para restablecer la configuración de la unidad tal y como vino de fábrica. 30. Conector de la interfaz de tarjetas SD El conector está... -
Página 51: Funciones Del Control Remoto
MP1524BT Funciones del control remoto 1. Botón MODALIDAD/CONECTAR Este botón permite la selección de la función de radio, la reproducción de una entrada auxiliar, de una tarjeta SD, de un dispositivo USB, de un CD o de la función Bluetooth®. - Página 52 MP1524BT Botón 3 (REPETIR) Al reproducir un CD de audio, presione este botón para repetir continuamente la misma pista. Vuelva a pulsar el botón para apagar la función de repetición. Aparecerá el ícono en la pantalla. Cuando reproduzca discos de MP3/WMA, presione y mantenga presionado el botón para repetir todas las pistas de la carpeta actual.
- Página 53 MP1524BT para AM1 y AM2. Al escuchar archivos con formato WMA/MP3, este botón se usa para buscar pistas. En la modalidad Bluetooth®, utilícelo para ingresar el ícono de asterisco (*). En la modalidad iPod®/iPhone®, presione este botón para ingresar en el menú del iPod®/iPhone®.
-
Página 54: Operación
MP1524BT OPERACIÓN Operación básica Encendido y apagado de la unidad Presione el botón de Encendido/Apagado /SILENCIAR (1) para ENCENDER la unidad. Cuando la unidad esté ENCENDIDA, presione y mantenga presionado el botón de Encendido/Apagado /SILENCIAR (1) para APAGAR la unidad. -
Página 55: Sonoridad
MP1524BT Silenciar Presione el botón de Encendido/Apagado ( )/SILENCIAR (1) por un instante para silenciar el volumen del audio de la unidad. Aparecerá MUTE en la pantalla. Si se vuelve a pulsar el botón de Encendido/Apagado ( )/SILENCIAR (1) o si se ajusta el nivel de volumen, la unidad regresará... -
Página 56: Entrada Auxiliar
MP1524BT Entrada auxiliar Abra la tapa del panel delantero (14) para acceder al conector de entrada auxiliar estéreo de 3.5 mm (12). Se puede conectar un dispositivo externo a la unidad usando el conector de entrada auxiliar (12). Enchufe el cable en el conector. Presione el botón de MODALIDAD/CONECTAR (5) en el panel frontal para cambiar al modo... -
Página 57: Exploración
MP1524BT 2. Seleccione la primera emisora para preconfigurar usando el botón (6) el botón (18). Pulse durante varios segundos hasta que la pantalla muestre la palabra MANUAL; esto indica que se ha activado la modalidad de sintonización manual. 3. Pulse el botón de preselección que desea configurar y manténgalo pulsado durante aproximadamente 2 segundos. -
Página 58: Operación De Cd/Mp3/Wma
MP1524BT Operación de CD/MP3/WMA Cambio a la modalidad de CD Si no hay un disco de CD/MP3/WMA insertado en el reproductor de CD: Introduzca suavemente el disco con la cara de la etiqueta hacia arriba, en la ranura de entrada de discos, hasta que note cierta resistencia. El disco será... -
Página 59: Expulsión De Un Disco
MP1524BT Expulsión de un disco Pulse el botón (10) para detener la reproducción del disco y expulsarlo por la ranura de inserción de discos (6). Funciones especiales para los discos MP3/ WMA 1. Selección de un directorio Cuando se seleccionan para su reproducción, la unidad accede a los archivos y carpetas en el orden en que fueron escritos por el grabador de CD. -
Página 60: Operación Del Usb
MP1524BT Operación del USB La unidad incluye una interfaz de USB (16). La interfaz de USB está situada en el panel frontal de la unidad, debajo de la cubierta de protección (13). Puede conectar un dispositivo de memoria USB usando esta interfaz. -
Página 61: Notas Sobre Discos
MP1524BT Notas sobre los discos Notas sobre los discos: • Intentar usar discos con formas que no sean estándar (por ejemplo, cuadrados, en forma de estrella o corazón) puede dañar la unidad. Asegúrese de utilizar siempre CD redondos en esta unidad. -
Página 62: Operación Del Ipod®/Iphone
MP1524BT Operación del iPod®/iPhone® Se puede conectar un iPod® o iPhone® a la unidad a través de la interfaz USB en el panel frontal. Una vez conectado, si la unidad está en otra modalidad de operación, pulse el botón MODALIDAD/CONECTAR (5) para seleccionar la modalidad iPod®. -
Página 63: Operación Del Bluetooth
MP1524BT Operación del Bluetooth® La tecnología Bluetooth® tiene la capacidad de sincronizar y transferir datos entre dispositivos de manera inalámbrica. Las capacidades de audio Bluetooth® pueden usarse para aplicaciones manos libres de teléfonos móviles. Bluetooth® tiene muchos perfiles y la unidad es compatible con la mayoría de los teléfonos móviles con Bluetooth®. - Página 64 MP1524BT 5. Debería aparecer una indicación para conectarse o vincularse en la pantalla de su teléfono móvil. Acepte la solicitud e inicie el proceso. NOTA: algunos teléfonos móviles requieren un código de conexión o “contraseña”. Si su teléfono requiere una contraseña o un código de conexión, deberá ingresar este número.
-
Página 65: Pre Num (Números Preconfigurados)
MP1524BT T-MENU (MENÚ T) Cuando la unidad se conecte correctamente con un teléfono móvil, al presionar brevemente el botón MENÚ (7) se accederá al menú del teléfono. Al presionar este botón o el botón (8) o (9), se desplazará por el menú. Los elementos del menú... -
Página 66: Contestación Manual (Manu Ans)/Contestación Automática (Auto Ans)
MP1524BT DIALED (MARCADOS) El elemento del menú marcados muestra la última llamada que marcó el teléfono. Utilice la perilla de volumen (21) para desplazarse a través de los números marcados. A medida que se muestran las llamadas realizadas, puede presionar brevemente el botón... -
Página 67: Operación Del Audio Por Bluetooth® (A2Dp)
MP1524BT AUDIO POR BLUETOOTH (FUNCIÓN A2DP) La unidad es compatible con las funciones de audio por Bluetooth®. Si su teléfono móvil puede reproducir música, cuando el teléfono y la unidad están conectados, puede seleccionar un archivo de audio en el teléfono móvil. Configure el teléfono para reproducir el archivo y se oirá... -
Página 68: Resolución De Problemas
MP1524BT RESOLUCIÓN DE PROBLEMAS Antes de consultar la lista de problemas, compruebe las conexiones de los cables. Si el problema persiste después de haber consultado la lista, póngase en contacto con el distribuidor de servicio más cercano. Síntoma Causa Solución No hay •... -
Página 69: Especificaciones
MP1524BT ESPECIFICACIONES Salida de Potencia: 13 vatios RMS X 4 canal en 4-ohmios a < 1% THD+N Relación señal-ruido: referencia bajo 70dBA. (Referencia: 1 vatio, 4-ohmios) Frecuencia de respuesta: 20Hz a 20kHz (-3dB), Entrada auxiliar utilizada como referencia de fuente Voltaje de suministro de referencia: 14.4 VCC... -
Página 70: Notas
MP1524BT NOTAS... - Página 71 MP1524BT NOTAS...
- Página 72 MP1524BT Audiovox Electronics Corporation Hauppauge, NY 11788 Asistencia técnica: 1-800-323-4815 www.mobile.jensen.com © 2012 Audiovox Imprimido en China Piezas de repuesto comunes del MP1524BT Manual del propietario, manual de instalación y guía de 30613690 inicio rápido Micrófono 34413690 Mazo de cables...