Tabla de contenido
Publicidad
Idiomas disponibles
Idiomas disponibles
Enlaces rápidos
INSTALLATION INSTRUCTIONS FOR PART 99-7523S
Mazda 6 2003-2005
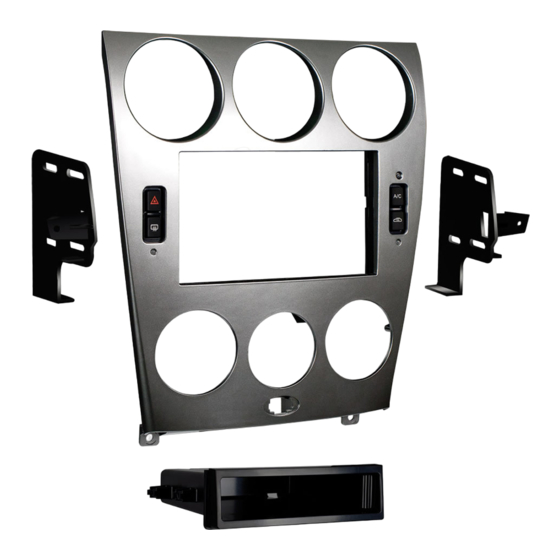
KIT FEATURES
• Double DIN radio provision
• ISO DIN radio provision with pocket
• Painted silver
• Pre-wired ASWC-1 harness included (ASWC-1
sold separately)
KIT COMPONENTS
• A) Radio/Climate control housing • B) Radio brackets • C) Pocket • D) (4) #8 x 3/8" Phillips screws
• E) (6) Plastic panel clips • F) Harness • G) (2) #8 x 1" Phillips screws
A
B
E
WIRING & ANTENNA CONNECTIONS (sold separately)
Wiring Harness: • Included with kit
Antenna Adapter: • Not required
METRA. The World's best kits.
APPLICATIONS
99-7523S
C
1-800-221-0932
™
D
F
G
metraonline.com
Table of Contents
Dash Disassembly
- Mazda 6 2003-2005 .........................................2-4
- Electronic climate control ..................................... 5
- Manual climate control ......................................... 6
- Felt tape application ............................................. 7
- ISO DIN radio provision with pocket ...................... 8
- Double DIN radio provision ................................... 8
- Display customization .......................................... 9
- Final wiring and assembly .............................10-11
TOOLS REQUIRED
• Small flat blade screwdriver • Phillips screwdriver
• Socket wrench
CAUTION: Metra recommends disconnecting the
negative battery terminal before beginning any
installation. All accessories, switches, and especially
air bag indicator lights must be plugged in before
reconnecting the battery or cycling the ignition.
NOTE: Refer to the instructions included with the
aftermarket radio.
© COPYRIGHT 2014 METRA ELECTRONICS CORPORATION
Publicidad
Capítulos
Tabla de contenido

Manuales relacionados para Metra 99-7523S


Resumen de contenidos para Metra 99-7523S
-
Página 1: Tabla De Contenido
INSTALLATION INSTRUCTIONS FOR PART 99-7523S APPLICATIONS Table of Contents Mazda 6 2003-2005 99-7523S Dash Disassembly – Mazda 6 2003-2005 .........2-4 KIT FEATURES Kit Assembly • Double DIN radio provision – Electronic climate control ........5 • ISO DIN radio provision with pocket •... -
Página 2: Dash Disassembly
99-7523S Dash Disassembly Electronic Climate Control 5. Unsnap and remove radio/climate control panel including climate 1. Unscrew the shift knob counter control vents at the top. (Figure D) clockwise to remove. (Figure A) 6. Remove (4) Phillips screws 2. Unclip and remove the cup holder/... - Página 3 99-7523S Dash Disassembly Manual Climate Control 5. Open glove box, squeeze sides together and let open fully then 1. Unscrew the shift knob counter remove (1) 10 mm bolt from the clockwise to remove. (Figure A) side of the radio bracket. (Figure E) 2.
- Página 4 99-7523S (Figure H) (Figure J) harness. (Figure K) the same way. (Figure H) Continue to kit assembly 9.
-
Página 5: Kit Assembly
99-7523S radio housing. (Figure B) (Figure C) Note: The light bulb boards will not be used with auto climate control vehicles disregard these bulbs. -
Página 6: Manual Climate Control
(Figure D) it into the kit. (Figures A, B, C) radio and insert into the 99-7523S radio housing. 2. Secure the radio with (Figure E) the factory hardware removed ASSEMBLED... -
Página 7: Felt Tape Application
Felt Tape Application Note: Due to differences in factory tolerances you may need to apply the provided felt tape to the edge of the 99-7523S radio housing to relieve backlight bleed through. 1. Looking at edge of radio housing apply felt tape to inner edge (toward back of kit). -
Página 8: Iso Din Radio Provision With Pocket
99-7523S Kit Assembly ISO DIN radio provision with pocket Double DIN radio provision 1. Mount the pocket to the radio 1. Attach the double DIN radio to the brackets with the (4) #8 x 3/8” radio brackets using the screws Phillips screws supplied. -
Página 9: Display Customization
99-7523S Kit Assembly 3. To set the clock press and hold the Start the car and test all the climate Clock button until “Hr. Adjust” is control functions. displayed then use the Set button Note: The air recirculation light will to select the desired hour. -
Página 10: Final Wiring And Assembly
99-7523S Final Wiring and Assembly Connections to be made to the aftermarket radio: • Connect the Green/Black wire tot he radio’s left rear negative speaker output. • Connect the Purple wire to the radio’s right rear positive speaker output. • Connect the Yellow wire to the 12-volt battery/memory wire. - Página 11 99-7523S Notes Location 2 Location 3 Location 1 (99-7523 radio housing diagram)
- Página 12 INSTALLATION INSTRUCTIONS FOR PART 99-7523S NOWLEDGE IS OWER Enhance your installation and fabrication skills by enrolling in the most recognized and respected mobile electronics school in our industry. Log onto www.installerinstitute.com or call 800-354-6782 for more information and take steps toward a better tomorrow.
-
Página 13: Componentes Del Kit
INSTRUCCIONES DE INSTALACIÓN PARA LA PIEZA 99-7523S APLICACIONES Indice Mazda 6 2003-2005 99-7523S Desmontaje del tablero – Mazda 6 2003-2005 .........2-4 CARACTERÍSTICAS DEL KIT Ensamble del kit • Provisión de radio doble DIN – Control electrónico de clima ......... 5 •... -
Página 14: Control Electrónico De Clima
99-7523S Desmontaje del tablero Control electrónico de clima 5. Suelte a presión y quite el panel de control de radio/clima, incluyendo las 1. Desatornille el contador de la perilla rejillas de control de clima de la parte de la palanca de velocidades hacia la superior. -
Página 15: Control Manual De Clima
99-7523S Desmontaje del tablero Control manual de clima 4. Jale las perillas del control de clima para quitarlas y quite (2) tornillos 1. Desatornille el contador de la Phillips de atrás de las perillas. perilla de la palanca de velocidades (Figura D) hacia la izquierda para quitarlo. - Página 16 (Figura K) en el 99-7523S. (Figura H) Continuará al ensamble 9. Quite los (4) tornillos del kit Phillips que sujetan la barra de dispersión de luz...
-
Página 17: Ensamble Del Kit
(Figura B) Nota: El arnés de 16 posiciones a 16 posiciones suministrado con el 99-7523S NO se utilizará Rear view of electronic climate control en vehículos con controles de clima electrónicos. (Figura B) - Página 18 ASSEMBLED Assembled e insértela en la carcasa del (Figuras A, B, C) radio 99-7523S. (Figura E) (Figura B) 2. Sujete la unidad con la tornillería de fábrica que se quitó en el paso 9 del (Figura E) desensamble del tablero de control de clima manual.
-
Página 19: Aplicación De Cinta De Fieltro
Nota: Debido a las diferencias en las tolerancias de fábrica, es posible que necesite aplicar la cinta de fieltro suministrada al borde de la carcasa del radio 99-7523S para bloquear el paso de la luz de retroiluminación. 1. Mirando el borde de la carcasa del radio, aplique la cinta de fieltro al borde interior (hacia la parte posterior del kit). -
Página 20: Provisión De Radio Iso Din Con Bolsillo
Metra recomienda el uso de adaptadores adecuados 3. Ubique el arnés de cableado de de acoplamiento de Metra y/o fábrica y el conector de la antena en... -
Página 21: Personalización De La Pantalla
99-7523S Ensamble del kit 2. Cuando haya ingresado el texto Encienda la marcha del vehículo y pruebe todas las funciones del control deseado, si no toca ningún botón de clima. durante 10 segundos, la pantalla indicará “Saved Text” (texto Nota: El foco de recirculación de aire guardado) y su texto se guardará. -
Página 22: Cableado Y Al Ensamble Final
99-7523S Cableado y al ensamble final Conexiones que se deben hacer a la radio: • Conecte el cable Verde/Negro con el cable de la bocina izquierda de atrás (-) del radio. • Conecte el cable Amarillo con la batería de 12 voltios/de memoria del radio. - Página 23 99-7523S Notas Ubicación 2 Ubicación 3 Ubicación 1 (99-7523 radio diagrama de la vivienda)
- Página 24 INSTRUCCIONES DE INSTALACIÓN PARA LA PIEZA 99-7523S EL CONOCIMIENTO ES PODER Mejore sus habilidades de instalación y NOWLEDGE IS OWER fabricación inscribiéndose en la escuela de Enhance your installation and fabrication skills by enrolling in the most recognized and respected dispositivos electrónicos móviles más reconocida...