Capítulos
Tabla de contenido
Solución de problemas

Manuales relacionados para EAS ELECTRIC EMD092BI


Resumen de contenidos para EAS ELECTRIC EMD092BI
- Página 1 Lavavajillas Manual de Instrucciones Parte I: Versión Genérica EMD092BI Lea atentamente este manual antes de utilizar el lavavajillas. Conserve este manual para futuras consulta. www.easelectric.es...
- Página 2 ÍNDICE INFORMACIÓN SOBRE SEGURIDAD RESUMEN DEL PRODUCTO USO DEL LAVAVAJILLAS Echar sal en el suavizante Consejos sobre la cesta MANTENIMIENTO Y LIMPIEZA Cuidado del exterior Cuidado del interior Cuidado del lavavajillas INSTRUCCIONES DE INSTALACIÓN Acerca de la conexión eléctrica Consumo de agua y drenaje Conexión de las mangueras de drenaje Colocación del aparato Instalación independiente...
-
Página 3: Información Sobre Seguridad
INFORMACIÓN SOBRE SEGURIDAD ADVERTENCIA Al usar el lavavajillas, tome las precauciones indicadas a continuación: • La instalación y reparación solo pueden ser llevadas a cabo por un técnico cualificado. • Este electrodoméstico ha sido diseñado para un uso doméstico y otras aplicaciones como: - zonas de cocina para personal en tiendas, oficinas y otros entornos de trabajo;... -
Página 4: Instrucciones De Puesta A Tierra
Este electrodoméstico no está diseñado para que lo usen personas (incluidos niños) con capacidades físicas, sensoriales o mentales reducidas, o con falta de experiencia y conocimiento, zonas de cocina para personal en tiendas, oficinas y otros entornos de trabajo, sin la supervisión o las instrucciones necesarias relativas al uso seguro del aparato por parte de una persona responsable de su seguridad. - Página 5 • No modifique el enchufe que se suministra con el aparato si no se adapta a la salida. • Haga que un electricista cualificado le instale una salida adecuada. • No abuse, se siente ni se suba en la puerta o la bandeja del lavavajillas.
- Página 6 • No lave objetos de plástico salvo que lleven la marca "apto para lavavajillas" o equivalente. • Si los objetos de plástico no incluyen ninguna marca, consulte las recomendaciones del fabricante. • Use solo detergente y abrillantador recomendados para su uso con lavavajillas automáticos.
-
Página 7: Disposición De Eliminación
Disposición de eliminación En base a la directiva europea 2012/19/UE de residuos de aparatos eléctricos y electrónicos (RAEE), los electrodomésticos no pueden ser arrojados en los contenedores municipales habituales; tienen que ser recogidos selectivamente para optimizar la recuperación y reciclado de los componentes y materiales que los constituyan y reducir el impacto en la salud humana y el medio ambiente. -
Página 8: Resumen Del Producto
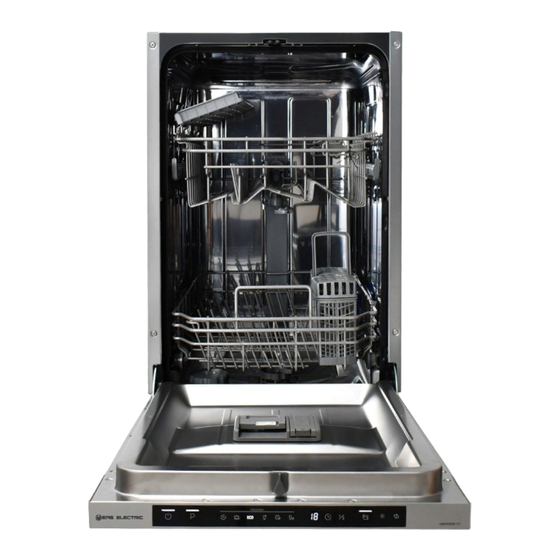
RESUMEN DEL PRODUCTO IMPORTANTE: Para obtener el máximo provecho de su lavavajillas, lea todas las instrucciones de funcionamiento antes de usarlo por primera vez. Tubo interior Brazo pulverizador inferior Depósito de sal Conjunto de filtrado Dispensador Cesto para cubiertos Cesta superior Bandeja para cubiertos Brazo pulverizador superior Cesta superior... -
Página 9: Uso Del Lavavajillas
USO DEL LAVAVAJILLAS Antes de usar el lavavajillas: Dentro Fuera 1. Ajuste el suavizante para el agua 2. Echar sal en el suavizante 3. Cargar la cesta 4. Llenar el dispensador Consulte la Sección 1 "Suavizante para el agua" en el APARTADO II: Versión especial, si necesita ajustar el suavizante para el agua. - Página 10 Siga estos pasos para echar sal al lavavajillas: 1. Saque la cesta inferior y desenrosque la tapa del depósito. 2. Coloque el extremo del embudo (suministrado) en el orificio y vierta en torno a 1,5 kg de sal para lavavajillas. 3.
-
Página 11: Consejos Sobre La Cesta
Consejos sobre la cesta Ajuste de la cesta superior Tipo 1: La altura de la cesta superior se puede ajustar fácilmente para meter platos más grandes en la cesta superior o en la inferior. Para ajustar la altura de la cesta superior, siga estos pasos: posición inferior Tire hacia fuera de la cesta superior. -
Página 12: Plegar Los Estantes Para Copas
Plegar los estantes para copas Para dejar espacio para los objetos altos en la cesta superior, pliegue hacia arriba los estantes para copas. Puede apoyar los vasos altos contra ellos. También puede quitarlos si no necesita usarlos. Plegar los estantes de la bandeja Las puntas de la cesta inferior sirven para sostener los platos y las fuentes. -
Página 13: Mantenimiento Y Limpieza
MANTENIMIENTO Y LIMPIEZA Cuidado del exterior La puerta y la junta de la puerta Limpie las juntas de la puerta regularmente con un paño suave humedecido para eliminar restos de comida. Al meter los platos en el lavavajillas, pueden caer restos de comida o bebida en los laterales de la puerta. - Página 14 Filtro para suciedad gruesa Filtro principal Filtro fino Abrir Sujete el filtro para suciedad gruesa El filtro fino se puede extraer tirando y gírelo hacia la izquierda para desde la parte inferior del conjunto desbloquearlo. Eleve el filtro hacia del filtro. El filtro para suciedad arriba y hacia fuera para sacarlo del gruesa se puede desacoplar del lavavajillas.
-
Página 15: Brazos Pulverizadores
Brazos pulverizadores Es necesario limpiar los brazos pulverizadores regularmente para retirar los productos químicos del agua que puedan obstruir los orificios para los chorros de agua y los rodamientos. Para limpiar los brazos pulverizadores, siga las instrucciones a continuación: Para quitar el brazo pulverizador Para quitar el brazo pulverizador superior, sujete la tuerca del centro inferior, tire hacia fuera del brazo y... -
Página 16: Cuidado Del Lavavajillas
Cuidado del lavavajillas Precaución anti-congelación Tome medidas para que el lavavajillas no se congele durante el invierno. Cada vez que use un ciclo de lavado, haga lo siguiente: 1. Corte el suministro eléctrico al lavavajillas en la fuente de alimentación. 2. -
Página 17: Acerca De La Conexión Eléctrica
INSTRUCCIONES DE INSTALACIÓN ADVERTENCIA Riesgo de descarga eléctrica Desconecte la alimentación eléctrica antes de instalar el lavavajillas. Si no lo hace podría producirse una descarga eléctrica, e incluso la muerte. Atención La instalación de las tuberías y los equipos eléctricos debe correr a cargo de profesionales. - Página 18 Consumo de agua y drenaje Conexión de agua fría Conecte el suministro de agua fría a un conector roscado de 3/4 (pulgadas) y asegúrese de que está apretado firmemente en su posición. Si las tuberías de agua son nuevas o no se han utilizado durante mucho tiempo, deje el agua correr para asegurarse de que sale limpia.
-
Página 19: Conexión De Las Mangueras De Drenaje
Conexión de las mangueras de drenaje Inserte la manguera de drenaje en una tubería de drenaje con un diámetro mínimo de 4 cm, o deje que corra por el sumidero, asegurándose de que no se doble ni se enrolle. La altura de la tubería de drenaje debe ser inferior a 1000 mm. El extremo libre de la manguera no debe sumergirse en agua para evitar el retorno del flujo. -
Página 20: Colocación Del Aparato
Colocación del aparato Coloque el aparato en la posición deseada. La parte posterior debe reposar sobre la pared tras él, y los laterales, a lo largo de los muebles o paredes adyacentes. El lavavajillas está equipado con mangueras de suministro de agua y de drenaje que se pueden colocar a la derecha o a la izquierda, para facilitar una instalación adecuada. -
Página 21: Debajo De La Encimera Existente
Debajo de la encimera existente (Cuando se encaja bajo una encimera) En la mayoría de las cocinas modernas solo hay una encimera bajo la que se acoplan los armarios y los electrodomésticos. En este caso, retire la parte superior del lavavajillas desatornillando los tornillos bajo el borde posterior de la parte superior (a). -
Página 22: Paso 2. Dimensiones Del Panel Estético E Instalación
2. Si el lavavajillas se coloca en la esquina del armario, debe dejarse algún espacio para abrir la puerta. Armario Lavavajillas Puerta del lavavajillas Espacio mínimo de 50 mm NOTA: Dependiendo de donde esté la toma eléctrica, podría necesitar hacer un orificio en la parte opuesta del armario. -
Página 23: Modelo Totalmente Integrado
Modelo totalmente integrado Instale el gancho del panel estético de madera y colóquelo en la ranura de la puerta del lavavajillas (vea la figura A). Una vez colocado el panel, fíjelo al exterior de la puerta con tornillos y pernos (vea la figura B). 1. -
Página 24: Paso 4. Pasos Para La Instalación Del Lavavajillas
Paso 4. Pasos para la instalación del lavavajillas Consulte los pasos específicos en las ilustraciones sobre la instalación. 1. Fije la tira de condensación bajo la encimera del armario. Asegúrese de que la tira de condensación está a ras de la encimera. (Paso 2) 2. -
Página 25: Paso 5. Nivelar El Lavavajillas
Paso 5. Nivelar el lavavajillas El lavavajillas debe estar nivelado para funcionar correctamente y lavar bien. 1. Coloque un nivel de burbuja en la puerta y la bandeja interior dentro de la cuba, como se muestra, para comprobar que el lavavajillas está nivelado. 2. -
Página 26: Consejos De Resolución De Problemas
CONSEJOS DE RESOLUCIÓN DE PROBLEMAS Antes de llamar al servicio técnico Revisar las páginas siguientes puede ahorrarle llamar al servicio técnico. Problema Posibles causas Qué hacer El lavavajillas Fusible fundido, o Sustituya el fusible o resetee el no se pone en fallo de corriente en el cortocircuito. - Página 27 Problema Posibles causas Qué hacer El abrillantador se ha Limpie siempre con un paño el derramado. abrillantador que se haya derramado inmediatamente. Puede haberse utilizado Asegúrese de que el detergente no lleva Manchas en el interior de la detergente con colorante.
- Página 28 Problema Posibles causas Qué hacer Los platos no No se ha puesto Ponga más detergente o cambie de salen limpios. suficiente detergente. detergente. Coloque los objetos para que el brazo Hay objetos bloqueando el movimiento de los pulverizador pueda girar libremente. brazos pulverizadores.
- Página 29 Problema Posibles causas Qué hacer Los platos no Se ha seleccionado un Con un programa corto, la temperatura están secos. programa inadecuado. de lavado es más baja, reduciendo el rendimiento de la limpieza. Elija un programa con una mayor duración de lavado. Uso de cubiertos con un El drenaje de agua es más difícil con recubrimiento de baja...
- Página 30 CARGA DE LAS CESTAS CONFORME A LA NORMA EN50242: 1. Cesta superior: Número Artículo Tazas Cazos Vasos Cuencos de servir pequeños Cuencos de servir medianos Cuencos de servir grandes 2. Cesta inferior: Número Artículo Platos de postre Platos llanos Platos hondos Fuentes ovaladas Cesto para cubiertos:...
-
Página 31: Cesta Para Cubiertos
Cesta para cubiertos Número Artículo Cucharas de sopa Tenedores Cuchillos Cucharillas de 4 4 4 café Cucharillas de La información para la prueba de compatibilidad postre cumple con la norma EN 50242 Cucharas de Capacidad: 9 ajustes de colocación servir Posición de la cesta superior: posición inferior Tenedores de Programa: ECO... -
Página 32: Parte Ii : V Ersión Especial
Lavavajillas Manual de Instrucciones PARTE II : V ersión Especial EMD092BI Lea atentamente este manual antes de utilizar el lavavajillas. Conserve este manual para futuras consultas. www.easelectric.es... - Página 33 ÍNDICE USO DEL LAVAVAJILLAS Panel de control Suavizante para el agua Preparación e introducción de la vajilla Funcionamiento del abrillantador y el detergente Llenado del depósito de abrillantador Llenado del dispensador de detergente PROGRAMAR EL LAVAVAJILLAS Tabla de ciclos de lavado Puesta en marcha del ciclo de lavado Cambiar el programa a mitad del ciclo ¿Ha olvidado meter algo?
- Página 34 GUÍA RÁPIDA Lea el contenido correspondiente del manual de instrucciones para conocer el funcionamiento en mayor detalle. Instalación del lavavajillas (Consulte la Sección 5 "INSTRUCCIONES DE INSTALACIÓN" en el APARTADO I: Versión genérica). Retirar la suciedad más visible de los Cargar las cestas cubiertos Llenar el dispensador...
-
Página 35: Panel De Control
USO DEL LAVAVAJILLAS Panel de control Funcionamiento (Botón) Pulse este botón para encender el lavavajillas, la pantalla se Potencia encenderá. Seleccione el programa de lavado adecuado y el indicador del Programa programa seleccionado se iluminará. Pulse este botón para programar las horas de retardo para el lavado. - Página 36 Es el programa estándar adecuado para cargas con una suciedad normal, como ollas, platos, vasos y sartenes ligeramente sucias. Indicador del programa Cristal Para vajillas ligeramente sucias que necesitan un lavado rápido. 90 min Para cargas con una suciedad normal que deben lavarse rápidamente.
-
Página 37: Suavizante Para El Agua
Suavizante para el agua El suavizante para el agua se debe seleccionar manualmente, con el selector de la dureza del agua. El suavizante para el agua se ha diseñado para eliminar las sales y los minerales del agua, que pudieran tener un efecto negativo en el funcionamiento del aparato. Cuantos más minerales contiene, más dura es el agua. -
Página 38: Preparación E Introducción De La Vajilla
Revise la Sección 3 “Carga de sal en el suavizante” del APARTADO I: Versión genérica, si su lavavajillas no tiene sal. NOTA: Si su modelo no lleva suavizante para el agua, puede saltarse esta sección. Suavizante para el agua La dureza del agua varía de un lugar a otro. Si se utiliza agua dura con el lavavajillas, se formarán depósitos en los platos y demás utensilios. -
Página 39: Recomendaciones Para Llenar El Lavavajillas
Recomendaciones para llenar el lavavajillas Retire los restos de alimentos de tamaño considerable. Reblandezca los restos de comida quemada de sartenes y ollas. No es necesario aclarar los platos bajo el grifo. Para lograr un mejor rendimiento del lavavajillas, siga estas instrucciones de carga. (Las características y apariencia de las cestas y el cesto para cubiertos pueden variar dependiendo del modelo). -
Página 40: Carga En La Cesta Superior
Carga en la cesta superior La cesta superior ha sido diseñada para los elementos más delicados, como el vidrio, las tazas de café y té y los cazos, así como platos, cuencos pequeños y ollas poco profundas (siempre que no estén demasiado sucias). Coloque los platos y cacerolas de modo que no se muevan al aplicarles el chorro de agua. -
Página 41: Funcionamiento Del Abrillantador Y El Detergente
Funcionamiento del abrillantador y el detergente El abrillantador se libera durante el aclarado final para evitar que el agua forme gotas sobre los platos, dejando manchas y rastros. También mejora el secado, haciendo que el agua resbale por los platos. El lavavajillas ha sido diseñado para usar abrillantador líquido. ADVERTENCIA Use solamente un abrillantador de marca para el lavavajillas. -
Página 42: Llenado Del Depósito De Abrillantador
Llenado del depósito de abrillantador Retire la tapa del depósito de abrillantador tirando del asa Vierta el abrillantador en el dispensador, teniendo cuidado de que no rebose Finalmente, cierre la tapa Ajuste del depósito de abrillantador Para lograr un mejor rendimiento de secado con poco abrillantador, el lavavajillas está diseñado para que el usuario pueda ajustar el consumo. -
Página 43: Llenado Del Dispensador De Detergente
Llenado del dispensador de detergente Deslizándolo hacia la izquierda B B B Presione hacia abajo Añada detergente en la cavidad de mayor tamaño (A) para el ciclo de lavado principal. Para obtener un mejor resultado de limpieza, sobre todo si los objetos están muy sucios, vierta un poco de detergente en la puerta. -
Página 44: Programar El Lavavajillas
PROGRAMAR EL LAVAVAJILLAS Tabla de ciclos de lavado En la siguiente tabla se muestra qué programas son mejores para los niveles de residuos de alimentos y cuánto detergente es necesario. También se muestra información variada sobre los programas. ) significa que es necesario rellenar el dispensador del abrillantador. Detergente Tiempo de Descripción del... -
Página 45: Puesta En Marcha Del Ciclo De Lavado
Nota: EN 50242: Este programa es el ciclo de prueba. La información para la prueba de compatibilidad cumple con la norma EN 50242. Puesta en marcha del ciclo de lavado 1. Saca la cesta inferior y superior, carga los platos y los empuja hacia atrás. Se recomienda cargar primero la cesta inferior y luego la superior. - Página 46 ¿Se le ha olvidado meter algo? Si olvida algún plato, puede añadirlo en cualquier momento antes de que se abra el dispensador de detergente. Si este fuera el caso, siga las instrucciones a continuación: 1. Pulse el botón de Encendido/Pausa para hacer una pausa en el lavado. Una vez que el brazo pulverizador se haya parado, puede abrir completamente la puerta.
-
Página 47: Códigos De Error
CÓDIGOS DE ERROR Si el lavavajillas no funciona bien, el lavavajillas mostrará códigos de error para identificarlos: Códigos Significado Posibles causas La llave de agua no está abierta, o el Tiempo de entrada más agua se ha restringido, o la suministro presión de agua es demasiado baja largo... -
Página 48: Información Técnica
INFORMACIÓN TÉCNICA 815 mm Altura (Al) 448 mm Anchura (An) 550 mm (con la puerta cerrada) Profundidad (P1) 1150 mm (con la puerta abierta 90°) Profundidad (P2) -
Página 49: Ficha Del Producto
Ficha del producto Hoja informativa del lavavajillas doméstico conforme a la Directiva de la UE 1016/2010 y 1059/2010: Fabricante EAS ELECTRIC SMART TECHNOLOGY Tipo / Descripción EMD092BI Ajustes de colocación estándar Clase de eficiencia energética u 197 kWh Consumo energético anual v Consumo energético del ciclo de lavado estándar... -
Página 50: Condiciones De La Garantía Comercial En Electrodomésticos
CONDICIONES DE LA GARANTÍA COMERCIAL EN ELECTRODOMÉSTICOS Este aparato tiene una garantía de reparación de dos años, a partir de la fecha de venta, contra todo defecto de funcionamiento proveniente de la fabricación, incluyendo mano de obra y piezas de recambio. Para justificar la fecha de compra será... - Página 51 10. Las averías que pueden sufrir los accesorios y complementos, así como cualquier pieza considerada consumible por el fabricante. 11. Electrodomésticos que se utilicen en aplicaciones industriales o para fines comerciales. 12. Electrodomésticos con número de serie ilegible. 13. Defectos o averías producidas como consecuencia de arreglos, reparaciones, modificaciones, o desarme de la instalación del aparato por un técnico no autorizado por el fabricante, o como resultado del incumplimiento manifiesto de...
- Página 52 PART Ⅰ: Generic Version EMD092BI Please read this manual carefully before using the dishwasher Keep this manual for future reference.
-
Página 53: Tabla De Contenido
CONTENTS SAFETY INFORMATION PRODUCT OVERVIEW USING YOUR DISHWASHER Loading The Salt Into The Softener Basket Used Tips MAINTENANCE AND CLEANING External Care Internal Care Caring For The Dishwasher INSTALLATION INSTRUCTION About Power Connection Water Supply And Drain Connection Of Drain Hoses Position The Appliance Free Standing Installation Built-In Installation(for the integrated model) -
Página 54: Safety Information
SAFETY INFORMATION WARNING When using your dishwasher, follow the precautions listed below: Installation and repair can only be carried out by a qualified technician This appliance is intended to be used in household and similar applications such as: -staff kitchen areas in shops, offices and other working environments;... -
Página 55: Earthing Instructions
mental capabilities, or lack of experience and knowledge, unless they have been given supervision or instruction concerning use of the appliance by a person responsible for their safety. (For IEC60335-1 ) Packaging material could be dangerous for children! This appliance is for indoor household use only. To protect against the risk of electrical shock, do not immerse the unit, cord or plug in water or other liquid. - Página 56 Do not modify the plug provided with the appliance; If it does not fit the outlet. Have a proper outlet installed by a qualified electrician. Do not abuse, sit on, or stand on the door or dish rack of the dishwasher. Do not operate your dishwasher unless all enclosure panels are properly in place.
- Página 57 Do not wash plastic items unless they are marked “dishwasher safe” or the equivalent. For unmarked plastic items not so marked, check the manufacturer's recommendations. Use only detergent and rinse agents recommended for use in an automatic dishwasher. Never use soap, laundry detergent, or hand washing detergent in your dishwasher.
- Página 58 Disposal For disposing of package and the appliance please go to a recycling center. Therefore cut off the power supply cable and make the door closing device unusable. Cardboard packaging is manufactured from recycled paper and should be disposed in the waste paper collection for recycling.
-
Página 59: Product Overview
PRODUCT OVERVIEW IMPORTANT: To get the best performance from your dishwasher, read all operating instructions before using it for the first time. Inner pipe Lower spray arm Salt container Filter assembly Dispenser upper spray arm Cup rack Cutlery basket Upper basket Lower basket NOTE: Pictures are only for reference, different models may be different. -
Página 60: Using Your Dishwasher
USING YOUR DISHWASHER Before using your dishwasher : Inside Outside 1. Set the water softener 2. Loading the salt Into the softener 3. Loading the basket 4. Fill the dispenser Please check the section 1 “Water Softener” of PART Ⅱ: Special Version, Please check the section 1 “Water Softener”... - Página 61 Please follow the steps below for adding dishwasher salt: 1. Remove the lower basket and unscrew the reservoir cap. 2. Place the end of the funnel (supplied) into the hole and pour in about 1.5kg of dishwasher salt. 3. Fill the salt container to its maximum limit with water, It is normal for a small amount of water to come out of the salt container.
-
Página 62: Basket Used Tips
Basket Used Tips Adjusting the upper basket Type 1: The height of the upper basket can be easily adjusted to accommodate taller dishes in either the upper or lower basket. To adjust the height of the upper rack, follow these steps: lower position Remove the upper basket. - Página 63 Type 2: To raise the upper basket just lift To lower the upper basket, lift the the upper basket at the center of adjust handles on each side to each side until the basket locks into release the basket and lower it to place in the upper position.
-
Página 64: Maintenance And Cleaning
MAINTENANCE AND CLEANING External Care The door and the door seal Clean the door seals regularly with a soft damp cloth to remove food deposits. When the dishwasher is being loaded, food and drink residues may drip onto the sides of the dishwasher door. These surfaces are outside the wash cabinet and are not accessed by water from the spray arms. - Página 65 Coarse filter Coarse filter Main filter Main filter Fine filter Open Open Hold the coarse filter and rotate it The fine filter can be pulled off the anticlockwise to unlock the filter. bottom of the filter assembly. Lift the filter upwards and out of The coarse filter can be detached the dishwasher.
-
Página 66: Spray Arms
Spray arms It is necessary to clean the spray arms regularly for hard water chemicals will clog the spray arm jets and bearings. To clean the spray arms, follow the instructions below: To remove the upper spray arm, To remove the lower spray arm, pull hold the nut in the center still and out the spray arm upward. -
Página 67: Caring For The Dishwasher
Caring For The Dishwasher Frost precaution Please take frost protection measures on the dishwasher in winter. Every time after washing cycles, please operate as follows: 1. Cut off the electrical power to the dishwasher at the supply source. 2. Turn off the water supply and disconnect the water inlet pipe from the water valve. 3. -
Página 68: Installation Instruction
INSTALLATION INSTRUCTION WARNING Electrical Shock Hazard Disconnect electrical power before installing dishwasher. Failure to do so could result in death or electrical shock. Attention The installation of the pipes and electrical equipments should be done by professionals. About Power Connection WARNING For personal safety: Do not use an extension cord or an adapter... -
Página 69: Water Supply And Drain
Water Supply And Drain Cold water connection Connect the cold water supply hose to a threaded 3/4(inch) connector and make sure that it is fastened tightly in place. If the water pipes are new or have not been used for an extended period of time, let the water run to make sure ordinary supply hose that the water is clear. -
Página 70: Connection Of Drain Hoses
Connection Of Drain Hoses Insert the drain hose into a drain pipe with a minimum diameter of 4 cm, or let it run into the sink, making sure to avoid bending or crimping it. The height of drain pipe must be less than 1000mm. The free end of the hose must not be immersed in water to avoid the back flow of it. -
Página 71: Position The Appliance
Position The Appliance Position the appliance in the desired location. The back should rest against the wall behind it, and the sides, along the adjacent cabinets or walls. The dishwasher is equipped with water supply and drain hoses that can be positioned either to the right or the left sides to facilitate proper installation. -
Página 72: Built-In Installation(For The Integrated Model)
Underneath existing work top (When fitting beneath a work top) In most modern fitted kitchens there is only one single work top under which cabinets and electrical appliances are fitted. In this case remove the work top of the dishwasher by unscrewing the screws under the rear edge of the top (a). - Página 73 2. If dishwasher is in stalled at the corner of the cabinet, there should be some space when the door is opened. Dishwasher Cabinet Door of dishwasher Minimum space of 50mm NOTE: Depending on where your electrical outlet is, you may need to cut a hole in the opposite cabinet side.
- Página 74 model Full-integrated Install the hook on the aesthetic wooden panel and put the hook into the slot of the outer door of dishwasher (see figure A). After positioning of the panel , fix the panel onto the outer door by screws and bolts (See figure B). 1.Take away the four short screws 2.Pin up the four long screws Step 3.
- Página 75 Step 4. Dishwasher installation steps Please refer to the specified installation steps in the installation Please refer to the specified installation steps in the installation drawings. drawings. 1. Affix the condensation strip under the work surface of cabinet. Please ensure the condensation strip is flush with edge of work surface.
- Página 76 Step 5. Levelling the dishwasher Dishwasher must be level for proper dish rack operation and wash performance. Place a spirit level on door and rack track inside the tub as shown to check that the dishwasher is level. Level the dishwasher by adjusting the three levelling legs individually. When level the dishwasher, please pay attention not to let the dishwasher tip over.
-
Página 77: Troubleshooting Tips
TROUBLESHOOTING TIPS Before Calling For Service Reviewing the charts on the following pages may save you from calling for service. Problem Possible Causes What To Do Dishwasher doesn't Fuse blown, or the Replace fuse or reset circuit breaker. start circuit break tripped. Remove any other appliances sharing the same circuit with the dishwasher. - Página 78 Problem Possible Causes What To Do Spilled rinse-aid. Always wipe up rinse-aid spills immediately. Stained tub interior Detergent with Make sure that the detergent has no colourant may colourant. have been used. White film on Hard water minerals. To clean the interior, use a damp inside surface sponge with dishwasher detergent and wear rubber gloves.
- Página 79 Problem Possible Causes What To Do The dishes Not enough detergent Use more detergent, or change are not clean. was dispensed. your detergent. Items are blocking Rearrange the items so that the spray the movement of can rotate freely. the spray arms. The filter combination Clean and/or fit the filter correctly.
- Página 80 Problem Possible Causes What To Do The dishes aren't Wrong program has With a short program, the drying been selected. washing temperature is lower, decreasing cleaning performance. Choose a program with a long washing time. Use of cutlery with a Water drainage is more difficult with low-quality coating.
-
Página 81: Loading The Baskets According To En50242
LOADING THE BASKETS ACCORDING TO EN50242: 1.Upper basket: Item Number Cups Saucers Glasses Small serving bowl Medium serving bowl Large serving bowl Item Number Dessert dishes Dinner plates Soup plates Oval platter Cutlery basker... -
Página 82: Cutlery Basket
3.Cutlery basket: Item Number Soup spoons Forks Knives 4 4 4 Teaspoons Dessert spoons Information for comparability Serving spoons tests in accordance with EN 50242 Capacity: 9 place settings Serving forks Position of the upper basket: lower position Gravy ladles Program: ECO Rinse aid setting: 6 Softener setting: H3... - Página 83 PART Ⅱ: Special Version EMD092BI Please read this manual carefully before using the dishwasher and Keep this manual for future reference.
-
Página 84: Note
CONTENTS USING YOUR DISHWASHER Control Panel Water Softener Preparing And Loading Dishes Function Of The Rinse Aid And Detergent Filling The Rinse Aid Reservoir Filling The Detergent Dispenser PROGRAMMING THE DISHWASHER Wash Cycle Table Starting A Cycle Wash Changing The Program Mid-cycle Forget To Add A Dish? ERROR CODES TECHNICAL INFORMATION... - Página 85 QUICK USER GUIDE Please read the corresponding content on the instruction manual for detailed operating method. Install the dishwasher (Please check the section 5 “INSTALLATION INSTRUCTION ” of PART Ⅰ: Generic Version.) Inside Outside Loading the baskets Removing the larger residue on the cutlery Filling the dispenser Selecting a program and running...
-
Página 86: Using Your Dishwasher
USING YOUR DISHWASHER Control Panel Operation (Button) Press this button to turn on your dishwasher,the screen lights up. Power Press this button to select the appropriate washing program, the Program selected program indicator will be lit Press this button to set the delayed hours for washing. You can delay the start of washing up to 24 hours. - Página 87 This is the standard program suitable for normally soiled loads, such as pots, plates, glasses and lightly soiled pans. Program Glass indicator For lightly soiled crockery and glass. 90Min For normally soiled loads that need quick wash. Rapid A shorter wash for lightly soiled loads that do not need drying.
-
Página 88: Water Softener
Water Softener The water softener must be set manually, using the water hardness dial. The water softener is designed to remove minerals and salts from the water, which would have a detrimental or adverse effect on the operation of the appliance. -
Página 89: Preparing And Loading Dishes
Please check the section 3 “Loading The Salt Into The Softener” Please check the section 3 “Loading The Salt Into The Softener” of PART Ⅰ: Generic Version, If your dishwasher lacks salt. Ⅰ: of PART Generic Version, If your dishwasher lacks salt. NOTE: If your model does not have any water softener, you may skip this section. -
Página 90: Removing The Dishes
Recommendations for loading the dishwasher Scrape off any large amounts of leftover food. Soften remnants of burnt food in pans. It is not necessary to rinse the dishes under running water. For best performance of the dishwasher, follow these loading guidelines. (Features and appearance of baskets and cutlery baskets may vary from your model.) Place objects in the dishwasher in following way:... - Página 91 Loading the upper basket The upper basket is designed to hold more delicate and lighter dishware such as glasses, coffee and tea cups and saucers, as well as plates, small bowls and shallow pans (as long as they are not too dirty).Position the dishes and cookware so that they will not get moved by the spray of water.
-
Página 92: Function Of The Rinse Aid And Detergent
Function Of The Rinse Aid And Detergent The rinse aid is released during the final rinse to prevent water from forming droplets on your dishes, which can leave spots and streaks. It also improves drying by allowing water to roll off the dishes. Your dishwasher is designed to use liquid rinse aids. WARNING Only use branded rinse aid for dishwasher. -
Página 93: Filling The Rinse Aid Reservoir
Filling The Rinse Aid Reservoir Remove the rinse reservoir cap by lifting up the handle . Pour the rinse aid into the dispenser, being careful not to overfill. Close the cap after all. Adjusting the rinse aid reservoir To achieve a better drying performance with limited rinse aid, the dishwasher is designed to adjust the consumption by user. -
Página 94: Filling The Detergent Dispenser
Filling The Detergent Dispenser Sliding it to the right Press down Add detergent into the larger cavity (A) for the main wash cycle . For better cleaning result, especially if you have very dirt items, pour a small amount of detergent onto the door. The additional detergent will activate during the pre-wash phase. -
Página 95: Programming The Dishwasher
PROGRAMMING THE DISHWASHER Wash Cycle Table The table below shows which programs are best for the levels of food residue on them and how much detergent is needed. It also show various information about the programs. )Means: need to fill rinse into the Rinse-Aid Dispenser. Description Energy Water... -
Página 96: Starting A Cycle Wash
NOTE: EN 50242: This program is the test cycle. The information for comparability test in accordance with EN 50242. Starting A Cycle Wash 1. Draw out the lower and upper basket, load the dishes and push them back. It is commended to load the lower basket first, then the upper one. 2. -
Página 97: Forget To Add A Dish
Forget To Add A Dish? A forgotten dish can be added any time before the detergent dispenser opens. If this is the case, follow the instructions below: Open the door a little to stop the washing. After the spray arms stop working, you can open the door completely. 3. -
Página 98: Error Codes
ERROR CODES If there is a malfunction, the dishwasher will display error codes to identify these: Meanings Codes Possible Causes Faucets is not opened, or water intake is Longer inlet time. restricted,or water pressure is too low. Not reaching required Malfunction of heating element . -
Página 99: Technical Information
TECHNICAL INFORMATION Height (H) 815mm Width (W) 448mm Depth (D1) 550mm (with the door closed) Depth (D2) 1150mm (with the door opened 90°) -
Página 100: Product Fiche
Product fiche Sheet of household dishwasher according to EU Directive 1016/2010 & 1059/2010: Manufacturer EAS ELECTRIC SMART TECHNOLOGY Type / Description EMD092BI Standard place settings Energy efficiency class Annual energy consumption 197 kWh Energy consumption of the standard cleaning cycle 0.69 kWh... -
Página 101: Warranty Exclusions
CONDITIONS OF THE COMMERCIAL GUARANTEE IN HOUSEHOLD APPLIANCES This appliance has a two-year repair warranty, from the date of sale, against all manufacturing malfunctions, including labor and replacement parts. To justify the purchase date, it will be mandatory to present the purchase invoice or receipt. This guarantee will only be effective in Spain. - Página 102 Malfunctions that may occur to accessories and complements, as well as any part considered consumable by the manufacturer. Appliances used in industrial applications or for commercial purposes. Appliances with illegible serial numbers. Defects or malfunctions resulting from repairs, modifications, or dismantling of the appliance installation by a technician not authorised by the manufacturer, or as a result of manifest non-compliance with the manufacturer's operating and maintenance instructions.