Tabla de contenido
Publicidad
Idiomas disponibles
Idiomas disponibles
Enlaces rápidos
GM Multi Kit 1990-2012
95-2001 or 99-2001
KIT FEATURES
95-2001
• ISO DDIN radio provision
99-2001
• DIN radio provision
• Equalizer provision
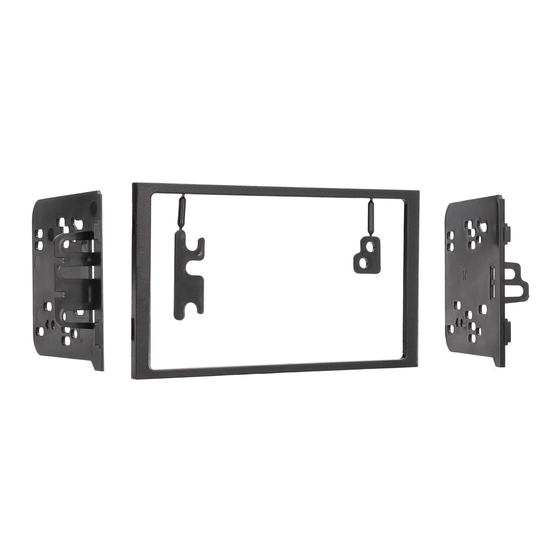
KIT COMPONENTS
95-2001: • A1) Radio trim plate • B1) Radio brackets •C1) Spacers
99-2001: • A2) Radio housing • B2) Spacer • C2) Equalizer dummy plate
A1
B1
A2
B2
METRA - The World's best kits
Installation instructions for part 95-2001 or 99-2001
C1
C2
metraonline.com
®
®
– See Pages 2 & 3
TOOLS REQUIRED
• Phillips screwdriver • Socket set • Utility knife (95-2001)
WIRING & ANTENNA CONNECTIONS (sold separately)
Wiring Harness:
• Please visit metraonline.com for more information
Antenna Adapter:
• 40-GM10 • 40-CR10
CAUTION!
especially air bag indicator lights must be connected before cycling
the ignition. Also, do not remove the factory radio with the key in the
on position, or while the vehicle is running.
Table of Contents
All accessories, switches, climate controls panels, and
© COPYRIGHT 2016 METRA ELECTRONICS CORPORATION
Publicidad
Capítulos
Tabla de contenido

Manuales relacionados para Metra 95-2001


Resumen de contenidos para Metra 95-2001
- Página 1 Wiring Harness: KIT COMPONENTS • Please visit metraonline.com for more information 95-2001: • A1) Radio trim plate • B1) Radio brackets •C1) Spacers Antenna Adapter: 99-2001: • A2) Radio housing • B2) Spacer • C2) Equalizer dummy plate • 40-GM10 • 40-CR10...
- Página 2 ® 95-2001 or 99-2001 Applications Buick Chevrolet (continued) Hummer Pontiac Century ......1997-2005 Malibu ......2001-2003 H2 .........2003-2007 Aztec ......2001-2005 Le Sabre ......1995-2005 Malibu Classic ....2004-2005 Bonneville ......2000-2005 Isuzu Park Avenue ....1995-2005 Monte Carlo ....2000-2005 Grand Am ......2001-2005 Rainier ......2004-2007 S-10 Ascender .......2003-2008 Montana ......2000-2005...
-
Página 3: Tabla De Contenido
- Chevrolet Kodiak 2003-2009 ........7 - Pontiac Sunfire 2000-2005 ........18 - Isuzu I-290/I370 2007-2008 ........8 - Chevrolet Malibu 2001-2003 ........10 Kit Assembly (95-2001) ..........19 - Isuzu I-280/I350 2006 ..........8 - Chevrolet Malibu Classic 2004-2005 .......10 Kit Assembly (99-2001) ..........19 - Chevrolet Monte Carlo 2000-2005......10... -
Página 4: Dash Disassembly
® 95-2001 or 99-2001 Dash Disassembly Buick Century 1997-2005 Buick Le Sabre/Buick Buick Le Sabre/Buick Park Park Avenue 1995-1999 Avenue 2000-2005 Buick Regal 1995-2004 1. Remove the plastic trim piece to the left of the 1. Unsnap the climate control trim panel (from door 1. -
Página 5: Buick Rendezvous 2002-2007
® 95-2001 or 99-2001 Dash Disassembly Buick Rendezvous 2002-2007 Buick Riviera 1996-1999 1. Unsnap left side panel exposing (1) 5. Unsnap bottom edge of trim bezel, 1. Open center console and remove (2) screws at front of console opening. (Figure A) Phillips screw to remove. -
Página 6: Buick Roadmaster 1995-1996
® 95-2001 or 99-2001 Dash Disassembly Buick Skylark 1996-1998 Buick Roadmaster 1995-1996 1. Unclip dash panel sides and remove. 1. Remove (6) 9/32” screws inside glove box. 2. Unclip panel below steering column and remove. 2. Under glove box and drivers knee bolster, remove (2) plastic panels by turning (2) 1/4 turn fasteners per side. -
Página 7: Cadillac Escalade, Escalade Esv & Ext 2003-2006
® 95-2001 or 99-2001 Dash Disassembly Chevrolet Blazer 2002-2005, Cadillac Escalade, Escalade ESV & EXT 2003-2006, Chevrolet Avalanche/Suburban/Tahoe 2003-2006, S-10/GMC Sonoma (with double DIN radio) 2002-2004, Chevrolet Kodiak 2003-2009 Oldsmobile Bravada 1998-2001 Chevrolet Silverado/Classic 2003-2007, 1. Remove (2) 9/32” hex-head screws from the knee bolster panel. -
Página 8: Chevrolet Cavalier 2000-2005
® 95-2001 or 99-2001 Dash Disassembly Chevrolet Cavalier Chevrolet Colorado 2004- 2000-2005 2008, GMC Canyon 2004- 2008, Isuzu I-290/I-370 1. Open drivers door and remove fuse panel on end of dash. 6. Remove (1) Phillips screw from the defroster duct. -
Página 9: Chevrolet Express Van (Full Size) 2001-2002
® 95-2001 or 99-2001 Dash Disassembly Chevrolet Express Van 2001-2002, Chevrolet Express Van 2003-2007, GMC Savanna 2003-2007 GMC Savanna 2001-2002 1. Unsnap and remove small trim 1. Remove (2) 10mm bolts from below knee bolster under steering panel below steering column. -
Página 10: Chevrolet Impala 2000-2005
® 95-2001 or 99-2001 Dash Disassembly Chevrolet Malibu 2001-2003, Chevrolet Monte Carlo Chevrolet Impala Chevrolet Malibu Classic 2000-2005 2000-2005 2004-2005 1. Unclip the trim panel above the pedals. (It is NOT 1. Unclip each side of the dash trim bezel (fuse necessary to remove the panel it may be left hanging.) -
Página 11: Chevrolet Trailblazer 2002-2009
® 95-2001 or 99-2001 Dash Disassembly Chevrolet Trailblazer 2002-2009 Chevrolet Venture 2000, Oldsmobile Silhouette 2000, 1. Remove (2) Phillips screws inside instrument cluster. Pontiac Montana 2000 (Except SV6) 2. Remove (1) Phillips screw under climate controls to the left of the power outlet. -
Página 12: Chevrolet Venture 2001-2005
® 95-2001 or 99-2001 Dash Disassembly Chevrolet Venture 2001-2005, Oldsmobile Silhouette 2001-2004 Pontiac Montana 2001-2005 (Except SV6) 1. Open cup holders and remove (2) Phillips 7mm screws. (Figure A) 2. Unsnap and remove dual power outlet assembly from lower storage. -
Página 13: Buick Rainier 2004-2007
® 95-2001 or 99-2001 Dash Disassembly GMC Envoy 2002-2007, Isuzu Ascender 2003-2005, Oldsmobile Bravada 2002-2004, Buick Ranier 2004-2007 1. Remove (4) Phillips screws, (2) from left and (2) from right of carpeted panel. (Figure A) 2. Slide carpeted panel down and backwards to reveal (2) Phillips screws and remove. -
Página 14: Hummer H2 2003-2007
® 95-2001 or 99-2001 Dash Disassembly Hummer H2 2003-2007 1. Open center console and remove 5. Remove (6) Phillips screws from 9. Slide control assembly Step 8 (4) 9/32” screws from console top of center console. (Figure F) rearwards. (Figure F) box and remove box. -
Página 15: Oldsmobile Achieva 1996-1998
® 95-2001 or 99-2001 Dash Disassembly Oldsmobile Achieva Oldsmobile Alero Oldsmobile Aurora 1996-1998 1999-2004 1995-2003 1. Unclip the radio trim bezel and remove the bezel. 1. Remove shift knob by using a small screwdriver to 1. Open the glove box, press inward on the walls of (Figure A) remove U-clip from front of shifter and pull upward. -
Página 16: Oldsmobile Cutlass 1997-1999
® 95-2001 or 99-2001 Dash Disassembly Oldsmobile Eighty-Eight Oldsmobile Cutlass 1997- Oldsmobile Intrigue 1994-1999 1999, Oldsmobile Cutlass 1998-2002 Supreme 1995-1997 1. Unclip the radio trim bezel and remove. 1. Open the center console storage compartment and remove (2) 9/32” hex-head screws exposed. -
Página 17: Oldsmobile Lss 1996-1999
® 95-2001 or 99-2001 Dash Disassembly Oldsmobile LSS 1996-1999 Pontiac Aztec Pontiac Bonneville / Regency 1997-1998 2001-2005 2000-2005 Note: (3) speed clips and screws will need to be 1. Pull out cup holder Step 1 supplied to attach the kit into the sub-dash where inserts. -
Página 18: Pontiac Grand Am 2001-2005
® 95-2001 or 99-2001 Dash Disassembly Pontiac Grand Am 2001-2005 Pontiac Sunfire 2000-2005 1. Unsnap and remove radio trim 1. Open the glove box and remove bezel. (Figure A) (2) Phillips screws exposed on the right edge of the radio trim bezel. -
Página 19: Kit Assembly (95-2001)
All applications: eliminate that space. 1. Locate the factory wiring harness and antenna connector in the dash. Metra Continue to All Applications recommends using the proper mating adapter from Metra or AXXESS. Test the radio for proper operation. -
Página 20: Important
® Installation instructions for part 95-2001 or 99-2001 IMPORTANT If you are having difficulties with the installation of this product, please call our Tech Support line at 1-800-253-TECH. Before doing so, look over the instructions a second time, and make sure the installation was performed exactly as the instructions are stated. -
Página 21: Herramientas Requeridas
COMPONENTES DEL KIT Arnés de cableado: 95-2001: • A1) Placa de moldura de radio • B1) Soportes del radio •C1) Espaciadores • Visite metraonline.com para más información 99-2001: • A2) Carcasa del radio • B2) Espaciador • C2) Placa ficticia de equalizer Adaptador de antena: •... - Página 22 ® 95-2001 o 99-2001 Aplicaciones Buick Chevrolet (continúa) Hummer Pontiac Kodiak ......2003-2009 Century ......1997-2005 H2 .........2003-2007 Aztec ......2001-2005 Malibu ......2001-2003 Le Sabre ......1995-2005 Bonneville ......2000-2005 Malibu Classic ....2004-2005 Isuzu Park Avenue ....1995-2005 Grand Am ......2001-2005 Monte Carlo ....2000-2005 Rainier ......2004-2007 Ascender .......2003-2008...
- Página 23 - Pontiac Sunfire 2000-2005 ........18 - Isuzu I-290/I370 2007-2008 ........8 - Chevrolet Malibu 2001-2003 ........10 Ensamble del kit (95-2001) ........19 - Isuzu I-280/I350 2006 ..........8 - Chevrolet Malibu Classic 2004-2005 .......10 Ensamble del kit (99-2001) ........19 - Chevrolet Monte Carlo 2000-2005......10...
-
Página 24: Desmontaje Tablero
® 95-2001 o 99-2001 Desmontaje tablero Buick Century 1997-2005 Buick Le Sabre/Buick Buick Le Sabre/Buick Park Park Avenue 1995-1999 Avenue 2000-2005 Buick Regal 1995-2004 1. Quite la pieza de moldura de plástico a la izquierda de 1. Suelte a presión el panel de la moldura del control 1. -
Página 25: Buick Rendezvous 2002-2007
® 95-2001 o 99-2001 Desmontaje tablero Buick Rendezvous 2002-2007 Buick Riviera 1996-1999 1. Abra la consola central y retire los (2) tornillos al frente de la apertura de la 1. Suelte a presión el panel del lado 5. Suelte a presión el borde inferior del bisel consola. -
Página 26: Buick Roadmaster 1995-1996
® 95-2001 o 99-2001 Desmontaje tablero Buick Roadmaster 1995-1996 Buick Skylark 1996-1998 1. Desenganche los lados del panel del tablero y quite. 1. Quite los (6) tornillos de 9/32” del interior de la guantera. 2. Desenganche el panel debajo de la columna de dirección y quite. -
Página 27: Cadillac Escalade, Escalade Esv & Ext 2003-2006
® 95-2001 o 99-2001 Desmontaje tablero Chevrolet Blazer 2002-2005, Cadillac Escalade, Escalade ESV & EXT 2003-2006, Chevrolet Avalanche/Suburban/Tahoe 2003-2006, S-10/GMC Sonoma (con radio de doble DIN) 2002-2004, Chevrolet Kodiak 2003-2009 Oldsmobile Bravada 1998-2001 Chevrolet Silverado/Classic 2003-2007, 1. Quite los (2) tornillos de cabeza hexagonal de 9/32” del panel del protector de rodillas . -
Página 28: Chevrolet Cavalier 2000-2005
® 95-2001 o 99-2001 Desmontaje tablero Chevrolet Cavalier Chevrolet Colorado 2004- 2000-2005 2008, GMC Canyon 2004- 2008, Isuzu I-290/I-370 1. Abra la puerta del conductor y quite el panel de 5. Quite los (2) tornillos de la esquina superior 2007-2008, Isuzu fusibles en el extremo del tablero. -
Página 29: Chevrolet Express Van (Tamaño Completo) 2001-2002
® 95-2001 o 99-2001 Desmontaje tablero Chevrolet Express Van 2001-2002, Chevrolet Express Van 2003-2007, GMC Savanna 2003-2007 GMC Savanna 2001-2002 1. Suelte a presión y quite el pequeño 1. Quite los (2) pernos de 10mm de abajo del protector de rodillas panel de la moldura debajo de la debajo de la columna de dirección y... -
Página 30: Chevrolet Impala 2000-2005
® 95-2001 o 99-2001 Desmontaje tablero Chevrolet Impala Chevrolet Malibu 2001-2003, Chevrolet Monte Carlo 2000-2005 Chevrolet Malibu Classic 2000-2005 2004-2005 1. Desenganche el panel de la moldura sobre los pedales 1. Desenganche cada lado del bisel de la moldura del (no es necesario retirar el panel, puede dejarse colgando). -
Página 31: Chevrolet Trailblazer 2002-2009
® 95-2001 o 99-2001 Desmontaje tablero Chevrolet Trailblazer 2002-2009 Chevrolet Venture 2000, Oldsmobile Silhouette 2000, 1. Quite los (2) tornillos Phillips del interior del conjunto de instrumentos. Pontiac Montana 2000 (Excepto SV6) 2. Quite (1) tornillo Phillips debajo de los controles del clima a la izquierda del tomacorriente. -
Página 32: Chevrolet Venture 2001-2005
® 95-2001 o 99-2001 Desmontaje tablero Chevrolet Venture 2001-2005, Oldsmobile Silhouette 2001-2004 Pontiac Montana 2001-2005 (Excepto SV6) 1. Abra los portavasos y quite los (2) tornillos Phillips de 7mm. (Figure A) 2. Suelte a presión y quite el conjunto de tomacorriente dual del compartimiento inferior de almacenamiento. -
Página 33: Buick Rainier 2004-2007
® 95-2001 o 99-2001 Desmontaje tablero GMC Envoy 2002-2007, Isuzu Ascender 2003-2005, Oldsmobile Bravada 2002-2004, Buick Ranier 2004-2007 1. Quite los (4) tornillos Phillips, (2) de la izquierda y (2) de la derecha del panel alfombrado. (Figura A) 2. Deslice el panel alfombrado hacia abajo y hacia atrás para revelar los... -
Página 34: Hummer H2 2003-2007
® 95-2001 o 99-2001 Desmontaje tablero Hummer H2 2003-2007 1. Abra la consola central y quite los 5. Quite los (6) tornillos Phillips de moldura de la consola en el lado del Paso 8 (4) tornillos de 9/32” de la caja de la parte superior de la consola pasajero. -
Página 35: Oldsmobile Achieva 1996-1998
® 95-2001 o 99-2001 Desmontaje tablero Oldsmobile Achieva Oldsmobile Alero Oldsmobile Aurora 1996-1998 1999-2004 1995-2003 1. Desenganche el bisel de la moldura del radio y 1. Abra la guantera, presione hacia dentro las paredes del 1. Quite la perilla de la palanca de velocidades con un quite el bisel. -
Página 36: Oldsmobile Cutlass 1997-1999
® 95-2001 o 99-2001 Desmontaje tablero Oldsmobile Cutlass 1997- Oldsmobile Eighty-Eight Oldsmobile Intrigue 1999, Oldsmobile Cutlass 1994-1999 1998-2002 Supreme 1995-1997 1. Desenganche el bisel de la moldura del aradio y quite. 1. Abra el compartimiento de almacenamiento de la consola central y quite los (2) tornillos de cabeza 2. -
Página 37: Oldsmobile Lss 1996-1999
® 95-2001 o 99-2001 Desmontaje tablero Pontiac Bonneville Pontiac Aztec Oldsmobile LSS 1996-1999 2001-2005 2000-2005 / Regency 1997-1998 Nota: (3) tendrá que ser suministrado clips de 1. Jale y saque los insertos Paso 1 velocidad y tornillos para fijar el kit en el sub-tablero de los portavasos. -
Página 38: Pontiac Grand Am 2001-2005
® 95-2001 o 99-2001 Desmontaje tablero Pontiac Grand Am 2001-2005 Pontiac Sunfire 2000-2005 1. Suelte y quite el bisel de la 1. Abra la guantera y quite (2) moldura del radio. (Figura A) tornillos Phillips expuestos en el borde superior derecho del bisel de 2. -
Página 39: Ensamble Del Kit (95-2001)
Siga Todas las Aplicaciones tablero. Metra recomienda que use adaptadores adecuados de acoplamiento (Figura B) de Metra y/o de AXXESS. Pruebe el radio para verificar que funcione correctamente. 2. Vuelva a armar el tablero al revés de como lo desarmó. -
Página 40: Importante
® Instrucciones de instalación para la pieza 95-2001 o 99-2001 IMPORTANTE Si tiene dificultades con la instalación de este producto, llame a nuestra línea de soporte técnico al 1-800-253-TECH. Antes de hacerlo, revise las instrucciones por segunda vez y asegúrese de que la instalación se haya realizado exactamente...