
Manuales relacionados para Optimus SMM-8SA

Resumen de contenidos para Optimus SMM-8SA
- Página 1 GESTOR DE AVISOS 8 ZONAS MESSAGE MANAGER 8 ZONES SMM-8SA Manual de instalación y funcionamiento v2.0 Installation and operation manual v2.0...
-
Página 2: Instrucciones De Seguridad
Tampoco incluye posibles situaciones de riesgo durante la instalación, funcionamiento o mantenimiento. Si usted necesita asistencia especial más allá del manual, por favor contacte con nuestro servicio técnico. SMM-8SA v2.0 Página 1 de 27... -
Página 3: Tabla De Contenido
FUNCIONES ESPECIALES..................23 7.1 DIRECCIÓN IP POR DEFECTO................. 23 7.2 USUARIO Y CONTRASEÑA POR DEFECTO............ 24 7.3 REESTABLECER CONFIGURACIÓN DE FÁBRICA.......... 25 CARACTERÍSTICAS TÉCNICAS ................26 CERTIFICADO DE GARANTÍA .................. 27 SMM-8SA v2.0 Página 2 de 27... -
Página 4: Información General
RTC (Real Time Clock) incorporado. Funcionamiento autónomo. Dispone de accesorios para el montaje en armarios rack de 19”, montaje en carril DIN o montaje mural (no incluidos). Véase la página 26. SMM-8SA v2.0 Página 3 de 27... -
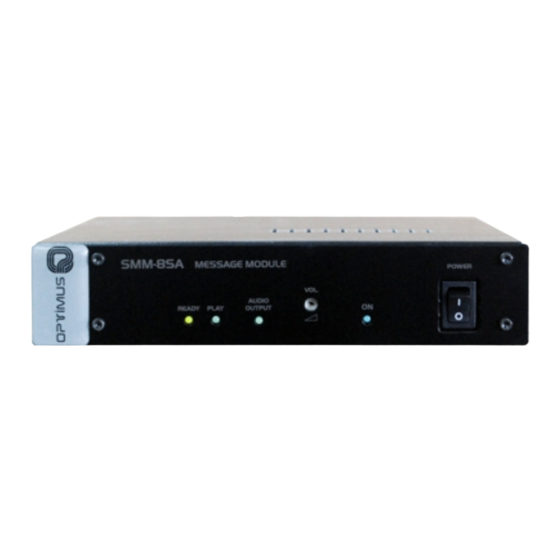
Página 5: Funcionamiento
Potenciómetro ‘VOL.’ Ajusta el nivel de audio de salida. Indicador luminoso ‘ON’ Se ilumina cuando el equipo recibe alimentación y el interruptor POWER está en posición Interruptor ‘POWER’ Enciende y apaga el equipo. SMM-8SA v2.0 Página 4 de 27... -
Página 6: Panel Posterior
(10) Regleta de contactos de entrada ‘INPUTS’ 8 contactos de entrada de tipo seco. La activación de los contactos puede ser por pulso o nivel. La función de los contactos es configurable mediante el servidor Web del equipo. SMM-8SA v2.0 Página 5 de 27... - Página 7 Permite la conexión a un switch o un router para poder acceder al equipo por servidor Web y configurar las funcionalidades. (14) Conectores ‘USB’ Permite la conexión de una memoria USB para hacer una copia de seguridad de los mensajes de audio internos del equipo (ver apartado 0). SMM-8SA v2.0 Página 6 de 27...
-
Página 8: Ejemplos De Conexión
SMM-8SA SCHEDULED MESSAGE MODULE GESTOR DE AVISOS 3. EJEMPLOS DE CONEXIÓN Imagen 3. Ejemplo de conexión para un sistema de 4 zonas. Imagen 4. Ejemplo de conexión para un sistema de 6 zonas. SMM-8SA v2.0 Página 7 de 27... -
Página 9: Configuración Del Equipo
El usuario y contraseña para acceder al equipo por defecto es ‘admin’, ‘admin’. Imagen 5. Página de registro Una vez aceptado se mostrará la página de inicio del equipo y a la izquierda el menú de navegación. Imagen 6. Página de inicio SMM-8SA v2.0 Página 8 de 27... -
Página 10: Red
En el caso de instalar varios equipos en una misma red se debe asignar un HostName diferente a cada uno de los equipos para evitar conflictos de red. Imagen 7. Ajuste de red y nombre del equipo (IP estática) Imagen 8. Ajuste de red y nombre del equipo (IP dinámica) SMM-8SA v2.0 Página 9 de 27... -
Página 11: Usuario / Idioma
PC o sincronización mediante servidor NTP. También permite establecer la fecha inicial y final del horario de verano. Imagen 10. Ajuste de fecha y hora manual con horario de verano SMM-8SA v2.0 Página 10 de 27... - Página 12 GESTOR DE AVISOS Imagen 11. Ajuste de fecha y hora por sincronización a PC con horario de verano Imagen 12. Ajuste de fecha y hora por sincronización mediante servidor NTP con horario de verano SMM-8SA v2.0 Página 11 de 27...
-
Página 13: Cargar Mensajes
Si se elimina un mensaje asociado a una programación esta se mostrará de color rojo para indicar que no funcionará. La carga de mensajes simultáneos está limitada a un máximo de 100 MB. Imagen 13. Gestión de mensajes SMM-8SA v2.0 Página 12 de 27... - Página 14 SMM-8SA SCHEDULED MESSAGE MODULE GESTOR DE AVISOS Imagen 14. Gestión de mensajes con errores detectados SMM-8SA v2.0 Página 13 de 27...
-
Página 15: Enviar Mensajes
(contacto/s de salida) y pulsar ‘Reproducir’. Para pararlo, pulse el botón ‘Parar’. Estos mensajes tienen prioridad sobre las programaciones horarias pero no sobre los mensajes activados mediante contactos. Imagen 15. Enviar mensajes SMM-8SA v2.0 Página 14 de 27... -
Página 16: Mantenimiento
USB y la restauración de las configuraciones de fábrica del equipo. SMM-8SAPC: Este menú permite la descarga de las configuraciones de la programación horaria y de los contactos. Al pulsar la opción deseada se abrirá el explorador de archivos y se podrá... -
Página 17: Festivos
Reproducción solo en días festivos o excepto en días festivos. Si el día festivo es el mismo cada año marque la casilla “cualquier año”. Imagen 17. Página de días festivos SMM-8SA v2.0 Página 16 de 27... -
Página 18: Monitorización
Imagen 18. Estado de los contactos 4.10 ACTUALIZAR Este menú permite la actualización del sistema de megafonía para aplicar mejoras al SMM-8SA. Imagen 19. Actualiza el sistema SMM-8SA v2.0... -
Página 19: Reiniciar
SMM-8SA SCHEDULED MESSAGE MODULE GESTOR DE AVISOS 4.11 REINICIAR Este menú permite el reinicio del equipo para aplicar las configuraciones realizadas. Imagen 20. Reiniciar el equipo SMM-8SA v2.0 Página 18 de 27... -
Página 20: Contactos De Entrada
ACK (solo en contacto 8): Al seleccionar ACK, se activará el modo confirmación. En este modo, una vez activado un contacto asociado a une secuencia, esta no se reproducirá hasta que el contacto ACK se cierre. SMM-8SA v2.0 Página 19 de 27... - Página 21 Zonificación: Seleccione las zonas por las que se tenga que reproducir la secuencia. Repeticiones: Seleccione cuantas veces se reproducirá la secuencia de los 3 mensajes. Pulse “Guardar” para salvar los cambios o “Cancelar” para descartar los cambios. SMM-8SA v2.0 Página 20 de 27...
-
Página 22: Programaciones Horarias
Este menú permite configurar la activación de secuencias según programaciones horarias. Son posibles hasta un máximo de 50 programaciones diferentes. Para cada programación se deberán configurar los siguientes parámetros: Imagen 22 configuración de programaciones horarias. SMM-8SA v2.0 Página 21 de 27... - Página 23 Solo si se ha seleccionado algún valor en “Repetir secuencia” Zonas: Seleccione las zonas por las que se tenga que reproducir el secuencia. Pulse “Guardar” para salvar los cambios, “Cancelar” para descartar los cambios o “Limpiar” para restaurar la configuración de fábrica. SMM-8SA v2.0 Página 22 de 27...
-
Página 24: Funciones Especiales
Reiniciar el equipo. Nota: La dirección IP por defecto es temporal. Una vez se reinicie nuevamente el equipo, este volverá a la IP configurada en servidor web. Imagen 23. Ejemplo de conexión para reestablecer la IP. SMM-8SA v2.0 Página 23 de 27... -
Página 25: Usuario Y Contraseña Por Defecto
Acceder al equipo desde el navegador, utilizando los valores por defecto, y seguir los pasos del apartado 0 si se requiere cambiarlos. Reiniciar el equipo. Usuario y contraseña reestablecidos. Imagen 24. Ejemplo de conexión para restablecer usuario y contraseña. SMM-8SA v2.0 Página 24 de 27... -
Página 26: Reestablecer Configuración De Fábrica
Mediante su explorador favorito, acceder al equipo con la IP por defecto (192.168.1.234) y configurarlo de nuevo según requerimientos. Reiniciar el equipo. Valores de configuración por defecto. Imagen 22. Ejemplo de conexión para reestablecer configuración de fábrica. SMM-8SA v2.0 Página 25 de 27... -
Página 27: Características Técnicas
Chasis: Hierro pintado negro RAL 9005 Tapa: Skinplate negro Z-120 Kit montaje simple (0,40 Kg) Z-116 Kit montaje doble (0,33 Kg) Accesorios (no incluidos) Z-111 Kit de montaje carril DIN (0,10 Kg) Z-110 Kit de montaje mural (0,24 Kg) SMM-8SA v2.0 Página 26 de 27... -
Página 28: Certificado De Garantía
30 días. No obstante, se deja aclarado que el plazo usual no supera los OPTIMUS S.A. tampoco asumirá costes en el marco de la garantía por este tipo 30 días. -
Página 29: Safety Instructions
Note: The information provided in this manual does not include neither details of design production or variations in equipment, nor possible risks during installation, operation or maintenance. If you need special assistance beyond the manual, please contact our customer service. SMM-8SA v2.0 Page 1 of 27... - Página 30 INPUT CONTACTS ....................19 SCHEDULING ......................21 SPECIAL FUNCTIONS ....................23 7.1 DEFAULT IP ADDRESS ..................23 7.2 DEFAULT USER AND PASSWORD..............24 7.3 FACTORY RESET....................25 TECHNICAL SPECIFICATIONS ................26 GUARANTEE CERTIFICATE ..................27 SMM-8SA v2.0 Page 2 of 27...
-
Página 31: General Information
Audio output (0 / -60 dB) with priority relay and front panel volume control. Built-in RTC (Real Time Clock). Standalone operation. Rack mounting brackets, DIN rail and wall mounting accessories available (not included). See section 8. SMM-8SA v2.0 Page 3 of 27... -
Página 32: Operation
‘Vol.’ Potentiometer. It adjusts the audio output level. ‘On’ LED indicator. It lights when the unit is powered up and the power switch is ON. ‘Power’ Switch. It turns on / off the unit. SMM-8SA v2.0 Page 4 of 27... -
Página 33: Rear Panel
Contacts activation can be configured using unit’s embedded webserver. (10) Input contacts terminal. 8 dry closure input contacts. Contact activation selectable by pulse or level. Contacts functionality can be configured using unit’s embedded webserver. SMM-8SA v2.0 Page 5 of 27... - Página 34 It allows to connect the unit to a switch or router to access the web server for setting configurations. (14) USB connectors. It allows the connection of a USB stick to save a backup of internal audio messages (see section 4.7). SMM-8SA v2.0 Page 6 of 27...
-
Página 35: Connection Example
SMM-8SA MESSAGE MANAGER SCHEDULED MESSAGE MODULE 3. CONNECTION EXAMPLE Image 3. Connection example for 4 zones installation. Image 4. Connection example for 6 zones installation. SMM-8SA v2.0 Page 7 of 27... -
Página 36: Unit Configuration
The username and password to access to web server is "admin", "admin". Image 5. Log in page. Once accepted, the user will be able to access the webserver and set up the unit. Image 6. Home page SMM-8SA v2.0 Page 8 of 27... -
Página 37: Network
In case of installing multiple units on the same network, a different HostName must be assigned to each of them to avoid network conflicts. Image 7. Network Settings and host name (static IP). Image 8. Network Setting and host name (dynamic IP). SMM-8SA v2.0 Page 9 of 27... -
Página 38: User / Language
This menu allows the setting of date and time. Date can be adjustment manually, synchronized by PC or synchronized by NTP server. It is also used to set beginning and end of summer time. Image 10. Setting date and time (manual setting) with summer time. SMM-8SA v2.0 Page 10 of 27... - Página 39 SMM-8SA MESSAGE MANAGER SCHEDULED MESSAGE MODULE Image 11. Setting date and time (synchronized by PC) with summer time. Image 12. Setting date and time (synchronized by NTP) with summer time. SMM-8SA v2.0 Page 11 of 27...
-
Página 40: Load Messages
If a message associated with a schedule is deleted, it will be shown in red to indicate that it will not work. Simultaneous message load is limited to a maximum of 100 MB. Image 13. Message management. SMM-8SA v2.0 Page 12 of 27... - Página 41 SMM-8SA MESSAGE MANAGER SCHEDULED MESSAGE MODULE Image 14. Message management with errors detected SMM-8SA v2.0 Page 13 of 27...
-
Página 42: Send Messages
SCHEDULED MESSAGE MODULE 4.6 SEND MESSAGES This menu allows to play audio files directly from the SMM-8SA in order to check the correct functionality of the messages themselves and the output contacts. To play audio files select the audio file, select the zones and then press the “Play” button. -
Página 43: Maintenance
USB memory and the restoration of the factory settings. SMM-8SAPC: This menu allows to download time schedule and contacts settings. Pressing the desired option will open the file browser and you can select the folder where the files will be saved, "config.xml"... -
Página 44: Holidays
This menu allows to select the holidays. This setting will be used afterwards as a restriction for time schedules. Broadcasting only on holidays or except on holidays. If the holiday is the same every year, check the box 'every year'. Image 17. Holidays setting menu. SMM-8SA v2.0 Page 16 of 27... -
Página 45: Monitoring
The monitoring is not in real time, you must press the "Update" button or wait 5 seconds with the contact activated, for the status change to be displayed. Image 18. Contacts status. 4.10 SYSTEM UPDATE This menu allows to update the firmware version. Image 5. System update SMM-8SA v2.0 Page 17 of 27... -
Página 46: Restart
SMM-8SA MESSAGE MANAGER SCHEDULED MESSAGE MODULE 4.11 RESTART This menu allows to restart the unit to apply changes. Image 6. Restart the unit SMM-8SA v2.0 Page 18 of 27... -
Página 47: Input Contacts
ACK (only in contact 8): When ACK is selected, confirmation mode will be activated. In this mode, once a contact associated with a sequence has been activated, it will not be played until the ACK contact is closed. SMM-8SA v2.0 Page 19 of 27... - Página 48 Zones: Select desired zones where the sequence has to be played. Repetitions: Select how many times the sequence 3 of messages will be played. Press "Save" to save the changes or "Cancel" to discard the changes. SMM-8SA v2.0 Page 20 of 27...
-
Página 49: Scheduling
This menu allows to configure the sequences activation according to time schedules. Up to 50 different scheduled programs are possible. The following parameters should be set for each program: Image 22. Time schedule configuration. SMM-8SA v2.0 Page 21 of 27... - Página 50 Zones: Select the zones where the sequence has to be broadcast. Click "save" to save changes, "cancel" to discard the changes or “Clear” to restore the factory settings. SMM-8SA v2.0 Page 22 of 27...
-
Página 51: Special Functions
Restart the unit. Note: The default IP address is temporary. Once the unit is restarted again, it will come back to the IP configured in the web server. Image 23. Connection example to restore default IP. SMM-8SA v2.0 Page 23 of 27... -
Página 52: Default User And Password
Access the unit from the web browser, using default user and password, and follow the steps of paragraph 0 to change them if required. Restart the unit. User and password reset. Image 24. Connection example to restore default login and password. SMM-8SA v2.0 Page 24 of 27... -
Página 53: Factory Reset
Access the unit from your web browser, using the default IP (192.168.1.234), and configure it again according to requirements. Restart the unit. Factory Reset. Image 8. Connection example to restore factory settings. SMM-8SA v2.0 Page 25 of 27... -
Página 54: Technical Specifications
Frame: Iron painted black RAL 9005 Cover: Black Skinplate Z-120 Simple assembly kit (0.4 Kg) Z-116 Double assembly kit (0.33 Kg) Accessories (not included) Z-111 DIN rail mounting kit (0.1 Kg) Z-110 Wall-mounting kit (0.24 Kg) SMM-8SA v2.0 Page 26 of 27... -
Página 55: Guarantee Certificate
If, within this guarantee period, defects appear which are not due to rights do not apply, OPTIMUS S.A. shall duly inform the client. If, within a factors outlined in section 2, OPTIMUS S.A. shall replace or repair the unit using period of 6 weeks from this communication, no written repair order is equivalent, new or reconstructed replacement parts, as it deems fit.