Tabla de contenido
Publicidad
Idiomas disponibles
Idiomas disponibles
Enlaces rápidos
Installation Instructions for 99-7804B
Honda Accord 2013-up
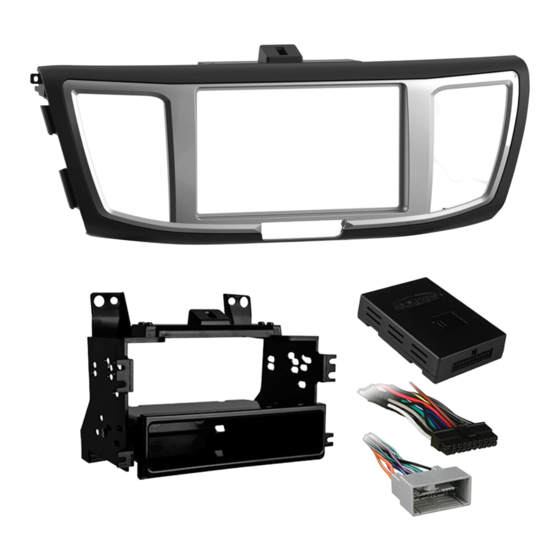
KIT FEATURES
• ISO DIN radio provision with pocket
• DDIN radio provision
• Painted two tone to match factory
• Retains factory color screen
KIT COMPONENTS
• A) Radio housing trim panel • B) Brackets • C) Top bracket • D) Pocket • E) (6) White panel clips
• F) (8) #6 x 3/8" Phillips screws • G) (8) #8 x 3/8" Phillips screws • H) Display retention interface and harness (not shown)
B
A
WIRING & ANTENNA CONNECTIONS (sold separately)
Wiring Harness: • Included
Antenna Adapter: • 40-HD11
METRA. The World's best kits.
99-7804B
C
D
F
1-800-221-0932
™
Dash Disassembly
- Honda Accord 2013-up .......................................2-3
Kit Assembly
- Kit preparation ..................................................... 4
- ISO DIN radio provision with pocket ...................... 5
- DDIN radio provision ............................................ 6
Wiring Instructions ............................................. 7-8
Touch Screen Instructions................................ 9-10
TOOLS REQUIRED
E
• Panel removal tool • Phillips screwdriver
CAUTION: Metra recommends disconnecting the
G
negative battery terminal before beginning any
installation. All accessories, switches, and especially
air bag indicator lights must be plugged in before
reconnecting the battery or cycling the ignition.
NOTE: Refer to the instructions included with the
aftermarket radio.
metraonline.com
Table of Contents
© COPYRIGHT 2015 METRA ELECTRONICS CORPORATION
Publicidad
Tabla de contenido

Manuales relacionados para Metra 99-7804B


Resumen de contenidos para Metra 99-7804B
-
Página 1: Tabla De Contenido
WIRING & ANTENNA CONNECTIONS (sold separately) Wiring Harness: • Included NOTE: Refer to the instructions included with the Antenna Adapter: • 40-HD11 aftermarket radio. METRA. The World’s best kits. 1-800-221-0932 metraonline.com ™ © COPYRIGHT 2015 METRA ELECTRONICS CORPORATION... -
Página 2: Dash Disassembly
99-7804B Dash Disassembly 1. Unclip and remove the side trim 3. Remove (2) 8 mm screws facing panels from each side of the up on bottom of radio chassis console. (Figure A) inside pocket cavity. (Figure C) 2. Remove (2) Phillips screws 4. - Página 3 99-7804B Dash Disassembly 5. Remove (2) Phillips screws on top 7. Remove (1) Phillips screw from of radio. (Figure E) each A/C vent then unclip and remove the vents. (Figure G) 6. Unclip and remove the radio 8. Remove (2) Phillips screws assembly.
-
Página 4: Kit Preparation
99-7804B Kit Preparation 1. Attach the hazard light switch to the radio trim panel using (2) of the supplied #8 x 3/8” Phillips screws. (Figure A) 2. Attach the (6) white panel clips to the radio housing trim panel. (Figure A) -
Página 5: Iso Din Radio Provision With Pocket
99-7804B Kit Assembly ISO DIN radio provision with pocket 6. Locate the factory wiring harness in the dash. Follow the Wiring and 1. Attach the radio brackets to the Initialization section of this manual radio housing trim panel using (4) before completing the installation. -
Página 6: Ddin Radio Provision
99-7804B Kit Assembly ISO DDIN radio provision 5. Locate the factory wiring harness in the dash. Follow the Wiring and 1. Attach the radio brackets to the Initialization section of this manual radio housing trim panel using before completing the installation. -
Página 7: Wiring Instructions
99-7804B Wiring Instructions Harnesses Included: Connections to be made: • 24-pin gray Honda connector to 14-pin black interface connector, with From the 24-pin gray Honda connector to the aftermarket radio: pre-wired 12-pin black ASWC-1 harness. • Connect the Red wire to the accessory wire. - Página 8 99-7804B Wiring Instruction Connections to be made: If Equipped with Factory Subwoofer: From the 14-pin black connector to the aftermarket radio: From the 8-pin gray Honda connector to the aftermarket radio: • Connect the Orange wire to the illumination wire. (If the aftermarket radio has •...
-
Página 9: Touch Screen Instructions
99-7804B Touch Screen Instructions Initialization Personalization Menu Procedure The controls are as follows: When the interface first boots up, the then continue through the menus. The steering wheel controls for the OEM screen will show an Android (System Settings>Others>Select personalization menu will override the... - Página 10 99-7804B Touch Screen Instructions System Settings Camera Settings This menu option allows for a This menu allows you to turn the • Press and hold the LaneWatch background change on the clock, the LaneWatch camera on and off, change button for 50 seconds to begin the...
- Página 11 99-7804B...
- Página 12 Log onto www.installerinstitute.com or call 800-354-6782 for more information and take steps toward a better tomorrow. Metra recommends MECP certified technicians METRA. The World’s best kits. 1-800-221-0932 metraonline.com ™ © COPYRIGHT 2015 METRA ELECTRONICS CORPORATION...
-
Página 13: Honda Accord 2013 Y Mas
INSTRUCCIONES DE INSTALACIÓN PARA LA PIEZA 99-7804B Indice Honda Accord 2013 y mas 99-7804B Desmontaje del tablero – Honda Accord 2013 y mas ........2-3 Ensamble del kit CaraCterístiCas del kit – Preparación kit ............. 4 • Provisión de radio ISO DIN con cavidad –... -
Página 14: Desmontaje Del Tablero
99-7804B Desmontaje del tablero 1. Desenganche y quite los paneles 3. Quite los (2) tornillos de 8 mm de moldura laterales a cada lado orientados boca arriba de la parte de la consola. (Figura A) inferior del chasís del radio en el interior de la cavidad. - Página 15 99-7804B Desmontaje del tablero 5. Quite los (2) tornillos Phillips que 7. Quite el (1) tornillo Phillips de están arriba del radio. (Figura E) cada rejilla de aire acondicionado y luego desenganche y quite las 6. Desenganche y quite el ensamble rejillas.
-
Página 16: Preparación Kit
99-7804B Preparación kit 1. Una el interruptor de las luces intermitentes al panel de la moldura del radio usando (2) de los tornillos Phillips suministrados #8 x 3/8”. (Figura A) 2. Coloque los (6) ganchos blancos del panel en el panel de la moldura de la carcasa del radio. -
Página 17: Ensamble Del Kit
Metra recomienda panel de la moldura de la carcasa que use adaptadores adecuados del radio usando (4) de los tornillos de acoplamiento de Metra y/o de Phillips suministrados #6 x 3/8”. AXXESS. (Figura A) 7. Monte el conjunto del radio en el 2. - Página 18 99-7804B Kit Assembly Provisiones de unidad central 5. Localice el arnés de cables ISO DDIN. de fábrica en el tablero. Siga la sección de cableado e 1. Coloque los soportes del radio en el inicialización de este manual antes panel de la moldura de la carcasa de terminar la instalación.
-
Página 19: Instrucciones De Conexiones De Cables
99-7804B Instrucciones de conexiones de cables Arneses incluidos: Conexiones que se deben hacer • Conector Honda gris de 24 pins al conector de interfase negro de 14 pins con Desde el conector Honda gris de 24 pins al radio de mercado secundario: arnés ASWC-1 negro de 12 pins precableado. - Página 20 99-7804B Instrucciones de conexiones de cables Conexiones que se deben hacer Si está equipado con subwoofer de fábrica: Desde el conector negro de 14 pins al radio de mercado secundario: Desde el conector Honda gris de 8 pins al radio de mercado secundario: •...
-
Página 21: Inicialización
99-7804B Tocar las instrucciones en pantalla Inicialización Procedimiento del menú de personalización Cuando se enciende la interfase, personalización, luego continúe Los controles en el volante para el Los controles son los siguientes: la pantalla original mostrará una pasando por los menús. (Ajustes menú... - Página 22 99-7804B Tocar las instrucciones en pantalla Ajustes del sistema Ajustes de la cámara Esta opción del menú permite cambiar • Presione y sostenga el botón Este menú le permite encender y el fondo del reloj, ajustar el reloj y LaneWatch durante 50 segundos apagar la cámara de mantenimiento...
- Página 23 99-7804B...
- Página 24 INSTRUCCIONES DE INSTALACIÓN PARA LA PIEZA 99-7804B EL CONOCIMIENTO ES PODER NOWLEDGE IS OWER Mejore sus habilidades de instalación y fabricación Enhance your installation and fabrication skills by inscribiéndose en la escuela de dispositivos electrónicos enrolling in the most recognized and respected mobile electronics school in our industry.