
Resumen de contenidos para impact AG139
- Página 1 AG139 Accelerated Polishing Machine Impact Test Equipment Ltd www.impact-test.co.uk & www.impact-test.com User Guide User Guide...
- Página 2 Impact Test Equipment Ltd. Building 21 Stevenston Ind. Est. Stevenston Ayrshire KA20 3LR T: 01294 602626 F: 01294 461168 E: sales@impact-test.co.uk Test Equipment Web Site www.impact-test.co.uk Test Sieves & Accessories Web Site www.impact-test.com...
-
Página 3: Tabla De Contenido
Contents Contents........................1 SAFETY NOTICE....................... 2 GENERAL SAFEGUARDS..................2 ELECTRICAL SAFEGUARDS................... 2 PERSONAL SAFEGUARDS..................3 CLEANING......................... 3 TRANSIT TY WRAPS ....................3 Function ........................4 Machine Features ...................... 5 INSTALLATION AND LEVELLING..............6 ELECTRICAL INSTALLATION................7 PREPARING SPECIMENS................. 8 MOUNTING SPECIMENS ON THE ROAD WHEEL. -
Página 4: Safety Notice
SAFETY NOTICE WARNING DO NOT CONNECT THE ACCELERATED POLISHING MACHINE TO ELECTRICAL POWER UNTIL YOU HAVE READ THESE INSTRUCTIONS COMPLETELY. KEEP THESE INSTRUCTIONS IN A CONVENIENT LOCATION FOR FUTURE REFERENCE. TO GUARD AGAINST INJURY, THE FOLLOWING BASIC SAFETY PRECAUTIONS MUST BE OBSERVED IN THE USE OF THIS PRODUCT. -
Página 5: Personal Safeguards
PERSONAL SAFEGUARDS. • Do not tamper with the machine whilst it is operating. • Care must be taken when removing / replacing the Road Wheel. It is heavy. • Loose clothing must be properly secured. • Suitable personal protective clothing should be worn when operating or cleaning the machine, e.g. -
Página 6: Function
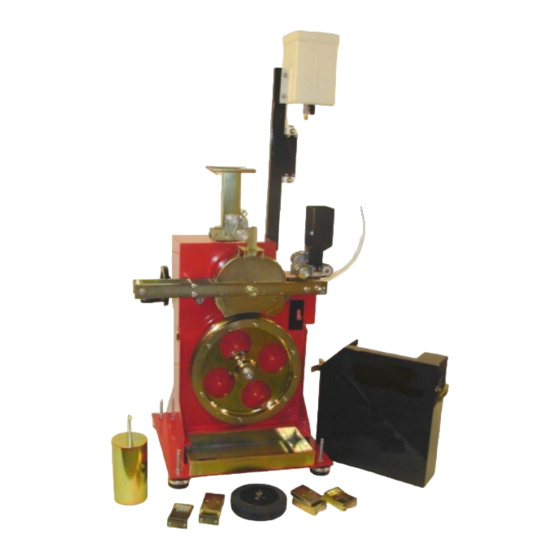
Function The function of the Accelerated Polishing Machine is to produce polished stone samples of aggregates used in road surfaces, to simulate actual road conditions. The samples produced form an integral part of the Polished Stone Value (PSV) Test. The PSV Test is a friction test that calculates a measure of resistance to skidding, performed using a Skid Resistance Tester. -
Página 7: Machine Features
Machine Features • Heavy welded steel mainframe, standing on adjustable anti-vibration mounts. • A steel main spindle running in sealed ball bearings, protected by a labyrinth seal. (The spindle is axially loaded to eliminate end-play). • 3Ø motor with speed control and an adjustable timing belt drive. •... -
Página 8: Installation And Levelling
INSTALLATION AND LEVELLING. On receipt. Inspect the unit for any damage incurred during transit. Check the loose components against the Packing List below. Item Operating Instructions Specimen Moulds Mould Plates Flour Spreader Feeder Unit (Corn Emery) Feeder Unit (Flour Emery) Water Tower &... -
Página 9: Electrical Installation
tyre will tend to take up a distinct track at some position across the running face of the tyre. The object of this levelling procedure is to ensure that this track is centrally disposed across the tyre. Check that the Corn Emery Tyred Wheel is fitted to the Pivoted Arm, and that this arm is lifted clear of the Road Wheel by turning the Handwheel (situated behind the weight), fully clockwise. -
Página 10: Preparing Specimens
On depressing the START button, the “eye” will glow brightly. An unlit “eye”, indicates that the machine has either “timed out” or the safety cover isn’t fitted. PREPARING SPECIMENS. Sand, Cement, and Mortar Specimens are now considered obsolete. Resin Specimens - It is essential to retain the Metal Backing Plate firmly clamped to the mould until the resin has completely cured. -
Página 11: Water Feed
WATER FEED. Remove the Water Tank Lid and fill the tank to a level so that the water is approximately 25mm from the tank lip. Refit the Water Tank lid and ensure that it is secure. Open the valve on the tank outlet and adjust the knurled knob at the base of the flowmeter to the required flow. -
Página 12: Flour Emery Feed
On completion of the timed run, raise the pivoted arm clear of the Road Wheel. Disconnect the machine from the supply voltage. Release the safety cover and remove the Road Wheel from the machine. Thoroughly clean out the spent abrasives. It is essential to clean the feeder thoroughly at the end of each run. -
Página 13: General Conditions
safety cover and remove the Road Wheel from the machine. Thoroughly clean out the spent abrasives. It is essential to clean the feeder thoroughly at the end of each run. GENERAL CONDITIONS. These operating conditions are complementary to BS812 Pt.114 & BS EN 1097-8:2000 or ASTM E303. - Página 14 there is no need to reset the Timer to continue the test. The machine can be restarted with the Start/Stop Switch in the normal manner. The machine will continue its test until the pre-set time is reached. The Feeder Units must be set with a gap between the bottom of the Hopper and the surface of the belt to allow free rotation.
-
Página 15: Timer Setting / Adjustment
10. TIMER SETTING / ADJUSTMENT. 10.1 To set / adjust the timer Press Red Button (Reset). Press P (Program button). Press the horizontal arrow key to select required digit. Displayed in the format ‘hh.mm.ss’. Press the vertical arrow key to select required number. Repeat ‘c’... - Página 16 - 14 -...
-
Página 17: System Diagram
System Diagram PROXIMITY SWITCH MAINS IN CONTROL UNIT CONTROL MAINS MAGNETIC SWITCH INVERTER FEEDERS CONTROL INTERCONNECTION MOTOR MAINS MOTOR - 15 -... -
Página 18: Fault Diagnosis
FAULT DIAGNOSIS PROBLEM CAUSE SOLUTION Machine will not start No power 1. Check supply fuse 2. Check 10A fuse in Control Unit Stop/Start not Fit/Refit safety cover. illuminated Reset timer or set timer Timer not set/reset as per paragraph 10 or timed out No displays 24V supply failure... -
Página 19: Supply And Replacements Parts
SUPPLY AND REPLACEMENTS PARTS. 1. AGGREGATE SUPPLIES DESCRIPTION SUPPLY QUANTITY Control Stone 25Kg Bag Criggion Stone 25Kg Bag Corn Emery 25Kg Bag Flour Emery 25Kg Bag † Leighton Buzzard Sand 25Kg Tub † Special Order Only. 2. REPLACEMENT PARTS DESCRIPTION Specimen Mould Specimen Mould Plate Tyred Wheel... -
Página 20: Psv Tests - Product Range
PSV TESTS - PRODUCT RANGE In accordance with BS EN 1097-8:2000, to determine the PSV it is necessary to use the Skid Resistance Tester & Base Plate. Skid Resistance Tester Introduction The Skid Resistance Tester was originally developed by the Transport Research Laboratory (TRL) to study the problems in design and maintenance of public highways. -
Página 21: Physical Data (Boxed)
Physical Data (Boxed) Width 70 cms Depth 30 cms Height 70 cms Volume 0.15 cu meters Weight 31 Kg Standard Accessories Carrying Case - Sturdy case with dense foam inserts giving excellent protection. ‘F’ Scale - Built in, for use with small slider set for 76mm-slide length. Set of 6 Sliders - Certificate included. -
Página 22: Aggregate Abrasion Machine
AGGREGATE ABRASION MACHINE Introduction Inadequate abrasion resistance of road surfacing aggregates means an early loss of the texture depth required to maintain high speed skidding resistance. The Aggregate Abrasion Machine provides engineers with a medium to test and measure the resistance of aggregate to surface wear by abrasion. The Aggregate Abrasion Value (AAV). -
Página 23: Ec Declaration Of Conformity
BS EN 1097-8:2000 the official English Language version of EN 1097-8:1999 Tests for mechanical and physical properties of aggregates- part 8: determination of polished stone value. Signed Name. Date Duly authorised to sign on and behalf of Impact Test Equipment Ltd, - 21 -... -
Página 24: Appendix A Controller Programming (Multi-Language)
Appendix A Controller Programming (multi-language) Impact Test Equipment Ltd www.impact-test.co.uk & www.impact-test.com... - Página 25 CODIX 907 R.60352.0009 - Index B PROGRAMMIERUNG DEUTSCH / PROGRAMMING ENGLISH Tasten / Keys Anschlussbelegung / Connections START Durch drücken der beiden Tasten P + R (>3 sec) starten Sie die Programmierung / Pressing Aktueller Zählwert / Current count value -- 3 s -- Sensorversorgungsausgang / Sensor supply voltage the two buttons P + R (>3 sec) starts the...
- Página 26 CODIX 907 R.60352.0009 - Index B PROGRAMMATION FRANCAIS / PROGRAMACIÓN ESPANOL START Touches / Teclas Raccordement / Conexiones Presser les deux touches P + R (>3 sec) pour lancer la programmation / Pulsar las dos Comptage courant / Conteo en curso -- 3 s -- Sortie d'alimentation capteur / Salida de alimentación sensor teclas P + R (>3 segundos) para iniciar la...
- Página 27 CODIX 907 R.63352.0009 - Index B PROGRAMMAZIONE ITALIANO START Tasti Collegamento Premere i due tasti P + R (>3 sec) per iniziare Conteggio corrente la programmazione -- 3 s -- Uscita d'alimentazione per un sensore Valore di preselezione [AC: 24 VDC/50 mA; DC: Ub passante ProG Indicatore della preselezione visualizzata in 9 GND (0 VDC) Connessione comune per gli ingressi di segnale e di...
- Página 28 R.63352.0009 - Index B Codix 907 Codix 907 Codix 907 Codix 907 Codix 907 DEUTSCH ENGLISH FRANÇAIS ESPAÑOL ITALIANO Vorwort Preface Introduction Introducción Introduzione Lesen Sie vor der Montage und der Inbetriebnahme diese Be- Please read this instruction manual entirely and carefully be- Lisez entièrement et attentivement ces instructions d’utilisa- Antes del montaje y de la puesta en servicio, lea completa y Prima di procedere al montaggio ed alla messa in funzione,...