Tabla de contenido
Publicidad
Enlaces rápidos
sauder.com
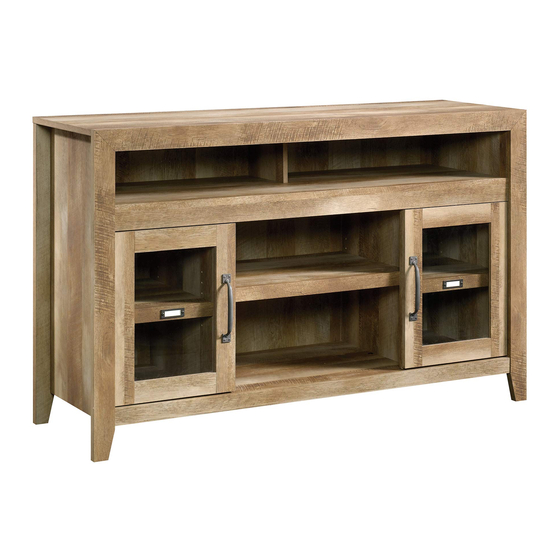
Entertainment/Fireplace Credenza
Dakota Pass Collection | 419119
Need help? Visit Sauder.com to view video assembly tips or chat with a live rep.
Prefer the phone? Call 1-800-523-3987.
Share your journey!
Designed for
distractions.
NOTE: THIS INSTRUCTION
BOOKLET CONTAINS IMPORTANT
SAFETY INFORMATION.
PLEASE READ AND KEEP FOR
FUTURE REFERENCE.
English pg 1-27
Français pg 28-31
Español pg 32-35
Lot # 373421
08/05/15
Purchased: __________________
Be sure to give us a ring before
making any returns. 1-800-523-3987
Publicidad
Tabla de contenido

Manuales relacionados para Sauder 419119


Resumen de contenidos para Sauder 419119
- Página 1 Dakota Pass Collection | 419119 NOTE: THIS INSTRUCTION BOOKLET CONTAINS IMPORTANT SAFETY INFORMATION. Need help? Visit Sauder.com to view video assembly tips or chat with a live rep. PLEASE READ AND KEEP FOR FUTURE REFERENCE. Prefer the phone? Call 1-800-523-3987.
- Página 2 • Check the size and weight of your TV. Compare it to the diagram below – before you begin assembly! • This Sauder unit is designed for use with televisions weighing less than 95 pounds. Never use with a TV that weighs more.
-
Página 3: Part Identifi Cation
SHELF MOLDING (1) LARGE ADJUSTABLE LARGE ADJUSTABLE SHELF MOLDING (1) SHELF MOLDING (1) RIGHT ADJUSTABLE RIGHT ADJUSTABLE SHELF MOLDING (1) SHELF MOLDING (1) LEFT ADJUSTABLE LEFT ADJUSTABLE SHELF MOLDING (1) SHELF MOLDING (1) MOLDING (2) MOLDING (2) www.sauder.com/services 419119 Page 3... - Página 4 BLACK 9/16" LARGE HEAD SCREW - 39 BLACK 1-7/8" FLAT HEAD SCREW - 6 BLACK 1/2" FLAT HEAD SCREW - 8 15S SILVER 5/8" MACHINE SCREW - 4 BLACK 2-1/4" FLAT HEAD SCREW - 8 SILVER 3/8" MACHINE SCREW - 4 Page 4 419119 www.sauder.com/services...
- Página 5 DOWELS into these edges. Arrow Hole Arrow The arrow in the HIDDEN CAM must point toward the hole in the edge of the board. Arrow Insert the metal end of the CAM DOWEL into the HIDDEN CAM. www.sauder.com/services 419119 Page 5...
- Página 6 Turn fourteen CAM SCREWS (8F) into the LEGS (O and P) å and TOP MOLDING (R). Tap two MOLDING CONNECTORS (17F) into the notches å in the TOP MOLDING (R). Flat end (14 used) Flat end Page 6 419119 www.sauder.com/services...
- Página 7 Step 3 Fasten the TOP MOLDING (R) to the TOP (F). Tighten six å HIDDEN CAMS. Short fl at edge www.sauder.com/services 419119 Page 7...
- Página 8 Righty tighty. Lefty loosey. BLACK 2-1/4" FLAT HEAD SCREW (8 used in this step) These surfaces should be even. Long edge with HIDDEN CAMS These surfaces should be even. Angled edge Long edge with HIDDEN CAMS Page 8 419119 www.sauder.com/services...
- Página 9 Tighten Risk of damage or Arrow injury. HIDDEN CAMS must be completely Arrow Maximum tightened. HIDDEN 210 degrees CAMS that are not completely tightened may loosen, and parts may separate. To Minimum completely tighten: 190 degrees www.sauder.com/services 419119 Page 9...
- Página 10 Notched edge Slide the SHELF MOLDING (T) onto the notched edge. S u r f a c H I D D E N i t h BLACK 1-7/8" FLAT HEAD SCREW (2 used in this step) Page 10 419119 www.sauder.com/services...
- Página 11 Minimum 190 degrees Notched edge i t h o f a c S u r D E N H I D i t h f a c S u r D E N H I D www.sauder.com/services 419119 Page 11...
- Página 12 Slide the MOLDINGS* (X) onto the notched edges of the å UPRIGHTS (C and D). *U.S. Patent No. 5,499,886 å Notched edge Slide the MOLDING (X) onto the notched edge. Slide the MOLDING (X) onto the notched edge. Page 12 419119 www.sauder.com/services...
- Página 13 Notched edge S u r f a c H I D D E N i t h BLACK 1-7/8" FLAT HEAD SCREW (4 used in this step) Slide the BOTTOM MOLDING (S) onto the notched edge. www.sauder.com/services 419119 Page 13...
- Página 14 Step 10 Fasten the RIGHT END (A) to the TOP (F), BOTTOM (G), å and SHELF (H). Tighten six HIDDEN CAMS. Maximum Arrow 210 degrees Minimum 190 degrees Long edge with HIDDEN CAMS Page 14 419119 www.sauder.com/services...
- Página 15 NOTE: Be sure the MOLDING CONNECTORS in the TOP å your drink. MOLDING (R) insert into the notches in the LEGS (O and P). You may need to gently tap them in with your hammer. Angled edge www.sauder.com/services 419119 Page 15...
-
Página 16: Important
Carefully cut out the holes needed. BLACK 9/16" LARGE HEAD SCREW (28 used for the CENTER BACK) The large hole on the UPPER BACK (I) must be here. The large holes on the BACKS (K) must be here. Page 16 419119 www.sauder.com/services... - Página 17 Use eight BLACK 9/16" LARGE HEAD SCREWS (1S). NOTE: Adjustments to the ADJUSTABLE FEET will be å made in Step 14 once your unit is standing upright. BLACK 9/16" LARGE HEAD SCREW (8 used in this step) www.sauder.com/services 419119 Page 17...
- Página 18 IMPORTANT: The ADJUSTABLE FOOT should not extend å beyond the bottom edges of the LEGS (O, P, and Q). With your No. 2 Phillips Screwdriver, turn the ADJUSTABLE FOOT downward until it touches the fl oor. Floor Page 18 419119 www.sauder.com/services...
- Página 19 Step 15 Fasten two HINGES (14H) to each DOOR (L). Use eight å BLACK 1/2" FLAT HEAD SCREWS (11S). BLACK 1/2” FLAT HEAD SCREW (8 used in this step) www.sauder.com/services 419119 Page 19...
- Página 20 DOOR (L) where they come in contact with the MOLDING (X) when closed. Repeat this step for the other DOOR (L). å See the next step for DOOR adjustments. å SILVER 3/8" MACHINE SCREW (4 used in this step) Page 20 419119 www.sauder.com/services...
- Página 21 To adjust the DOORS in or out (depth), loosen the mounting å screw one turn and move the DOORS in or out, as needed. Mounting screw (depth) Tighten the mounting screw after making adjustments. Adjusting screw (horizontal) (vertical adjustment) www.sauder.com/services 419119 Page 21...
- Página 22 Step 20 now. If inserting the 418738 Electric Fireplace Converter Kit, continue with next step. 4 1 8 7 3 8 If inserting the LARGE ADJUSTABLE SHELF (M), go to Step 20 now. Page 22 419119 www.sauder.com/services...
- Página 23 BLACK 9/16" LARGE HEAD SCREW (3 used in this step) 7 3 8 4 1 8 www.sauder.com/services 419119 Page 23...
- Página 24 This ADJUSTABLE SHELF (N) will now be called the RIGHT ADJUSTABLE SHELF. Notched edge Slide the RIGHT ADJUSTABLE SHELF MOLDING (V) onto Open end the notched edge. SILVER 5/8" MACHINE SCREW (4 used in this step) Page 24 419119 www.sauder.com/services...
- Página 25 å onto the notched edge of the LARGE ADJUSTABLE Almost time to SHELF (M). celebrate! With a nap. *U.S. Patent No. 5,499,886 å Notched edge Slide the LARGE ADJUSTABLE SHELF MOLDING (U) onto the notched edge. www.sauder.com/services 419119 Page 25...
- Página 26 ADJUSTABLE SHELVES (M and N) onto the METAL PINS. Separate a CARD from the CARD SHEET (38M) and insert å into each CARD HOLDER on the ADJUSTABLE SHELF MOLDINGS (V and W). (12 used) (2 used) Page 26 419119 www.sauder.com/services...
- Página 27 - The TV must weigh less than 95 lbs. - The base of the TV must be able to sit completely on this shelf. 95 lbs. 15 lbs. 30 lbs. 20 lbs. 15 lbs. 60 lbs. total (6 used) To cover HIDDEN CAMS www.sauder.com/services 419119 Page 27...
-
Página 28: Liste De Pièces
EXTRÉMITÉ DROITE ..........1 34E PIED RÉGLABLE ............2 pour future référence. EXTRÉMITÉ GAUCHE ..........1 EXCENTRIQUE ESCAMOTABLE ....30 Pour contacter Sauder MONTANT DROIT ............1 CHEVILLE D'EXCENTRIQUE ......16 en ce qui concerne cet MONTANT GAUCHE ..........1 VIS D'EXCENTRIQUE ..........14 élément, faire référence... - Página 29 ! PETIT MONTANT (E) dans les trous du DESSUS (F). • Cette unité Sauder est conçue pour les téléviseurs pesant moins Attention: Risque des dégâts ou blessures. Les Excentriques Escamotables de 43 kg. Ne jamais utiliser avec des téléviseurs plus lourds.
- Página 30 IMPORTANT : Le PIED RÉGLABLE ne doit pas dépasser les chants inférieurs des PIEDS (O, P et Q). ÉTAPE 15 Fixer deux CHARNIÈRES (14H) à chaque PORTE (L). Utiliser huit VIS TÊTE PLATE 13 mm NOIRES (11S). Page 30 419119 www.sauder.com/services...
- Página 31 16 mm ARGENT (15S). * Brevet État Unis n° 5,499,886 ÉTAPE 21 Enfi ler la MOULURE DE LA GRANDE TABLETTE RÉGLABLE* (U) sur le chant cranté de la GRANDE TABLETTE RÉGLABLE (M). * Brevet État Unis n° 5,499,886 www.sauder.com/services 419119 Page 31...
-
Página 32: Credencia De Entretenimiento / Chimenea
EXTREMO IZQUIERDO ..........1 EXCÉNTRICO ESCONDIDO ......30 pour future référence. PARAL DERECHO ............1 PASADOR DE EXCÉNTRICO ......16 Pour contacter Sauder PARAL IZQUIERDO .............1 BIELA DE EXCÉNTRICO ........14 en ce qui concerne cet PARAL PEQUEÑO ............1 17F CONECTOR DE MOLDURA ........2 élément, faire référence... - Página 33 - antes de comenzar el ensamblaje! PEQUEÑO (E) dentro de los agujeros del PANEL SUPERIOR (F). • Esta unidad Sauder está diseñada para ser usada con Precaución: Riesgo de daños o heridas. Los Excéntricos Escondidos deben televisores cuyo peso sea inferior a 43 Kg. Nunca la use para un apretarse completamente.
-
Página 34: Importante
La PATA AJUSTABLE no debe extenderse más allá de los bordes inferiores de las PATAS (O, P y Q). PASO 15 Fije dos BISAGRAS (14H) a cada PUERTA (L). Utilice ocho TORNILLOS NEGROS DE CABEZA PERDIDA de 13 mm (11S). Page 34 419119 www.sauder.com/services... - Página 35 PLATEADOS PARA METAL de 16 mm (15S). *Patente EE. UU. No. 5,499,886 PASO 21 Deslice una MOLDURA DEL ESTANTE AJUSTABLE GRANDE* (U) sobre el borde con muesca del ESTANTE AJUSTABLE GRANDE (M). *Patente EE. UU. No. 5,499,886 www.sauder.com/services 419119 Page 35...
- Página 36 • Physical injury. Furniture can be very heavy. • Do not push furniture, especially on a carpeted fl oor. Have a friend help you lift the item and set it in place. Page 36 419119 www.sauder.com/services...
- Página 37 équipé. • Blessure physique. Le mobilier peut être très lourd. • Ne pas pousser le mobilier, surtout sur la moquette. Se faire aider par une autre personne pour soulever l’élément et le mettre en place. www.sauder.com/services 419119 Page 37...
- Página 38 • Lesión física. El mobiliario puede ser • No empuje la unidad, especialmente muy pesado. sobre un piso alfombrado. Pide la ayuda de otra persona en levantar la unidad y colocarla en lugar. Page 38 419119 www.sauder.com/services...
-
Página 39: Garantie Limitée De 5 Ans
GARANTIE LIMITÉE DE 5 ANS 1. Sauder Woodworking Co. (Sauder®) off re une couverture de garantie limitée à l’ a cheteur 4. La présente garantie ne s’ a pplique qu’ a ux défauts garantis qui se produisent pour initial du présent produit pendant une période de cinq ans à... - Página 40 Dear Valued Customer: So, how did it go? Thanks so much for choosing Sauder® furniture. I hope the Set a world record for speed? purchase and assembly process was a positive experience Feeling good about yourself? and you feel good about the furniture you just built. If you Nice.