Tabla de contenido
Publicidad
Idiomas disponibles
Idiomas disponibles
Enlaces rápidos
PLUG & PLAY
VM220
KIT DAB+ UNIVERSALE
DAB + UNIVERSAL KIT
ALFA Giulietta con piattaforma uconnect 15>, CITROEN DS3 2010>, DACIA con radio senza monitor 2012>,
FIAT 500 con piattaforma Uconnect, 500L 2016>, Punto Evo 2012>, FORD C-Max >2011, Fiesta 2010>2018
KIA C'eed 2012>, Sportage 2015>, NISSAN Quashqai senza navigatore 2015>, Juke 2014>2019,
PEUGEOT 208, RENAULT Captur senza monitor 2013>2017, Clio senza monitor 2013>2017,
TOYOTA Auris 2012>2018, Rav4 2015>2019, SKODA Octavia 2013>2019, VOLKSWAGEN Golf VII, Tiguan 2017
Istruzioni di montaggio
IT
Installation instructions
EN
Notices d'installation
FR
Bedienungsanleitungen
DE
Instrucciones de montaje
ES
09/2020
Publicidad
Tabla de contenido

Manuales relacionados para Phonocar PLUG & PLAY VM220


Resumen de contenidos para Phonocar PLUG & PLAY VM220
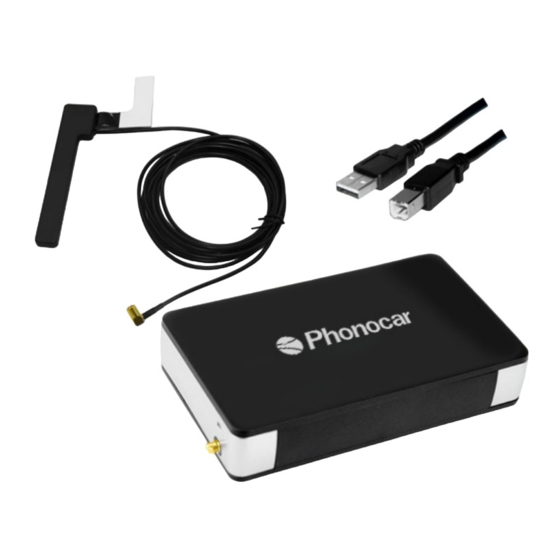
- Página 1 PLUG & PLAY VM220 KIT DAB+ UNIVERSALE DAB + UNIVERSAL KIT ALFA Giulietta con piattaforma uconnect 15>, CITROEN DS3 2010>, DACIA con radio senza monitor 2012>, FIAT 500 con piattaforma Uconnect, 500L 2016>, Punto Evo 2012>, FORD C-Max >2011, Fiesta 2010>2018 KIA C’eed 2012>, Sportage 2015>, NISSAN Quashqai senza navigatore 2015>, Juke 2014>2019, PEUGEOT 208, RENAULT Captur senza monitor 2013>2017, Clio senza monitor 2013>2017, TOYOTA Auris 2012>2018, Rav4 2015>2019, SKODA Octavia 2013>2019, VOLKSWAGEN Golf VII, Tiguan 2017...
-
Página 2: Caratteristiche Tecniche
La superficie di installazione prescelta deve essere priva di umidità e al riparo da fonti di calore. Assicurarsi che durante l’installazione vengano utilizzati gli strumenti corretti per evitare danni al veicolo o prodotto. Phonocar declina ogni responsabilità derivante dall’installazione di questo prodotto. -
Página 3: Installazione Dell'antenna
Installazione dell’antenna Importante: Installare l’interfaccia servendosi ESCLUSIVAMENTE dell’antenna in dotazione. Nota : si consiglia di posizionare l’antenna a 3/4 del parabrezza (dal basso verso l’alto) e lontano da tutti gli elementi soggetti a surriscaldamento, per un’installazione sicura. La posizione ottimale del segnale varia da veicolo a veicolo. Schema di collegamento 1) Interfaccia RF 2) Antenna amplificata... - Página 4 Impostazioni 1. Collegare l’interfaccia al veicolo come indicato nello schema di collegamento a pagina 2. Per un funzionamento corretto dell’interfaccia, effettuare i collegamenti alla porta USB di serie del veicolo e all’antenna amplificata 2. Installare l’antenna fornita in dotazione all’interno del veicolo, come indicato nello schema “Installazione dell’anten- na”...
- Página 5 Schema dei menù Per accedere ai menu dell’interfaccia, passare alla sorgente USB e selezionare ‘Browse’ (sfoglia). Si aprirà una serie di cartelle sfogliabili tramite i comandi al volante di serie, il touchscreen o i pulsanti della centralina di serie. Nota: Se il dispositivo è...
-
Página 6: Features & Benefits
Please ensure that the correct tools are using during the installation to avoid damage to the vehicle or product. Phonocar Spa can not be held responsible for the installation of this product. -
Página 7: Antenna Installation
Antenna installation Important: Only install the AutoDAB USB using the included antenna. Note: We recommend placing the antenna 3/4 of the way up the windscreen and away from all heating ele- ments to ensure a reliable installation. Optimal location for signal will vary from vehicle to vehicle. Connection diagram 1) AutoDAB RF Interface 2) Amplified Antenna... -
Página 8: Adjusting Settings
Set up 1. Connect the interface to the vehicle as outlined in the Connection Diagram on Page 2. Connections must be made to the vehicle’s OEM USB port and to the amplified antenna in order for the interface to function correctly. 2. -
Página 9: Configuration
Menu tree To enter the AutoDAB USB Interface menus, change the source to USB and select ‘Browse’. This will then open a series of folders that can be navigated through using the OEM steering wheel controls or via the OEM head unit touchscreen or buttons. -
Página 10: Caractéristiques Techniques
La surface d’installation choisie doit être dépourvue d’humidité et à l’abri des sources de chaleur. Assurez-vous d’utiliser pendant l’installation les accessoires correctes afin d’éviter d’endommager le véhicule ou le produit. Phonocar décline toute responsabilité dérivant de l’installation de ce produit. -
Página 11: Installation De L'antenne
Installation de l’antenne Important : Installez l’interface en utilisant UNIQUEMENT l’antenne fournie. Remarque : il est recommandé d’installer l’antenne aux 3/4 de la pare-brise (du bas vers le haut) et à l’abri de tous les éléments susceptibles de surchauffer, pour une installation plus fiable. La position optimale du signal varie d’un véhicule à... -
Página 12: Conseil D'utilisation
Réglages 1. Branchez l’interface au véhicule comme indiqué dans le schéma de branchement à la page 2. Pour le bon fonctionnement du produit, effectuez les branchements sur le port USB d’origine du véhicule et à l’anten- ne amplifiée. 2. Installez l’antenne fournie à l’intérieur du véhicule comme indiqué dans le schéma “Installation de l’antenne”. N.B.: Installez le VM220 en utilisant uniquement l’antenne fournie. - Página 13 Schéma des menus Pour accéder aux menus de l’interface, allez à la source USB et sélectionnez “Browse”. Une série de dossiers s’ouvriront et pourront être consultés à travers les commandes au volant, l’écran tactile ou les boutons de l’interface d’origine. Remarque: Si l’appareil est branché...
-
Página 14: Technische Merkmale
Die gewählte Installationsfläche muss frei von Feuchtigkeit und geschützt vor Wärmequellen sein. Stellen Sie sicher, dass bei der Installation die richtigen Werkzeuge verwendet werden, um Schäden am Fahrzeug oder Produkt zu vermeiden. Phonocar lehnt jegliche Haftung ab, die sich aus der Installation dieses Produkts ergibt. - Página 15 Antennen-Installation Wichtig: Installieren Sie das Interface NUR mit der mitgelieferten Antenne. Hinweis: Für eine sichere Installation wird empfohlen, die Antenne an 3/4 der Windschutzscheibe (von unten nach oben) und entfernt von allen Elementen, die einer Überhitzung ausgesetzt sind, zu positionieren Die optimale Signalposition variiert von Fahrzeug zu Fahrzeug.
- Página 16 Einstellungen 1. Schließen Sie das Interface wie im Anschlussplan auf Seite 2 dargestellt an das Fahrzeug an. Für den ordnungsgemäßen Betrieb des Produkts müssen die Anschlüsse zum Standard-USB-Anschluss des Fahrzeugs und zur verstärkten Antenne hergestellt werden. 2. Installieren Sie die mitgelieferte Antenne innerhalb des Fahrzeugs wie im Diagramm “Antenneninstallation” darge- stellt.
-
Página 17: Konfiguration
Menüplan Um auf die Menüs des Interface zuzugreifen, wechseln Sie zur USB-Quelle und wählen Sie ‘Durchsuchen’. Es öffnen sich eine Reihe von Ordnern, die durch die Original- Lenkradbedienelemente, -Touchscreen oder -Tasten des Interface durchsucht werden können. Anmerkung: Wenn das Gerät an einen PC angeschlossen ist, wird das Interface als Wechseldatenträger erkannt. Um auf die Einstellungen zuzugreifen, klicken Sie einfach auf das Gerät, öffnen Sie es und navigieren Sie durch die Ordner. -
Página 18: Características Técnicas
La superficie de instalación elegida debe estar libre de humedad y lejos de fuentes de calor. Asegúrese de utilizar las herramientas correctas para la instalacion, para evitar daños al vehículo o al producto. Phonocar declina cualquier responsabilidad derivada de la instalación de este producto. -
Página 19: Instalación De La Antena
Instalación de la antena Importante: instale el interfaces usando EXCLUSIVAMENTE la antena suministrada. Nota: se recomienda colocar la antena a 3/4 del parabrisas (de abajo hacia arriba) y lejos de todos los elemen- tos sujetos a calentamiento, para una instalación segura. La posición óptima de la señal varía de un vehículo a otro. -
Página 20: Modificar La Configuración
Ajustes 1. Conectar el interfaces al vehículo como se indica en el esquema de conexión en la página 2. Para realizar una insta- lacion correcta del interfaces, conecte la USB a la toma USB de serie del vehículo y la antena amplificada 2. -
Página 21: Esquema De Los Menú
Esquema de los menú: Para acceder a los menús del interfaces, desplazarse a la fuente USB y seleccionar ‘Browse’. se abrirán una serie de carpetas a través de los controles del volante, la pantalla táctil o los botones de la centralita de serie. - Página 24 Phonocar S.p.A. Via F.lli Cervi, 167/C · 42124 Reggio Emilia (Italy) · Tel. +39 0522 941621 · Fax +39 0522 1602093 · info@phonocar.it...