
Resumen de contenidos para Nogueira PN-MASTER 3000
- Página 1 Forage Chopper - Picador de Forrajes PN-MASTER 3000 Instructions Manual Manual de Instrucciones...
- Página 3 This information is very important for identifying your machine when technical support or part replacement are needed. Nogueira S/A is always at your disposition, ready to answer any question, request for information, and supply efficient and permanent technical support.
-
Página 4: Tabla De Contenido
Guarantee certificate Guarantee control Note: 1- Nogueira máquinas aims its products to be constantly getting upgraded and improved in addition to having its own right to introduce changes in its components and accessories without prior notice. 2- Illustrations in this manual are merely illustrative. -
Página 5: Environmental Conservation
Environmental conservation Nogueira is continually concerned with the environmental conservation, in the development phase, as well in the utilization of processes and materials ecologically appropriate in its production and its products. PROTECT AND RESPECT THE ENVIRONMENT, remember that conservation is the social responsibility of everyone. -
Página 6: Safety
SAFETY INSTRUCTIONS safety of people involved in operating and performing maintenance procedures on the - The Forage Chopper PN-Master 3000 has Forage Chopper. During the course of been developed exclusively to chop forages to developing the design for this machine, we animal food. - Página 7 2- Pay attention to the types and quantities of lubricants recommended for diverse parts and components. When it is necessary to lift the machine outside of the box, use appropriate straps and fasten them to the adequate places. PN-MASTER 3000...
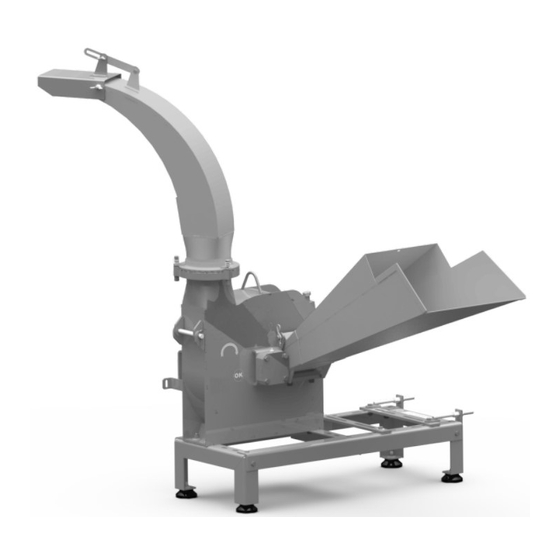
- Página 8 Apresentação da máquina 1- Feeding nozzle; 2- Rotary discharge tube; 3- Deflector; 4- Chopper (2 knifes); 5- Rack (to machine and driving motor); 6- Rubber cushions (4 units); 7- Pulley with two channel (1 unit). Instructions manual...
-
Página 9: Operation
OPERATION TECHNICAL SPECIFICATIONS Drive Electric motor The Forage Chopper PN-Master 3000 has Power of the motor 7,5 hp to 10 hp simple and efficient running. It is designed to (5,5 to 7,5 kW) chop corn, sugar cane, sorghum, elephant Work speed 2.400 rpm to 2.600 rpm... -
Página 10: Assembly And Adjustments Before Operating
ASSEMBLY AND ADJUSTMENTS BEFORE OPERATING Assembly of the detached parts The parts described below are delivered disassembled to facilitate the machine transport. Assemble it according next steps: Feeding nozzle (1) Install the feeding nozzle (1) according picture aside and fasten it through pin (1a) and cotterpin (2b), which are together with the detached items that follow the machine. - Página 11 NOTE: All the bolts, nuts and washers used in that assembly which follow the machine. Installing the Forage Chopper and motor on the rack Install the Forage Chopper on the rack (3) and fasten it with four bolts (4a) + plain washers and the nuts. PN-MASTER 3000...
- Página 12 Electric motor IMPORTANT: See required motor power on this manual. Install the motor on the rails (3c) and fasten it with the bolts (4b) + plain washers and nuts. c) Make the alignment between the motor’s pulley and the machine’s pulley (5), moving the motor according necessary.
- Página 13 NOTE: If necessary displace the motor moved. lengthwise (see arrows below) to assemble the belts. 1º b) Adjust the belt tightening according instructions on this manual. c) Install the shield (5a) and fasten it with four nuts (5b). 2º 3º PN-MASTER 3000...
-
Página 14: Forage Chopper Adjustments
Forage chopper adjustments When you operate the forage chopper, adjust the chute position (1) and the deflector (2) according next steps: Chute (1) Turn the chute manually according desired position. If necessary, release the nut (1a) to turn the chute easily. Then, retighten the nuts (1a) a little bit. -
Página 15: Step By Step Operation
NOTE: The new bundle must be placed over the previous one, so the machine has been more uniform amount of product coming in. That it will always do a uniform and on selected size cut. e) The forage jet will be thrown by the output chute (1). PN-MASTER 3000... -
Página 16: Maintenance Instructions
MAINTENANCE INSTRUCTIONS CHOPPER KNIVES SHARPENING Grease lubricating points This operation is more important on machine Lubricate each 8 work hours or daily the rear m a i n t e n a n c e , b e c a u s e a i m a t g o o d and frontal bearing chopper (see pictures performance and durability of the knives (1). -
Página 17: Important
Chamfer IMPORTANT: - Don’t cool hot knifes with water. It can cause lashing. - Do not sharpen the knife chamfered surface, but the cutting edge only. Maintain the cutting angle. PN-MASTER 3000... -
Página 18: Gap Adjustments Between Knife And Counter Knife
(6). IMPORTANT: It cannot have interference between the knives and counter-knife during the operation. Therefore, Nogueira recommends a minimum gap 0,05 to 0,15 mm. d) Check the gap through feeding nozzle (7), turning the impeller (4) manually and slowly. -
Página 19: Counter Knife
NOTE: Counter knife with rounded edge cause unlevel cut, product shredding and waste driving power. To disassemble the counter knife, remove the nuts (2). Thereafter the counter knife assembly check the play between the knives and impeller, according described on previous item. PN-MASTER 3000... -
Página 20: Belts Tension Adjustments And Replacements
Belts tension adjustment and replacements Check the belt tension (1) every 50 work hours or weekly. To do it: a) Remove front cover (5a) loosing the four nut (3 - two upper and two lower). b) Check the tension pressing the belts (1) at a point indicated on central point. -
Página 21: Forage Chopper Preservation
Check the bolts tightener of the impeller knifes; Remake painting in the points where needed; Lubricate the bearings of the chopper impeller; Very important: always keep the head in a dry place, protected from sun and rain. Without this care, there is no preservation. PN-MASTER 3000... -
Página 22: Guidelines For Calculation Of Pulleys And Rpm
Guidelines for calculation of pulleys and RPM See on this manual the speed ratio to operate the PN-Master 3000. To have different speeds in this zone. Its necessary change the pulleys combination, that is, use differents diameters. The formulas below will help you to discover which diameter is better to each pulley, according the desired speed. -
Página 23: Stickers Found On The Forage Chopper
Stickers found on the Forage Chopper PARA EVITAR RISCOS DE SOBRECARGA OU DANO AO MOTOR: PN-MASTER 3000 1 - ASSEGURE-SE QUE A CORRENTE ELÉTRICA ESTEJA NA VOLTAGEM CORRETA (110 OU 220V); 2 - EVITE SOBRECARREGAR A MÁQUINA; Rotação/Rotación/Speed..2400/2800 RPM 3 - MANTENHA A MÁQUINA GIRANDO LIVRE PARA LIMPEZA INTERNA POR 3 MINUTOS ANTES DE DESLIGÁ-LA COMPLETAMENTE;... -
Página 24: Detached Items That Come Along With The Machine
Detached items that come along with the machine Identification Especification Quantity Output chute 1 unit Feeding nozzle 1 unit Feeding nozzle pin 1 unit 2 units Assembled rack 1 unit Instructions manual... -
Página 25: Troubleshooting
Material put is excess inside of Supply the machine uniformly the feeding nozzle. and continuously without exaggeration. The belt is slipping. Belt very is loosen and/ or dirt Adjust the belt tension and clean of oil or grease. the belt. PN-MASTER 3000... -
Página 26: Technical Assistance
(1). 2- Whenever replacing parts, use always Nogueira Genuine spare parts. Only genuine spare parts are made according to the drawing, materials and specifications with rigid quality control. - Página 29 Sr. Propietario Felicitaciones por la adquisición del Picador de Forrajes PN-Master 3000 Nogueira. Un producto de la más alta calidad, especialmente desarrollado para atender a sus necesidades. Este manual contiene instrucciones de operación, mantenimiento y seguridad, que debidamente observadas, serán la garantía de buen funcionamiento y durabilidad de su Picador de Forrajes PN-Master 3000.
- Página 30 Certificado de garantía Control de garantía Notas: 1- Nogueira tiene como objetivo la constante actualización y perfeccionamiento de sus productos, reservándose el derecho de introducir modificaciones en sus componentes y accesorios sin aviso previo. 2- Las ilustraciones contenidas en este manual son meramente ilustrativas. Todas las instrucciones de seguridad deberán ser tenidas en cuenta para ambas configuraciones de...
-
Página 31: Medio Ambiente
Medio ambiente Nogueira tiene una preocupación constante por la preservación del medio ambiente, tanto en el desarrollo, como en la utilización de procesos y materiales ecológicamente apropiados en la producción de sus productos. PROTEJA Y RESPETE EL MEDIO AMBIENTE, recordando que su preservación es responsabilidad social de todos. -
Página 32: Seguridad
Seguridad Nosotros, de Nogueira, nos preocupamos por RECOMENDACIONES DE SEGURIDAD la seguridad de las personas involucradas en la operación y el mantenimiento del Picador de - El Picador de Forrajes fue desarrollado Forrajes. exclusivamente para picar forraje para En el desarrollo del proyecto, pensamos en alimentación animal. -
Página 33: Transporte Sobre Camión
á n d o l o s correctamente en los puntos correctos. PN-MASTER 3000... -
Página 34: Presentación De La Máquina
Presentación de la Máquina 1- Boquilla de alimentación; 2- Boquilla giratoria de salida; 3- Deflector; 4- Rotor picador (2 cuchillas); 5- Caballete (para la máquina y el motor de accionamiento); 6- Amortiguadores de goma (4 unidades); 7- Polea de 2 canales (1 unidad). Manual de Instrucciones... -
Página 35: Funcionamiento
FUNCIONAMIENTO ESPECIFICACIONES TÉCNICAS Acionamiento Motor eléctrico El Picador de forraje PN-Master 3000 posee un Potencia necesaria del motor 7,5 cv a 10 cv funcionamiento sencillo y eficaz. Elle ha sido (5,5 a 7,5 kW) desarrollada para picar maíz, caña de azucar, Rotación de trabajo... -
Página 36: Montajes Y Ajustes Antes De La Operación
MONTAJES Y AJUSTES ANTES DE LA OPERACIÓN Montaje de piezas sueltas Las piezas que se describen a continuación son entregadas desmontadas, para facilitar el transporte de la máquina. Realice el ensamble según la descripción: Boquilla de alimentación (1) Ensamble la boquilla de alimentación (1) según la figura al lado, fijándola con el perno (1a) y los dos pasadores (1b) que hacen parte de las piezas sueltas que acompañan la máquina. - Página 37 Montaje del picador y del motor sobre el máquina. caballete Coloque el picador sobre el caballete (3) y fíjelo con los 4 tornillos (4a), más arandelas lisas, más las tuercas que acompañan la máquina. PN-MASTER 3000...
- Página 38 Motor eléctrico IMPORTANTE: Vea la potencia necesaria del motor en este manual. Coloque el motor sobre los rieles deslizantes (3c) y fíjelo con los 4 tornillos (4b), más las arandelas, más las tuercas que acompañan la máquina. c) Realice la alineación entre la polea del motor (5) y la polea de la máquina (5d), desplazando el motor según la necesidad.
- Página 39 1º b) Realice el ajuste de tensión de las correas según las instrucciones en este manual. c) Vuelva a instalar la cubierta (5a) y fíjela con las 4 tuercas (5b). 2º 3º PN-MASTER 3000...
-
Página 40: Ajuste Del Picador
Ajuste del picador Antes de operar el picador, ajuste la posición de la boquilla de salida (1) y del deflector (2) según se describe a continuación: Boquilla (1) Gire manualmente la boquilla según la posición deseada, para la descarga del producto. Si necesario, afloje un poco las tuercas (1a) para permitir que la boquilla gire con más facilidad. -
Página 41: Operación Paso A Paso
De esta manera, el tamaño del material picado se mantendrá uniforme. e) El chorro de forraje será arrojado por la boquilla de salida (1). PN-MASTER 3000... -
Página 42: Instrucciones De Mantenimiento
INSTRUCCIONES DE AFILADO DE LAS CUCHILLAS DEL ROTOR PICADOR MANTENIMIENTO Puntos de lubricación con grasa Esta es la operación más importante en el mantenimiento de la máquina, pues mantiene el Lubrique a cada 8 horas de trabajo o buen desempeño y durabilidad de las cuchillas diariamente los cojinetes traseros y delantero (1). - Página 43 Bisel IMPORTANTE: No esfrie las cuchillas calientes con agua. Esto puede provocar trincas. No afile toda la superficie achaflanada de la cuchilla, solamente el filo de corte. Mantenga el ángulo de corte. PN-MASTER 3000...
-
Página 44: Ajuste De La Distancia Entre Las Cuchillas Y Contracuchillas
(5) de la contracuchilla (6). IMPORTANTE: No puede haber roce entre las cuchillas y la contracuchilla durante la operación. Por eso, Nogueira recomienda una luz mínima de 0,05 a 0,15 mm (espesor de una hoja de papel) entre ellas. d) Compruebe la luz a través de la boquilla de entrada del producto (7), girando manualmente el rotor (4) bien despacio. -
Página 45: Contracuchilla
OBS.: Contracuchilla con borde redondo provoca cortes no uniformes, producto con hilachas y desperdício de energia de accionamiento. Para desmontar la contracuchilla, quite las tuercas (2). Tras el ensamble de la contracuchilla, compruebe la distancia entre ella y las cuchillas del rotor, según se describe en el punto anterior. PN-MASTER 3000... -
Página 46: Ajuste De La Tensión Y Cambio De Las Correas
Ajuste de la tensión y cambio de las correas Controle el huelgo de las correas (a) a cada 50 horas de trabajo, o semanalmente. Para ello: a) Quite la parte frontal de la cubierta (2) aflojando las cuatro tuercas (3 - dos arriba y dos abajo). -
Página 47: Conservación Del Picador
Verifique el apriete de los tornillos de las cuchillas del rotor; Retoque la pintura en los puntos donde haya necesidad; Lubrique los cojinetes del rotor picador; Muy importante: mantenga la ensiladora siempre en local seco, protegido del sol y de la lluvia. Sin este cuidado, no hay conservación. PN-MASTER 3000... -
Página 48: Orientación Para El Cálculo De Poleas Y Rpm
Orientación para el cálculo de poleas y RPM Vea en el inicio de este manual la gama de rotación ideal para operar el Picador PN-Master 3000. Para obtener diferentes rotaciones dentro de ésta gama, es necesario alterar la combinación de poleas, o sea, usar diámetros diferentes. -
Página 49: Calcomanías Encontradas En La Máquina
Calcomanías encontradas en la máquina PARA EVITAR RISCOS DE SOBRECARGA OU DANO AO MOTOR: PN-MASTER 3000 1 - ASSEGURE-SE QUE A CORRENTE ELÉTRICA ESTEJA NA VOLTAGEM CORRETA (110 OU 220V); 2 - EVITE SOBRECARREGAR A MÁQUINA; Rotação/Rotación/Speed..2400/2800 RPM 3 - MANTENHA A MÁQUINA GIRANDO LIVRE PARA LIMPEZA INTERNA POR 3 MINUTOS ANTES DE DESLIGÁ-LA COMPLETAMENTE;... -
Página 50: Piezas Sueltas Que Acompañan La Máquina
Piezas sueltas que acompañan la máquina Identificación Especificación Cantidad Boquilla de salida 1 unidad Boquilla de alimentación 1 unidad Perno de la boquilla de alimentación 1 unidad Pasador 2 unidades Caballete montado 1 unidad Manual de Instrucciones... -
Página 51: Diagnóstico De Anormalidades Y Soluciones
Reemplace la contracuchilla. Mucho material colocado Alimente la máquina de manera dentro de la boquilla de continuada y uniforme, sin alimentación. exagerar. Correa patinando. Correa muy floja y/o sucia de Ajuste la tensión y limpie la aceite o grasa. correa. PN-MASTER 3000... -
Página 52: Asistencia Técnica
Anote aqui el número de serie del Picador: Notas: 1- Al enviar comunicaciones o solicitar auxilio del Service Nogueira, informe siempre el numero de serie y el modelo de la máquina, los cuales constan en la placa de indetificación (1). -
Página 53: Certificado De Garantía
09 (nueve) últimos meses - garantía adicional concedida por Nogueira Máquinas Agrícolas. 2- Consiste en la presente garantía, en el compromiso de Nogueira en reparar o sumi- nistrar gratuitamente, en su fábrica, las piezas que a su exclusivo juicio presentan defectos de fabricación. -
Página 54: Instrucciones Para El Registro En El Sitio
1. Llene el TÉRMINO DE RECIBO con la información solicitada y fi rme; 2. Dispare el TÉRMINO DE RECIBO completado y la factura de venta; 3. Acceder al sitio www.nogueira.com.br y haga clic en la pestaña “TÉRMINO DE RECIBO” o acceda nogueira.industriasnb.com/entrega ;... - Página 56 NOGUEIRA Ind. Com. Impl. Máquinas Agrícolas S.A. St./R: Fernando de Souza, 533 - Distrito Industrial - CEP 13877-775 Tel/Phone.: (19) 3638.1500 - Fax: (19) 3638.1556 nogueira@nogueira.com.br - www.nogueira.com.br CNPJ: 08.510.974/0001-27...