Tabla de contenido
Publicidad
Idiomas disponibles
Idiomas disponibles
Enlaces rápidos
Removing Unit From Carton
Assemble The Unit
Slot
Bracket
1 1
2
Remove all contents from
Slide shield's slot onto
carton.
mounting bracket. Rotate
shield onto shaft. Push
square bolt through shield
and bracket. Tighten
washer and wing nut
onto bolt.
Assemble The Unit
40:1
5
6
Mix thoroughly in a separate
Place unit on a level surface.
fuel can:
Fill fuel tank.
– 3.2 fl. oz. of 2-cycle
engine oil
– 1 gallon of unleaded
gasoline
NOTE: Do not mix directly in
the unit fuel tank.
Starting The Unit
1 9
10
Crouch in starting position.
SQUEEZE and HOLD
throttle for ALL further
steps.
Reloading The Line*
Outer
Bump
Spool
Knob
Spring
1 1
2
Unscrew the bump knob
Remove the inner reel and
counterclockwise.
spring.
Reloading The Line
For replacement line, call 1-877-282-8684 or go to
an authorized service dealer.
For single line installation or replacement spool
installation instructions, refer to the Replacing the
Trimming Line section of this manual.
*This is to assist in the reloading of Splitline® only. These instructions
are NOT part of the fast assembly instructions. Line does not need to
be installed on the initial assembly and start-up.
1 8
Hold the inner reel and outer
spool together. Firmly pull
the two line ends to release
them from the holding slots.
Screw the bump knob on
clockwise. Tighten the bump
knob securely.
IMPORTANT: READ THE OPERATOR'S MANUAL THOROUGHLY AND FOLLOW THE SAFE OPERATION PRACTICES WHILE OPERATING THE UNIT.
NEED HELP?
769-07498 P01
Operator's Manual
Knob
3
Remove the protective cap
and gray spacer from the
upper and lower shafts.
Push the attachment into
the coupler. Turn the knob
clockwise to tighten.
Starting The Unit
Primer
Bulb
10 X
7
Press primer bulb 10 times,
or until fuel is visible
5 X
11
Pull rope 5 times.
Inner
Reel
3
Cut one 6-foot (1.8 m)
length of new 0.095" split
line trimming line. Split each
end about 6 inches (150
mm).
CALL 1-877-282-8684 IN U.S. OR 1-800-668-1238 IN CANADA
ASSEMBLY TOOLS REQUIRED:
• 3/8" Socket
Min. 6"
4
Loosen the bolt. Move the
handle to the location that
provides the best grip. Move
the handle a minimum of 6
inches away from the shaft
grip. Tighten the bolt until the
handle is secure.
Choke Lever
8
Cutting Head Shield
Move choke lever to
Position 1.
Choke Lever
12
13
Move choke lever to
Pull rope 3-5 times to start
Position 2 and squeeze
engine. Run unit for 30-60
throttle.
seconds to warm up.
Top Hole
Split Wall
Bottom Hole
4
5
Insert the end of one line
Wind the line tightly in the
into the top hole and the
direction shown on the inner
end of the other line into the
reel. The split wall will divide
bottom hole.
the line. Wind the line until it
is completely divided and
about 6 inches (150 mm) of
line remains.
CS202
2-Cycle Trimmer
Starter Rope
On/ Off Switch
D-Handle
Rapid-link™
Need Help?
Call 1-877-282-8684
DIDN'T START?
Repeat the starting instructions.
If the unit still fails to start,
refer to the operator's manual
for additional starting and
troubleshooting information.
Choke Lever
3-5 X
14
Continue to squeeze
throttle. Move choke lever
to Position 3.
Holding Slots
6
Insert the two 6-inch
sections into the two .095
holding slots.
Fuel Cap
Throttle Control
15
Continue to squeeze
throttle. Run unit for an
additional 60 seconds to
complete warm-up. Unit
may be used during this
time.
Eyelets
7
Pass the two line ends
through the eyelets. Place
the spring inside the inner
reel. Insert the inner reel into
the outer spool. Push the
inner reel and outer spool
together.
03/12
Publicidad
Capítulos
Tabla de contenido
Solución de problemas

Manuales relacionados para Cub Cadet CS202


Resumen de contenidos para Cub Cadet CS202
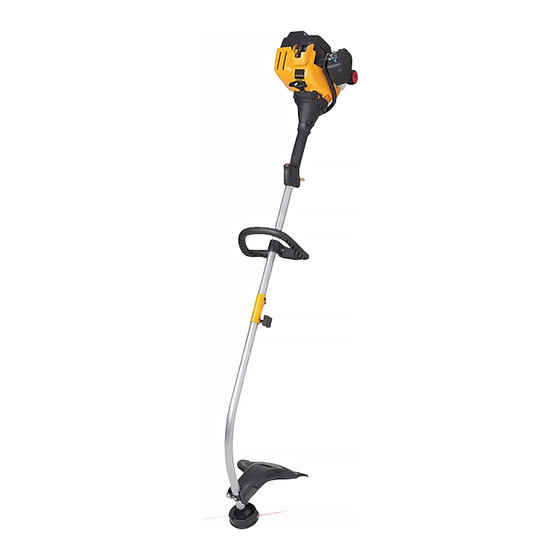
- Página 1 CS202 2-Cycle Trimmer Operator’s Manual Removing Unit From Carton Assemble The Unit ASSEMBLY TOOLS REQUIRED: • 3/8” Socket Slot Starter Rope Fuel Cap Min. 6” Bracket Knob On/ Off Switch Remove all contents from Slide shield’s slot onto Remove the protective cap Loosen the bolt.
-
Página 2: Tabla De Contenido
TABLE OF CONTENTS SAFETY Service ............... . .2 Safety . -
Página 3: Know Your Unit
KNOW YOUR UNIT ASSEMBLY APPLICATIONS OPERATING THE RAPID-LINK™ SYSTEM 90˚ Edging Hole (Trimmer Only) As a trimmer: WARNING: To avoid serious personal injury and damage to the • Cutting grass and light weeds. unit, shut the unit off before removing or installing an attachment. •... -
Página 4: Starting And Stopping
STARTING AND STOPPING MAINTENANCE MAINTENANCE SCHEDULE Off (O) / Stop WARNING: Operate this unit only in a well-ventilated outdoor area. Carbon monoxide exhaust fumes can be lethal in a confined area. On ( I ) / Start WARNING: To prevent serious injury, never perform maintenance or repairs while the unit is running. Always allow the unit to cool before servicing or repairing the unit. -
Página 5: Cleaning And Storage
MAINTENANCE TROUBLESHOOTING ADJUSTING THE IDLE SPEED PROBLEM SOLUTION NOTE: Careless adjustments can seriously damage the unit. A qualified service dealer should make carburetor THE ENGINE WILL NOT START adjustments. The fuel tank is empty Fill the fuel tank with properly mixed fuel WARNING: The cutting head may spin during idle speed adjustments. -
Página 6: Outils Requis Pour L'assemblage
CS202 Désherbeuse à 2-temps Manuel de L'utilisateur Retirer l’appareil du carton Assembler l’appareil Cordon de démarrage OUTILS REQUIS POUR L’ASSEMBLAGE : Fente • Douille 3/8 po Bouton Bouchon de Min. 6 po. marche/ arrêt réservoir de carburant Support Bouton Retirez tous les éléments... -
Página 7: Service
TABLE DES MATIÈRES SÉCURITÉ Service ............... . .7 Sécurité... -
Página 8: Familiarisez-Vous Avec Votre Appareil
FAMILIARISEZ-VOUS AVEC VOTRE APPAREIL ASSEMBLAGE APPLICATIONS Le système Rapid-Link™ En tant que débroussailleuse : Le système Rapid-Link™ permet d'utiliser les accessoires optionnels suivants : • Coupe d’herbe et de mauvaises herbes peu denses. • Coupe-bordures* • Coupe de bordures • Motobineuse •... -
Página 9: Démarrage Et Arrêt
DÉMARRAGE ET ARRÊT ENTRETIEN PROGRAMME D’ENTRETIEN Arrêt (O) / Arrêter AVERTISSEMENT : Ne faites marcher l'appareil qu'à l'extérieur, Marche (I) dans un lieu bien aéré. Les fumées d’échappement de monoxyde de / Démarrer carbone peuvent être mortelles dans les zones confinées. AVERTISSEMENT : Afin d’éviter les blessures graves, n’effectuez jamais de réparation ou n’entretenez jamais l’appareil lorsqu’il est en fonctionnement. -
Página 10: Nettoyage Et Entreposage
ENTRETIEN RÉSOLUTION DES PROBLÈMES ENTRETIEN DU FILTRE À AIR PROBLÈME SOLUTION LE MOTEUR NE DÉMARRE PAS AVERTISSEMENT : Afin d’éviter des blessures graves, arrêtez toujours l’appareil et laissez-le refroidir avant tout nettoyage ou entretien. Remplissez le réservoir de carburant avec du carburant Le réservoir de carburant est vide correctement mélangé... -
Página 11: Herramientas De Ensamblaje Necesarias
CS202 Recortador de 2 Ciclos Manual del Operador Sacar la unidad de la caja Ensamblado de la unidad HERRAMIENTAS DE ENSAMBLAJE NECESARIAS: • Casquillo de 10 mm (3/8 pulgadas) Ranura Cuerda de arranque Mín. 6” Soporte Interruptor de Perilla Encendido/Apagado... -
Página 12: Servicio
TABLA DE CONTENIDO SEGURIDAD Servicio ............... .12 Seguridad . -
Página 13: Conozca Su Unidad
CONOZCA SU UNIDAD ENSAMBLAJE USOS FUNCIONAMIENTO DEL SISTEMA RAPID-LINK™ Orificio de 90º para bordeadora (solo recortadora) Como recortadora: ADVERTENCIA: Para evitar lesiones personales graves y daños • Cortar césped y malas hierbas escasas. a la unidad, apague la unidad antes de quitar o instalar cualquier •... -
Página 14: Arranque Y Parada
ARRANQUE Y PARADA MANTENIMIENTO PLAN DE MANTENIMIENTO Apagado (O) / Parada ADVERTENCIA: Opere esta unidad solamente en un área exterior bien ventilada. El monóxido de carbono de los gases de Encendido ( I ) / Arranque escape puede ser letal en un área confinada. ADVERTENCIA: Para evitar lesiones graves, no haga nunca ningún mantenimiento ni reparación con la unidad funcionando. -
Página 15: Limpieza Y Almacenamiento
MANTENIMIENTO LIMPIEZA Y ALMACENAMIENTO MANTENIMIENTO DEL FILTRO DE AIRE LIMPIEZA ADVERTENCIA: ADVERTENCIA: Para evitar lesiones personales graves, apague siempre el motor y deje que se Para evitar lesiones personales graves, apague siempre el motor y deje que se enfríe antes de limpiar o dar mantenimiento a la unidad. enfríe antes de limpiar o dar mantenimiento a la unidad. -
Página 16: Warranty
C. Cub Cadet no le ofrece ninguna garantía a los productos que sean vendidos o exportados fuera de los Estados Unidos de América, sus posesiones y territorios, excepto aquellos que se vendan a través de los canales de distribución para...