Tabla de contenido
Publicidad
Idiomas disponibles
Idiomas disponibles
Enlaces rápidos
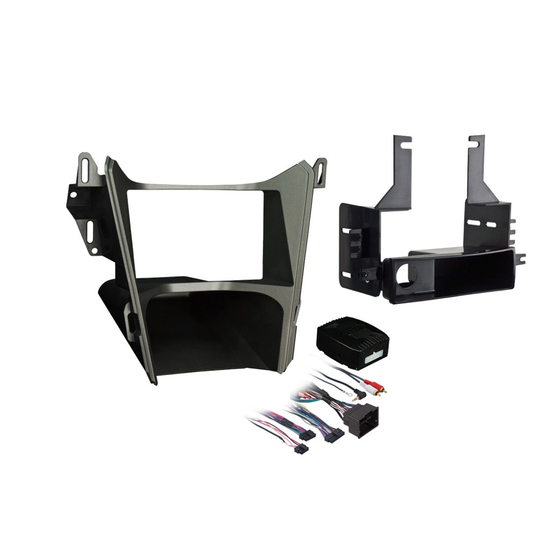
INSTALLATION INSTRUCTIONS FOR PART 99-3307G
Chevy Equinox 2010-2015 / GMC Terrain 2010-2014
KIT FEATURES
• ISO DIN radio provision with pocket
• ISO DDIN radio provision
• Painted gray to match factory finish
KIT COMPONENTS
• A) Radio trim panel • B) Radio brackets • C) Pocket • D) (6) #8 x 3/8" Phillips screws
• E) (2) #10 x ¾" Phillips screws • F) (2) #10 panel clips • G) Axxess interface and wiring harness (not shown)
A
B
WIRING & ANTENNA CONNECTIONS (sold separately)
Wiring Harness: • Axxess interface and harness included
Antenna Adapter: • 40-EU55
METRA. The World's best kits.
(with monochrome display)
99-3307G
D
C
metraonline.com
®
Dash Disassembly ................................................. 2
Kit Preparation ....................................................... 3
- ISO DIN radio provision with pocket ...................... 4
- ISO DDIN radio provision ...................................... 4
Axxess Interface Installation .............................5-7
TOOLS REQUIRED
• Panel removal tool • Phillips screwdriver
• 9/32" socket wrench
E
F
CAUTION!
and especially air bag indicator lights must be connected before
cycling the ignition. Also, do not remove the factory radio with
the key in the on position, or while the vehicle is running.
Table of Contents
All accessories, switches, climate controls panels,
© COPYRIGHT 2017 METRA ELECTRONICS CORPORATION
Publicidad
Capítulos
Tabla de contenido

Manuales relacionados para Metra 99-3307G

Resumen de contenidos para Metra 99-3307G
-
Página 1: Tabla De Contenido
INSTALLATION INSTRUCTIONS FOR PART 99-3307G Table of Contents Chevy Equinox 2010-2015 / GMC Terrain 2010-2014 (with monochrome display) Dash Disassembly ..........2 99-3307G Kit Preparation ............3 Kit Assembly – ISO DIN radio provision with pocket ...... 4 KIT FEATURES –... -
Página 2: Dash Disassembly
99-3307G Dash Disassembly 1. With pocket above factory radio 5. Remove (4) 9/32” screws to remove controls - Remove (2) 9/32” the pocket/CD slot panel. Remove screws from inside the pocket, the power outlet and attach it to the then unclip and remove the pocket. -
Página 3: Kit Preparation
99-3307G Kit Preparation 1. A small section of the sub-dash must be cut with a cutting tool to allow the radio to fit: a. Remove the lip from the section of dash just above the original CD slot location by cutting along the dotted line. -
Página 4: Kit Assembly
99-3307G Kit Assembly ISO DIN radio provision with pocket ISO DDIN radio provision 1. Attach the pocket to the radio 1. Attach the radio brackets to the brackets using the (4) #8 x 3/8” radio using the screws supplied Phillips screws provided. -
Página 5: Axxess Interface Installation
99-3307G Axxess Interface Installation Connections to be made From the 3307 harness to the aftermarket radio: INTERFACE FEATURES • Provides accessory power (12-volt 10-amp) • Connect the Black wire with a ring terminal to the chassis of the aftermarket radio. -
Página 6: Final Assembly
2. Locate the factory antenna connector in the dash and complete all necessary • Connect the Light Green wire to the parking brake wire. connections to the radio. Metra recommends using the proper mating adapter from Metra. • The Black/Yellow wire is used for OnStar level adjustment for models that do not come equipped with steering wheel controls. - Página 7 99-3307G Final Assembly (cont.) 5. Chime level adjustment: a. With the vehicle on, turn it off and leave the keys in the ignition. Open the driver’s door; chimes will be heard. b. Wait 10 seconds, and then with a small flat-blade screwdriver, turn the potentiometer clockwise to raise the chime level;...
- Página 8 INSTALLATION INSTRUCTIONS FOR PART 99-3307G IMPORTANT If you are having difficulties with the installation of this product, please call our Tech Support line at 1-800-253-TECH. Before doing so, look over the instructions a second time, and make sure the installation was performed exactly as the instructions are stated.
-
Página 9: Características Del Kit
INSTRUCCIONES DE INSTALACIÓN PARA LA PIEZA 99-3307G Indice Chevy Equinox 2010-2015 / GMC Terrain 2010-2014 (con pantalla monocromática) Desmontaje del tablero ......... 2 99-3307G Preparación del kit ..........3 Ensamble del kit – Provisión de radio ISO DIN con cavidad ....4 CARACTERÍSTICAS DEL KIT... -
Página 10: Desmontaje Del Tablero
99-3307G Desmontaje del tablero 1. Con la cavidad por encima de los 5. Quite los (4) tornillos de 9/32” para controles del radio de fábrica, retire quitar el panel de la cavidad/ranura los (2) tornillos de 9/32” de dentro del CD. Quite la toma de corriente de la cavidad, luego desenganche y y fíjela a la cavidad incluida si está... -
Página 11: Preparación Del Kit
99-3307G Preparación del Kit 1. Una pequeña sección del sub tablero debe estar cortada con una herramienta de corte para permitir que el radio quepa: a. Quite el borde de la sección del tablero justo encima de la ubicación de la ranura del CD original, cortando a lo largo de la línea punteada. -
Página 12: Ensamble Del Kit
99-3307G Ensamble del kit Provisión de radio ISO DIN Provisión de radio ISO DDIN con cavidad 1. Sujete los soportes del radio al 1. Sujete la cavidad a los soportes del radio usando los tornillos que se radio con los (4) tornillos Phillips suministraron con el radio. -
Página 13: Instalación De La Interfase Axxess
99-3307G Instalación de la interfase Axxess Conexiones que se deben hacer Desde el arnés 3307 al radio de mercado secundario: CARACTERÍSTICAS DE LA INTERFAZ • Provee corriente de accesorios (12 voltios 10 amperes) • Conecte el cable negro con la terminal de aro al chasis del radio de mercado secundario. Atención: la interfaz no funcionará... -
Página 14: Ensamble Final
2. Localice el conector de la antena de fábrica en el tablero y realice todas las • Conecte el cable verde/púrpura al cable de reversa. conexiones necesarias al radio. Metra recomienda el uso de un adaptador • Conecte el cable verde claro al cable de freno de mano. - Página 15 99-3307G Ensamble final (cont.) Ajuste del nivel de los tonos: a. Con el vehículo encendido, apague el vehículo y deje las llaves en la ignición. Abra la puerta del conductor, se escucharán los tonos. b. Espere 10 segundos, y después con un pequeño destornillador plano, gire el potenciómetro hacia la derecha para subir el nivel de los tonos y hacia la...
- Página 16 INSTRUCCIONES DE INSTALACIÓN PARA LA PIEZA 99-3307G IMPORTANTE Si tiene dificultades con la instalación de este producto, llame a nuestra línea de soporte técnico al 1-800-253-TECH. Antes de hacerlo, revise las instrucciones por segunda vez y asegúrese de que la instalación se haya realizado exactamente como se indica en las instrucciones.