Riester ri-focus LED Instrucciones Para El Uso
Ocultar thumbs
Ver también para ri-focus LED:
- Instrucciones para el uso (44 páginas) ,
- Instrucciones para el uso (88 páginas)
Tabla de contenido
Publicidad
Idiomas disponibles
Idiomas disponibles
Enlaces rápidos
Publicidad
Tabla de contenido

Manuales relacionados para Riester ri-focus LED


Resumen de contenidos para Riester ri-focus LED
- Página 1 Gebrauchsanweisung Stirnspiegel und Stirnlampen Instructions Head mirrors and head lamps Mode d’emploi Miroirs frontaux et lampes frontales Instrucciones para el uso Frontoespejos y frontoluces нструкции по эксплуатации алобные зеркала и налобные осветители All models...
-
Página 2: Tabla De Contenido
Inhaltsverzeichnis Seite Wichtige Information zur Beachtung vor Inbetriebnahme. Stirnlampen und Stirnspiegel. Ersatzteile Technische Daten Wartung. Entsorgung Garantie Table of Contents Page Important information to be observed before operation. Headlights and head mirrors Replacement parts Technical data Maintenance Disposal Warranty Sommaire Page Informations importantes à... - Página 3 Achtung Bedienungsanleitung beachten! Gerät der Schutzklasse II Achtung: Nicht in den Strahl blicken. Achtung: Gebrauchte elektrische und elektronische Geräte sollten nicht in den normalen Hausmüll gelangen sondern gemäß nationaler bzw. EU- Richtlinien separat entsorgt werden. Typ B Nicht im Freien verwenden Wechselstrom Gleichstrom LED Licht...
-
Página 4: Wichtige Information Zur Beachtung Vor Inbetriebnahme
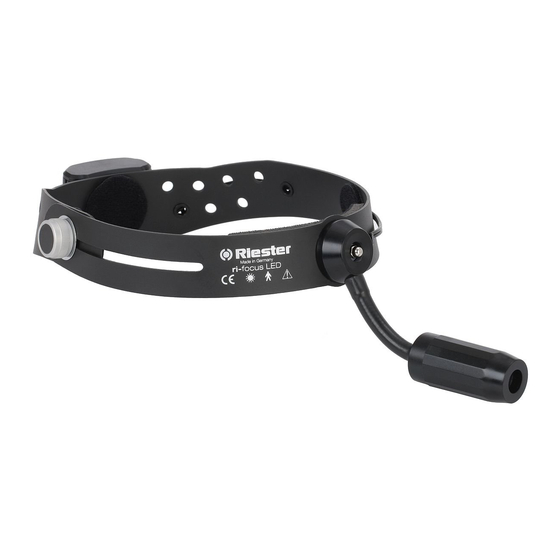
Bitte lesen Sie die Gebrauchsanweisung vor Inbetriebnahme sorgfältig durch, und bewahren Sie sie gut auf. Sollten Sie Fragen haben, stehen wir, oder der für Sie zuständige Vertreter für RIESTER Produkte, Ihnen jederzeit gerne zur Verfügung. Unsere Adresse finden Sie auf der letzten Seite dieser Gebrauchsanweisung. Die Adresse unseres Vertreters erhal- ten Sie gerne auf Anfrage. - Página 5 2.3.2 Einstellen des Lampenkopfes ri-focus ® Individuelle Voreinstellung des Lampenkopfes mit dem flexiblen Lampenarm Bild 1 parallel zum Strahlengang der Augen. Individuelle Feineinstellung des Lampenkopfes mit dem flexiblen Lampenarm Picture 1 Achtung! Der biegsame Leuchtenarm sollte nicht zu eng gebogen werden, da dies zu einer vorzeitigen Materialermüdung führen könnte.
- Página 6 2.3.3 Einsetzen der Batterien bzw. der Accus ® ri-focus LED und clar N Um das Batteriefach zu öffnen Drücken Sie die beiden Druckknöpfe und ziehen Sie den Batteriefachdeckel nach oben ab. Polarität Batterien Typ AAA Polarität Batterien Lithium CR 123A bzw.
- Página 7 ri-focus ® , ri-focus ® reverse und ri-clar ® 55/100 mm Verbinden der Kabel zwischen Stirnband und Stufenschalter durch den Steckkontakt. Zum Einschalten stellen Sie den Stufenschalter auf Position 1 oder 2. Stellen Sie den Stufenschalter auf eine der beiden Positionen der 0, um das Gerät auszuschalten. 2.3.5 Fokussierung ri-focus ®...
- Página 8 clar N und ri-clar ® 55/100 mm Manuelle Bewegung der Lampenfassung zum Spiegel hin und vom Spiegel weg. ri-clar ® clar N 2.3.6 Anbringen der Stirnlampe/ des Stirnspiegels ri-focus ® Der Lampenkopf ist fest mit dem Stirnband verbunden und kann nur in verbindung mit dem Stirnband ausgetauscht werden.
- Página 9 2.3.7 Lampen Auswechseln der Lampe ® ® ri-focus ri-focus reverse Vorderes Teil des Lampenkopfes abschrauben und die Lampe mit Keramiksockel vorsichtig aus dem Stecksockel ziehen. Neue Lampe in den Keramiksockel stecken und komplette Einheit in die Fassung der Lampe. Achten Sie darauf, dass Sie beim Einsetzen der neuen Lampe den Glaskörper nicht mit den Fingern berühren! ri-clar ®...
- Página 10 Achtung: • Es dürfen mit diesem Ladegerät nur die Handelsüblichen Akku´s Typ AAA aufgeladen werden. Ein Aufladen nicht aufladbarer Batterien kann zur Zerstörung der Batterien oder des Ladegeräts führen. • Das Ladegerät darf nur in geschlossenen Räumen verwendet werden. • Entfernen Sie das Gerät aus der Steckdose, wenn es nicht gebraucht wird.
-
Página 11: Ersatzteile
Die Instrumente und deren Zubehör bedürfen keiner speziellen Wartung. Sollte ein Instrument aus irgendwelchen Gründen überprüft werden müssen, schicken Sie es bitte an uns oder an einen autorisierten RIESTER Fachhändler in Ihrer Nähe, den wir Ihnen auf Anfrage gerne benennen. 6. Entsorgung Bitte beachten Sie, dass Batterien und Elektrogeräte speziell entsorgt werden müssen. - Página 12 Caution: Observe the operating instructions Device belongs to protective class II Attention: Do not stare into the beam Attention: Dispose of the device in accordance with valid regulations Type B Not for outdoor use Alternating current Direct current LED light Do not stare into the beam Class 2 LED LED light...
-
Página 13: Important Information To Be Observed Before Operation
Please read the Instructions for Use carefully before operating the unit and keep them in a safe place. If you should have any questions, we or your responsible RIESTER product representative are available to answer queries at any time. Our address can be found on the last page of these Instructions for Use. The address of our sales representative will be provided upon request. - Página 14 2.3.2 Adjusting the lamp head ri-focus ® Individual adjustment of the lamp head with the flexible light arm: see Picture 1 parallel to the optical path of the eyes. Individual fine adjustment of the lamp head (during the examination) Picture 1 with the flexible light arm Caution! The flexible arm of the light should not be bent in a too small radius...
- Página 15 2.3.3 Fitting batteries or rechargeable batteries ® ri-focus LED and clar N In order to open the battery compartment, press the two push buttons and pull off the cover of the battery compartment Polarity of batteries type AAA Polarity of batteries lithium CR 123A or rechargeable batteries Type AAA Attention: It is important to ensure that the polarity is correct.
- Página 16 ri-focus ® , ri-focus ® reverse and ri-clar ® 55/100 mm Connecting the cable between the headband and the step switch with the plug contact. To switch on, move the step switch to position 1 or 2. Position the step switch to one of the two settings “0” in order to switch off the device. 2.3.6 Focussing ri-focus ®...
- Página 17 ® clar N and ri-clar 55/100 mm Manually moving the lamp fixture towards and away from the mirror. ri-clar ® clar N 2.3.7 Attaching the headlight / the head mirror ri-focus ® The lamp head is firmly fixed to the headband and can only be exchanged together with the headband. ®...
- Página 18 2.3.8 Lamps Exchanging the lamp ® ® ri-focus ri-focus reverse Unscrew the front part of the lamp head and carefully pull the lamp together with the ceramic base out of the connecting socket. Push a new lamp into the ceramic base and then place the complete unit back into the lamp fixture.
- Página 19 Attention: • Only commercially available rechargeable batteries Type AAA may be charged with this charging device. Charging non-rechargeable batteries may lead to the destruction of the batteries or the charging device. • The charging device may only be used in closed rooms. •...
-
Página 20: Replacement Parts
The instruments and their accessories do not require any special maintenance. If an instrument has to be checked for any reason, send it to us or to an authorised RIESTER dealer near you, who we shall be pleased to name upon request. - Página 21 Attention: Veuillez suivre le mode dʼemploi Appareil de classe de protection Attention: ne pas regarder directement dans la lumière Attention: Les dispositifs électriques et électroniques usagés ne doivent pas être éliminés avec les déchets domestiques non triés et doi- vent être collectés séparément conformément à la réglementation nationale/eropéenne en vigueur. Pièce d'utilisation de type B Ne peut pas utiliser à...
-
Página 22: Informations Importantes À Lire Attentivement Avant Utilisation
1. Informations importantes à lire attentivement avant l’utilisation Vous avez fait l’acquisition d’un produit RIESTER haut de gamme, qui a été fabriqué conformément à la directive 93/42/CE « Dispositifs médicaux » et fait l’objet de contrôles de qualité constants des plus sévères. Son excellente qualité est pour vous le garant de la fiabilité... - Página 23 2.3.2 Réglage de la tête de la lampe ® ri-focus Positionnement individuel de la lampe grâce à la conduite lumière flexible, voir fig. No. 1 en parallèle au champ de vision des yeux. Positionnement individuel et précis de la tête de la lampe (pendant l’examen ) Picture 1 grâce à...
- Página 24 2.3.3 Mise en place des piles ou des accus ri-focus ® LED et clar N Pour ouvrir le compartiment à piles, appuyer sur les deux boutons-poussoirs et tirer le couvercle vers le haut. Polarité piles et accus type AAA Polarité piles lithium CR 123A Attention : il est indispensable de bien respecter les polarités + et -.
- Página 25 ri-focus ® , ri-focus ® reverse et ri-clar ® 55/100 mm Raccorder le câble entre le bandeau et le commutateur pas-à-pas au moyen du connecteur à fiche. Pour allumer, mettre le commutateur pas-à-pas sur la position 1 ou 2. Pour éteindre, mettre le commutateur pas-à-pas sur l’une des deux positions 0. 2.3.5 Focalisation ri-focus ®...
- Página 26 clar N et ri-clar ® 55/100 mm Rapprocher et éloigner la lampe du miroir en la tenant par la douille. ri-clar ® clar N 2.3.6 Montage de la lampe frontale / du miroir frontal ri-focus ® La tête de la lampe est soudée au bandeau et ne peut être remplacée qu’avec le bandeau. ri-focus ®...
- Página 27 2.3.7 Lampes Remplacement de la lampe ri-focus ® ri-focus ® reverse Dévisser la lampe en la tenant par la tête et extraire avec précaution la lampe avec son socle céramique de la douille. Enfoncer la nouvelle lampe dans le socle en céramique et introduire le tout dans la douille, en prenant soin de ne pas toucher la partie en verre avec les doigts.
- Página 28 Attention : • Le chargeur ne doit être utilisé que pour les accus de type AAA. Ne pas essayer de recharger des piles non rechargeables, cela détruirait les piles ou le chargeur. • Utiliser le chargeur uniquement dans des locaux fermés. •...
-
Página 29: Pièces De Rechange
Attention Ne jamais plonger le miroir et la lampe dans un liquide. Les instruments ne sont pas admis pour un nettoyage ou une désinfection par machine car ils pourraient être endom- magés. 3. Pièces de rechange Lampe halogène : Réf. 11320 1 ampoule de rechange 6 V pour ri-clar 55 et 100 mm ®... - Página 30 ¡Atención! favor de seguir las instrucciones del manual de usuario Aparatos da la clase de protección II ¡Atención! No mire directamente a la luz ¡Atención!: Los productos eléctricos y electrónicos usados no pueden eliminarse como basura general; deberán dese- charse de forma separada de acuerdo con las regulaciones nacionales/UE. Componente de aplicación de tipo B No para uso en el exterior Corriente alterna...
-
Página 31: Informaciones Importantes Que Deben Tenerse En Cuenta Antes Del Uso
1. Informaciones importantes que deben tenerse en cuenta antes del uso Ha adquirido usted un producto RIESTER de alta calidad, que ha sido fabricado de acuerdo con la Directiva 93/42 CEE sobre productos sanitarios y está sometido a estrictos controles de calidad continuos. La excelente calidad le garantizará diagnósticos fiables. - Página 32 .3.2 Ajuste del cabezal de la lámpara ri-focus ® Ajuste individual del cabezal de la lámpara con su brazo flexible: ver foto 1, paralelo a la via de los ojos. Fino ajuste individual del cabezal de la lámpara (durante la examinación) Picture 1 con el brazo flexible de la lámpara.
-
Página 33: Colocación De Las Pilas O Baterías Recargables Ri-Focus
2.3.3 Colocación de las pilas o baterías recargables ® ri-focus LED y clar N Para abrir el compartimento de las pilas Presione ambos pulsadores y extraiga hacia arriba la tapa del compartimento. Polaridad de las pilas tipo AAA Polaridad de las pilas de litio CR 123A o las baterías recargables tipo AAA Atención: Es imprescindible respetar la polaridad correcta. - Página 34 ri-focus ® , ri-focus ® reverse y ri-clar ® 55/100 mm Una los cables entre la cinta frontal y el interruptor de varias posiciones mediante el conector enchufable. Para encender la lámpara, sitúe el interruptor en la posición 1 o 2. Para apagarla, sitúelo en cualquiera de las dos posiciones 0.
-
Página 35: Colocación De La Lámpara/Espejo Frontal Ri-Focus
clar N y ri-clar ® 55/100 mm Movimiento manual del alojamiento de la lámpara acercándola al espejo o alejándola de él. ri-clar ® clar N 2.3.6 Colocación de la lámpara/espejo frontal ri-focus ® El cabezal de la lámpara está unido de forma fija con la cinta frontal y sólo puede sustituirse junto con la misma. ri-focus ®... -
Página 36: Puesta En Marcha Del Cargador Ri-Focus
2.3.7 Lámparas Sustitución de la lámpara ® ® ri-focus ri-focus reverse Desatornille la parte anterior del cabezal de la lámpara y extraiga cuidadosamente del conector la lámpara con el casquillo cerámico. Coloque la lámpara nueva en el casquillo cerámico e introduzca la unidad completa en el conector. -
Página 37: Sustitución De La Almohadilla De La Cinta Frontal
Atención: • Con este cargador sólo deben cargarse baterías recargables de tipo AAA habituales en el comercio. Intentar cargar pilas no recargables puede inutilizar las pilas o el cargador. • El cargador no debe utilizarse al aire libre. • Desenchufe el aparato de la red cuando no lo utilice. •... -
Página 38: Accesorios
Los instrumentos y sus accesorios no requieren un mantenimiento especial. Si un instrumento tuviera que ser revisado por algún motivo, envíenoslo a nosotros o a un establecimiento autorizado RIESTER cerca de usted, que le indicaremos con mucho gusto. 6. Eliminación de residuos Tenga en cuenta que las pilas y aparatos eléctricos no deben eliminarse con la basura doméstica. - Página 39 нимание, прочитайте указания, содержащиеся в сопроводительной документации! риборы класса защиты II нимание: ельзя смотреть прямо в световой луч нимание: спользованные электрические и электронные изделия нельзя утилизировать как несортированный городской мусор, их следует собирать в отдельном месте в соответствии с национальными правилами и правилами спользование...
-
Página 40: Ажная Информация Для Прочтения Перед Использованием
росим ас перед использованием внимательно ознакомиться с инструкцией по эксплуатации и хранить ее в надежномместе. сли у ас появятся вопросы, фирма RIESTER или ее представитель, отвечающий за аш регион, всегда охотно ответят на них. аш адрес ы найдете на последней странице данной инструкции по эксплуатации. Адрес нашего представителя мы предоставим ам по ашему запросу. - Página 41 2.3.2 егулировка головки лампы ri-focus ® ндивидуальное регулирование головки лампы с помощью гибкого держателя: см. рисунок 1, параллельный оптической траектории глаз. ндивидуальная точная настройка головки лампы (во время эксплуатации) с помощью гибкого держателя. Picture 1 редостережение! ибкий держатель головки лампы не должен быть согнут до слишком маленького...
- Página 42 2.3.3 ставление батарей или аккумуляторов ri-focus LED и clar N ® тобы открыть батарейный отсек, нажмите на обе нажимных кнопки и снимите крышку батарейного отсека, потянув наверх. олярность батареи тип ААА олярность батареи литиевые CR 123A нимание: ледует неукоснительно соблюдать правильную полярность. ставить...
- Página 43 ri-focus , ri-focus reverse и ri-clar 55/100 мм ® ® ® оединить кабели между налобной лентой и ступенчатым переключателем с помощью штепсельного контакта. ля включения установите ступенчатый переключатель на позицию «1» или «2». тобы выключить прибор, установите ступенчатый переключатель на одну из обеих позиций «0». 2.3.5 окусировка...
- Página 44 clar N и ri-clar 55/100 мм ® еремещение вручную патрона лампы ближе к зеркалу или дальше от него. ri-clar ® clar N 2.3.6 рисоединение налобного осветителя/зеркала ri-focus ® оловка лампы прочно присоединена к налобной ленте и может быть заменена только вместе с налобной лентой. ri-focus ri-focus reverse ri-clar...
- Página 45 2.3.7 ампы амена лампы ri-focus ri-focus reverse ® ® Отвинтить переднюю часть головки лампы и осторожно вынуть лампу вместе с керамическим цоколем из штекерного разъема патрона. ставить новую лампу в керамический цоколь, а затем весь элемент – в патрон лампы. ри...
- Página 46 нимание: • помощью данного зарядного устройства могут быть заряжены только стандартные аккумуляторы типа ААА. арядка не пригодных для зарядки батарей может привести к порче батарей или зарядного устройства. • арядное устройство можно использовать только в закрытых помещениях. • Отсоедините прибор от розетки, если им не пользуются. •...
-
Página 47: Апасные Части
анные инструменты и принадлежности к ним не требуют какого-либо специального технического обслуживания. сли по каким-либо причинам требуется провести проверку инструмента, просим прислать его нам или авторизованному дилеру фирмы RIESTER, адрес которого мы охотно сообщим ам по ашему запросу. 6. Утилизация... -
Página 48: Garantie
We will, of course, be pleased to carry out checks or repairs after expiry of the warranty period at a charge. You are also welcome to request a provisional cost estimate from us free of charge. In case of a warranty claim or repair, please return the RIESTER product with the completed Warranty Card to the following address: Rudolf Riester GmbH Dept. -
Página 49: Garantie
Naturalmente, una vez transcurrido el plazo de la garantía realizaremos gustosamente cualquier comprobación o reparación mediante el correspondiente pago. Puede solicitar un presupuesto gratuito sin ningún compromiso. En caso de prestaciones por garantía o reparación, le rogamos envíe el producto RIESTER, junto con la tarjeta de garantía rellenada en su tota- lidad, a la siguiente dirección: Rudolf Riester GmbH Reparaturen Abt.RR... -
Página 50: Арантия
азумеется, мы будем рады произвести проверку или ремонт изделия и после истечения срока гарантии, но за плату. ожалуйста, обращайтесь к нам также по поводу предварительной оценки затрат, которая выполняется бесплатно. случае гарантийных рекламаций, а также для проведения ремонта, отправьте изделие RIESTER вместе с заполненным арантийным талоном по следующему адресу: Rudolf Riester GmbH Dept. Repairs RR Bruckstr. -
Página 52: All Models
Gesamtkatalog (Best. Nr. 51231-50). Oder gehen Sie online unter www.riester.de. Riester offers a large selection of products in the areas of Blood pressure measuring devices I Instruments for ENT, Ophthalmological instruments I Dermatological instruments I Thermometers I Stethoscopes I Head mirrors, Head lights, Examination lights I Laryngoscopes I...