
Manuales relacionados para Cooke & Lewis CLFSDISHUK1

Resumen de contenidos para Cooke & Lewis CLFSDISHUK1
- Página 1 5059340123318 5059340123301 CLFSDISHUK1 CLFSDISHEU1 V31120 BX220IM GALA13082-01_209193_s1_s1_60cm built-in dishwasher IM V31120 BX220IM V3R.indd 1 10/11/2020 12:18...
- Página 2 Preparation Préparation Przygotowanie Preparación Preparação Installation Installation Montaż Instalare Utilisation Utilizare Utilização Entretien et maintenance inere Cuidados y Mantenimiento GALA13082-01_209193_s1_s1_60cm built-in dishwasher IM V31120 BX220IM V3R.indd 2 10/11/2020 12:18...
- Página 3 IMPORTANT- IMPORTANT - WAŻNE - Please read Lire attentivement Przed użyciem carefully le guide de proszę dokładnie the separate sécurité séparé zapoznać się safety guide avant utilisation. z instrukcja before use. bezpieczeństwa. IMPORTANT - IMPORTANTE - IMPORTANTE - Vă rugăm să citi i Lea atentamente Leia atentamente cu aten ie ghidul...
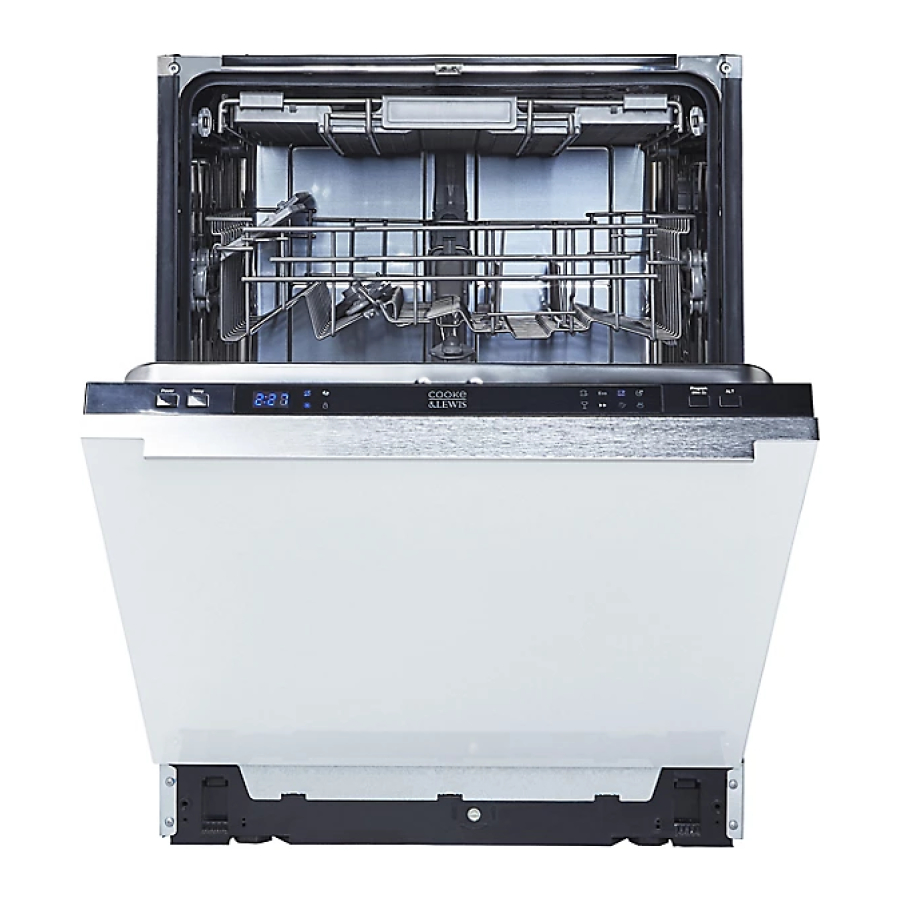
- Página 4 Front view 1. Cutlery Tray 2. Spray Arms 3. Salt Container 4. Detergent Dispenser 5. Glass Supports 6. Upper Basket 7. Lower Basket 8. Rinse Aid Dispenser Vue de face 1. Tiroir à couverts 2. Bras gicleurs 3. Réservoir de sel 4. Distributeur de détergent 5. Supports à verres 6. Panier supérieur 7.
- Página 5 Montaż Installation Installation Instalare WARNING: Danger of electric shock! The power supply must not be connected until the appliance has been fully installed. Only a qualified person in compliance with the instructions provided can install the appliance. The manufacturer declines all responsibility for improper installation, which may harm persons and animals and cause damage.
- Página 6 AVERTISMENT: Pericol de electrocutare! Sursa de alimentare electrică nu trebuie conectată până când aparatul nu a fost instalat complet. Numai o persoană calificată, în conformitate cu instrucţiunile furnizate, poate instala aparatul. Producătorul nu îşi asumă nicio responsabilitate pentru instalarea necorespunzătoare, care poate provoca rănirea persoanelor şi a animalelor şi poate produce prejudicii.
- Página 7 >=25mm >=600mm 596mm 95mm 52mm Installation of Built-in Dishwashers For correct installation, this product should be fitted under the work surface between two floor base units. A plinth can be installed across the base of the floor units and the base of the dishwasher. IMPORTANT: To avoid damage to the support legs, ensure that the fixing screws [06] are used to secure the appliance to the base units and also the work surface.
- Página 8 Instalación de lavavajillas integrables Para una correcta instalación, este producto debe ser instalado debajo de la superficie de trabajo entre dos módulos bajos sobre el suelo. Se puede instalar un zócalo en la base de los módulos bajos y del lavavajillas. IMPORTANTE: Para evitar daños en las patas de apoyo, asegúrese de usar los tornillos de fijación [06] para fijar el aparato a los módulos bajos y a la superficie de trabajo.
- Página 9 IMPORTANT: Nu ridicaţi maşina de spălat vase ţinându-o de mânerul uşii, pentru a evita posibilele deteriorări ale uşii şi balamalelor. ATENŢIE! În cazul în care cablul de alimentare este deteriorat, acesta trebuie înlocuit de producător, agentul de service sau persoane cu un nivel de calificare similar pentru evita o situaţie periculoasă.
- Página 10 [08] [06] [06] x2 (4 x 26mm) 28.5mm 540mm 28.5mm 16-21mm [08] x2 <7Kg 597mm Attaching the decorative door panel Using the dimensions above, carefully mark two holes on the back of the door. Fix the door plugs [08] with two screws [06] to the back of the door.
- Página 11 Engage the two plugs [08] into the two holes in the upper panel. Push the door panel upwards until it locks into place. IMPORTANT! Ensure the top of the door panel is level and fully engaged to the tops of the grooves before fixing wood screws [05].
- Página 12 Introduceţi cele două dibluri [08] în cele două găuri din panoul superior. Împingeţi panoul de uşă în sus până când se blochează în poziţie. IMPORTANT! Asiguraţi-vă că partea de sus a panoului de uşă este la acelaşi nivel şi complet cuplată în partea de sus a canalelor, înainte de a fixa şuruburi de lemn [05]. Acople los dos tacos [08] en los dos orificios de la parte superior del panel.
- Página 13 Once the door panel is fitted and level, remove the two screws shown nearest to the bottom of the inner edge of the door. Using the wood screws [05], secure the panel though the four holes shown. IMPORTANT! Ensure that the wood screws used do not exceed the total thickness of the dishwasher door and fitted panel! Une fois le panneau de porte installé...
- Página 14 IMPORTANTE! Certifique-se de que os parafusos para madeira utilizados não ultrapassam a espessura total da porta da máquina de lavar louça e do painel instalado! Adjustment of the Door Tension Springs Once the decorative panel is attached to the door, the tension springs can be adjusted so that the door will stay open. Adjust the tension screws on both sides of the door with a 4mm hex wrench (not supplied) until the right balance is achieved.
- Página 15 Ajuste das molas de tensão da porta Após a instalação do painel decorativo na porta, é possível ajustar as molas de tensão para que a porta se mantenha aberta. Ajuste os parafusos tensores em ambos os lados da porta com uma chave hexagonal de 4 mm (não fornecida), até alcançar o equilíbrio certo.
- Página 16 [03] [03] [03] x 1 Attach [03] to the wall to suit the drainage requirements using fixings appropriate to the substrate (not supplied). For connection direct to the waste trap of a sink, attach the hose over the U-bend and push firmly into place on a push-fit connector, not supplied (A).
- Página 17 Using a spirit level check that the dishwasher is firm and level and does not rock. The overall height of the dishwasher can be adjusted between 810-880mm to fit flush under the kitchen work surface. To avoid damage to the legs, raise all three legs consecutively, and no more than 20mm at a time, to ensure the appliance does not tilt excessively.
- Página 18 Important. To ensure smooth opening and closing of the door, the plinth needs to have an aperture cut into the top. Ensure that the appliance is at the correct height and secured to the cabinets before cutting the plinth. Please adjust the size of the plinth and the decorative door so that the gap between them is 15mm.
- Página 19 [06] [06] [07] [07] [06] x4 [06] [06] (4 x 26mm) [07] x4 Finally secure the dishwasher into the cabinets and the work surface using screws [06] and plugs [07]. Ensure that the screws used do not exceed the total thickness of the dishwasher frame and side panel of the cabinet! Enfin, fixer le lave-vaisselle à...
- Página 20 Installation All installation must be carried out by a competent person The replacement fuse must be rated at 13 Amps (UK only). or qualified electrician. Before connecting the mains supply To avoid the risks that are always present when you use an ensure that the mains voltage corresponds to the voltage on the electrical appliance it is important that this appliance is installed rating plate.
-
Página 21: Instalación
Instalarea Instalarea trebuie să fie realizată în totalitate de o persoană Siguranţa de schimb trebuie să aibă 13 Amperi (numai în competentă sau de un electrician calificat. Înainte de conectarea Regatul Unit). la reţeaua electrică, asiguraţi-vă că tensiunea reţelei corespunde Pentru a evita riscurile aferente utilizării unui echipament electric, cu tensiunea specificată... -
Página 22: Control Panel
Utilisation Utilizare Utilização Control Panel 8 10 1. Power Button 2. Program Delay Button 3. Program Select / Child Lock Button 4. Function Button 5. Program Indicators 6. Dry Plus Indicator 7. Salt Refill Indicator 8. Rinse Aid Refill Indicator 9. 3-In-1 Indicator 10. Child Lock Indicator 11. - Página 23 Water Hardness Table Appliance Setting Clarke Degrees (°e) French Degrees (°fH) German Degrees (°dH) Millimoles (mmol/L) 0 - 8 0 - 11 0 - 6 0 - 1.1 9 - 10 12 - 14 7 - 8 1.2 - 1.4 11 - 12 15 - 17 9 - 10...
-
Página 24: Rinse Aid
Rinse Aid Rinse Aid is added during the last rinse cycle and lowers the surface tension of water before the drying cycle commences. This ensures that water droplets are not formed on your dishes and ensures spot and streak free drying. IMPORTANT: Always use dishwasher compatible rinse aid. - Página 25 IMPORTANT: Soak up any spilt rinse aid with a damp absorbent cloth to avoid excess foaming during the next wash cycle. Adjusting the Rinse Aid Setting The rinse aid dispenser has six settings, and is factory set at 5. This will be the correct setting in most cases. However, if there are drops of water remaining on the dishes after washing, the rinse aid use can be increased by turning the arrow head anti-clockwise.
-
Página 26: Using Your Dishwasher
Using your dishwasher Use of the 3-in-1 Multi-Tablet and the Dry Plus functions Before using 3-in-1 Multi-Tablet detergent in your appliance, check the compatibility of the tablets with the hardness of the water in your area. Multi-Tablets are a combination of detergent, rinse aid and salt, however if your water is particularly hard it is recommended to continue to use rinse aid and dishwasher salt in the appliance in addition to the tablet. - Página 27 IMPORTANT: Information for correct loading of the dishwasher to ensure correct washing performance: • Only wash items that are dishwasher safe. • Do not wash items made of wood, aluminium, copper or bone china. • Do not wash lead crystal glasses. •...
-
Página 28: Starting A Wash Program
Loading the Lower Basket Place large items which are more heavily soiled in the bottom basket, such as pots, pans, lids, serving dishes and bowls, as shown in the diagram below. Ensure that the tallest items are placed to the sides to avoid blocking the rotation of the spray arm. The bottom basket also features fold down racks that can be laid flat to create space for larger items. - Página 29 Program Wash Table Icon Program Type Of Program Program Program Duration Energy Water Description Use (kWh) Use (L) Load Cycles Duration Dry Plus (hours:minutes) (hours:minutes) Normal soil, Pre-wash 3:59 4:04 0.95 10.0 crockery Main wash (*EN 60436) and cutlery 48°C (Standard Rinses Drying Programme)
-
Página 30: Unloading The Baskets
Unloading the baskets 1. When the wash program has finished, there will be an audible beep six times and the display will show “ - - - “. 2. Press the Power button to turn off the appliance, open the door and allow the items to cool down before handling – note that the items will be hot! 3. -
Página 31: Cleaning The Filters
Entretien et maintenance inere Cuidados y Mantenimiento The filter parts The filter system consists of a flat mesh filter and a cylindrical filter in two parts, coarse and fine. 1. Flat mesh filter: Food particles will be initially washed onto the steel mesh filter before entering the plastic cylindrical filter. -
Página 32: Cleaning The Spray Arms
Cleaning the Spray Arms Check the spray arms weekly to ensure that all the jets are clear and not blocked with limescale or food particles. If it is necessary to clean the spray arms, they can be removed as follows: Bottom arm 1. -
Página 33: Panneau De Commande
Utilisation Utilizare Utilização Panneau de commande 8 10 1. Bouton d'alimentation 2. Bouton de départ différé du programme 3. Bouton de sélection/sécurité enfant 4. Bouton de fonction 5. Voyants des programmes 6. Voyant du programme de séchage intensif 7. Indicateur de remplissage du sel 8. - Página 34 H7, il revient ensuite à H0 avant d'augmenter de nouveau. Un signal sonore est émis à chaque fois que vous appuyez sur le bouton. 8. Enfin, appuyer une seule fois sur le bouton de sélection de programme pour enregistrer. Un signal sonore est alors émis pour confirmer le réglage.
-
Página 35: Produit De Rinçage
• Retirer l'entonnoir et remettre le bouchon. • L'indicateur de sel sur le panneau d'affichage devrait s'éteindre dès que le premier cycle de lavage complet aura amorcé le système d'adoucisseur d'eau. [04] Produit de rinçage Le produit de rinçage est ajouté pendant le dernier cycle de rinçage et permet d'abaisser la tension superficielle de l'eau avant le démarrage du cycle de séchage. - Página 36 Le distributeur de produit de rinçage est situé à l'intérieur de la porte sur le panneau de détergent. Pour ouvrir le distributeur, tourner le bouchon de 90° dans le sens antihoraire et le retirer (voir photo 1). Verser soigneusement le produit de rinçage dans le réservoir en vous aidant de l'indicateur visuel de produit de rinçage (voir photo 2).
-
Página 37: Utilisation De Votre Lave-Vaisselle
Pour ouvrir le couvercle du distributeur de détergent, relever le levier vers la droite et le couvercle s'ouvre sous l'effet du ressort. Après avoir ajouté du détergent approprié dans le distributeur, fermer le couvercle en appuyant dessus jusqu'à entendre un « clic » indiquant qu'il est bien fermé. - Página 38 2. Appuyer une seule fois sur le bouton de fonction pour sélectionner l'option de séchage intensif ; l'appareil émet un signal sonore et l'icône correspondante s'allume sur l'affichage. La durée totale de chaque programme est alors légèrement augmentée. Se reporter au Tableau des programmes de lavage ci-dessous pour plus de détails. 3.
- Página 39 Chargement du panier supérieur Le panier supérieur est conçu pour y placer les éléments plus légers et plus délicats, comme les verres, tasses et soucoupes, les petits bols et petites casseroles. Vérifier que la vaisselle ne risque pas de basculer pendant le cycle de lavage. Réglage du panier supérieur Si nécessaire, il est possible de régler la hauteur du panier supérieur afin d'obtenir plus de place pour les grands ustensiles, soit dans le panier supérieur...
- Página 40 Tiroir à couverts Disposer les couverts dans le panier de façon à ce qu'ils ne se touchent pas. Il y a deux côtés qui peuvent être ajustés soit pour qu'ils se chevauchent, soit pour les retirer afin d'obtenir plus de place pour des éléments de grande taille dans le panier supérieur situé...
-
Página 41: Ajout De Vaisselle En Cours De Programme De Lavage
Icône Description Type de Cycles du Durée du Durée du Consommation Consommation vaisselle programme programme programme d'énergie (kWh) d'eau (L) programme (heures:minutes) Séchage intensif (heures:minutes) Cristal Salissure Lavage principal Non applicable 02:04 0,90 11,0 modérée, 40 °C Rinçages vaisselle, Séchage couverts et casseroles Rapide... - Página 42 Déchargement des paniers 1. Lorsque le programme de lavage est terminé, un signal sonore retentit 6 fois et l'affichage indique « - - - ». 2. Appuyer sur le bouton d'alimentation pour éteindre l'appareil, ouvrir la porte et laisser les éléments refroidir avant de les toucher : la vaisselle est chaude ! 3.
-
Página 43: Nettoyage Des Filtres
Entretien et maintenance inere Cuidados y Mantenimiento Les pièces du filtre Le système de filtre se compose d'un filtre à mailles plat et d'un filtre cylindrique en deux parties : une partie à trous fins et une partie à gros trous. 1. -
Página 44: Nettoyage Des Bras Gicleurs
Nettoyage des bras gicleurs Vérifier les bras gicleurs chaque semaine pour s'assurer que tous les jets sont propres et non obstrués par le calcaire ou des résidus d'aliments. S'il est nécessaire de nettoyer les bras gicleurs, ils peuvent être retirés comme suit : Bras inférieur 1. -
Página 45: Panel Sterowania
Utilisation Utilizare Utilização Panel sterowania 8 10 1. Przycisk zasilania 2. Przycisk opóźnienia programu 3. Przycisk wyboru programu / Blokada rodzicielska 4. Przycisk funkcyjny 5. Wskaźniki programu 6. Wskaźnik funkcji Dry Plus 7. Wskaźnik konieczności uzupełnienia soli 8. Wskaźnik konieczności uzupełnienia nabłyszczacza 9. Wskaźnik 3 w 1 10. Wskaźnik blokady rodzicielskiej 11. Wyświetlacz Przed rozpoczęciem użytkowania Usunąć... - Página 46 Tabela Twardość wody Ustawienie Stopnie Clarka (°e) Stopnie Stopnie Milimole (mmol/l) urządzenia francuskie (°fH) niemieckie (°dH) 0 - 8 0 - 11 0 - 6 0 - 1,1 9 - 10 12 - 14 7 - 8 1,2 - 1,4 11 - 12 15 - 17 9 - 10...
- Página 47 Nabłyszczacz Nabłyszczacz jest dodawany podczas ostatniego cyklu płukania i obniża napięcie powierzchniowe wody przed rozpoczęciem cyklu osuszania. Zapewnia to brak kropel wody na naczyniach, co gwarantuje niepozostawiające smug suszenie. WAŻNE: Zawsze używać nabłyszczacza odpowiedniego do stosowania w zmywarce. Należy używać wyłącznie nabłyszczaczy przeznaczonych do stosowania w zmywarce. Nigdy nie należy napełniać dozownika nabłyszczacza innymi substancjami, np.
- Página 48 Gdy wskaźnik jest całkowicie ciemny, pojemnik jest pełny; nie przepełniać go. Założyć z powrotem korek, ustawiając go na równi ze strzałkami, i obrócić go w prawo o 90 stopni w celu zablokowania (patrz ilustracja 3). WAŻNE: Wytrzeć rozlany nabłyszczacz za pomocą wilgotnej ściereczki, aby uniknąć nadmiaru piany podczas kolejnego cyklu mycia.
- Página 49 Korzystanie ze zmywarki Korzystanie z tabletek wielofunkcyjnych 3 w 1 i funkcji Dry Plus Przed użyciem tabletek wielofunkcyjnych 3 w 1 w urządzeniu należy sprawdzić zgodność tabletek z twardością wody w danym obszarze. Tabletki wielofunkcyjne stanowią połączenie detergentu, nabłyszczacza i soli. Niemniej jednak, jeśli woda jest bardzo twarda, zaleca się...
- Página 50 Załadunek i rozładunek koszy zmywarki Aby uzyskać najlepszą wydajność zmywarki, należy postępować zgodnie z poniższymi wskazówkami dotyczącymi załadunku. Funkcje i wygląd koszy oraz pojemników na sztućce mogą się różnić w zależności od modelu. WAŻNE: Informacje dotyczące prawidłowego umieszczania naczyń w zmywarce w celu zapewnienia odpowiedniej efektywności zmywania: •...
-
Página 51: Uruchamianie Programu Mycia
Załadunek dolnego kosza W dolnym koszu należy umieszczać duże przedmioty, które są bardziej zabrudzone, np. garnki, patelnie, pokrywy, talerze i misy, zgodnie z poniższym schematem. Najwyższe przedmioty należy umieszczać po bokach, aby uniknąć zablokowania ruchu ramion spryskujących. W dolnym koszu znajdują się także rozkładane półki, które można rozłożyć na płasko, aby zapewnić więcej miejsca na większe przedmioty. - Página 52 WAŻNE: To urządzenie nie jest wyposażone w przycisk uruchamiania, w związku z czym program mycia uruchomi się automatycznie po wybraniu programu i zamknięciu drzwi. 1. Otworzyć drzwi, załadować zmywarkę i dodać detergent lub tabletkę 3 w 1 do dozownika. 2. Nacisnąć przycisk zasilania , aby włączyć...
- Página 53 Zmiana lub anulowanie programu mycia Aby zmienić bieżący program, nacisnąć przycisk zasilania w celu anulowania cyklu. Ponownie nacisnąć przycisk zasilania, aby powrócić do programu ECO i wybrać nowy program po wykonaniu powyższych czynności. UWAGA: Jeśli program jest uruchomiony przez pewien czas, detergent mógł zostać zużyty w trakcie mycia głównego.
-
Página 54: Dodawanie Przedmiotów W Trakcie Trwania Programu Mycia
UWAGA: Jeśli program jest uruchomiony przez pewien czas, detergent mógł zostać zużyty w trakcie mycia głównego. Zaleca się otwarcie drzwi i sprawdzenie dozownika przed rozpoczęciem nowego programu. Dodawanie przedmiotów w trakcie trwania programu mycia Aby dodać przedmiot w trakcie uruchomionego programu, ostrożnie otworzyć drzwi w celu odblokowania blokady. NIE OTWIERAĆ... -
Página 55: Czyszczenie Filtrów
Entretien et maintenance inere Cuidados y Mantenimiento Elementy filtra System filtra składa się z płaskiego filtra siatkowego i filtra cylindrycznego z dwoma częściami, zgrubną i drobną. 1. Płaski filtr siatkowy: Pozostałości jedzenia zostaną usunięte i przeniesione na stalowy filtr siatkowy, zanim dotrą do filtra cylindrycznego z tworzywa sztucznego. -
Página 56: Czyszczenie Ramion Spryskujących
Czyszczenie ramion spryskujących Raz na tydzień sprawdzać ramiona spryskujące, aby upewnić się, że wszystkie dysze są czyste i niezablokowane przez osad lub pozostałości jedzenia. Jeżeli konieczne jest wyczyszczenie ramion, można je zdemontować w następujący sposób: Dolne ramię 1. Wyjąć dolny kosz. 2. -
Página 57: Panou De Control
Utilisation Utilizare Utilização Panou de control 8 10 1. Buton de alimentare 2. Buton de întârziere a programului 3. Buton de selectare a programului / blocare pentru copii 4. Buton pentru funcţii 5. Indicatoare de program 6. Indicator uscare suplimentară 7. Indicator reumplere cu sare 8. Indicator reumplere cu soluţie de clătire 9. - Página 58 Tabel de duritate a apei Setare aparat Grade Clarke (°e) Grade franţuzeşti (°fH) Grade germane (°dH) Milimoli (mmol/L) 0 - 8 0 - 11 0 - 6 0 - 1,1 9 - 10 12 - 14 7 - 8 1,2 - 1,4 11 - 12 15 - 17 9 - 10...
- Página 59 Soluţie de clătire Soluţia de clătire este adăugată în timpul ultimului ciclu de clătire şi reduce tensiunea superficială a apei înainte de începerea ciclului de uscare. Acest lucru previne formarea de picături de apă pe vase şi asigură o uscare fără pete. IMPORTANT: Folosiţi întotdeauna soluţie de clătire compatibilă...
- Página 60 IMPORTANT: Ştergeţi soluţia de clătire vărsată cu o lavetă absorbantă umedă, pentru a evita formarea de spumă în exces în timpul următorului ciclu de spălare. Reglarea setării pentru soluţia de clătire Dozatorul de soluţie de clătire are şase setări şi este setat din fabrică...
- Página 61 Folosirea maşinii de spălat vase Utilizarea funcţiilor Tabletă multifuncţională 3 în 1 şi Uscare suplimentară Înainte de a folosi Tableta multifuncţională 3 în 1 în aparat, verificaţi compatibilitatea tabletelor cu duritatea apei din zona dvs. Tabletele multifuncţionale 3 în 1 sunt o combinaţie de detergent, soluţie de clătire şi sare, însă dacă apa dvs. este deosebit de dură, se recomandă...
- Página 62 Încărcarea şi descărcarea coşurilor maşinii de spălat vase Pentru cele mai bune performanţe ale maşinii de spălat vase, urmaţi aceste instrucţiuni de încărcare. Caracteristicile şi aspectul coşurilor şi al tăvilor pentru tacâmuri pot fi diferite de modelul dvs. IMPORTANT: Informații privind încărcarea corectă a mașinii de spălat vase pentru a asigura o performanță...
- Página 63 Încărcarea coşului inferior Aşezaţi articolele mari, care sunt mai murdare – precum oale, tigăi, capace, vase şi boluri de servit –, în coşul inferior, aşa cum se arată în schema de mai jos. Asiguraţi-vă că cele mai înalte articole sunt aşezate în părţile laterale, pentru a evita blocarea rotirii braţului de pulverizare. Coşul inferior dispune şi de rafturi pliabile, care pot fi aplatizate orizontal ca să...
- Página 64 IMPORTANT: Acest aparat nu dispune de un buton de pornire, aşadar programul de spălare va porni automat când se selectează programul, iar uşa este complet închisă. 1. Deschideţi uşa, încărcaţi maşina de spălat vase şi adăugaţi detergent pentru maşina de spălat vase sau o tabletă 3 în 1 în dozator.
-
Página 65: Descărcarea Coşurilor
NOTĂ: Dacă programul este în desfăşurare de ceva timp, este posibil ca detergentul să fi fost distribuit şi utilizat la spălarea principală. Se recomandă să deschideţi uşa şi să verificaţi dozatorul înainte de a începe un nou program. Adăugarea de articole suplimentare în timpul unui program de spălare Dacă... -
Página 66: Curăţarea Filtrelor
Entretien et maintenance inere Cuidados y Mantenimiento Piesele filtrului Sistemul filtrului constă într-un filtru cu plasă plată şi un filtru cilindric din două părţi, grosieră şi fină. 1. Filtrul cu plasă plată: Particulele de mâncare vor fi iniţial măturate în filtrul cu plasă din oţel înainte de a intra în filtrul cilindric din plastic. - Página 67 Curăţarea braţelor de pulverizare Verificaţi braţele de pulverizare săptămânal pentru a vă asigura că toate orificiile sunt libere şi nu sunt blocate de calcar sau particule de mâncare. Dacă este necesar să curăţaţi braţele de pulverizare, acestea pot fi demontate după cum urmează: Braţul inferior 1.
-
Página 68: Panel De Control
Utilisation Utilizare Utilização Panel de control 8 10 1. Botón de encendido 2. Botón de inicio con retardo de programa 3. Botón de selección de programa / bloqueo infantil 4. Botón de función 5. Indicadores de programa 6. Indicador Secado Plus 7. Indicador de recarga de sal 8. Indicador de recarga de abrillantador 9. - Página 69 Tabla de dureza del agua Ajuste del aparato Grados Clarke (°e) Grados franceses (° F) Grados alemanes (° D) Milimoles (mmol/l) 0 - 8 0 - 11 0 - 6 0 - 1,1 9 - 10 12 - 14 7 - 8 1,2 - 1,4 11 - 12 15 - 17...
-
Página 70: Abrillantador
Abrillantador El abrillantador se añade durante el último ciclo de enjuagado y reduce la tensión superficial del agua antes de que empiece el ciclo de secado. Esto garantiza que no queden gotas de agua en los platos, y asegura un secado sin manchas ni franjas. IMPORTANTE: Utilice siempre abrillantador apto para lavavajillas. -
Página 71: Detergente Para El Lavavajillas
Coloque el tapón con las flechas alineadas y gírelo 90 ° hacia la derecha para encajarlo en su lugar (ver imagen 3). IMPORTANTE: Limpie cualquier salpicadura de abrillantador con un paño húmedo absorbente para evitar un exceso de espuma durante el siguiente ciclo de lavado. Ajuste de la configuración del abrillantador El dosificador de abrillantador tiene seis niveles, y viene ajustado de fábrica en 5. -
Página 72: Uso Del Lavavajillas
Uso del lavavajillas Uso de las funciones Pastillas 3 en 1 y Secado Plus Antes de usar detergente en pastillas 3 en 1 en el aparato, compruebe la compatibilidad de las pastillas con la dureza del agua de su zona. Las pastillas todo en 1 combinan detergente, abrillantador y sal. No obstante, si el agua es especialmente dura, se recomienda seguir utilizando abrillantador y sal para lavavajillas en el aparato, además de la pastilla. - Página 73 IMPORTANTE: Información sobre la carga correcta del lavavajillas para garantizar una eficiencia de lavado adecuada: • Lave solamente utensilios aptos para lavavajillas. • No lave utensilios de madera, aluminio, cobre o porcelana. • No lave vasos de cristal con plomo. •...
- Página 74 Ajuste del cesto superior Si es necesario, la altura del cesto superior se puede ajustar para crear más espacio para grandes utensilios de cocina en el cesto superior o en el cesto inferior. El cesto superior se puede ajustar en altura si sujeta las asas de ambos lados de la cesta y lo eleva o baja hasta que encaje en su sitio.
-
Página 75: Inicio De Un Programa De Lavado
Inicio de un programa de lavado Una vez que haya completado todos los pasos anteriores de montaje y configuración, ya está listo para empezar con su primer programa de lavado. IMPORTANTE: Este aparato no dispone de un botón de inicio, por lo que el programa de lavado se inicia automáticamente cuando el programa se ha seleccionado y la puerta está... -
Página 76: Añadido De Utensilios Adicionales Durante El Programa De Lavado
NOTA: Si el programa está en funcionamiento durante bastante tiempo, es posible que el detergente se haya utilizado en el lavado principal. Se recomienda abrir la puerta y comprobar el dosificador antes de iniciar un nuevo programa. Añadido de utensilios adicionales durante el programa de lavado Si desea añadir un utensilio a un programa de lavado en funcionamiento, abra la puerta con cuidado para quitar el bloqueo. -
Página 77: Piezas Del Filtro
Entretien et maintenance inere Cuidados y Mantenimiento Piezas del filtro El sistema de filtro consta de un filtro de malla plano y un filtro cilíndrico en dos piezas, una gruesa y otra fina. 1. Filtro de malla plano: Las partículas de alimentos se alojan inicialmente en el filtro de malla de acero antes de pasar al filtro cilíndrico de plástico. -
Página 78: Limpieza De Los Brazos De Aspersión
Limpieza de los brazos de aspersión Revise los brazos de aspersión semanalmente para asegurarse de que todos los surtidores están libres y no están bloqueados con cal o partículas de comida. Si es necesario limpiar los brazos de aspersión, se pueden retirar de la siguiente manera: Brazo inferior 1. -
Página 79: Painel De Controlo
Utilisation Utilizare Utilização Painel de controlo 8 10 1. Botão de alimentação 2. Botão de atraso do programa 3. Botão de seleção de programa/bloqueio para crianças 4. Botão de função 5. Indicadores de programa 6. Indicador de abrilhantador 7. Indicador de nível de sal 8. Indicador de nível de abrilhantador 9. - Página 80 8. Por último, prima o botão de seleção do programa uma vez para guardar; e será emitido um sinal sonoro para confirmar a definição. Tabela da dureza da água Definição Graus Graus franceses (°fH) Graus alemães (°dH) Milimoles (mmol/L) do aparelho ingleses (°Clarke) 0 - 8 0 - 11...
-
Página 81: Abrilhantador
[04] Abrilhantador O abrilhantador é adicionado durante o último ciclo de enxaguamento e reduz a tensão superficial da água antes de iniciar o ciclo de secagem. Isto assegura que não são formadas gotas de água nos seus pratos e garante uma secagem sem manchas e sem marcas. IMPORTANTE: Utilize sempre abrilhantador adequado a máquina de lavar louça. - Página 82 O dispensador de abrilhantador está localizado no interior da porta, no painel de detergente. Para abrir o dispensador, rode a tampa 90° para a esquerda e retire-a (veja a imagem 1). Verta cuidadosamente o abrilhantador para o compartimento, recorrendo ao indicador visual do nível de abrilhantador como orientação (veja a figura 2).
- Página 83 Para abrir a tampa do detergente, mova a patilha para cima em direção ao lado direito e a tampa abre-se. Depois de adicionar o detergente correto no compartimento, feche a tampa pressionando-a sobre o encaixe até encaixar com um estalido. Adicione sempre o detergente imediatamente antes de iniciar um ciclo de lavagem.
- Página 84 3. Prima o botão Função uma segunda vez para selecionar a opção para pastilhas 3 em 1 ; o aparelho emite novamente um sinal sonoro, a função de abrilhantador é cancelada, a respetiva luz apaga-se e acende-se o ícone 3 em 1 .
- Página 85 Colocar louça no cesto superior O cesto superior foi concebido para colocar os itens mais delicados e leves, como copos, chávenas e pires, taças pequenas e frigideiras pequenas. Certifique-se de que os itens não serão derrubados durante o ciclo de lavagem. Ajustar o cesto superior Se necessário, pode ajustar a altura do cesto superior para criar mais espaço para utensílios de cozinha grandes no cesto superior ou no cesto inferior.
- Página 86 Porta-talheres Organize os talheres no suporte sem ficarem encostados. Este dispõe de duas laterais que podem ser ajustadas para ficarem sobrepostas ou podem ser removidas para criar mais espaço para itens altos no cesto superior rebaixado. Iniciar um programa de lavagem Após a conclusão de todos os passos apresentados acima relativamente à...
- Página 87 Ícone Descrição Tipo de Ciclos do Duração do Duração do programa Consumo Consumo do programa itens programa programa Com abrilhantador energético de água (L) (horas:minutos) (horas:minutos) (kWh) Rápido Pouca sujidade, Lavagem principal a Não aplicável 0:40 0,55 lavagem curta 45 °C, enxaguamento Pré-lavagem Pouca sujidade, Apenas pré-lavagem...
-
Página 88: Limpeza Dos Filtros
Entretien et maintenance inere Cuidados y Mantenimiento As peças do filtro O sistema do filtro é composto por um filtro de malha plano e um filtro cilíndrico de duas partes, grosso e fino. 1. Filtro de malha plano: As partículas de alimentos são inicialmente conduzidas para o filtro de malha de aço, antes de entrarem no filtro cilíndrico de plástico. -
Página 89: Linha De Atendimento Ao Cliente (Gratuita)
Limpeza dos braços de pulverização Verifique os braços de pulverização semanalmente para garantir que todos os jatos estão desobstruídos, sem bloqueios de calcário ou partículas de alimentos. Se for necessário limpar os braços de pulverização, pode removê-los da seguinte forma: Braço inferior 1. - Página 90 Manufacturer • Fabricant • Producent www.castorama.pl Producător • Fabricante: Infolinia dla klientów (bezpłatna): UK Manufacturer: 800 121 2222 Kingfisher International Products Limited, poland@kingfisherservice.com 3 Sheldon Square, London, W2 6PX, Aby zapoznać się z instrukcją obsługi online, United Kingdom odwiedź stronę www.kingfisher.com/products EU Manufacturer: www.bricodepot.ro Kingfisher International Products B.V.