Tabla de contenido
Publicidad
Idiomas disponibles
Idiomas disponibles
Enlaces rápidos
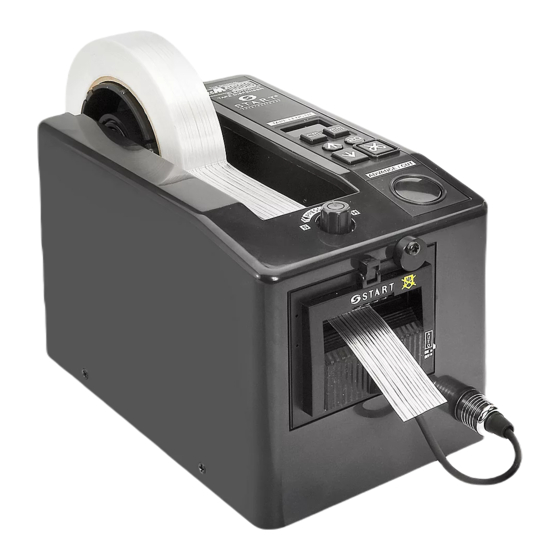
H-99
INDUSTRIAL AUTOMATIC
TAPE DISPENSER
Do not leave the tape
dispenser in direct sunlight.
Do not use the tape dispenser
in humid or dusty places.
• If using automatic feed, when one piece of tape is
removed, the unit will automatically feed and cut
the next piece at the preset length.
• The tape length is easily seen on the LED display,
and operation is simple. Press the CM key or MM key
to set the length. (Setting limit 20mm to 999mm.)
PAGE 1 OF 15
1-800-295-5510
uline.com
NOTES
Do not drop the tape
dispenser or subject it to
heavy shocks.
Do not insert bars or plates
into the tape outlet-this will
damage the blades.
FEATURES
• If a piece of long tape is needed, press the
ADVANCE key for desired length, then press CUT key
to cut.
• The blade unit can be removed and replaced easily.
(Tape jamming is also easily fixed by removing the
blade unit.)
Para Español, vea páginas 6-10.
Pour le français, consulter les pages 11-15.
Do not use volatile liquids
(benzine, thinner, etc.)
to clean the dispenser.
Wipe with dry cloth only.
DO NOT insert your fingers
into the tape outlet!
0621 IH-99
Publicidad
Tabla de contenido

Manuales relacionados para Uline H-99


Resumen de contenidos para Uline H-99
- Página 1 Para Español, vea páginas 6-10. Pour le français, consulter les pages 11-15. H-99 1-800-295-5510 uline.com INDUSTRIAL AUTOMATIC TAPE DISPENSER NOTES Do not leave the tape Do not drop the tape Do not use volatile liquids dispenser in direct sunlight. dispenser or subject it to (benzine, thinner, etc.)
-
Página 2: Parts And Functions
PARTS AND FUNCTIONS Reel Tape Length Display Pressure Knob Length Adjustment Keys Reset Key Reverse Key Cut Key Advance Key Advance/Cut Key Sensor Switch Sensor Plug Fuse Feed Separating Roller Roller Power Switch CONTROLS REVERSE KEY POWER SWITCH Feed Roller reverses. Use this key to Press to turn power ON or OFF. - Página 3 OPERATION USING AUTOMATIC FEED TO REPLACE CUTTER UNIT Plug in power cord and turn unit on. 1. Turn off sensor and power before removing cutter unit. Pull sensor plug out, then pull cutter unit forward 2. Set tape on the center of reel and stick the end of while pressing the knob on the top of the unit.
- Página 4 OPERATION CONTINUED SETTING MEMORIES 4. After lengths are set, the display will flash "0" Press MM key to switch between "0" and "5". Press and hold the M key until the LED display • On "0", the machine will feed and cut the first set flashes.
-
Página 5: Preventive Maintenance
Replace as needed. cutter liners. Place one drop of silicone oil on each liner, or replace if worn. Inspect feed roller and blade for tape fragments or adhesive buildup. Clean with alcohol. 1-800-295-5510 PAGE 5 OF 15 0621 IH-99 uline.com... -
Página 6: Despachador Automático De Cinta Adhesiva Industrial
H-99 800-295-5510 uline.mx DESPACHADOR AUTOMÁTICO DE CINTA ADHESIVA INDUSTRIAL NOTAS No deje el despachador No deje caer el No utilice líquidos volátiles de cinta adhesiva expuesto despachador de cinta (bencina, diluyente, etc.) para directamente al sol. adhesiva ni lo someta a limpiar el despachador. -
Página 7: Partes Y Funciones
PARTES Y FUNCIONES Carrete Pantalla de Largo de la Cinta Adhesiva Perilla de Presión Teclas de Ajuste del Largo Tecla de Reinicio Tecla de Reversa Tecla de Corte Tecla de Avance Tecla de Avance/Corte Interruptor del Sensor Enchufe del Sensor Fusible Rodillo de Rodillo... -
Página 8: Funcionamiento
FUNCIONAMIENTO USAR EL DESPACHADO AUTOMÁTICO PARA REEMPLAZAR LA UNIDAD DE LA CORTADORA Enchufe el cable de electricidad y encienda la unidad. 1. Apague el sensor y la electricidad antes de quitar la unidad de la cortadora. Desconecte el enchufe 2. Coloque la cinta adhesiva en el centro del carrete del sensor y a continuación estire de la unidad de y pegue el extremo de la cinta adhesiva al rodillo la cortadora hacia adelante a la vez que presiona... -
Página 9: Continuación De Funcionamiento
CONTINUACIÓN DE FUNCIONAMIENTO CONFIGURAR LAS MEMORIAS 4. Una vez fijados los largos, en la pantalla parpadeará un "0". Presione la tecla MM para Presione y mantenga presionada la tecla M hasta alternar entre "0" y "5". que la pantalla LED parpadee. •... -
Página 10: Solución De Problemas
Ponga una gota de aceite de silicón en cada forro o reemplácelos según sea necesario. Inspeccione el rodillo de alimentación y la navaja en busca de fragmentos de cinta adhesiva o acumulación de adhesivo. Límpielo con alcohol. 800-295-5510 PAGE 10 OF 15 0621 IH-99 uline.mx... - Página 11 H-99 1-800-295-5510 uline.com DÉVIDOIR DE RUBAN ADHÉSIF AUTOMATIQUE INDUSTRIEL REMARQUES Ne laissez pas le dévidoir Évitez de faire tomber N'utilisez pas de liquides de ruban adhésif en plein le dévidoir de ruban volatils (benzène, diluant, soleil. adhésif ou de le etc.) pour nettoyer le...
-
Página 12: Pièces Et Fonctions
PIÈCES ET FONCTIONS Bobine Affichage de la longueur de ruban Bouton de pression Touches de réglage de la longueur Touche Réinitialiser Touche Arrière Touche Couper Touche Avancer Touche Avancer/Couper Interrupteur du capteur Fiche du capteur Fusible Rouleau Rouleau d'alimentation séparateur Interrupteur d'alimentation COMMANDES INTERRUPTEUR D'ALIMENTATION... - Página 13 FONCTIONNEMENT UTILISATION DE LA DISTRIBUTION AUTOMATIQUE POUR REMPLACER L'UNITÉ DE COUPE Branchez le cordon d'alimentation et allumez l'appareil. Éteignez le capteur et débranchez l'alimentation avant de retirer l'unité de coupe. Débranchez la 2. Posez le ruban au centre de la bobine et collez fiche du capteur, puis tirez l'unité...
- Página 14 FONCTIONNEMENT SUITE RÉGLAGE DES TOUCHES DE MÉMOIRE 4. Lorsque les longueurs auront été réglées, le chiffre « 0 » clignotera à l'écran. Appuyez sur la touche MM Maintenez la touche M enfoncée jusqu'à ce que pour basculer entre « 0 » et « 5 ». l'écran DEL clignote. •...
-
Página 15: Entretien Préventif
Déposez une goutte d'huile de silicone sur chaque doublure, ou remplacez si elles sont usées. Inspectez le rouleau d'alimentation et la lame pour vérifier si des fragments de ruban ou d'adhésif s'y sont accumulés. Nettoyez avec de l'alcool. 1-800-295-5510 PAGE 15 OF 15 0621 IH-99 uline.ca...