Publicidad
Idiomas disponibles
Idiomas disponibles
Publicidad
Tabla de contenido

Manuales relacionados para AmazonBasics B00H7P1FUU


Resumen de contenidos para AmazonBasics B00H7P1FUU
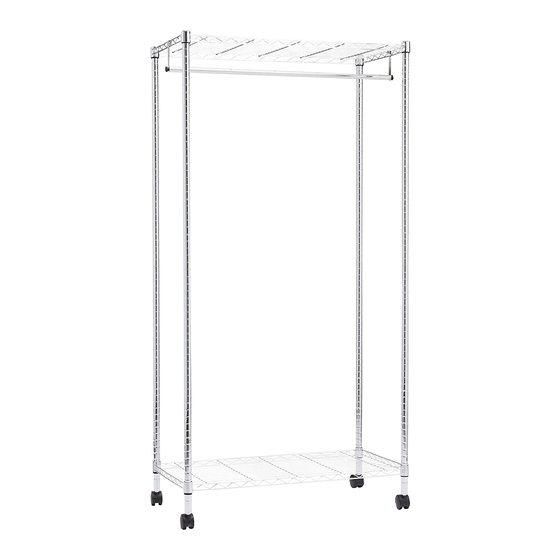
- Página 1 B00H7P1FUU...
- Página 2 English ..... .3 Français .....9 Deutsch .
- Página 3 English Instruction Manual · English AmazonBasics Garment Rack with Top and Bottom Shelves Contents Make sure that the package contains the following parts: A (sleeve) B (wheel) C (wrench) (18 pcs) (Includes 2 spares) (4 pcs) (1 pc) D (top pole with a cap on 1 end and a threaded...
- Página 4 Assembly Instructions Step 1: Connect the top and bottom poles. Note: The threaded connector (F) may be pre-installed on part D. Step 2: Attach 8 sleeves (2 per pole) to the poles at the height where you want the bottom shelf to be.
- Página 5 Step 3: Install the bottom shelf by pushing it down onto the sleeves on each pole. Tip: You can lay the garment rack on its side to install the shelf. Step 4: Install the wheels. Tip: You can lay the garment rack on its side to install the shelf.
- Página 6 Step 5: Attach sleeves to the poles at the height where you want the top shelf to be. Note: The sleeves keep the shelf in place and are used in pairs. Make sure that the sleeves are in the same position on all 4 poles or the shelf will not be level.
- Página 7 Step 6: Install the top shelf by pushing it down onto the sleeves on each pole. Step 7: Attach the hanging rod brackets and hanging rod to the top shelf.
-
Página 8: Safety And Compliance
Safety and Compliance • Use care when handling. • Two adults are recommended for ease of assembly. • To avoid scratching the floor, assemble the closet on a soft surface such as a carpet. • Do not let children climb on or play around the closet. Specifications Dimensions 70.5 x 35 x 17.3 in. - Página 9 Français Manuel d’instructions · Français Range vêtements AmazonBasics avec étagères supérieure et inférieure Contenu Assurez-vous que l’emballage contient les pièces suivantes : A (manchon) B (roue) C (clé) (18 pièces) (Comprend 2 (4 pièces) (1 pc) pièces de rechange) D (4 pcs) (poteau supérieur avec un capuchon E (poteau inférieur avec des trous filetés sur...
- Página 10 Notice d’assemblage Étape 1 : Connectez les poteaux supérieur et inférieur. Note : Le connecteur fileté (F) peut être préinstallé sur la pièce D. Étape 2 : Attachez 8 manchons (2 par poteau) aux poteaux à la hauteur où vous voulez placer l’étagère inférieure.
- Página 11 Étape 3 : Installez l’étagère inférieure en la poussant vers le bas sur les manchons sur chaque poteau. Conseil : Vous pouvez mettre le range-vêtements sur son côté pour installer l’étagère. Étape 4 : Installez les roues. Conseil : Vous pouvez mettre le range-vêtements sur son côté pour installer l’étagère.
- Página 12 Étape 5 : Attachez les manchons aux poteaux à la hauteur où vous voulez placer l’étagère supérieure. Note : Les manchons gardent l’étagère en place et sont utilisés en paires. Assurez-vous que les étagères sont dans la même position sur les 4 poteaux sinon l’étagère ne sera pas de niveau.
- Página 13 Étape 6 : Installez l’étagère supérieure en la poussant vers le bas sur les manchons sur chaque poteau. Étape 7 : Attachez les supports de tige suspendue et la tige suspendue à l’étagère supérieure.
-
Página 14: Sécurité Et Conformité
Sécurité et conformité • Procédez avec précautions lors de la manipulation. • Pour faciliter l’assemblage, faites-vous aider d’un autre adulte. • Pour éviter de rayer le sol, assemblez le placard sur une surface douce telle qu’un tapis. • Ne pas laisser les enfants grimper ou jouer autour du placard. Caractéristiques Dimensions 179,1 x 88,9 x 43,9 cm... - Página 15 Deutsch Bedienungsanleitung · Deutsch AmazonBasics – Kleidergestell mit oberem und unterem Regal Inhalt Bitte stellen Sie sicher, dass das Paket die folgenden Teile enthält: A (Manschette) B (Rad) (18 Stck.) (einschließlich 2 (4 Stck.) (Schraubenschlüssel) Ersatzmanschetten) (1 Stck.) D (obere Stange mit einer Kappe auf einem Ende E (untere Stange mit Gewindelöchern an jedem...
- Página 16 Montageanleitung Schritt 1: Setzen Sie die oberen und unteren Stangen zusammen. Hinweis: Der Gewindeanschluss (F) kann auf Teil D vorinstalliert sein. Schritt 2: Befestigen Sie an den Stangen 8 Manschetten (2 pro Stange) auf der Höhe, auf der das untere Regal positioniert sein soll. Hinweis: Die Manschetten sichern das Regal und werden paarweise verwendet.
- Página 17 Schritt 3: Installieren Sie das untere Regal, indem Sie es nach unten auf die Manschetten an jeder Stange drücken. Tipp: Sie können das Kleidergestell auf die Seite legen, um das Regal zu installieren. Schritt 4: Installieren Sie die Räder. Tipp: Sie können das Kleidergestell auf die Seite legen, um das Regal zu installieren.
- Página 18 Schritt 5: Befestigen Sie an den Stangen Manschetten auf der Höhe, auf der das obere Regal positioniert sein soll. Hinweis: Die Manschetten sichern das Regal und werden paarweise verwendet. Stellen Sie sicher, dass die Manschetten an allen 4 Stangen gleich positioniert sind. Andernfalls ist das Regal nicht eben.
- Página 19 Schritt 6: Installieren Sie das obere Regal, indem Sie es nach unten auf die Manschetten an jeder Stange drücken. Schritt 7: Befestigen Sie die Kleiderstangenhalterungen und die Kleiderstange am oberen Regal.
-
Página 20: Technische Daten
Sicherheit und Compliance • Bei der Handhabung vorsichtig sein. • Für den Zusammenbau werden zwei Erwachsene empfohlen. • Um Kratzer auf dem Boden zu vermeiden, das Schrankgestell auf einer weichen Oberfläche (z. B. Teppich) zusammenbauen. • Kinder nicht auf das Schrankgestell klettern oder in der Nähe spielen lassen. Technische Daten Abmessungen 179,1 x 88,9 x 43,9 cm... - Página 21 Italiano Manuale di istruzioni · Italiano Carrello appendiabiti AmazonBasics con ripiani superiore e inferiore Contenuto Assicurarsi che la confezione comprenda le seguenti parti: A (fermo) B (ruota) C (chiave) (18 pz.) (Include 2 ricambi) (4 pz.) (1 pz.) D (barra superiore con un tappo a 1 estremità e E (barra inferiore con fori filettati su ogni estremità)
-
Página 22: Istruzioni Di Montaggio
Istruzioni di montaggio Fase 1: Montare la barra superiore e inferiore. Nota: Il connettore filettato (F) potrebbe essere pre-installato sul componente D. Fase 2: Sistemare gli 8 fermi (2 per barra) sulle barre all’altezza di montaggio del ripiano inferiore. Nota: I fermi mantengono il ripiano in posizione e sono usati a coppie. Assicurarsi che i fermi siano alla stessa posizione su tutte e 4 le barre, altrimenti il ripiano non sarà... - Página 23 Fase 3: Montare il ripiano superiore spingendolo verso il basso sui fermi di ogni barra. Consiglio: È possibile posizionare il carrello appendiabiti su un fianco per installare il ripiano. Fase 4: Montare le ruote. Consiglio: È possibile posizionare il carrello appendiabiti su un fianco per installare il ripiano.
- Página 24 Fase 5: Sistemare i fermi sulle barre all’altezza di montaggio del ripiano superiore. Nota: I fermi mantengono il ripiano in posizione e sono usati a coppie. Assicurarsi che i fermi siano alla stessa posizione su tutte e 4 le barre, altrimenti il ripiano non sarà livellato.
- Página 25 Fase 6: Montare il ripiano superiore spingendolo verso il basso sui fermi di ogni barra. Fase 7: Inserire le staffe e la barra appendiabiti nel ripiano superiore.
-
Página 26: Dati Tecnici
Sicurezza e conformità • Prestare attenzione durante lo spostamento. • Per facilitare il montaggio, deve essere eseguito da due persone adulte. • Per evitare di graffiare il pavimento, montare l’armadio su una superficie morbida, come un tappeto. • Non permettere ai bambini di arrampicarsi sull’armadio o di giocarvi intorno. Dati tecnici Dimensioni 179,1 x 88,9 x 43,9 cm... - Página 27 Español Manual de instrucciones · Español AmazonBasics colgador para prendas con baldas superior e inferior Contenido Asegúrese de que el paquete contenga las siguientes piezas: A (manguito) B (rueda) C (llave para tuercas) (18 uds.) (incluye 2 de (4 uds.) (1 ud.)
- Página 28 Instrucciones de montaje Paso 1: Conecte los postes superior e inferior. Atención: El conector roscado (F) puede venir preinstalado en la pieza D. Paso 2: Conecte 8 manguitos (2 por poste) a los postes a la altura a la que desee situar la balda inferior.
- Página 29 Paso 3: Instale la balda inferior fijándola a presión a los manguitos de cada poste. Sugerencia: Para instalar la balda, puede tender el colgador para prendas sobre un lado. Paso 4: Instale las ruedas. Sugerencia: Para instalar la balda, puede tender el colgador para prendas sobre un lado.
- Página 30 Paso 5: Conecte manguitos a los postes a la altura a la que desee situar la balda superior. Atención: Los manguitos mantienen la balda en posición y se utilizan por parejas. Asegúrese de que los manguitos se encuentren en la misma posición de los 4 postes, dado que de lo contrario la balda quedaría desnivelada.
- Página 31 Paso 6: Instale la balda superior fijándola a presión a los manguitos de cada poste. Paso 7: Conecte los soportes de la barra para perchas y la barra para perchas a la balda superior.
-
Página 32: Seguridad Y Conformidad
Seguridad y conformidad • Ponga cuidado al manipular las piezas. • Se recomienda que el montaje sea realizado por dos adultos para una mayor facilidad. • Para evitar arañar el suelo, monte el armario sobre una superficie blanda, por ejemplo una moqueta o alfombra. - Página 36 Made in China V1 14-0470...