Tabla de contenido
Publicidad
Idiomas disponibles
Idiomas disponibles
Enlaces rápidos
DVI/USB + Audio &
Peripheral Sharing
Register your product for quicker service and ultimate peace of mind.
You could also win an ISOBAR6ULTRA surge protector-a $100 value!
1111 W. 35th Street, Chicago, IL 60609 USA • www.tripplite.com/support
18-09-501-9338C1.indb 1
Owner's Manual
KVM Switch
Model: B043-DUA8-SL
Table of Contents
PROTECT YOUR INVESTMENT!
www.tripplite.com/warranty
Copyright © 2018 Tripp Lite. All rights reserved.
17
25
1
2
2
2
2
3
4
5
5
6
8
9
11/2/2018 3:01:49 PM
Publicidad
Capítulos
Tabla de contenido

Manuales relacionados para Tripp-Lite B043-DUA8-SL


Resumen de contenidos para Tripp-Lite B043-DUA8-SL
-
Página 1: Tabla De Contenido
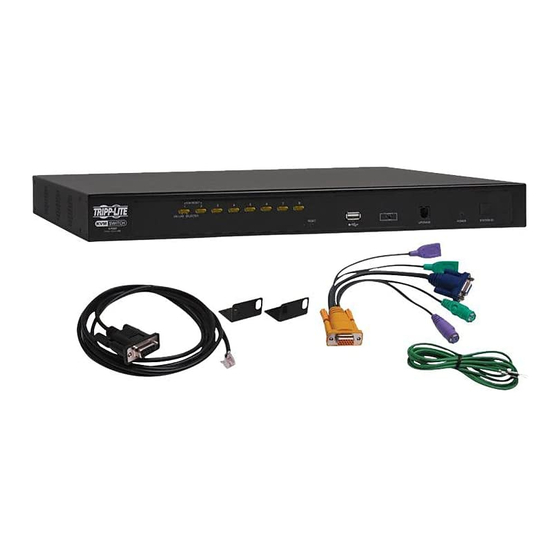
Owner’s Manual DVI/USB + Audio & Peripheral Sharing KVM Switch Model: B043-DUA8-SL Table of Contents Package Contents Optional Accessories System Requirements Product Features Front Panel Safety Instructions Rackmount Installation System Installation Operation Warranty & Product Registration Español Français Русский PROTECT YOUR INVESTMENT! Register your product for quicker service and ultimate peace of mind. -
Página 2: Package Contents
Package Contents • B043-DUA8-SL KVM Switch • External Power Supply (Input: 100-240V, 50/60Hz; Output: 9V, 2A) • Rackmount Hardware • Owner’s Manual Optional Accessories • P312-Series 3.5 mm Mini Stereo Audio Cables • P556-Series DVI Male to VGA Male Adapter Cables •... -
Página 3: Front Panel
Front Panel USB 2.0 Hub Ports – Two hub ports allow for USB peripheral sharing among connected computers. BANK LED – This 2-digit display represents the KVM’s place in a cascaded installation hierarchy. The first KVM in a chain will have a BANK number of 00; standalone KVM’s will also have a BANK number of 00. -
Página 4: Safety Instructions
Safety Instructions • Read all of these instructions and save them for future reference. • Follow all warnings and instructions marked on the device. • Do not place the device on any unstable surface (cart, stand, table, etc.). If the device falls, serious damage will result. -
Página 5: Rackmount Installation
Rackmount Installation Attach the included rackmount brackets to the KVM switch. Using user-supplied screws, fasten the rackmount brackets to the rack. System Installation Standalone Installation Note: Before making any connections, turn off the power to the KVM switch and all devices that are being connected. -
Página 6: Operation
System Installation Connect up to two USB 2.0 devices to the USB hub ports on the front panels of the first- and second-level KVM switches. Note: Connected USB 2.0 devices can only be accessed by computers that are directly connected to the corresponding KVM switch. For example, a computer connected to a KVM switch with BANK 01 will not be able to access the USB 2.0 devices connected to the KVM switch with BANK 00. - Página 7 Operation Command Hotkey Sequence Description Bind KVM and USB [Scroll Lock] [Scroll Lock] [Z] When the KVM and USB Hub Hub Functionality functionality have been unbinded, performing this hotkey command will bind them back together. The focus of the USB Hub ports, KVM and Audio will now all switch at the same time.
-
Página 8: Warranty & Product Registration
Warranty and Product Registration 3-YEAR LIMITED WARRANTY Seller warrants this product, if used in accordance with all applicable instructions, to be free from original defects in material and workmanship for a period of three (3) years from the date of initial purchase. If the product should prove defective in material or workmanship within that period, Seller will repair or replace the product, in its sole discretion. -
Página 9: Español
Manual del Propietario KVM DVI / USB + Audio y Compartido de Periféricos Modelo: B043-DUA8-SL Índice Contenido del Empaque Accesorios Opcionales Requisitos del Sistema Características del Producto Panel Frontal Instrucciones de Seguridad Instalación en Rack Instalación del Sistema Operación Garantía English Français... -
Página 10: Contenido Del Empaque
Contenido del Empaque • KVM B043-DUA8-SL • Fuente de Alimentación Externa (entrada: 100V ~ 240V, 50Hz / 60Hz; Salida: 9V, 2A) • Accesorios para Instalación en Rack • Manual del Propietario Accesorios Opcionales • Cables de Audio Mini Estéreo de 3.5 mm Serie P312 •... -
Página 11: Panel Frontal
Panel Frontal Puertos de Hub USB 2.0 – Dos puertos del hub permiten compartir periféricos USB entre las computadoras conectadas. LED de BANCO - Esta pantalla de 2 dígitos representa el lugar del KVM en una jerarquía de instalación en cascada. El primer KVM en una cadena tendrá un número de BANCO de 00; los KVMs independientes también tendrán un número de BANCO de 00. -
Página 12: Instrucciones De Seguridad
Instrucciones de Seguridad • Lea todas estas instrucciones y consérvelas para referencias futuras. • Siga todas las advertencias e instrucciones marcadas en el dispositivo. • No coloque el aparato sobre superficies inestables (carro, soporte, mesa, etc.). Si se cae el dispositivo, resultarán daños severos. -
Página 13: Instalación En Rack
Instalación en Rack Fije los soportes de instalación en rack incluidos en el KVM. Usando tornillos suministrados por el usuario, fije los soportes de instalación en el rack. Instalación del Sistema Instalación Independiente Nota: antes de hacer cualquier conexión, apague el KVM y todos los dispositivos que se estén conectados. -
Página 14: Operación
Instalación del Sistema Repita el paso 6 para cada monitor adicional que esté conectando. Conecte hasta dos dispositivos USB 2.0 a los puertos de hub USB en los paneles frontales de los KVMs del primer y segundo nivel. Nota: Los dispositivos USB 2.0 conectados solo pueden accederse por las computadoras que están conectadas directamente al KVM correspondiente. - Página 15 Operación Comando Secuencia de Teclas Rápidas Descripción Funcionalidad de [Scroll Lock] [Scroll Lock] [Z] Cuando la funcionalidad el KVM y Vincular el KVM y el del hub USB ha sido desvinculada, Hub USB realizar este comando de teclas rápidas los vinculará nuevamente. El objetivo de los puertos de hub USB, KVM y audio cambiarán ahora todas al mismo tiempo.
-
Página 16: Garantía
Garantía GARANTÍA LIMITADA DE 3 AÑOS El vendedor garantiza este producto, Si se usa de acuerdo con todas las instrucciones aplicables, de que está libre de defectos en material y mano de obra por un período de tres (3) años a partir de la fecha de compra inicial. Si el producto resultara defectuoso en material o mano de obra dentro de ese período, el vendedor reparará... -
Página 17: Français
Manuel de l'utilisateur DVI/USB + audio et partage de périphériques commutateur écran-clavier-souris Modèle : B043-DUA8-SL Table des matières Contenu de l'emballage Accessoires en option Configuration requise Caractéristiques du produit Panneau avant Consignes de sécurité Installation à montage en bâti Installation du système... -
Página 18: Contenu De L'emballage
Contenu de l'emballage • Commutateur écran-clavier-souris B043-DUA8-SL • Source d'alimentation externe (entrée : 100 à 240 V, 50/60 Hz; sortie : 9 V, 2 A) • Quincaillerie pour le montage en bâti • Manuel de l'utilisateur Accessoires en option • Câbles audio mini stéréo de 3,5 mm de la série P312 •... -
Página 19: Panneau Avant
Panneau avant Ports de concentrateur USB 2.0 – deux ports du concentrateur permettent le partage de périphérique USB entre les ordinateurs connectés. VOYANT À DEL DU BANC – cet affichage à 2 chiffres représente l'emplacement du commutateur écran-clavier-souris dans une hiérarchie d'installation en cascade. Le premier commutateur écran-clavier-souris dans une chaîne aura un numéro de BANC de 00;... -
Página 20: Consignes De Sécurité
Consignes de sécurité • Lire toutes ces consignes et les conserver pour consultation ultérieure. • Observer tous les avertissements et les consignes qui sont affichés sur l'appareil. • Ne pas placer l'appareil sur une surface instable (chariot, support, table, etc.). Une chute de l'appareil risque de causer de graves dommages. -
Página 21: Installation À Montage En Bâti
Installation à montage en bâti Fixer les supports pour le montage en bâti inclus au commutateur écran-clavier-souris. À l'aide de vis fournies par l'utilisateur, fixer les supports pour le montage en bâti au bâti. Installation du système Installation autonome Remarque: Avant toute connexion, s'assurer que l'alimentation du commutateur écran-clavier-souris et de tous les appareils à... -
Página 22: Fonctionnement
Installation du système Connecter un ordinateur à l'un des ports pour ordinateur disponibles sur les commutateurs écran-clavier-souris du premier ou du second niveau en utilisant une trousse de câble pour commutateur écran-clavier-souris DVI-D/USB/audio de la série P759. Répéter l'étape 6 pour chaque ordinateur supplémentaire à raccorder. Raccorder jusqu'à... - Página 23 Fonctionnement Commande Séquence de touches Description rapides Délier le commutateur [Scroll Lock] [Scroll Lock] [X] Permet de délier le commutateur écran-clavier-souris et écran-clavier-souris et la fonctionnalité du concentrateur USB. Une fois délié, la fonctionnalité du passer d'un ordinateur à un autre transférera uniquement le concentrateur USB commutateur écran-clavier-souris et la fonctionnalité...
-
Página 24: Garantie
Garantie GARANTIE LIMITÉE DE 3 ANS Le vendeur garantit que ce produit, s'il est utilisé conformément à toutes les instructions applicables, est exempt de tous défauts de matériaux et de fabrication pour une période de trois (3) ans à partir de la date d'achat initiale. Si le produit s'avère défectueux en raison d'un vice de matériaux ou de fabrication au cours de cette période, le vendeur s'engage à... -
Página 25: Русский
Руководство пользователя КВМ-переключатель с интерфейсами DVI/USB, аудиоканалом и распределением периферии Модель: B043-DUA8-SL Содержание Содержимое упаковки Опциональные комплектующие Системные требования Характеристики изделия Передняя панель Указания по технике безопасности Монтаж в стойку Установка системы Порядок эксплуатации Гарантийные обязательства English Español Français 1111 W. 35th Street, Chicago, IL 60609 USA • www.tripplite.com/support Охраняется... -
Página 26: Содержимое Упаковки
Содержимое упаковки • КВМ-переключатель мод. B043-DUA8-SL • Внешний блок питания (Вход: 100-240 В; 50/60 Гц Выход: 9 В, 2 А) • Монтажная оснастка • Руководство пользователя Опциональные комплектующие • Кабели с разъемом Mini Stereo Audio 3,5 мм серии P312 • Кабели-переходники DVI (штекер) — VGA (штекер) серии P556 •... -
Página 27: Передняя Панель
Передняя панель Порты концентратора USB 2.0: два концентраторных порта, обеспечивающие возможность совместного использования USB-периферии подключенными компьютерами. СИД BANK ("ГРУППА"): этот 2-разрядный индикатор указывает место КВМ-переключателя в каскадной иерархии установки. Первый КВМ-переключатель в цепочке (так же как и автономный КВМ-переключатель) будет иметь номер ГРУППЫ 00. КВМ-переключатель, каскадно... -
Página 28: Указания По Технике Безопасности
Указания по технике безопасности • Внимательно изучите все изложенные здесь указания и сохраните их для возможного использования в будущем. • Следуйте всем предупреждениям и указаниям на корпусе устройства. • Не размещайте устройство на неустойчивой поверхности (тележке, подставке, столе и т.п.) В случае падения устройства ему может быть... -
Página 29: Монтаж В Стойку
Монтаж в стойку Прикрепите кронштейны для стоечного монтажа к корпусу КВМ-переключателя. Прикрепите кронштейны к стойке при помощи винтов (в комплекте не поставляются). Установка системы Автономная установка Примечание. Перед выполнением любых соединений отключите питание КВМ-переключателя и всех подключаемых устройств. Подключите свой монитор к гнездовому консольному порту DVI-I на задней панели КВМ-переключателя. Примечание. VGA-монитор... -
Página 30: Порядок Эксплуатации
Установка системы Подключите до 2 устройств с интерфейсом USB 2.0 к портам USB-концентратора на передних панелях КВМ-переключателей первого и второго уровней. Примечание. Доступ к подключенным устройствам с интерфейсом USB 2.0 возможен только с компьютеров, напрямую подключенных к соответствующему КВМ-переключателю. Например, компьютер, подключенный к КВМ-переключателю с номером... - Página 31 Порядок эксплуатации Команда Последовательность "горячих" клавиш Описание Связать функционалы [Scroll Lock] [Scroll Lock] [Z] После развязывания функционалов КВМ- КВМ-переключателя и USB- переключателя и USB-концентратора выполнение концентратора данной команды, задаваемой "горячими" клавишами, связывает их повторно. Теперь переключение приоритета портов USB- концентратора, КВМ-переключателя и аудиопорта будет...
-
Página 32: Гарантийные Обязательства
Гарантийные обязательства ОГРАНИЧЕННАЯ ГАРАНТИЯ СРОКОМ 3 ГОДА Продавец гарантирует отсутствие изначальных дефектов материала или изготовления в течение 3 (трех) лет с момента первоначальной покупки данного изделия при условии его использования в соответствии со всеми применимыми к нему указаниями. В случае проявления каких-либо дефектов материала или изготовления в течение указанного...