
Manuales relacionados para Shark UltraLight PowerFins HZ600 Serie


Resumen de contenidos para Shark UltraLight PowerFins HZ600 Serie
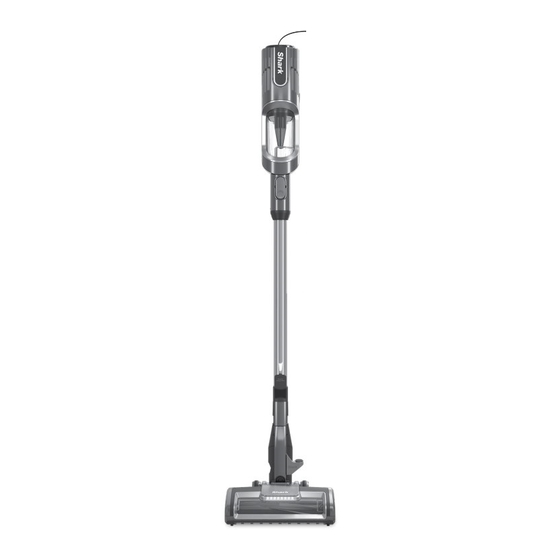
- Página 1 UltraLight PowerFins ™ Corded Stick Vacuum with Self-Cleaning Brushroll HZ600 Series OWNER’S GUIDE...
-
Página 2: Important Safety Instructions
This device contains 12. DO NOT use without filters in place. electrical connections, electrical 13. Only use Shark® branded filters wiring, and moving parts that and accessories. potentially present risk to the user. - Página 3 28. Hand wash with water only. or tables. Washing with cleaning chemicals could damage the unit. 23. Your Shark® vacuum may not be designed to stand up on its own. 29. During cleaning or routine When taking a break from cleaning,...
- Página 4 ASSEMBLY (Click) (Click) 1. Insert Wand into Floor Nozzle. 2. Insert Handheld Vacuum into wand. (Snap) 3. Snap the Onboard Storage Clip onto the 4. For compact storage, hang the handheld wand, then place accessories in the holder. vacuum from the Storage Hook on the wand. Ensure all connections click securely into place.
- Página 5 SETTINGS CONTROLS POWER BUTTON The control panel is located on top of Power Button the handheld vacuum. Press the Power button to begin vacuuming. Press again to turn off power. BARE FLOOR SETTING CARPET SETTING Slide the floor select button to setting Slide the floor select button to setting I to clean bare floors and small area II to clean carpets.
-
Página 6: Cleaning Modes
CLEANING MODES FLOOR MODE ABOVE-FLOOR WITH WAND To clean floors, step on floor nozzle For more reach, detach the wand. Stand the vacuum upright, step on the Foot Pedal and tilt handheld vacuum back. on the side of the nozzle, and pull up the wand to detach. -
Página 7: Storage Mode
STORAGE MODE HANDHELD STORAGE HOOK Storage Hook Press the Wand Release button near the top Wrap the cord around the two cord hooks. of the wand to detach the handheld vacuum. Start with the top hook, and leave a little Align the Catch on the side of the handheld slack in the cord. -
Página 8: Available Accessories
AVAILABLE ACCESSORIES NOTE: Not all accessories come with all units. For a list of the accessories included with this model, see the top inside flap of the box. To order additional accessories, visit sharkaccessories.com. Crevice Tool This slim tool is great for cleaning in tight spaces, between couch cushions, and in hard-to-reach areas. - Página 9 MAINTENANCE IMPORTANT: Unplug the vacuum before performing any maintenance. EMPTYING THE DUST CUP Empty the dust cup each time you vacuum and periodically during cleaning, when debris in the dust cup reaches the MAX fill line. Press the Wand Release button and lift off To remove the dust cup from the handheld vacuum, press the two Dust Cup Release the handheld vacuum.
-
Página 10: Replacement Filters
MAINTENANCE IMPORTANT: Unplug the vacuum before performing any maintenance. CLEANING FILTERS Regularly rinse and replace the filters to maintain your vacuum's suction power. To prevent damage from cleaning chemicals, rinse filters with cold water only. Do not use soap. Allow all filters to air-dry for at least 24 hours before reinstalling them to prevent liquid from being drawn into electronic parts. -
Página 11: Checking For Blockages
MAINTENANCE CHECKING FOR BLOCKAGES CHECK HANDHELD CHECK WAND Remove the handheld vacuum from the Detach the wand and check it for blockages. wand and check all dust cup intake openings for debris or blockages. CHECK FLOOR NOZZLE Detach the wand, then tilt the floor nozzle Debris Intake back and check openings for blockages. -
Página 12: Cord Maintenance
MAINTENANCE NOZZLE MAINTENANCE SELF-CLEANING BRUSHROLL If you run over a hard or sharp object or notice a noise change while vacuuming, check for blockages or objects caught in the brushroll. If some fibers remain wrapped around the brushroll after continued use, clear them from the brushroll. - Página 13 TROUBLESHOOTING Power cord caught in brushroll or floor nozzle. • To minimize the risk of power cord damage, DO NOT run the vacuum over the power cord. If this occurs, immediately shut off power to the vacuum and remove the cord from the brushroll or nozzle. •...
- Página 14 FIVE (5) YEAR LIMITED WARRANTY The Five (5) Year Limited Warranty applies to purchases made from authorized retailers of SharkNinja Operating LLC. Warranty coverage applies to the original owner and to the original product only and is not transferable. SharkNinja warrants that the unit shall be free from defects in material and workmanship for a period of five (5) years from the date of purchase when it is used under normal household conditions and maintained according to the requirements outlined in the Owner’s Guide, subject to the following conditions and exclusions:...
-
Página 15: Technical Specifications
REGISTER YOUR PURCHASE Benefits of registering your product and creating an account: registeryourshark.com • Get easier, faster product support and access to warranty information Scan QR code using • Access troubleshooting and product care mobile device instructions • Be among the first to know about RECORD THIS INFORMATION exclusive product promotions Model Number: ������������������������... - Página 16 PLEASE READ CAREFULLY AND KEEP FOR FUTURE REFERENCE. This Owner’s Guide is designed to help you get a complete understanding of your new Shark Ultralight PowerFins™ Corded Stick Vacuum with Self-Cleaning Brushroll. SharkNinja Operating LLC US: Needham, MA 02494 CAN: Ville St-Laurent, QC H4S 1A7 sharkclean.com...
- Página 17 UltraLight PowerFins ™ Corded Stick Vacuum with Self-Cleaning Brushroll Aspirateur-balai à fil ultraléger PowerFins avec brosse ™ rotative autonettoyante Aspiradora vertical de varilla con cable UltraLight PowerFins ™ con cepillo giratorio de autolimpieza HZ600 Series • Série • Serie OWNER’S GUIDE GUIDE DE L’UTILISATEUR GUÍA DEL PROPIETARIO...
- Página 18 This device contains 12. DO NOT use without filters in place. electrical connections, electrical 13. Only use Shark® branded filters wiring, and moving parts that and accessories. potentially present risk to the user.
- Página 19 28. Hand wash with water only. or tables. Washing with cleaning chemicals could damage the unit. 23. Your Shark® vacuum may not be designed to stand up on its own. 29. During cleaning or routine When taking a break from cleaning,...
- Página 20 ASSEMBLY (Click) (Click) 1. Insert Wand into Floor Nozzle. 2. Insert Handheld Vacuum into wand. (Snap) 3. Snap the Onboard Storage Clip onto the 4. For compact storage, hang the handheld wand, then place accessories in the holder. vacuum from the Storage Hook on the wand. Ensure all connections click securely into place.
- Página 21 SETTINGS CONTROLS POWER BUTTON The control panel is located on top of Power Button the handheld vacuum. Press the Power button to begin vacuuming. Press again to turn off power. BARE FLOOR SETTING CARPET SETTING Slide the floor select button to setting Slide the floor select button to setting I to clean bare floors and small area II to clean carpets.
- Página 22 CLEANING MODES FLOOR MODE ABOVE-FLOOR WITH WAND To clean floors, step on floor nozzle For more reach, detach the wand. Stand the vacuum upright, step on the Foot Pedal and tilt handheld vacuum back. on the side of the nozzle, and pull up the wand to detach.
- Página 23 STORAGE MODE HANDHELD STORAGE HOOK Storage Hook Press the Wand Release button near the top Wrap the cord around the two cord hooks. of the wand to detach the handheld vacuum. Start with the top hook, and leave a little Align the Catch on the side of the handheld slack in the cord.
- Página 24 AVAILABLE ACCESSORIES NOTE: Not all accessories come with all units. For a list of the accessories included with this model, see the top inside flap of the box. To order additional accessories, visit sharkaccessories.com. Crevice Tool This slim tool is great for cleaning in tight spaces, between couch cushions, and in hard-to-reach areas.
- Página 25 MAINTENANCE IMPORTANT: Unplug the vacuum before performing any maintenance. EMPTYING THE DUST CUP Empty the dust cup each time you vacuum and periodically during cleaning, when debris in the dust cup reaches the MAX fill line. Press the Wand Release button and lift off To remove the dust cup from the handheld vacuum, press the two Dust Cup Release the handheld vacuum.
- Página 26 MAINTENANCE IMPORTANT: Unplug the vacuum before performing any maintenance. CLEANING FILTERS Regularly rinse and replace the filters to maintain your vacuum's suction power. To prevent damage from cleaning chemicals, rinse filters with cold water only. Do not use soap. Allow all filters to air-dry for at least 24 hours before reinstalling them to prevent liquid from being drawn into electronic parts.
- Página 27 MAINTENANCE CHECKING FOR BLOCKAGES CHECK HANDHELD CHECK WAND Remove the handheld vacuum from the Detach the wand and check it for blockages. wand and check all dust cup intake openings for debris or blockages. CHECK FLOOR NOZZLE Detach the wand, then tilt the floor nozzle Debris Intake back and check openings for blockages.
- Página 28 MAINTENANCE NOZZLE MAINTENANCE SELF-CLEANING BRUSHROLL If you run over a hard or sharp object or notice a noise change while vacuuming, check for blockages or objects caught in the brushroll. If some fibers remain wrapped around the brushroll after continued use, clear them from the brushroll.
- Página 29 TROUBLESHOOTING Power cord caught in brushroll or floor nozzle. • To minimize the risk of power cord damage, DO NOT run the vacuum over the power cord. If this occurs, immediately shut off power to the vacuum and remove the cord from the brushroll or nozzle.
- Página 30 FIVE (5) YEAR LIMITED WARRANTY The Five (5) Year Limited Warranty applies to purchases made from authorized retailers of SharkNinja Operating LLC. Warranty coverage applies to the original owner and to the original product only and is not transferable. SharkNinja warrants that the unit shall be free from defects in material and workmanship for a period of five (5) years from the date of purchase when it is used under normal household conditions and maintained according to the requirements outlined in the Owner’s Guide, subject to the following conditions and exclusions:...
- Página 31 REGISTER YOUR PURCHASE Benefits of registering your product and creating an account: registeryourshark.com • Get easier, faster product support and access to warranty information Scan QR code using • Access troubleshooting and product care mobile device instructions • Be among the first to know about RECORD THIS INFORMATION exclusive product promotions Model Number: ������������������������...
-
Página 32: Consignes De Sécurité Importantes
13. Utilisez uniquement des filtres et des électriques, du filage électrique et des accessoires de marque Shark®. pièces amovibles pouvant exposer 14. N’ENDOMMAGEZ PAS le cordon l’utilisateur à certains risques. d’alimentation : Utilisez uniquement des pièces de... - Página 33 23. Votre aspirateur Shark® pourrait ne pas 29. Pendant le nettoyage ou l’entretien, NE avoir été conçu pour se maintenir de COUPEZ AUCUNE matière autre que lui-même en position verticale. Lorsque...
- Página 34 ASSEMBLAGE (Clic) (Clic) 1. Insérez le tube dans la buse de plancher. 2. Insérez l’aspirateur portatif dans le tube. (se casser) 3. Enclenchez l’attache de rangement 4. Pour un rangement compact, suspendez intégrée sur le tube, puis placez les l’aspirateur portatif par le crochet de accessoires sur le support.
- Página 35 RÉGLAGES COMMANDES BOUTON POWER (MISE EN MARCHE) Le panneau de commande se trouve Bouton Power (mise en marche) sur le dessus de l’aspirateur portatif. Appuyez sur le bouton de mise en marche pour commencer à passer l’aspirateur. Appuyez de nouveau pour l’arrêter.
-
Página 36: Nettoyage Des Escaliers
MODES DE NETTOYAGE MODE POUR PLANCHERS AU-DESSUS DU SOL AVEC LE TUBE Pour nettoyer les planchers, appuyez sur Pour élargir votre portée, détachez le tube. la buse de plancher et inclinez vers l’arrière Pour détacher le tube, placez l’aspirateur en position debout, appuyez sur la pédale sur le l’aspirateur portatif. - Página 37 MODE RANGEMENT CROCHET DE RANGEMENT DE L’ASPIRATEUR PORTATIF Crochet de rangement Appuyez sur le bouton Wand Release Enroulez le câble d’alimentation autour des (dégagement du tube) situé près de la partie deux crochets. Commencez par le crochet supérieure du tube pour dégager l’aspirateur supérieur et laissez un peu de jeu dans le fil.
-
Página 38: Accessoires Disponibles
ACCESSOIRES DISPONIBLES REMARQUE : Tous les accessoires ne sont pas fournis avec tous les appareils. Pour une liste des accessoires inclus avec ce modèle, consultez le rabat intérieur supérieur de la boîte. Pour acheter des accessoires supplémentaires, consultez le site sharkaccessories.com. Suceur plat Cet outil mince est parfait pour nettoyer les espaces restreints, entre les coussins du divan et... - Página 39 ENTRETIEN IMPORTANT : Débranchez l’aspirateur avant d’effectuer tout entretien. VIDANGE DU RÉCIPIENT À POUSSIÈRE Videz le récipient à poussière chaque fois que vous passez l’aspirateur et périodiquement pendant le nettoyage, lorsque les débris dans le récipient atteignent la ligne MAX fill (remplissage maximal).
-
Página 40: Nettoyage Des Filtres
ENTRETIEN IMPORTANT : Débranchez l’aspirateur avant d’effectuer tout entretien. NETTOYAGE DES FILTRES Rincez régulièrement et remplacez les filtres afin de maintenir la puissance d’aspiration de votre aspirateur. Rincez les filtres avec de l’eau froide seulement afin d’éviter les dégâts résultant de l’utilisation de produits chimiques. -
Página 41: Vérification De La Présence D'obstructions
ENTRETIEN VÉRIFICATION DE LA PRÉSENCE D’OBSTRUCTIONS VÉRIFIEZ L’ASPIRATEUR PORTATIF VÉRIFIEZ LE TUBE Retirez l’aspirateur portatif du tube et vérifiez Détachez le tube et vérifiez qu’il n’est toutes les entrées du récipient à poussière pas obstrué. pour y déceler la présence de débris ou de poussière. -
Página 42: Débris Enroulés Autour De La Brosse Rotative
ENTRETIEN ENTRETIEN DES BUSES BROSSE ROTATIVE AUTONETTOYANTE Si vous aspirez un objet dur ou tranchant ou remarquez un changement de bruit pendant que vous passez l’aspirateur, vérifiez si des débris ou objets obstruent la brosse rotative. Si des fibres sont restées enroulées autour de la brosse rotative après une utilisation continue, enlevez-les. - Página 43 DÉPANNAGE Si le cordon d’alimentation reste coincé dans la brosse rotative ou la tête d’aspirateur. • Pour éviter le plus possible d’endommager le cordon d’alimentation, NE passez PAS l’aspirateur sur le cordon d’alimentation. Si cela se produit, coupez immédiatement l’alimentation de l’aspirateur et retirez le cordon de la brosse rotative ou de la tête d’aspirateur.
-
Página 44: Garantie Limitée De Cinq (5) Ans
GARANTIE LIMITÉE DE CINQ (5) ANS La garantie limitée de cinq (5) ans s’applique aux achats effectués auprès de détaillants autorisés de SharkNinja Operating LLC. La garantie s’applique uniquement au premier propriétaire et au produit original et n’est pas transférable. SharkNinja garantit ce produit contre toute défectuosité de matériau ou de main-d’œuvre pour une période de cinq (5) ans à... -
Página 45: Caractéristiques Techniques
ENREGISTREZ VOTRE ACHAT : Les avantages d’enregistrer votre produit et de créer un compte : registeryourshark.com • Obtenez un support produit plus facile et plus rapide, et accédez aux informations de Numérisez le code QR avec garantie votre appareil mobile • Accédez aux instructions de dépannage et de maintenance produit CONSIGNEZ CES RENSEIGNEMENTS •... -
Página 46: Instrucciones Importantes De Seguridad
13. Solo use filtros y accesorios de la marca aspiradora. Este dispositivo contiene Shark®. conexiones eléctricas, cables eléctricos y piezas móviles que presentan un riesgo 14. NO dañe el cable de alimentación: potencial para el usuario. - Página 47 23. La aspiradora Shark® no está diseñada para sostenerse por sí sola. Cuando haga 30. Permita que todos los filtros se sequen...
- Página 48 ENSAMBLADO (Clic) (Clic) 1. Inserte el vástago en la boquilla de piso. 2. Inserte la aspiradora portátil en el vástago. (Quebrar) 3. Encaje el clip de almacenamiento 4. Para un almacenamiento compacto, integrado en el vástago, y luego coloque cuelgue la aspiradora portátil del gancho los accesorios en el soporte.
-
Página 49: Botón Power (Encendido)
AJUSTES CONTROLES BOTÓN POWER (ENCENDIDO) El panel de control se encuentra en la Botón Power (encendido) parte superior de la aspiradora portátil. Presione el botón Power (encendido) para comenzar a aspirar. Presiónelo nuevamente para apagar la aspiradora. Presione el botón FLOOR TYPE (tipo de piso) para alternar entre los ajustes piso sencillo y alfombra. -
Página 50: Modos De Limpieza
MODOS DE LIMPIEZA MODO PISO ENCIMA DEL PISO CON VÁSTAGO Para limpiar los pisos, pise la boquilla de piso Para mayor alcance, separe el vástago. e incline la aspiradora portátil hacia atrás. Coloque la aspiradora en posición vertical, luego pise el pedal que se encuentra a un costado de la boquilla de piso y tire del vástago para separarlo. -
Página 51: Modo Almacenamiento
MODO ALMACENAMIENTO GANCHO DE ALMACENAMIENTO PARA LA PORTÁTIL Storage Gancho de Hook almacenamiento Presione el botón Wand Release (liberación Enrolle el cable alrededor de los dos ganchos del vástago), en la parte superior del vástago, para el cable. Comience con el gancho para separar la aspiradora portátil. -
Página 52: Accesorios Disponibles
ACCESORIOS DISPONIBLES NOTA: No se incluyen todos los accesorios en todas las unidades. Para ver la lista de accesorios incluidos con este modelo, consulte la solapa interior superior de la caja. Para solicitar accesorios adicionales, visite sharkaccessories.com. Herramienta para grietas Esta delgada herramienta es excelente para limpiar espacios reducidos, entre los cojines del sofá... -
Página 53: Mantenimiento
MANTENIMIENTO IMPORTANTE: Desenchufe la aspiradora antes de cualquier tarea de mantenimiento. CÓMO VACIAR EL RECIPIENTE PARA EL POLVO Vacíe el recipiente para el polvo cada vez que aspire y límpielo periódicamente cuando limpie y cuando los escombros lleguen a la línea de llenado MAX en el recipiente para el polvo. Presione el botón Wand Release (liberación Para retirar el recipiente para el polvo de la aspiradora portátil, oprima al mismo tiempo los... -
Página 54: Limpieza De Los Filtros
MANTENIMIENTO IMPORTANTE: Desenchufe la aspiradora antes de cualquier tarea de mantenimiento. LIMPIEZA DE LOS FILTROS Enjuague y remplace los filtros con regularidad para mantener el poder de succión de la aspiradora. Para evitar los daños que pueden causar los productos químicos de limpieza, enjuague los filtros únicamente con agua fría. -
Página 55: Cómo Verificar Si Hay Obstrucciones
MANTENIMIENTO CÓMO VERIFICAR SI HAY OBSTRUCCIONES REVISE LA PORTÁTIL REVISE EL VÁSTAGO Quite la aspiradora portátil del vástago y Desconecte el vástago y verifique que no revise todas las aberturas de entrada del haya obstrucciones. recipiente para el polvo para ver si hay escombros u obstrucciones. -
Página 56: Residuos Enredados Alrededor Del Cepillo Giratorio
MANTENIMIENTO MANTENIMIENTO DE BOQUILLAS CEPILLO GIRATORIO DE AUTOLIMPIEZA Si aspira un objeto duro o afilado, o se da cuenta de un cambio en el ruido mientras aspira, verifique si hay obstrucciones u objetos atrapados en el cepillo giratorio. Si aún quedan fibras enredadas en el cepillo giratorio después del uso constante, quítelas del cepillo giratorio. -
Página 57: Solución De Problemas
SOLUCIÓN DE PROBLEMAS Cable de alimentación atascado en el cepillo giratorio o la boquilla de piso. • Para minimizar el riesgo de daños en el cable de alimentación, NO pase la aspiradora sobre él. Si esto ocurre, apague inmediatamente la fuente de alimentación a la aspiradora y quite el cable del cepillo o la boquilla. - Página 58 GARANTÍA LIMITADA DE CINCO (5) AÑOS La garantía limitada de cinco (5) años se aplica a las compras realizadas a los vendedores minoristas autorizados de SharkNinja Operating LLC. La cobertura de garantía se aplica solo al propietario y al producto originales y no puede transferirse.
-
Página 59: Registre Su Compra
REGISTRE SU COMPRA Beneficios de registrar su producto y crear una cuenta: registeryourshark.com • Obtenga un servicio de asistencia para el producto más fácil y rápido Escanee el código QR • Acceda a instrucciones para la solución de con un dispositivo móvil problemas y cuidado de su producto •... - Página 60 Para obtener información sobre las patentes de SharkNinja en los EE. UU., visite sharkninja.com/uspatents © 2021 SharkNinja Operating LLC. SHARK is a registered trademark of SharkNinja Operating LLC. POWERFINS is a trademark of SharkNinja Operating LLC. © 2021 SharkNinja Operating LLC. SHARK est une marque de commerce déposée de SharkNinja Operating LLC.