Tabla de contenido
Publicidad
Idiomas disponibles
Idiomas disponibles
Enlaces rápidos
Publicidad
Capítulos
Tabla de contenido

Manuales relacionados para AERMEC DMH Serie


Resumen de contenidos para AERMEC DMH Serie
- Página 1 2 1 . 1 0 – 5 8 9 9 0 0 0 _ 0 3 I s t r u z i o n i O r i g i n a l i DMH - DMH-I - DMV - DMV-I Manuale installazione 50Hz DEUMIDIFICATORE PER IMPIANTI DI...
- Página 3 Gentile cliente, La ringraziamo per aver voluto conoscere un prodotto Aermec. Esso è frutto di pluriennali esperienze e di particolari studi di progettazione, ed è stato costruito con materiali di primissima scelta e con tecnologie avanzatissime. Il manuale che Lei sta per leggere ha lo scopo di presentarle il prodotto e aiutarla nella selezione dell'unità...
- Página 4 Tutte le specifiche sono soggette a modifiche senza preavviso. Sebbene sia stato fatto ogni sforzo per assicurare la precisione, Aermec non si assume alcuna responsabilità per...
-
Página 5: Tabla De Contenido
INDICE 1. Introduzione ....................p. 6 Funzionamento dell'unità con aria neutra unità DMH ....p. 6 Funzionamento dell'unità DMH-C ............p. 6 Funzionamento dell'unità DMH-I............p. 6 2. Descrizione dell'unità ................p. 7 Caratteristiche tecniche ................p. 7 Dati tecnici ......................p. 8 Dimensioni e pesi ..................p. 9 3. Installazione e messa in servizio ........... p. 10 Imballaggio .................... -
Página 6: Introduzione
INTRODUZIONE Questo manuale riporta le informazioni e quanto ritenuto necessario per il trasporto, L'aria, filtrata attraverso la sezione filtrante (1), subisce un preraffreddamento nello l'installazione, l'uso e la manutenzione dei deumidificatori della serie DMH - DMH-I - scambiatore (2) tramite l'acqua proveniente dal collettore dell'impianto radiante (8); nei DMV - DMV-I. -
Página 7: Descrizione Dell'unità
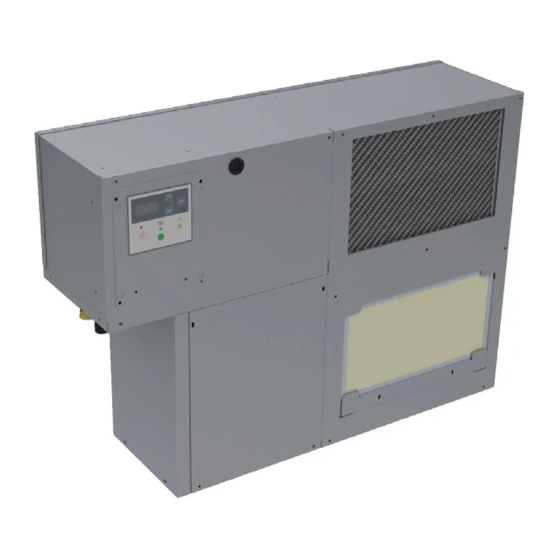
DESCRIZIONE DELL'UNITÀ CARATTERISTICHE TECNICHE Struttura: in pannelli di lamiera zincata, rivestiti internamente con materassino fonoassorbente in polietilene. Sezione filtrante: setto filtrante sintetico spessore 12 mm in telaio in lamiera zincata, classe di efficienza ISO 16890 COARSE 50% (G3 EN 779), estraibile frontalmente. Circuito frigorifero: composto da compressore frigorifero alternativo a R134a, filtro freon, capillare di espansione, evaporatore e condensatore a tubi di rame ed alettatura continua turbolenziata dotata di trattamento idrofilico e telaio in alluminio (per versioni raffreddanti "-C", con integrazione "I", condensatore ad acqua-freon). -
Página 8: Dati Tecnici
DATI TECNICI DMH220 DMH220C DMH220I DMH220V DMH220V-I DMH360 DMH360C DMH360I Prestazioni (1) Umidità condensata l/24h Potenza all’ e vaporatore 1050 1050 1050 1020 1020 1480 1480 1480 Potenza smaltita sull’acqua 1820 1820 1820 1540 2680 2680 Portata acqua nominale m³/h Perdita di carico acqua Potenza sensibile disponibile 1340... -
Página 9: Dimensioni E Pesi
DIMENSIONI E PESI DMH220 / DMH220-C / DMH220-I DMH360 / DMH360-C / DMH360-I DMV / DMV-I DMH220 DMH220C DMH220I DMH220V DMH220V-I DMH360 DMH360C DMH360I Dimensioni e pesi Ø 1/2” F 1/2” F 1/2” F 1/2” F 1/2” F 1/2” F 1/2”... -
Página 10: Installazione E Messa In Servizio
INSTALLAZIONE E MESSA IN SERVIZIO Posizionare il deumidificatore in spazi idonei, prossimi agli ambienti da trattare, e su Come tali, si intendono quelle persone fisiche che hanno conseguito uno studio spe- strutture adeguate a supportarne il peso; accertarsi anche della presenza di spazi tecnici cifico e che sono quindi in grado di riconoscere i pericoli derivati dall'utilizzo di questa per agevolare le operazioni di manutenzione standard e/o straordinaria. -
Página 11: Posizionamento Dell' Unità Versione Orizzontale
POSIZIONAMENTO DELL' UNITÀ VERSIONE ORIZZONTALE — Allo scopo di garantire il regolare deflusso della condensa si consiglia di montare l'unità inclinata di 3 mm verso lo scarico condensa. Qui di seguito sono illustrate alcune sequenze del montaggio: 1. Eseguire la foratura a soffitto e fissare quattro tiranti filettati come indicato in figura. POSIZIONAMENTO DELLA MACCHINA VERSIONE DA 2. -
Página 12: Collegamento Ai Canali
COLLEGAMENTO AI CANALI — Il percorso del tubo di scarico condensa deve avere sempre un pendenza verso l'e- sterno, deve inoltre risultare il più breve possibile e con il minor numero possibile di curve. — Assicurarsi sempre che il tubo per il deflusso della condensa non solleciti l'attacco di Si fa divieto di mettere in funzione l'unità... -
Página 13: Collegamenti Elettrici
COLLEGAMENTI ELETTRICI ATTENZIONE: Prima di iniziare qualsiasi operazione assicurarsi che la linea di alimentazione generale sia sezionata. Eseguire i collegamenti con cavi di sezione adeguata ai carichi — I collegamenti elettrici al quadro di comando devono essere effettuati da personale specializzato secondo lo schema fornito. —... -
Página 14: Pannello Di Comando
PANNELLO DI COMANDO Legenda: Display Tasto (Down) Tasto (UP) tasto (Set) Tasto (On/Off) Tasto (Funzione) L1 - Led attivazione compressore L2 - Led attivazione ventilatore L3 - Led attivazione deumidifica L4 - Led attivazione integrazione estiva L5 - Led attivazione integrazione invernale L6 - Led attivazione modo programmazione L7 - Led segnalazione allarmi Una volta alimentata elettricamente, l'unità... -
Página 15: Modalità Di Funzionamento
Tabella parametri di regolazione Ramo CFn / RamodFr / RamoALL Parametro Default Range Unità Descrizione 7,0 – 12,0 °C Valore min temperatura acqua ingresso in funzionamento DEUMIDIFICATORE 15,0 – 25,0 °C Valore max temperatura acqua ingresso in funzionamento DEUMIDIFICATORE 25,0 – 35,0 °C Valore min temperatura acqua ingresso in funzionamento TERMOVENTILANTE INVERNALE 10,0 –... -
Página 16: Versione Dmv, Dmv-I
Legenda: Umidostato RU% Commutatore E/I Inverno Estate Termostato invernale °C VERSIONE DMV, DMV-I Nella versione con integrazione DMV-I, l'unità è predisposta per funzionare in modalità deumidificazione estiva, come già visto per le precedenti versioni DMH/DMH-C, oppure in modalità integrazione. Quest'ultima prevede l'attivazione di una valvola a 3 vie che consente di deviare l'acqua uscente dal condensatore verso la batteria di post-riscaldamento o direttamente verso l'uscita, in modo da avere in immissione rispettivamente aria neutra o raffreddata (vedi fig. -
Página 17: Controlli E Primo Avviamento
CONTROLLI E PRIMO AVVIAMENTO 1. Verificare la tenuta del circuito idraulico e l'assenza di gocciolamenti dalla macchina Prima di avviare l'unità verificare quanto segue: 2. In base alle perdite di carico delle canalizzazioni, selezionare la velocità del ventila- — Ancoraggio dell'unità al soffitto o alla parete. —... - Página 20 SERVIZI ASSISTENZA TECNICA Per il Servizio Assistenza Tecnica fare riferimento all’elenco allegato all’unità. L’elenco è anche consultabile sul sito www.aermec.com/Servizi/Aermec è vicino a te. 5899000_03 2 1 . 1 0 – 5 8 9 9 0 0 0 _ 0 3...
- Página 21 2 1 . 1 0 – 5 8 9 9 0 0 0 _ 0 3 T r a n s l a t i o n o f O r i g i n a l i n s t r u c t i o n s DMH - DMH-I - DMV - DMV-I Installation Manual...
- Página 23 Dear Customer, Thank you for wanting to learn about a product Aermec. This product is the result of many years of experience and in-depth engineering research, and it is built using top quality materials and advanced technologies. The manual you are about to read is meant to present the product and help you select the unit that best meets the needs of your system.
- Página 24 All specifications are subject to change without prior notice. Although every effort has been made to ensure accuracy, Aermec shall not be held liable for any errors or...
- Página 25 TABLE OF CONTENTS 1. Introduction ..................p. 6 Unit functioning with neutral air DMH unit .........p. 6 DMH-C unit functioning ..............p. 6 DMH-I unit functioning ................p. 6 2. Unit description ...................p. 7 Technical features ..................p. 7 Technical data ..................p. 8 Dimensions and weights ..............p. 9 3. Installation and start-up ..............
-
Página 26: Introduction
INTRODUCTION This manual states the information and that deemed necessary for transport, in- The air, filtered through the filtering section (1), is pre-cooled in the exchanger (2) stallation, use and maintenance of the range dehumidifiers DMH - DMH-I - DMV by water coming from the radiant system collector (8). -
Página 27: Unit Description
UNIT DESCRIPTION TECHNICAL FEATURES Structure: galvanised sheet metal panels, lined on the inside with a soundproofing polyethylene covering. Filter section: 12 mm thick synthetic filtering baffle made with a galvanised sheet metal frame, efficiency class ISO 16890 COARSE 50% (G3 EN 779), can be removed from the front. -
Página 28: Technical Data
TECHNICAL DATA DMH220 DMH220C DMH220I DMH220V DMH220V-I DMH360 DMH360C DMH360I Performances (1) Condensed humidity l/24h Power at the evaporator 1050 1050 1050 1020 1020 1480 1480 1480 Power dissipated with water 1820 1820 1820 1540 2680 2680 Nominal water flow rate m³/h Water pressure drop Available sensitive power... -
Página 29: Dimensions And Weights
DIMENSIONS AND WEIGHTS DMH220 / DMH220-C / DMH220-I DMH360 / DMH360-C / DMH360-I DMV / DMV-I DMH220 DMH220C DMH220I DMH220V DMH220V-I DMH360 DMH360C DMH360I Dimensions and weights Ø 1/2” F 1/2” F 1/2” F 1/2” F 1/2” F 1/2” F 1/2”... -
Página 30: Installation And Start-Up
INSTALLATION AND START-UP Place the dehumidifier in appropriate areas, next to the rooms to be dehumidified, SAFETY STANDARDS and on suitable facilities to support its weight. Also make sure there are the techni- cal spaces to ensure routine/extraordinary maintenance can be carried out. The Manufacturer declines all responsibility for the failure to comply with the Safe- —... -
Página 31: Machine Positioning, Recessed Version
MACHINE POSITIONING, RECESSED VERSION tie-rod — We recommend positioning the unit at about 15-20 cm from the ground. — Hydraulic and drainage connections are located near the gap of the unit, which vibration damper allows for rear, side or bottom connections. washer —... -
Página 32: Connection To The Ducts
CONNECTION TO THE DUCTS — The siphon must finally have a cap for cleaning the lower part or must however allow quick disassembly for periodical cleaning. — The route of the condensation drain pipe must always be tilted outwards, as well as being as short as possible and with as few bends as possible. -
Página 33: Electrical Wiring
ELECTRICAL WIRING ATTENTION: Before starting any operation, make sure that the main power supply line has been isolated. Perform the connections with cables featuring cables fea- turing a suitable cross-section — The electric connections to the control board must be made by specialised staff according to the diagram supplied. —... -
Página 34: Control Panel
CONTROL PANEL Key: Display Key (Down) Key (UP) key (Set) Key (On/Off) Key (Function) L1 - Compressor activation LED L2 - Fan activation LED L3 - Dehumidification activation LED L4 - Summer integration activation LED L5 - Winter integration activation LED L6 - Programming mode activation LED L7 - Alarm signalling LED Once the unit has been powered up, it will go to OFF, then press the ON/OFF key to bring it to the ON state;... -
Página 35: Operating Mode
Table of adjustment parameters Branch CFn / BranchdFr / BranchALL Parameter Default Range Unit Description 7.0 – 12.0 °C Min inlet water temperature value in DEHUMIDIFIER mode 15.0 – 25.0 °C Max inlet water temperature value in DEHUMIDIFIER mode 25.0 – 35.0 °C Min inlet water temperature value in WINTER FORCED AIR HEATER mode 10.0 –... -
Página 36: Version Dmv, Dmv-I
Key: Humidistat RH% E/I switch Winter Summer Winter thermostat °C VERSION DMV, DMV-I In the version with DMV-I integration, the unit is set up to operate in summer dehumidification mode, as already seen for the previous DMH/DMH-C versions, or in integration mode. -
Página 37: Controls And Commissioning
CONTROLS AND COMMISSIONING 1. Check the watertightness of the hydraulic circuit and ensure there are no leaks Check the following before starting the unit: — Anchorage of the unit to the ceiling or the wall. from the machine 2. Based on the pressure drops of the ducts, select the best-suited fan speed for —... - Página 40 A E R M E C S . p . A . V i a R o m a , 9 9 6 - 3 7 0 4 0 B e v i l a c q u a ( V R ) - I t a l y P h o n e + 3 9 0 4 4 2 6 3 3 1 1 1 - F a x + 3 9 0 4 4 2 9 3 5 7 7 s a l e s @ a e r m e c .
- Página 41 2 1 . 1 0 – 5 8 9 9 0 0 0 _ 0 3 T r a d u c t i o n s d ’ a p r è s l e s m o d e s d ’ e m p l o i d ’ o r i g i n e DMH - DMH-I - DMV - DMV-I Manuel d'installation...
- Página 43 Cher client, Nous vous remercions de vouloir en savoir plus sur un produit Aermec. Il est le résultat de plusieurs années d’expériences et d’études de conception particulières, il a été construit avec des matériaux de première sélection à l’aide de technologies très avancées.
- Página 44 Déversement illégal du produit par l’utilisateur entraîne l’application de sanctions administratives prévues par la loi. Toutes les spécifications sont soumises à modifications sans préavis. Même si tous les efforts ont été faits pour assurer la précision, Aermec n'assume aucune responsabilité pour d'éven-...
- Página 45 TABLE DES MATIÈRES Introduction ......................p. 6 Fonctionnement de l'unité avec air neutre unité DMH ......p. 6 Fonctionnement de l'unité DMH-C ...............p. 6 Fonctionnement de l'unité DMH-I ..............p. 6 Description de l’unité ..................p. 7 Caractéristiques techniques ................p. 7 Données techniques ...................p. 8 Dimensions et poids ...................p. 9 Installation et mise en service ..............
-
Página 46: Introduction
INTRODUCTION Ce manuel vous donne les informations et tout ce qui est considéré comme étant nécessaire L'air, filtré à travers la section filtrante (1), subit un pré-rafraîchissement dans l'échangeur (2) pour le transport, l'installation, l'utilisation et l’entretien des déshumidificateurs de la série avec l’eau provenant du collecteur de l’installation radiante (8) ;... -
Página 47: Description De L'unité
DESCRIPTION DE L’UNITÉ CARACTÉRISTIQUES TECHNIQUES Structure : en panneaux de tôle galvanisée, revêtus à l’intérieur avec tapis insonorisant en polythène. Section filtrante : cloison filtrante synthétique de 12 mm d'épaisseur dans un châssis en tôle galvanisée, classe de rendement ISO 16890 COARSE 50% (G3 EN 779), extractible par l'avant. Circuit frigorifique : composé... -
Página 48: Données Techniques
DONNÉES TECHNIQUES DMH220 DMH220C DMH220I DMH220V DMH220V-I DMH360 DMH360C DMH360I Prestations (1) Humidité condensée l/24h Puissance à l’ é vaporateur 1050 1050 1050 1020 1020 1480 1480 1480 Puissance éliminée sur l’ e au 1820 1820 1820 1540 2680 2680 Débit d’... -
Página 49: Dimensions Et Poids
DIMENSIONS ET POIDS DMH220 / DMH220-C / DMH220-I DMH360 / DMH360-C / DMH360-I DMV / DMV-I DMH220 DMH220C DMH220I DMH220V DMH220V-I DMH360 DMH360C DMH360I Dimensions et poids Ø 1/2” F 1/2” F 1/2” F 1/2” F 1/2” F 1/2” F 1/2”... -
Página 50: Installation Et Mise En Service
INSTALLATION ET MISE EN SERVICE PERSONNEL SPÉCIALISÉ : Positionner le déshumidificateur dans des espaces adaptés, proches des environnements à traiter, et sur des structures en mesure d’en supporter le poids ; s’assurer aussi de la présence Par personnel spécialisé, on entend des personnes physiques qui ont un niveau d’étude spé- d'espaces techniques pour faciliter les opérations d'entretien standards et/ou extraordinaire. -
Página 51: Positionnement De L'unité Version Horizontale
POSITIONNEMENT DE L'UNITÉ VERSION HORIZONTALE — Afin de favoriser l'écoulement régulier de la condensation, nous conseillons de monter la machine inclinée de 3 mm vers l'évacuation de la condensation. Ci-dessous sont illustrées certaines séquences du montage : Percer le plafond et fixer quatre raidisseurs filetés comme indiqué sur le schéma. POSITIONNEMENT DE LA MACHINE VERSION À... -
Página 52: Raccordement Aux Canaux
RACCORDEMENT AUX CANAUX — Le siphon doit être doté de bouchon pour le nettoyage dans la partie inférieure ou dans tous les cas, il doit permettre un démontage rapide pour le nettoyage périodique. — Le parcours du tube d'évacuation de la condensation doit toujours avoir une inclinaison vers l'extérieur, il doit être aussi court que possible, avec le moins de courbes possibles. -
Página 53: Raccordements Électriques
RACCORDEMENTS ÉLECTRIQUES ATTENTION : Avant de débuter toute opération, s'assurer que la ligne d'alimentation générale soit coupée. Effectuer les raccordements avec des câbles de section adaptée aux charges — Les connexions électriques au panneau de commande doivent être effectuées par du personnel spécialisé selon le schéma fourni. —... -
Página 54: Panneau De Commande
PANNEAU DE COMMANDE Légende : Afficheur Touche (Down) Touche (UP) touche (Point de consigne) Touche (On/Off) Touche (Fonction) L1 - LED d'activation du compresseur L2 - LED d'activation du ventilateur L3 - LED d'activation de la déshumidification L4 - LED d'activation de l'intégration estivale L5 - LED d'activation de l'intégration hivernale L6 - LED d'activation du mode de programmation L7 - LED de signalisation des alarmes... -
Página 55: Mode De Fonctionnement
Tableau des paramètres de réglage Branche CFn / RamodFr / Branche ALL Paramètre Par défaut Range Unitè Description 7,0 – 12,0 °C Valeur min température eau entrée en fonctionnement DÉSHUMIDIFICATEUR 15,0 – 25,0 °C Valeur max température eau entrée en fonctionnement DÉSHUMIDIFICATEUR 25,0 –... -
Página 56: Version Dmv, Dmv-I
Légende : Humidostat RU% Commutateur E/I Hiver Été Thermostat hivernal °C VERSION DMV, DMV-I Dans la version d'intégration DMV-I, l'unité est configurée pour fonctionner en mode déshumidification estivale, comme déjà vu pour les versions précédentes DMH/DMH-C, ou en mode inté- gration. Cette dernière implique l'activation d'une vanne à... -
Página 57: Contrôles Et Première Mise En Service
CONTRÔLES ET PREMIÈRE MISE EN SERVICE Avant de mettre l'unité en marche, vérifier les points suivants: Vérifier l’étanchéité du circuit hydraulique et l'absence d’égouttements de la machine — Ancrage de l'unité au plafond ou au mur. Sur la base des pertes de charge des canalisations, sélectionner la vitesse du ventilateur —... - Página 60 A E R M E C S . p . A . V i a R o m a , 9 9 6 - 3 7 0 4 0 B e v i l a c q u a ( V R ) - I t a l i e T é...
- Página 61 2 1 . 1 0 – 5 8 9 9 0 0 0 _ 0 3 Ü b e r s e t z u n g a u s d e m i t a l i e n i s c h e n O r i g i n a l t e x t DMH - DMH-I - DMV - DMV-I Installations Handbuch...
- Página 63 Sehr geehrter Kunde, Wir danken Ihnen für Ihr Kaufinteresse an einem Aermec Produkt. Dieses ist das Ergebnis jahrelanger Erfahrungen und spezieller Planungsstudien und wurde mit Werkstoffen höchster Güte und unter Einsatz der modernsten Technologien hergestellt. Das Handbuch, das Sie gerade lesen, hat den Zweck Ihnen das Produkt vorzustellen und Sie bei der Auswahl des Geräts zu unterstützen, das den Bedürfnissen Ihrer Anlage am besten...
- Página 64 Sie sich an den Händler, wo Sie das Produkt erworben . Für weitere Informationen wenden Sie sich bitte an die entsprechende Behörde. Illegale Ablagerung des Produkts durch den Anwender bringt die Verhängung von Verwaltungsstrafen gesetzlich vorgesehen ist. Alle Spezifikationen können ohne Vorankündigung geändert werden. Obwohl jegliche Anstrengung unternommen wurde, um Genauigkeit zu gewährleisten, übernimmt Aermec keinerlei Haftung für eventuelle Fehler oder Auslassungen.
- Página 65 INHALTSVERZEICHNIS Einleitung ........................S. 6 Betriebsweise der Einheit mit neutraler Luft DMH-Einheit ......S. 6 Funktionsweise der DMH-C-Einheit ...............S. 6 Funktionsweise der DMH-I-Einheit ................S. 6 Gerätebeschreibung ....................S. 7 Technische Eigenschaften ..................S. 7 Technische Daten ......................S. 8 Abmessungen und gewicht ..................S. 9 Installation und Inbetriebnahme ..............S. 10 Verpackung ........................S. 10 Handling und Transport ...................S. 10 Kontrolle beim Empfang ..................S. 10 Lagerung ........................S. 10 Definitionen ........................S. 10...
-
Página 66: Einleitung
EINLEITUNG Diese Anleitung enthält alle Informationen, die für Transport, Installation, Gebrauch und Wartung Die durch den Filtereinheit (1) gefilterte Luft wird im Wärmetauscher (2) mittels des aus dem der Entfeuchter der Serie erforderlich sind DMH - DMH-I - DMV - DMV-I. Kollektor der Strahlplatten-Anlage (8) stammenden Wassers vorgekühlt;... -
Página 67: Gerätebeschreibung
GERÄTEBESCHREIBUNG TECHNISCHE EIGENSCHAFTEN Konstruktion: aus Platten aus verzinktem Blech, innen mit schallabsorbierender Matte aus Polyethylen beschichtet. Filtereinheit: 12 mm dicker Synthetikfilter in Rahmen aus verzinktem Blech, effizienzklasse ISO 16890 COARSE 50% (G3 EN 779), nach vorne entnehmbar. Kühlkreislauf: besteht aus einem Kühlverdichter (Kolbenkompressor) mit R134a, Freon-Filter, Expansionskapillarrohr, Verdampfer und Verflüssiger mit Kupferrohren und durchgehenden Verwirbelungsla- mellen, hydrophiler Beschichtung und Aluminiumrahmen (bei Ausführungen mit Kühlung „-C“, mit „I“-Integration, wasser-/freongekühlter Verdampfer). -
Página 68: Technische Daten
TECHNISCHE DATEN DMH220 DMH220C DMH220I DMH220V DMH220V-I DMH360 DMH360C DMH360I Leistungen (1) Kondensierte Feuchtigkeit l/24h Leistung am Verdampfer 1050 1050 1050 1020 1020 1480 1480 1480 An das Wasser abgeführte Leistung 1820 1820 1820 1540 2680 2680 Nennwasserdurchfluss m³/h Druckverlust Wasser Verfügbare fühlbare Leistung 1340 1340... -
Página 69: Abmessungen Und Gewicht
ABMESSUNGEN UND GEWICHT DMH220 / DMH220-C / DMH220-I DMH360 / DMH360-C / DMH360-I DMV / DMV-I DMH220 DMH220C DMH220I DMH220V DMH220V-I DMH360 DMH360C DMH360I Abmessungen und gewicht Ø 1/2” F 1/2” F 1/2” F 1/2” F 1/2” F 1/2” F 1/2”... -
Página 70: Installation Und Inbetriebnahme
INSTALLATION UND INBETRIEBNAHME Den Entfeuchter an einem geeigneten Platz in der Nähe der zu behandelnden Räume auf Kons- Darunter versteht man physische Personen, die eine Fachausbildung absolviert haben und daher truktionen aufstellen, die sein Gewicht tragen können. Dabei auch technische Mindestabstände in der Lage sind, die mit dem Gebrauch dieses Geräts verbundenen Gefahren zu erkennen und beachten, damit die routinemäßige und/oder außerordentliche Wartung problemlos durchge- zu vermeiden. -
Página 71: Aufstellung Der Einheit In Der Horizontalen Version
AUFSTELLUNG DER EINHEIT IN DER HORIZONTALEN — Seitlich der hydraulischen und elektrischen Anschlüsse muss ein Freiraum von mindestens 50 mm verbleiben und die Zugänglichkeit für künftige Wartungs- oder Reparaturarbeiten muss VERSION gewährleistet sein; eine möglichst freie Ansaugung garantieren. — Damit das Kondenswasser einwandfrei abfließen kann, sollte das Gerät mit einer Neigung von Nachfolgend sind einige Montagefolgen dargestellt: 3 mm zum Kondensatabfluss montiert werden. -
Página 72: Anschluss An Die Lüftungskanäle
ANSCHLUSS AN DIE LÜFTUNGSKANÄLE — Der Siphon muss außerdem einen Verschlussstopfen für die Reinigung im unteren Teil haben bzw. eine schnelle Demontage zur regelmäßigen Reinigung erlauben. — Der Verlauf des Abflussrohrs für das Kondensat muss stets eine Neigung nach außen aufwei- sen, so kurz wie möglich sein und so wenig Bögen wie möglich haben. -
Página 73: Elektrische Anschlüsse
ELEKTRISCHE ANSCHLÜSSE ACHTUNG: Vor Beginn aller Arbeiten ist stets sicherzustellen, dass die Hauptversorgungsleitung getrennt ist. Für die Anschlüsse Kabel mit für die Lasten ausreichendem Querschnitt verwenden. — Die elektrischen Anschlüsse an den Schaltkasten müssen von Fachpersonal und nach dem mitgelieferten Plan ausgeführt werden. —... -
Página 74: Bedientafel
BEDIENTAFEL Legende: Display Taste (Down) Taste (UP) Taste (Set) Taste (On/Off) Tasto (Funktion) L1 - Led Aktivierung Verdichter L2 - Led Aktivierung Gebläse L3 - Led Aktivierung Entfeuchtung L4 - Led Aktivierung Ergänzung Sommer L5 - Led Aktivierung Ergänzung Winter L6 - Led Aktivierung Programm-Modus L7 - Led Anzeige Alarme Nach dem Einschalten schaltet das Gerät auf OFF, dann die Taste ON/OFF drücken, um es in den ON-Zustand zu versetzen;... -
Página 75: Betriebsarten
Tabelle Einstellungsparameter Zweig CFn / ZweigdFr / ZweigALL Parameter Default Range Außen- Beschreibung 7,0 – 12,0 °C Min. Wert Wassereingangstemperatur im ENTFEUCHTER-Betrieb 15,0 – 25,0 °C Max. Wert Wassereingangstemperatur im ENTFEUCHTER-Betrieb 25,0 – 35,0 °C Min. Wert Wassereingangstemperatur im HEIZLÜFTER-WINTER-Betrieb 10,0 –... -
Página 76: Version Dmv, Dmv-I
Legende: Feuchtigkeitsregler RU% Schalter E/I Winter Sommer Winterthermostat °C VERSION DMV, DMV-I In der Ergänzungsversion DMV-I wird das Gerät so eingestellt, dass es im Sommer in der Betriebsart Entfeuchtung arbeitet, wie bereits bei den Vorgängerversionen DMH/DMH-C, oder in der Betriebsart Ergänzung. -
Página 77: Kontrolle Und Erstmaliges Einschalten
KONTROLLE UND ERSTMALIGES EINSCHALTEN Vor dem Starten der Einheit ist folgendes zu prüfen: Überprüfen, ob der Wasserkreislaufs dicht ist und es aus dem Gerät nicht tropft — Verankerung der Einheit an der Decke oder Wand. Je nach Druckverlust der Kanäle die geeignete Gebläsedrehzahl auswählen, um den not- —... - Página 80 A E R M E C S . p . A . V i a R o m a , 9 9 6 - 3 7 0 4 0 B e v i l a c q u a ( V R ) - I t a l i e n T e l .
-
Página 81: Manual Instalación
2 1 . 1 0 – 5 8 9 9 0 0 0 _ 0 3 T r a d u c c i ó n d e l o r i g i n a l DMH - DMH-I - DMV - DMV-I Manual Instalación 50Hz... - Página 83 Estimado cliente, Gracias por querer conocer un producto Aermec. Este es el fruto de muchos años de experiencia y de investigaciones específicas sobre el diseño, utilizando para su fabricación materiales de primera calidad y las tecnologías más vanguardistas. El manual que está a punto de leer tiene por objeto presentarle el producto y ayudarle a seleccionar la unidad que mejor se adapte a las necesidades de su sistema.
- Página 84 Vertido ilegal del producto por parte del usuario conlleva la aplicación de sanciones administrativas previstas por la ley. Todas las especificaciones están sujetas a modificaciones sin aviso previo. No obstante todos los esfuerzos para asegurar la precisión, Aermec no se responsabiliza por eventuales...
- Página 85 ÍNDICE 1. Introducción ....................p. 6 Funcionamiento de la unidad con aire neutro Unidad DMH..p. 6 Funcionamiento de la unidad DMH-C ..........p. 6 Funcionamiento de la unidad DMH-I ............p. 6 2. Descripción de la unidad ..............p. 7 Características técnicas ................p. 7 Datos técnicos ....................p. 8 Dimensiones y pesos ...................p. 9 3.
-
Página 86: Introducción
INTRODUCCIÓN Este manual reproduce las informaciones y todo lo que se considere necesario para el El aire, que se filtra a través de la sección de filtro (1), se somete a un enfriamiento previo transporte, la instalación, el uso y el mantenimiento de los deshumidificadores de la a través del intercambiador de agua (2) con agua procedente del colector de la instala- serie DMH - DMH-I - DMV - DMV-I. -
Página 87: Descripción De La Unidad
DESCRIPCIÓN DE LA UNIDAD CARACTERÍSTICAS TÉCNICAS Estructura: en paneles de chapa galvanizada, revestidos por la parte interna con colchón fonoabsorbente de polietileno. Sección filtrante: Medio filtrante sintético de 12 mm de espesor en marco de chapa galvanizada, clase de eficiencia ISO 16890 COARSE 50% (G3 EN 779), extraíble por la parte delantera. Circuito frigorífico: compuesto por compresor frigorífico alternativo a R134a, filtro freón, capilar de expansión, evaporador y condensador con tubos de cobre y aletas continuas de turbulencia equipadas con tratamiento hidrófugo y bastidor de aluminio (para versiones enfriadoras "-C", con integración "I", condensador por agua-freón). -
Página 88: Datos Técnicos
DATOS TÉCNICOS DMH220 DMH220C DMH220I DMH220V DMH220V-I DMH360 DMH360C DMH360I Prestaciones (1) Humidostato de condensación l/24h Potencia del evaporador 1050 1050 1050 1020 1020 1480 1480 1480 Potencia eliminada con el agua 1820 1820 1820 1540 2680 2680 Caudal de agua nominal m³/h Pérdida de carga de agua Potencia sensible disponible... -
Página 89: Dimensiones Y Pesos
DIMENSIONES Y PESOS DMH220 / DMH220-C / DMH220-I DMH360 / DMH360-C / DMH360-I DMV / DMV-I DMH220 DMH220C DMH220I DMH220V DMH220V-I DMH360 DMH360C DMH360I Dimensiones y pesos Ø 1/2” F 1/2” F 1/2” F 1/2” F 1/2” F 1/2” F 1/2”... -
Página 90: Instalación Y Puesta En Servicio
INSTALACIÓN Y PUESTA EN SERVICIO PERSONAL ESPECIALIZADO: Coloque el deshumidificador en espacios idóneos, cercanos a los ambientes por tratar, y en estructuras adecuadas para soportar el peso; asegúrese también de la presencia Come tal, se entienden aquellas personas físicas que han conseguido un estudio espe- de espacios técnicos para facilitar las operaciones de mantenimiento estándar y/o ex- cífico y que son capaces de reconocer los peligros derivados del uso de esta máquina y traordinario. -
Página 91: Colocación De La Unidad En Versión Horizontal
COLOCACIÓN DE LA UNIDAD EN VERSIÓN HORIZONTAL — Con el objetivo de favorecer el flujo regular de la condensación, se recomienda montar la máquina inclinada de 3 mm hacia la descarga de la condensación. A continuación se muestran algunas secuencias del montaje: 1. -
Página 92: Conexión A Los Canales
CONEXIÓN A LOS CANALES — Al final el sifón debe tener un tapón para la limpieza en la parte baja o, de cualquier manera, debe permitir un desmontaje rápido para la limpieza periódica. — El recorrido del tubo de descarga de condensación debe tener siempre una pen- diente hacia el exterior, y ser lo más breve posible y tener el menor número de cur- Está... -
Página 93: Conexiones Eléctricas
CONEXIONES ELÉCTRICAS ATENCIÓN: Antes de iniciar cualquier operación, asegúrese de que la línea de alimentación general esté seccionada. Realice las conexiones con cables de sección adecuada para las cargas. — Las conexiones eléctricas al cuadro de mando las debe realizar personal especializado según los esquemas suministrados. —... -
Página 94: Panel De Control
PANEL DE CONTROL Leyenda: Pantalla Tecla (Down) Tecla (UP) tecla (Set) Tecla (On/Off) Tecla (Función) L1 - Led de activación del compresor L2 - Led de activación del ventilador L3 - Led de activación de la deshumidificación L4 - LED de activación de la integración de verano L5 - LED de activación de la integración invernal L6 - LED de activación del modo de programación L7 - Led de señalación de alarmas... -
Página 95: Modalidad De Funcionamiento
Tabla de parámetros de ajuste Rama CFn / RamadFr / RamaALL Parámetro Por defecto Range Unidad Descripción 7,0 – 12,0 °C Valor mínimo de temperatura del agua de entrada en funcionamiento DESHUMIDIFICADOR 15,0 – 25,0 °C Valor máximo de temperatura del agua de entrada en funcionamiento DESHUMIDIFICADOR 25,0 –... -
Página 96: Versión Dmv, Dmv-I
Leyenda: Humidostato RU% Interruptor E/I Invierno Verano Termostato invernal °C VERSIÓN DMV, DMV-I En la versión de integración DMV-I, la unidad se configura para funcionar en modo de deshumidificación de verano, como ya se ha visto en las versiones anteriores DMH/DMH-C, o en modo de integración. -
Página 97: Control Y Primera Puesta En Marcha
CONTROL Y PRIMERA PUESTA EN MARCHA 1. Compruebe la estanqueidad del circuito hidráulico y la ausencia de goteo de la Antes de encender la unidad controle lo siguiente: — Fijación de la unidad al techo o a la pared. máquina. 2. - Página 100 A E R M E C S . p . A . V i a R o m a , 9 9 6 - 3 7 0 4 0 B e v i l a c q u a ( V R ) - I t a l i a T e l .