Tabla de contenido
Publicidad
Idiomas disponibles
Idiomas disponibles
Enlaces rápidos
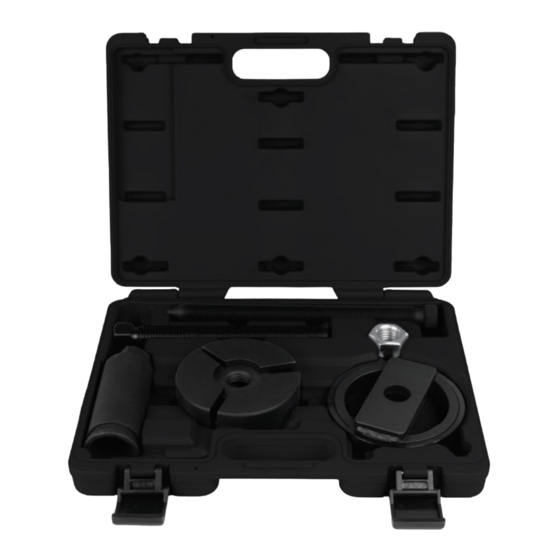
RS499
Parts List:
1. Force Screw
2. Centering Force Screw
3. Center Plate
4. Seal Installer
5. Hex Nut
6. Threaded Adapter
7. Remover Plates (3)
8. Sleeve Ring
Wear safety goggles.
Usar gafas de seguridad.
Porter des lunettes de
(users and bystanders)
(Usuarios y espectadores)
sécurité. (les utilisateurs et
les spectateurs)
www.matcotools.com
Page 1
Publicidad
Tabla de contenido

Manuales relacionados para Matco Tools RS499


Resumen de contenidos para Matco Tools RS499
- Página 1 RS499 Parts List: 1. Force Screw 2. Centering Force Screw 3. Center Plate 4. Seal Installer 5. Hex Nut 6. Threaded Adapter 7. Remover Plates (3) 8. Sleeve Ring Wear safety goggles. Usar gafas de seguridad. Porter des lunettes de...
- Página 2 ALWAYS wear eye protection that meets ANSI Z87.1 and OSHA standards. ALWAYS refer to the vehicle and engine specific manuals before doing any job. This tool is NOT intended for non-Ford applications. Images contained herein may not represent the actual vehicle. This tool is meant to be used by professionally trained technicians.
- Página 3 Center Plate Installation Figure C Center Plate Parts List No. 3 1. Attach the Center Plate to the crankshaft Cap Screws flange with cap screws (not provided). (not provided) Crankshaft Flange Seal Housing Sealing Figure D 1. Make sure the engine side of the seal Seal Housing housing and block are clear of debris and Align Dowel Pins...
-
Página 4: Final Assembly
Seal / Wear Sleeve Installer Assembly Figure F Seal Installer Parts List No. 4 1. Thread the hex nut onto the Force Screw. 2. Thread the Force Screw with the Hex Nut into the Seal Installer. 3. Put the Sleeve Ring over the Seal Installer. Force Screw and Hex Nut Parts List No. -
Página 5: Lista De Piezas
RS499 Lista De Piezas: 1. Tornillo de fuerza 2. Tornillo de fuerza de centrado 3. Placa centro 4. Instalador de sellos 5. Tuerca hexagonal 6. Adaptador de rosca 7. Placa de extracción (3) 8. Anillo de manguito Wear safety goggles. -
Página 6: Desmontaje De La Junta
USE SIEMPRE PROTECCIÓN OCULAR CONFORME CON LA NORMA ANSI Z87.1 Y LAS NORMAS DE LA OSHA. ANTES DE REALIZAR CUALQUIER OPERACIÓN, CONSULTE SIEMPRE LOS MANUALES ESPECÍFICOS DEL VEHÍCULO Y DEL MOTOR. ESTA HERRAMIENTA NO SE HA DISEÑADO PARA APLICACIONES QUE NO SEAN DE FORD. ES POSIBLE QUE LAS IMÁGENES QUE SE INCLUYEN NO REPRESENTEN EL VEHÍCULO REAL. -
Página 7: Instalación De La Placa Central
Instalación de la placa central Gráfico C Placa centro Lista de piezas 3 1. Fije la placa central a la brida del cigüeñal Tornillos de sombrerete con los tornillos de sombrerete (no (no suministrados) suministrados). Brida del cigüeñal Sellado de la carcasa Gráfico D 1. -
Página 8: Conjunto De La Junta Y Del Dispositivo De Instalación Del Protector
Conjunto de la junta y del dispositivo de Gráfico F instalación del protector Instalador de sellos 1. Enrosque la tuerca hexagonal en el tornillo Lista de piezas 4 de centrado. 2. Enrosque el tornillo de centrado con la tuerca hexagonal en el dispositivo de instalación de la junta.