Tabla de contenido
Publicidad
Idiomas disponibles
Idiomas disponibles
Enlaces rápidos
Publicidad
Capítulos
Tabla de contenido

Manuales relacionados para auna Ambient


Resumen de contenidos para auna Ambient
- Página 1 All manuals and user guides at all-guides.com...
- Página 2 All manuals and user guides at all-guides.com...
-
Página 3: Tabla De Contenido
All manuals and user guides at all-guides.com Sehr geehrter Kunde, wir gratulieren Ihnen zum Erwerb Ihres Gerätes. Lesen Sie die folgenden Hinweise sorgfältig durch und befolgen Sie diese, um möglichen Schäden vorzubeugen. Für Schäden, die durch Missachtung der Hinweise und unsachgemäßen Gebrauch entstehen, übernehmen wir keine Haftung. -
Página 4: Technische Daten
All manuals and user guides at all-guides.com TECHNISCHE DATEN Artikelnummer 10034900 10034901 Stromversorgung Netzteil Eingang: 100-240V~ 50/60 Hz Ausgang: 9 V (1 A) Leistungsaufnahme (im Betrieb) ca. 10 W Power consumption (standby) ≤ 1 W Ausgänge Stereo-Kopfhöreranschluss (3.5 mm) Anzahl der Senderspeicher 40 DAB+, 40 FM-Radio BT-Frequenzband 2.4 GHz BT- Übertragunsleistung... - Página 5 All manuals and user guides at all-guides.com WARNUNG VORSICHT: DAS GEHÄUSE NICHT ÖFFNEN, UM EINEN STROMSCHLAG UND ERNSTE PERSONENVERLETZUNGEN ZU VERMEIDEN. IM INNEREN KEINE VOM KUNDEN ZU WARTENDEN KOMPONENTEN. WENDEN SIE SICH AUSSCHLIESSLICH AN QUALIFIZIERTE FACHLEUTE. WARNUNG. UM DIE GEFAHR EINES BRANDS ODER EINES STROMSCHLAGS ZU VERRINGERN, DAS GERÄT NICHT IN WASSER, REGEN ODER FEUCHTIGKEIT AUSZUSETZEN.
-
Página 6: Sicherheitshinweise
All manuals and user guides at all-guides.com SICHERHEITSHINWEISE Allgemeine Hinweise • Blitzschlag - Wenn Sie das Gerät länger nicht benutzen oder es gewittert, ziehen Sie den Stecker aus der Steckdose oder trennen Sie das Gerät vom Antennenanschluss. Dadurch werden Schäden am Produkt durch Blitzschlag und Überspannung vermieden. - Página 7 All manuals and user guides at all-guides.com Besondere Hinweise • Kinder ab 8 Jahren, psychisch, sensorisch und körperlich eingeschränkte Menschen dürfen das Gerät nur benutzen, wenn sie vorher von einer für sie verantwortlichen Aufsichtsperson ausführlich mit den Funktionen und den Sicherheitsvorkehrungen vertraut gemacht wurden und die damit verbundenen Risiken verstehen.
-
Página 8: Ansicht
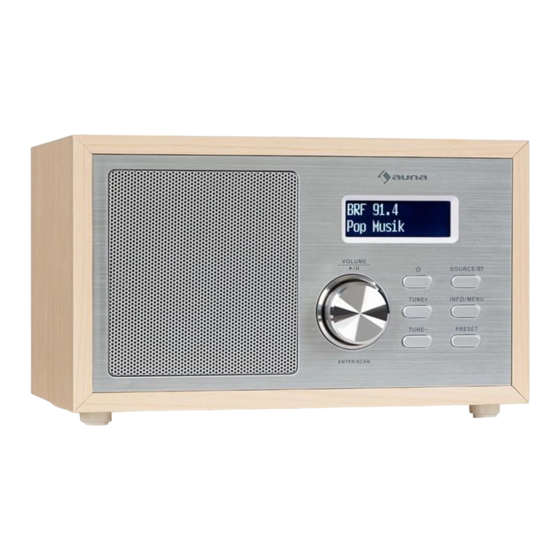
All manuals and user guides at all-guides.com ANSICHT Vorderansicht LCD-Anzeige Standby-Taste (Ein/Aus) Quelle/BT INFO/MENU button PRESET button TUNE- (Menünavigation zurück/Sender wechseln/Titel wechseln) TUNE+ (Menünavigation vor/Sender wechseln/Titel wechseln) VOLUME/ ENTER/SCAN – Drehknopf mit Druckfunktion Lautsprecher... - Página 9 All manuals and user guides at all-guides.com Rückansicht 10 Teleskopantenne Bassanschluss 12 AUX IN-Anschluss 13 Kopfhöreranschluss 14 Netzgerätanschluss...
-
Página 10: Einrichtung Und Inbetriebnahme
All manuals and user guides at all-guides.com EINRICHTUNG UND INBETRIEBNAHME Nehmen Sie das Gerät vorsichtig heraus und überprüfen Sie die Lieferung auf Vollständigkeit hin. • 1 x Bedienungsanleitung • 1 x Netzadapter • 1 x Internetradio Schneller Einstieg 1. Stecken Sie den Anschluss des Netzadapters in den Anschluss an der Geräterückseite und den Netzstecker auf der anderen Seite des Netzadapters in die Steckdose (B). -
Página 11: Bedienung Des Radios
All manuals and user guides at all-guides.com BEDIENUNG DES RADIOS Sie können das Radio zum Empfang von DAB+ und FM-Radiosendern verwenden. Sie können jeweils bis zu 40 voreingestellte DAB+- und FM- Radiosender speichern. HINWEIS Bei der ersten Verwendung des Geräts startet es im DAB+-Radiomodus und die Senderliste der verfügbaren DAB+-Radiosender wird automatisch erstellt. - Página 12 All manuals and user guides at all-guides.com 'Drehknopf' genannt) verwenden, um einen Sender aus der Senderliste auszuwählen. • Drücken Sie den Drehknopf, um den ausgewählten Sender wiederzugeben. Manuelle Senderauswahl Mit der manuellen Abstimmfunktion können Sie die Signalstärke und damit die Empfangsqualität eines DAB+-Radiosenders einstellen. •...
- Página 13 All manuals and user guides at all-guides.com HINWEIS Gespeicherte Radiosender werden überschrieben, wenn Sie andere Sender in bereits belegten Senderspeicherplätzen speichern. Aufrufen gespeicherter Sender • Drücken Sie im DAB+-Radiomodus kurz die Taste PRESET, um die in den Voreinstellungen gespeicherten DAB+-Radiosender aufzurufen. Der LC-Bildschirm zeigt die Meldung „Preset Recall“...
- Página 14 All manuals and user guides at all-guides.com Informationen zum Sender Im DAB+-Radiomodus können Sie zusätzliche Senderinformationen auf der LCD-Anzeige anzeigen. Drücken Sie die Taste INFO/MENU wiederholt kurz, um folgende Senderinformationen anzuzeigen: • Lauftext (Radiotext) - Titel • Künstler • Signalstärke (Balken) •...
- Página 15 All manuals and user guides at all-guides.com • Drücken Sie im FM-Radiomodus die Taste TUNE+ oder die Taste TUNE- , um einen FM-Radiosender aus der Senderliste auszuwählen. • Drücken Sie den Drehknopf, um Ihre Auswahl zu bestätigen Manuelle Sendersuche • Drücken Sie kurz den Drehknopf, um zum nächsten empfangbaren Sender mit einer höheren oder niedrigeren Frequenz zu wechseln.
-
Página 16: Bt-Wiedergabe
All manuals and user guides at all-guides.com HINWEIS Gespeicherte Radiosender werden überschrieben, wenn Sie andere Sender in bereits belegten Senderspeicherplätzen speichern. Aufrufen gespeicherter Sender Drücken Sie im FM-Radiomodus kurz die Taste PRESET, um die in den Voreinstellungen gespeicherten FM-Radiosender aufzurufen. Der LC- Bildschirm zeigt die Meldung „Preset Recall“... - Página 17 Sie in der Bedienungsanleitung Ihres externen Wiedergabegerätes. • Wählen Sie aus der Liste der gefundenen BT-Geräte im Einstellungsmenü Ihrer externen Wiedergabe das Gerät Ambient aus. Das externe Wiedergabegerät verbindet sich nun automatisch über BT mit dem Radio. Wenn die Verbindung erfolgreich hergestellt wurde und „BT Connected“...
-
Página 18: Anschließen Externer Wiedergabegeräte (Aux In-Modus)
All manuals and user guides at all-guides.com Taste Funktion TUNE- Kurz drücken, um zum Anfang des aktuell wiedergegebenen Titels zu gelangen. Erneut kurz drücken, um zum vorherigen Titel zu gelangen. SOURCE/BT Für ca. 2 Sekunden drücken, um die Geräte zu entkoppeln. ANSCHLIESSEN EXTERNER WIEDERGABEGERÄTE (AUX IN-MODUS) Im Modus AUX IN können Sie externe Wiedergabegeräte wie... -
Página 19: Anschließen Von Kopfhörern
All manuals and user guides at all-guides.com ANSCHLIESSEN VON KOPFHÖRERN • Drehen Sie den Drehknopf gegen den Uhrzeigersinn auf die niedrigste Lautstärke. • Stecken Sie den Anschlussstecker des Kopfhörers in die Kopfhörerbuchse auf der Rückseite des Geräts. Die Tonwiedergabe erfolgt nun nur noch über die angeschlossenen Kopfhörer. •... - Página 20 All manuals and user guides at all-guides.com Systemmenü Drehknopf drehen, um Punkt auszuwählen Drehknopf drücken, um Auswahl zu bestätigen Zeit einstellen 1-120 min Sleep aus Sleep 10, 15, 30, 45, 60, 90, 120 Minuten (Stunde: Minute) Dauer (15, 30, 45, 60, 90, 120 Minuten) Wecker 1 Quelle (Summer, DAB, FM)
- Página 21 All manuals and user guides at all-guides.com Systemmenü Zeitabschaltung [aus], 10, 20, 30, 45, 60, 90, 120, 180 Sek Hoch An-Einstellung Mittel Beleuchtung Niedrig Hoch Dim level Mittel Niedrig Englisch, Französisch, Deutsch, Tschechisch, Dänisch, Sprache Niederländisch, Polnisch, Slowakisch Werksein- stellung Nein SW-Version Anzeige der Softwareversion.
- Página 22 All manuals and user guides at all-guides.com Automatische Abschaltung (Sleep-Funktion) • Mit der Sleep-Funktion können Sie das Gerät nach 10 bis 120 Minuten automatisch ausschalten. • Nach der eingestellten Zeit schaltet sich das Gerät automatisch aus. • Um die Funktion Sleep zu deaktivieren, wählen Sie die Einstellung "off" wie oben beschrieben aus und drücken Sie den Drehknopf, um die Auswahl zu bestätigen.
- Página 23 All manuals and user guides at all-guides.com angezeigt. Einstellung von Datum und Uhrzeit Auto-Update-Funktion: Mit der Funktion „Auto Update“ können Sie einstellen, ob Datum und Uhrzeit automatisch über das RDS-Signal (Radio Data System) des Radiosenders oder manuell eingestellt werden. 12h/24h-Anzeige •...
-
Página 24: Konformitätserklärung
All manuals and user guides at all-guides.com Software-Version • Drücken Sie im Systemmenü die Taste TUNE+ oder TUNE- (ggf. mehrmals) oder drehen Sie am Drehknopf, bis die SW-Version auf der LCD-Anzeige erscheint. • Drücken Sie den Drehknopf, um die Software-Version des Geräts anzuzeigen. - Página 25 All manuals and user guides at all-guides.com Dear Customer, Congratulations on purchasing this equipment. Please read this manual carefully and take care of the following hints to avoid damages. Any failure caused by ignoring the items and cautions mentioned in the instruction manual are not covered by our warranty and any liability.
-
Página 26: Technical Data
All manuals and user guides at all-guides.com TECHNICAL DATA Item number 10034900, 10034901 Receiving power supply Input: 100-240V~ 50/60 Hz Output: 9 V (1 A) Power consumption (in operation): approx .10 W Power consumption (standby) ≤ 1 W Outputs 3.5 mm stereo headphone socket Number of presets 40 DAB+, 40 FM radio BT Frequency band... - Página 27 All manuals and user guides at all-guides.com WARNINGS CAUTION: TO REDUCE THE RISK OF ELECTRIC SHOCK AND SERIOUS PERSONAL INJURY, DO NOT REMOVE ANY COVER. NO USER-SERVICABLE PARTS INSIDE. REFER SERVICING TO QUALIFIED SERVICE PERSONNEL ONLY. WARNING. TO REDUCE THE RISK OF FIRE OR ELECTRICAL SHOCK, DO NOT EXPOSE THIS PRODUCT TO WATER, RAIN OR MOISTURE.
-
Página 28: Safety Instruction
All manuals and user guides at all-guides.com SAFETY INSTRUCTION General information • Lightning - If you are not going to use the device for a long time or if there is a storm, disconnect the plug from the electrical outlet and disconnect the device from the antenna connector. - Página 29 All manuals and user guides at all-guides.com • Mains plug/Power adaptor is used as disconnect device and it should remain readily operable during intended use. • In order to disconnect the apparatus from the mains completely, the main plug/power adaptor should be disconnected from the mains socket outlet completely.
-
Página 30: Overview
All manuals and user guides at all-guides.com OVERVIEW Front LCD Display Standby button SOURCE/BT button INFO/MENU button PRESET button TUNE- button (menu navigation back/change station/track change) TUNE+ button (menu navigation forwards/change station/track change) VOLUME/ ENTER /SCAN dial (with button function) ... - Página 31 All manuals and user guides at all-guides.com Back 10 Telescopic aerial Bass reflex port 12 AUX IN socket 13 Headphone socket 14 Mains adapter connection DC IN...
-
Página 32: Getting Started
All manuals and user guides at all-guides.com GETTING STARTED Carefully remove the unit and all accessories from the package. Please verify that you have all the following accessories before recycling the gift box. • User Manual • AC/DC Adapter Getting started - Quick set up 1. -
Página 33: Radio Operation
All manuals and user guides at all-guides.com RADIO OPERATION You can use the radio to receive DAB+ and FM radio stations.You can store up to 40 preset DAB+ and FM radio stations each. NOTE When the device is first used, it starts in DAB+ radio mode and the station list of the available DAB+ radio stations is created automatically. - Página 34 All manuals and user guides at all-guides.com Manual station selection The manual tune function allows you to adjust the signal strength and thus the reception quality of a DAB+ radio station. • In DAB+ radio mode, press the INFO / MENU button for about 2 seconds to call up the DAB settings menu.
-
Página 35: Station Information
All manuals and user guides at all-guides.com Dynamic Range Control (DRC) The DRC function ensures that quieter passages are better heard when playing DAB+ radio stations when the radio is used in a noisy environment. • In DAB+ radio mode, press the INFO/MENU button for about 2 seconds to call up the DAB settings menu. -
Página 36: Fm Radio Operation
All manuals and user guides at all-guides.com FM radio operation Automatic station scan with station storage (AMS) The automatic station scan with station memory scans the entire frequency band once and automatically saves the found FM radio stations as a station list. - Página 37 All manuals and user guides at all-guides.com The following appears on the display Scan setting. • Press the dial to confirm the selection. • Press the TUNE+ or TUNE- button or turn the dial to select 'Strong stations' only or All stations. •...
-
Página 38: Playback Via Bt
• From the list of discovered BT devices in the settings menu of your external playback, select the entry Ambient. The external playback device will now connect to the radio automatically via BT. When the connection has been successfully established and BT Connected appears on the LCD display. -
Página 39: Aux In Mode
All manuals and user guides at all-guides.com Button functions during playback via BT Button Function VOLUME | ENTER / SCAN Press briefly to start/stop playback. TUNE+ Button Press briefly to move to the next track. TUNE- Button Press briefly to go to the beginning of the current track. -
Página 40: Connecting Headphones
All manuals and user guides at all-guides.com CONNECTING HEADPHONES Turn the dial anticlockwise to the lowest volume level. • Plug the jack plug of the headphones into the headphone socket won the rear of the device. Sound playback now takes place only via the connected headphones. - Página 41 All manuals and user guides at all-guides.com System Menu On time (hour: minute) Duration (15, 30, 45, 60, 90 120 minutes) Alarm 1 Source (buzzer, DAB, FM) Setup Alarm 1 Once, weekends, weekdays) Date, (DD-MM-YYYY Alarm Volume Alarm on Alarm off Alarm 2 see Alarm 1 Setup...
- Página 42 All manuals and user guides at all-guides.com System Menu High Backlight Dim level Medium English, French, German, Czech, Danish, Dutch, Polish, Language Slovak Factroy Reset SW version Display of SW version Notes To access a menu item refer to the System Menu Table. Nap timer (NAP function) Using the NAP function, you can set a timer alarm that will wake you up with an alarm signal after 1–120 minutes.
- Página 43 All manuals and user guides at all-guides.com Save your settings by pressing the dial. The LCD display shows the message Alarm Saved. The alarm clock is now activated. • The alarm settings are only saved if you then confirm your settings under the menu option Alarm On or Alarm Off by pressing the dial.
-
Página 44: Backlight
All manuals and user guides at all-guides.com Backlight Timeout: You can use the Timeout function to set the number of seconds after which the display backlight is dimmed after the device is switched off or after a button was pressed. On level: The On level function allows you to adjust the brightness level of the display backlight during operation. - Página 45 All manuals and user guides at all-guides.com Chère cliente, cher client, Toutes nos félicitations pour l’acquisition de ce nouvel appareil. Veuillez lire attentivement et respecter les instructions de ce mode d’emploi afin d’éviter d’éventuels dommages. Nous ne saurions être tenus pour responsables des dommages dus au non-respect des consignes et à...
-
Página 46: Fiche Technique
All manuals and user guides at all-guides.com FICHE TECHNIQUE Numéro d'article 10034900 10034901 Alimentation de l'adaptateur Entrée: 100-240V~ 50/60 Hz secteur Sortie: 9 V (1 A) Consommation (en marche) ca. 10 W Consommation (en veille) ≤ 1 W Sorties Prise casque stéréo (3.5 mm) Nombre d'emplacements 40 stations DAB+, 40 stations FM mémoire pour les stations... - Página 47 All manuals and user guides at all-guides.com MISE EN GARDE ATTENTION : POUR RÉDUIRE LES RISQUES DE CHOCS ÉLECTRIQUES, NE DÉMONTEZ AUCUN CACHE. L‘APPAREIL NE CONTIENT AUCUNE PIÈCE À ENTRETENIR. ADRESSEZ- VOUS UNIQUEMENT À DES PERSONNELS QUALIFIÉS POUR LA MAINTENANCE. MISE EN GARDE : POUR RÉDUIRE LE RISQUE D‘INCENDIE ET DE CHOC ÉLECTRIQUE, N‘EXPOSEZ PAS CET APPAREIL À...
-
Página 48: Consignes De Sécurité
All manuals and user guides at all-guides.com CONSIGNES DE SÉCURITÉ Consignes générales de sécurité • Foudre - Si vous n‘utilisez pas l‘appareil pendant une longue période ou qu‘il y a de l‘orage, débranchez la fiche de la prise et débranchez aussi la prose d‘antenne de l‘appareil. - Página 49 All manuals and user guides at all-guides.com Consignes particulières • Les enfants à partir de 8 ans et les personnes aux capacités mentales, physiques et psychiques limitées ne sont autorisés à utiliser l‘appareil qu‘après avoir été familiarisés en détail avec les fonctions et les consignes de sécurité...
-
Página 50: Présentation
All manuals and user guides at all-guides.com PRÉSENTATION Vue de face Ecran LCD Touche de veille (marche/arrêt) Source/BT Touche INFO/MENU Touche PRESET TUNE - (Retour dans le menu navigation/changer de station/changer de titre) TUNE+ (Suivant dans le menu navigation/changer de station/changer de titre) VOLUME/ ... - Página 51 All manuals and user guides at all-guides.com Vue de dos 10 Antenne télescopique Branchement pour une basse 12 Prise AUX IN 13 Prise casque 14 Prise de l‘adaptateur secteur...
-
Página 52: Installation Et Mise En Marche
All manuals and user guides at all-guides.com INSTALLATION ET MISE EN MARCHE Retirez soigneusement l‘appareil et vérifiez l‘intégralité de la livraison. • 1 x mode d‘emploi • 1 x adaptateur secteur • 1 x radio Internet Démarrage rapide 1. Branchez le connecteur de l‘adaptateur secteur dans la prise à l‘arrière de l‘appareil et la fiche d‘alimentation de l‘autre côté... -
Página 53: Utilisation De La Radio
All manuals and user guides at all-guides.com UTILISATION DE LA RADIO Vous pouvez utiliser la radio pour recevoir des stations DAB + et FM. Vous pouvez mémoriser jusqu‘à 40 stations de radio DAB + et FM avec accès rapide pour chacune. REMARQUE Lors de la première utilisation de l‘appareil, il démarre en mode radio DAB + et la liste des stations de radio DAB + disponibles est créée... - Página 54 All manuals and user guides at all-guides.com simplement le „molette“) pour sélectionner une station dans la liste. • Appuyez sur la molette pour lire la station sélectionnée. Recherche manuelle de stations Avec la fonction de réglage manuel, vous pouvez régler la puissance du signal et donc la qualité...
- Página 55 All manuals and user guides at all-guides.com REMARQUE Les stations de radio enregistrées seront écrasées si vous enregistrez d‘autres stations dans une présélection déjà utilisée. Rappel des stations mémorisées • En mode radio DAB +, appuyez brièvement sur la touche PRESET pour appeler les stations de radio DAB + enregistrées dans les présélections.
-
Página 56: Utilisation De La Radio Fm
All manuals and user guides at all-guides.com Informations de la station En mode radio DAB +, vous pouvez afficher des informations supplémentaires sur la station sur l‘écran LCD. Appuyez brièvement sur la touche INFO / MENU à plusieurs reprises pour afficher les informations de station suivantes : •... - Página 57 All manuals and user guides at all-guides.com Choix d‘une station • En mode radio FM, appuyez sur la touche TUNE + ou TUNE- pour sélectionner une station de radio FM dans la liste des stations. • Appuyez sur la molette pour confirmer votre sélection Recherche manuelle de stations •...
-
Página 58: Lecture Par Bt
All manuals and user guides at all-guides.com REMARQUE Les stations de radio enregistrées seront écrasées si vous enregistrez d‘autres stations sur un même emplacement. Rappel d‘une station mémorisée En mode radio FM, appuyez brièvement sur la touche PRESET pour appeler les stations de radio FM enregistrées dans les présélections. - Página 59 Une description détaillée de la procédure se trouve dans le mode d‘emploi de votre appareil de lecture externe. • Sélectionnez le périphérique Ambient dans la liste des appareils BT du menu des paramètres de l‘appareil externe. • L‘appareil de lecture externe se connecte désormais automatiquement à...
-
Página 60: Connexion De Périphériques De Lecture Externes (Mode Aux In)
All manuals and user guides at all-guides.com Touche Fonction SOURCE/BT Appuyez pendant environ 2 secondes pour découpler les appareils. CONNEXION DE PÉRIPHÉRIQUES DE LECTURE EXTERNES (MODE AUX IN) En mode AUX IN, vous pouvez connecter des appareils de lecture externes tels qu‘un smartphone ou un lecteur MP3 pour les utiliser comme source de lecture pour la radio. -
Página 61: Branchement D'un Casque
All manuals and user guides at all-guides.com BRANCHEMENT D‘UN CASQUE • Tournez la molette dans le sens antihoraire au volume le plus bas. • Insérez la fiche du casque dans la prise casque à l‘arrière de l‘appareil. Le son n‘est désormais diffusé que par les écouteurs connectés. •... - Página 62 All manuals and user guides at all-guides.com Menu système Tournez la molette pour sélectionner un point appuyez sur la molette pour confirmer le choix Réglage de la durée 1-120 min Quitter le mode sleep Sleep 10, 15, 30, 45, 60, 90, 120 minutes Activée (heure : minute) Durée (15, 30, 45, 60, 90, 120 minutes)
- Página 63 All manuals and user guides at all-guides.com Menu système Temporisation [désactivée], 10, 20, 30, 45, 60, 90, 120, 180 Sek Elevé Réglage allumé Moyen Éclairage Faible Elevé niveau de luminosité Moyen Faible Anglais, français, allemand, tchèque, danois, Langue néerlandais, polonais, slovaque Paramètres d'usine Version de...
- Página 64 All manuals and user guides at all-guides.com Arrêt automatique (fonction Sleep) • Avec la fonction Sleep, vous pouvez éteindre l‘appareil automatiquement après 10 à 120 minutes. • Après la durée définie, l‘appareil s‘éteint automatiquement. • Pour désactiver la fonction Sleep, sélectionnez le réglage „off“ comme décrit ci-dessus et appuyez sur la molette pour confirmer la sélection.
- Página 65 All manuals and user guides at all-guides.com System) de la station de radio, ou manuellement. Format d‘affichage 12 h / 24 h • Si l‘affichage 12 heures est réglé, „PM“ apparaît après l‘affichage de l‘heure de midi à 23 h 59. L‘heure „AM“ s‘affiche sur l‘écran LCD de 12 h à...
-
Página 66: Déclaration De Conformité
All manuals and user guides at all-guides.com DÉCLARATION DE CONFORMITÉ Fabricant : Chal-Tec GmbH, Wallstraße 16, 10179 Berlin, Allemagne La déclaration complète de conformité du fabricant est accessible par le lien suivant https://use.berlin/10034900... - Página 67 All manuals and user guides at all-guides.com Estimado cliente: Le felicitamos por la adquisición de este producto. Lea atentamente el siguiente manual y siga cuidadosamente las instrucciones de uso con el fin de evitar posibles daños. La empresa no se responsabiliza de los daños ocasionados por un uso indebido del producto o por haber desatendido las indicaciones de seguridad.
-
Página 68: Datos Técnicos
All manuals and user guides at all-guides.com DATOS TÉCNICOS Número de artículo 10034900 10034901 Alimentación del adaptador de Entrada: 100-240V~ 50/60 Hz Salida: 9 V (1 A) Consumo (en funcionamiento) ca. 10 W Consommation (en veille) ≤ 1 W Salidas Conexión estéreo para auriculares (3,5 mm) Memoria de emisoras 40 radio DAB+, 40 radio FM... - Página 69 All manuals and user guides at all-guides.com ADVERTENCIA: ¡ATENCIÓN! NO ABRA LA CARCASA PARA EVITAR DESCARGAS ELÉCTRICAS Y LESIONES PERSONALES GRAVES. EL APARATO NO CONTIENE PIEZAS EN SU INTERIOR QUE EL USUARIO PUEDA REPARAR. CONTACTE ÚNICAMENTE CON EL PERSONAL CUALIFICADO. ADVERTENCIA: PARA EVITAR UN INCENDIO O UNA DESCARGA ELÉCTRICA, NO EXPONGA EL APARATO AL AGUA, LLUVIA O HUMEDAD.
-
Página 70: Indicaciones De Seguridad
All manuals and user guides at all-guides.com INDICACIONES DE SEGURIDAD Indicaciones generales • Relámpago - Si no va a utilizar el aparato durante un periodo largo de tiempo o si hay una tormenta eléctrica, desenchufe el aparato y desconecte la antena. De este modo, protegerá el aparato de los daños que pueden ocasionar los relámpagos y la sobretensión. - Página 71 All manuals and user guides at all-guides.com Indicaciones especiales • Los niños mayores de 8 años y las personas con discapacidad física, sensorial o psíquica pueden utilizar el aparato si han sido previamente instruidos por su tutor o supervisor sobre el funcionamiento del mismo y conocen las funciones, las indicaciones de seguridad y los riesgos asociados.
-
Página 72: Vista General Del Aparato
All manuals and user guides at all-guides.com VISTA GENERAL DEL APARATO Parte frontal Pantalla LCD Botón de encendido/apagado Botón SOURCE/BT Botón INFO/MENU Botón PRESET TUNE- (Atrás en la navegación por el menú/Cambiar emisora/Cambiar pista) TUNE+ (Adelante en la navegación por el menú/Cambiar emisora/ Cambiar pista) Perilla VOLUME/ ... - Página 73 All manuals and user guides at all-guides.com Parte posterior 10 Antena telescópica Entrada para bajos 12 Entrada AUX 13 Entrada para auriculares 14 Entrada para el cable de alimentación...
-
Página 74: Instalación Y Puesta En Funcionamiento
All manuals and user guides at all-guides.com INSTALACIÓN Y PUESTA EN FUNCIONAMIENTO Retire cuidadosamente la unidad y compruebe que la entrega esté completa. • 1 manual de instrucciones • 1 cable de alimentación • 1 radio de internet Instalación rápida 1. -
Página 75: Funcionamiento De La Radio
All manuals and user guides at all-guides.com FUNCIONAMIENTO DE LA RADIO Puede utilizar la radio para escuchar emisoras DAB+ y FM, así como guardar hasta 40 emisoras de radio DAB+ y 40 emisoras de radio FM. NOTA La primera vez que use la radio, esta inicia en el modo de radio DAB+ y crea automáticamente una lista de emisoras DAB+ que están disponibles. - Página 76 All manuals and user guides at all-guides.com Selección manual de emisoras La función de sintonización manual permite ajustar la intensidad de la señal y, por tanto, la calidad de recepción de una emisora DAB+. • En el modo DAB+, mantenga pulsado durante aprox. 2 segundos el botón INFO/MENU para acceder al menú...
- Página 77 All manuals and user guides at all-guides.com NOTA Las emisoras de radio guardadas se sobrescriben si ha guardado otras emisoras en la memoria de emisoras que está en uso. Acceder a las emisoras almacenadas • En el modo DAB+, pulse brevemente el botón PRESET para acceder a la memoria de las emisoras DAB+ almacenadas.
-
Página 78: Funcionamiento De La Radio Fm
All manuals and user guides at all-guides.com Información acerca de la emisora En el modo DAB+, la pantalla LCD puede mostrar información adicional sobre la emisora de radio. Pulse brevemente y varias veces el botón INFO/ MENU para visualizar la siguiente información: •... - Página 79 All manuals and user guides at all-guides.com Selección de emisora • En el modo FM, pulse el botón TUNE+ o TUNE- para elegir una emisora FM de la lista de emisoras. • Pulse la perilla para confirmar la selección. Búsqueda manual de emisoras •...
-
Página 80: Reproducción A Través De Bluetooth (Bt)
All manuals and user guides at all-guides.com NOTA Las emisoras de radio guardadas se sobrescriben si ha guardado otras emisoras en la memoria de emisoras que está en uso. Acceder a las emisoras almacenadas En el modo FM, pulse brevemente el botón PRESET para acceder a la memoria de las emisoras FM almacenadas. - Página 81 All manuals and user guides at all-guides.com el menú de configuración de su dispositivo de audio externo. El dispositivo de audio externo ahora se conecta automáticamente a la radio a través de BT. Cuando la conexión se establece con éxito, aparece «BT Connected»...
-
Página 82: Conexión De Aparatos De Reproducción Externos (Modo Aux In)
All manuals and user guides at all-guides.com CONEXIÓN DE APARATOS DE REPRODUCCIÓN EXTERNOS (MODO AUX IN) En el modo AUX IN, puede conectar dispositivos de reproducción externos, como un teléfono inteligente o un reproductor de MP3, para utilizarlos como fuente de reproducción para la radio. NOTA Apague la radio y el dispositivo de reproducción externo antes de conectarlos. -
Página 83: Conexión De Auriculares
All manuals and user guides at all-guides.com CONEXIÓN DE AURICULARES • Gire la perilla en sentido contrario a las agujas del reloj para poner el volumen al mínimo. • Conecte el conector de los auriculares a la salida para auriculares en la parte posterior de la radio. - Página 84 All manuals and user guides at all-guides.com Menú del sistema Gire la perilla para seleccionar Pulse para perilla para confirmar la selección Configurar el tiempo 1-120 min Sleep apagado Sleep 10, 15, 30, 45, 60, 90, 120 minutos Activado (hora: minuto) Duración (15, 30, 45, 60, 90, 120 minutos) Fuente (buzzer, DAB, FM)
-
Página 85: Indicaciones Sobre El Menú
All manuals and user guides at all-guides.com Menú del sistema Temporizador [désactivée], 10, 20, 30, 45, 60, 90, 120, 180 Sek Alto Nivel de brillo Medio Iluminación Bajo Alto Nivel de atenuación Medio Bajo inglés, francés, alemán, checo, danés, neerlandés, Idioma polaco, eslovaco Sí... -
Página 86: Despertador
All manuals and user guides at all-guides.com Apagado automático (función Sleep) • Con la función Sleep, puede apagar la radio en un intervalo de 10-120 minutos. • Tras transcurrir el tiempo configurado, la radio se apaga automáticamente. • Para desactivar la función Sleep, seleccione la configuración «OFF» como se describe arriba y pulse la perilla para confirmar la selección. -
Página 87: Retroiluminación
All manuals and user guides at all-guides.com Configuración de la fecha y hora Función actualización automática: Con la función de actualización automática puede establecer si la fecha y la hora se configuren automáticamente a través de la señal RDS (Radio Data System) de la emisora de radio o manualmente. -
Página 88: Declaración De Conformidad
All manuals and user guides at all-guides.com • Pulse la perilla para ver la versión del software de la radio. DECLARACIÓN DE CONFORMIDAD Fabricante: Chal-Tec GmbH, Wallstraße 16, 10179 Berlín, Alemania. Puede descargar la declaración de conformidad completa del fabricante en el siguiente enlace: https://use.berlin/10034900... - Página 89 All manuals and user guides at all-guides.com Gentile cliente, congratulazioni l’acquisto questo dispositivo. La invitiamo a leggere attentamente e a rispettare le seguenti istruzioni, così da prevenire eventuali danneggiamenti. Si declina qualsiasi responsabilità per danni derivanti dalla mancata osservanza delle istruzioni e da un uso improprio.
-
Página 90: Dati Tecnici
All manuals and user guides at all-guides.com DATI TECNICI Numero articolo 10034900 10034901 Alimentazione elettrica Ingresso: 100-240V~ 50/60 Hz Uscita: 9 V (1 A) Consumo (in funzionamento) ca. 10 W Consumo (stand-by) ≤ 1 W Uscite Collegamento cuffie stereo (3,5 Slot memoria stazioni 40 radio DAB+, 40 radio FM Banda di frequenza BT 2.4 GHz... - Página 91 All manuals and user guides at all-guides.com AVVERTENZA: ATTENZIONE: PER EVITARE IL RISCHIO DI SCOSSE ELETTRICHE E GRAVI LESIONI PERSONALI, NON RIMUOVERE IL RIVESTIMENTO. ALL’INTERNO DEL DISPOSITIVO NON SONO PRESENTI COMPONENTI RIPARABILI DALL’UTENTE. RIVOLGERSI ESCLUSIVAMENTE A PERSONALE SPECIALIZZATO. ATTENZIONE: PER LIMITARE IL RISCHIO DI SCOSSE ELETTRICHE, NON ESPORRE IL PRODOTTO AD ACQUA, PIOGGIA O UMIDITÀ.
-
Página 92: Avvertenze Di Sicurezza
All manuals and user guides at all-guides.com AVVERTENZE DI SICUREZZA Istruzioni generali • Fulmini - Se il dispositivo non viene utilizzato per un lungo periodo o durante un temporale, scollegare la spina dalla presa elettrica, oppure separare il dispositivo dalla collegamento all’antenna. È così possibile evitare danni al prodotto causati da fulmini e sovratensione. - Página 93 All manuals and user guides at all-guides.com Note particolari • L’uso di questo dispositivo da parte di bambini di età superiore agli 8 anni e di persone con ridotte capacità fisiche, sensoriali o mentali è consentito solo se tali persone siano state istruite da una persona responsabile sulle funzioni e sull’utilizzo sicuro dell’apparecchio e siano consapevoli dei rischi connessi.
-
Página 94: Panoramica
All manuals and user guides at all-guides.com PANORAMICA Parte frontale Display LCD Tasto stand-by (on/off) Sorgente/BT Pulsante INFO/MENU Pulsante PRESET TUNE- (navigazione indietro nel menu/cambio stazione/cambio traccia) TUNE+ (navigazione avanti nel menu/cambio stazione/cambio traccia) VOLUME/ ENTER/SCAN –Manopola con funzione di pulsante ... - Página 95 All manuals and user guides at all-guides.com Parte posteriore 10 Antenna telescopica Porta bass reflex 12 Collegamento AUX IN 13 Ingresso cuffie 14 Collegamento alimentatore...
-
Página 96: Installazione E Messa In Esercizio
All manuals and user guides at all-guides.com INSTALLAZIONE E MESSA IN ESERCIZIO Estrarre il dispositivo con cautela e accertarsi che la dotazione sia completa. • 1 manuale di istruzioni • 1 adattatore di rete • 1 radio internet Avvio rapido 1. -
Página 97: Funzionamento Della Radio
All manuals and user guides at all-guides.com FUNZIONAMENTO DELLA RADIO È possibile utilizzare la radio per la ricezione di stazioni DAB+ e FM. È possibile salvare fino a 40 stazioni DAB+ e FM predefinite. NOTA Al primo utilizzo del dispositivo, si avvia la modalità radio DAB+ e viene creato automaticamente l’elenco delle stazioni DAB+ disponibili. - Página 98 All manuals and user guides at all-guides.com Ricerca manuale delle stazioni Con la funzione di ricerca manuale, è possibile impostare la potenza del segnale e la qualità di ricezione della propria radio DAB+. • In modalità radio DAB+, tenere premuto per ca. 2 secondi il tasto INFO/MENU per aprire il menu delle impostazioni DAB.
- Página 99 All manuals and user guides at all-guides.com NOTA Le stazioni radio salvate vengono sovrascritte se sono state salvate altre stazioni nella memoria della stazione in uso. Accedere alle stazioni memorizzate • In modalità radio DAB+, premere brevemente il tasto PRESET per accedere alle stazioni radio DAB+ salvate nei preset.
- Página 100 All manuals and user guides at all-guides.com Informazioni sulla stazione In modalità DAB+, il display LCD può mostrare informazioni aggiuntive sulla stazione radio. Premere brevemente e ripetutamente il tasto INFO/MENU per visualizzare le seguenti informazioni: • Testo scorrevole (testo radio): titolo •...
- Página 101 All manuals and user guides at all-guides.com Selezione delle stazioni • Nel modo FM, premere il tasto TUNE+ o TUNE- per scegliere una stazione FM dall’elenco delle stazioni. • Premere la manopola per confermare la selezione. Ricerca manuale delle stazioni •...
-
Página 102: Riproduzione Bt
(qualora vi siano già associazioni salvate). • Impostare il dispositivo esterno in modo tale che cerchi altri dispositivi BT. Una descrizione dettagliata della procedura è disponibile sul libretto di istruzioni del dispositivo esterno. • Nel menu impostazioni del dispositivo esterno, selezionare “Ambient”... - Página 103 All manuals and user guides at all-guides.com dall’elenco di dispositivi BT trovati. Ora il dispositivo esterno si connette automaticamente alla radio tramite BT. Una volta che il collegamento è stato creato, sul display LCD compare il messaggio “BT Connected”. Ora è possibile utilizzare la radio per riprodurre musica da dispositivi esterni, tramite l’altoparlante della radio.
-
Página 104: Collegamento Di Dispositivi Di Riproduzione Esterni (Aux In Mode)
All manuals and user guides at all-guides.com Tasto Funzione SOURCE/BT Premere per ca. 2 secondi per scollegare i dispositivi. COLLEGAMENTO DI DISPOSITIVI DI RIPRODUZIONE ESTERNI (AUX IN MODE) In modalità AUX IN, è possibile collegare dispositivi di riproduzione esterni, come uno smartphone o un lettore MP3, per utilizzarli come sorgente di riproduzione per la radio. -
Página 105: Connessione Degli Auriculari
All manuals and user guides at all-guides.com CONNESSIONE DEGLI AURICULARI • Ruotare la manopola in senso antiorario per impostare il volume al minimo. • Collegare il jack delle cuffie all’uscita cuffie sul retro della radio. Il suono viene ora riprodotto solo attraverso le cuffie collegate. •... - Página 106 All manuals and user guides at all-guides.com Menú del sistema Ruotare la manopola per selezionare Premere la manopola per confermare la selezione Configurare il tempo 1-120 min Sleep spento Sleep 10, 15, 30, 45, 60, 90, 120 minuti Attiva (ora: minuti) Durata (15, 30, 45, 60, 90, 120 minuti) Sorgente (segnale acustico,...
- Página 107 All manuals and user guides at all-guides.com Menú del sistema Spegnimento [spento], 10, 20, 30, 45, 60, temporizzato 90, 120, 180 sec. Alto Livello illuminazione Medio Illuminazione Basso Alto Livello attenuazione Medio Basso inglese, francese, tedesco, ceco, danese, neerlandese, Lingua polacco, slovacco Sì...
- Página 108 All manuals and user guides at all-guides.com Spegnimento automatico (funzione Sleep) • Con la funzione sleep è possibile spegnere il dispositivo dopo 10 e fino a 120 minuti. • Allo scadere del tempo impostato, il dispositivo si spegne automaticamente. • Per disattivare la funzione sleep, selezionare l’impostazione “off” come già...
- Página 109 All manuals and user guides at all-guides.com • In modalità stand-by, sul display compaiono ora e data. Impostazione di data e ora Funzione auto update: con la funzione “auto update” è possibile determinare se la data e l’ora vengano impostate automaticamente tramite segnale RDS (Radio Data System) oppure manualmente.
-
Página 110: Dichiarazione Di Conformità
All manuals and user guides at all-guides.com compare la versione del software. • Premere la manopola per visualizzare la versione del software del dispositivo. DICHIARAZIONE DI CONFORMITÀ Produttore: Chal-Tec GmbH, Wallstraße 16, 10179 Berlin, Deutschland. La dichiarazione di conformità completa del produttore è... - Página 111 All manuals and user guides at all-guides.com...
- Página 112 All manuals and user guides at all-guides.com...