Tabla de contenido
Publicidad
Idiomas disponibles
Idiomas disponibles
Enlaces rápidos
Model KCR-100
User manual – Kitchen radio with bluetooth, light and timer
Gebruikshandleiding – Keukenradio met Bluetooth, licht en timer
Benutzerhandbuch-Küchenradio mit Bluetooth, Licht und Timer
Guide d'utilisation - Radio de cuisine avec Bluetooth, lumière et minuteur
Manual de usuario – Radio de cocina con Bluetooth, luz y temporizador
Publicidad
Tabla de contenido

Manuales relacionados para Lenco KCR-100


Resumen de contenidos para Lenco KCR-100
- Página 1 Model KCR-100 User manual – Kitchen radio with bluetooth, light and timer Gebruikshandleiding – Keukenradio met Bluetooth, licht en timer Benutzerhandbuch-Küchenradio mit Bluetooth, Licht und Timer Guide d’utilisation - Radio de cuisine avec Bluetooth, lumière et minuteur Manual de usuario – Radio de cocina con Bluetooth, luz y temporizador...
-
Página 2: Tabla De Contenido
Index English ........................................3 Nederlands ......................................14 Deutsch ........................................25 Français ........................................36 Español ........................................47 Version: 1.0... -
Página 3: English
English KCR-100 CAUTION: Usage of controls or adjustments or performance of procedures other than those specified herein may result in hazardous radiation exposure. This unit should not be adjusted or repaired by anyone except qualified service personnel. PRECAUTIONS BEFORE USE KEEP THESE INSTRUCTIONS IN MIND: Do not use this device near water. - Página 4 Make sure the unit is adjusted to a stable position. Damage caused by using this product in an unstable position or by failure to follow any other warning or precaution contained within this user manual will not be covered by warranty. Never remove the casing of this apparatus.
- Página 5 ACCESSORIES • Mounting kit (plastic plate + 2 sets of screws + 4 spacers + drill hole paper template) Plastic plate Spacer Drill hole paper template • Instruction manual MOUNTING THE SET UNDER A CABINET 1. Decide the location to install the unit in the cabinet/shelf. Since the unit’s speakers are located on the left edge side and right edge side respectively, it is recommended to reserve enough space to avoid blocking the sound.
-
Página 6: Numeric Buttons
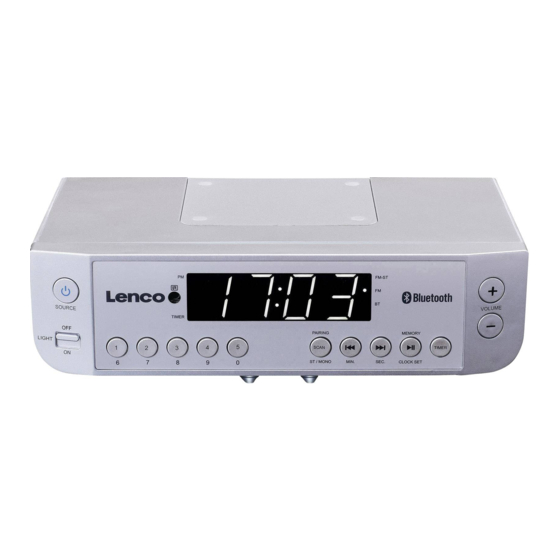
FRONT PANEL 1. STANDBY /SOURCE Press to turn on the unit. When it is turned on, press this button will toggle between FM and Bluetooth mode. Press and hold to turn off and go to Standby mode 2. LIGHT ON/OFF Slide to turn on or turn off the downward lighting 3. -
Página 7: Remote Control
16. IR Receiver Window 17. TIMER LED It is an indicator and turn on when the timer is set. REMOTE CONTROL STANDBY NUMERIC BUTTONS SCAN TUNE TUNE BT PREVIOUS BT NEXT BT PLAY/PAUSE TIMER MIN. SEC. VOLUME + VOLUME – MUTE ST/MONO MEMORY... - Página 8 To replace an empty battery, please refer to the figure shown below. When inserting a battery, be sure to do so in the proper direction. Battery case Pull out the battery case Push in according to this direction CR2025 battery •...
-
Página 9: Installing The Batteries
INSTALLING THE BATTERIES FOR CLOCK/FM PRESET CHANNEL/TIMER BACKUP The clock/FM preset channel/timer (if set) will be maintained during a power failure by installing 2 x AAA/LR03 batteries (not supplied). Once the power is restored, check the clock to make sure it is accurate and set it again if necessary. INSTALLING THE BATTERIES 1. -
Página 10: Bluetooth Audio
2. If the unit has never been paired with a Bluetooth device before or cannot find the last paired device, the BT LED will keep on flashing. Turn on the Bluetooth function of your device and enable the search until “Lenco KCR-100” is found. Select “Lenco KCR- 100”... -
Página 11: Timer Setup
TIMER SETUP 1. Press the TIMER button to enter the Timer setup. 2. Press the MIN. and SEC button on the unit (the MIN. and SEC. button on the remote control) to adjust the minute and second respectively. Press the TIMER button. 3. - Página 12 Trouble Shooting No power • Ensure that the mains cable is connected securely. • Ensure that the unit is switched on. The remote control does not function • Use the remote control near to the unit. • Point the remote control at the remote control sensor on the unit. •...
-
Página 13: Technical Specifications
• Our product is improved ceaselessly and the specification and function may be changed without prior notice. GUARANTEE Lenco offers service and warranty in accordance with the European law, which means that in case of repairs (both during and after the warranty period) you should contact your local dealer. -
Página 14: Nederlands
Nederlands KCR-100 LET OP: Gebruik van bedieningen of afstellingen of uitvoer van procedures anders dan gespecificeerd in deze documentatie kan leiden tot blootstelling aan schadelijke straling. Dit apparaat dient uitsluitend te worden aangepast of gerepareerd door gekwalificeerd onderhoudspersoneel. VOORZORGSMAATREGELEN VOOR GEBRUIK ONTHOUD DE VOLGENDE INSTRUCTIES: Gebruik dit apparaat niet in de buurt van water. -
Página 15: Installatie
Dit apparaat is niet bestemd voor gebruik door mensen (inclusief kinderen) met fysieke, zintuiglijke of geestelijke gebreken of gebrek aan kennis en ervaring, tenzij zij onder toezicht staan of instructies hebben over het juiste gebruik van het apparaat hebben gekregen van de persoon die verantwoordelijk is voor hun veiligheid. Dit product is alleen voor niet-professioneel gebruik bedoeld en niet voor commercieel of industrieel gebruik. -
Página 16: De Set Onder Een Kastje Monteren
ACCESSOIRES • Mounting kit (plastic plate + 2 sets of screws + 4 spacers + drill hole paper template) Kunststof plaat Tussenring Papieren sjabloon voor boorgaten • Gebruiksaanwijzing DE SET ONDER EEN KASTJE MONTEREN 1. Bepaal op welke plek u het apparaat onder het kastje/de schap wilt installeren. Omdat de luidsprekers van het apparaat aan de linker- en rechterzijden zijn geplaatst, raden wij u aan genoeg ruimte over te laten zodat het geluid niet wordt geblokkeerd. -
Página 17: Voorpaneel
VOORPANEEL 1. STAND-BY /BRON Indrukken om het apparaat in te schakelen. Wanneer het apparaat is ingeschakeld, dan kunt u op deze toets drukken om te wisselen tussen de FM-modus en Bluetooth-modus. Indrukt houden om uit en op stand-by te schakelen 2. -
Página 18: Afstandsbediening
14. FM-ST-LED Deze indicator zal inschakelen wanneer de Stereo FM-modus is geselecteerd 15. PM-LED Deze indicator zal 's middags inschakelen wanneer het 12 uur klokformaat is geselecteerd 16. IR-ontvangstvenster 17. TIMER-LED Deze indicator zal inschakelen wanneer de timer is ingesteld. AFSTANDSBEDIENING Stand-by NUMERIEKE TOETSEN... - Página 19 Raadpleeg a.u.b. de afbeelding hieronder om een uitgeputte batterij te vervangen. Let a.u.b. op de juiste polariteitrichting wanneer u een batterij installeert. Batterijhouder De batterijhouder uittrekken In deze richting indrukken CR2025 batterij • Als deze afstandsbediening interferentie ontvangt van andere apparatuur, dan zal de werking ervan worden aangetast. •...
-
Página 20: Aansluiting Op De Voeding
DE BATTERIJEN INSTALLEREN VOOR DE KLOK/FM-VOORKEUZEKANALEN/TIMERBACK-UP De klok/FM-voorkeuzekanalen/timer (indien ingesteld) zullen tijdens een stroomuitval worden behouden door 2 x type AAA/LR03 batterijen te installeren (niet inbegrepen). Nadat de stroom eenmaal is hersteld, controleer dan of de klok nog steeds nauwkeurig is en stel eventueel opnieuw in. - Página 21 2. Als het apparaat nog niet eerder was gepaard met een Bluetooth-apparaat of het laatste gepaarde apparaat niet kan vinden, dan zal de BT-LED blijven knipperen. Schakel de Bluetooth-functie van uw apparaat in en laat deze zoeken totdat “Lenco KCR-100” is gevonden.
-
Página 22: Tijd Instellen
3. Druk op de toetsen MIN. en SEC op het apparaat (de toetsen MIN. en SEC. op de afstandsbediening) om te wisselen tussen 24H (24 uur tijdsformaat) en 12H (12 uur tijdsformaat). Druk op de toets CLOCK SET op het apparaat (de toets CLOCK SET op de afstandsbediening) om te bevestigen. - Página 23 Probleemoplossing Geen spanning • Zorg ervoor dat het netsnoer stevig is aangesloten. • Zorg ervoor dat het apparaat is ingeschakeld. De afstandsbediening werkt niet • Gebruik de afstandsbediening in de buurt van het apparaat. • Richt de afstandsbediening op de afstandsbedieningssensor op het apparaat. •...
-
Página 24: Technische Specificaties
GARANTIE Lenco biedt service en garantie aan overeenkomstig met de Europese wetgeving. Dit houdt in dat u, in het geval van reparaties (zowel tijdens als na de garantieperiode), contact moet opnemen met uw lokale handelaar. Belangrijke opmerking: Het is niet mogelijk om producten die moeten worden gerepareerd rechtstreeks naar Lenco te sturen. -
Página 25: Deutsch
Deutsch KCR-100 ACHTUNG: Die zweckentfremdete Bedienung, Benutzung oder Einstellung der Prozeduren kann zu gefährlichen Unfällen durch Strahlen führen. Dieses Gerät darf außer von qualifizierten Fachleuten von niemand anderem repariert oder eingestellt werden. VORSICHTSMASSNAHMEN VOR DER BENUTZUNG BEFOLGEN SIE IMMER FOLGENDE ANWEISUNGEN: Benutzen Sie das Gerät nicht in der Nähe von Wasser. - Página 26 Dieses Gerät ist nicht zur Benutzung durch Personen (auch Kinder) mit physischen, sensorischen oder mentalen Beeinträchtigungen oder ohne ausreichender Erfahrung vorgesehen, es sei denn, sie werden durch eine verantwortliche Person beaufsichtigt oder wurden in die ordnungsgemäße Bedienung des Gerätes durch eine für ihre Sicherheit verantwortlichen Person eingewiesen.
- Página 27 ZUBEHÖR • Befestigungssatz (Kunststoffplatte + 2 Satz Schrauben + 4 Abstandshalter + Bohrlochpapierschablone) Kunststoffplatte Abstandshalter Papiervorlage für Bohrlöcher • Bedienungsanleitung MONTAGE DES GERÄTS UNTER EINEM SCHRANK 1. Entscheiden Sie sich für den Einbauort des Gerätes im Schrank/Regal. Da sich die Lautsprecher des Geräts auf der linken bzw. rechten Seite befinden, wird empfohlen, genügend Platz vorzusehen, um den Klang nicht zu blockieren.
- Página 28 VORDERANSICHT 1. STANDBY QUELLE Drücken Sie die Taste, um das Gerät einzuschalten. Wenn es eingeschaltet ist, drücken Sie diese Taste, um zwischen FM- und Bluetooth-Modus zu wechseln. Halten Sie die Taste gedrückt, um das Gerät auszuschalten und den Standby-Modus aufzurufen 2.
- Página 29 14. FM-ST LED Es ist eine Anzeige und schaltet sich ein, wenn es sich im FM-Stereo-Modus befindet 15. PM LED Es ist eine Anzeige und schaltet sich ein, wenn es im 12-Stunden-Anzeigeformat zur Nachmittagszeit ist 16. IR Empfangsfenster 17. LED-Anzeige TIMER Es ist eine Anzeige und schaltet sich ein, wenn der Timer eingestellt ist.
- Página 30 Um eine leere Batterie zu ersetzen, beachten Sie bitte die untenstehende Abbildung. Achten Sie beim Einlegen der Batterie auf die richtige Ausrichtung der Batterie. Batteriefach Batteriefach herausziehen In die angezeigte Richtung drücken CR2025-Knopfzelle • Wenn die Fernbedienung und andere Geräte sich gegenseitig stören, kann dies ihren Betrieb beeinflussen. •...
-
Página 31: Grundlegende Bedienung
EINLEGEN DER BATTERIEN FÜR DIE UNTERSTÜTZUNG DER UHR/FM VOREINGESTELLTER KANAL/TIMER-BACKUP Die Uhr/FM voreingestellter Kanal/Timer (falls eingestellt) wird bei einem Stromausfall beibehalten, indem 2 x AAA/LR03 Batterien (nicht mitgeliefert) eingesetzt werden. Sobald die Stromversorgung wiederhergestellt ist, überprüfen Sie die Uhr auf ihre Richtigkeit und stellen Sie sie bei Bedarf wieder ein. - Página 32 2. Wenn das Gerät noch nie mit einem Bluetooth-Gerät gekoppelt wurde oder das letzte gekoppelte Gerät nicht gefunden werden kann, blinkt die BT-LED weiter. Schalten Sie die Bluetooth-Funktion Ihres Gerätes ein und aktivieren Sie die Suche, bis „Lenco KCR-100“ gefunden wurde. Wählen Sie auf dem Bluetooth-Gerät „Lenco KCR-100“, um eine Verbindung herzustellen. Geben Sie, falls erforderlich, den Zugangscode „0000“...
-
Página 33: Einstellen Der Uhrzeit
EINSTELLEN DER UHRZEIT 1. Schalten Sie das Gerät aus wenn sich dieses im Bereitschaftsmodus befindet. 2. Halten Sie die Taste CLOCK SET am Gerät gedrückt (oder drücken Sie die Taste CLOCK SET auf der Fernbedienung), um die Uhr- Einstellung aufzurufen. „24H“ oder"„12H“ wird angezeigt. 3. - Página 34 Fehlersuche Kein Strom • Stellen sie sicher, dass das Netzkabel sicher eingesteckt ist. • Stellen Sie sicher, dass die Anlage eingeschaltet ist. Die Fernbedienung funktioniert nicht • Verwenden Sie die Fernbedienung in der Nähe der Anlage. • Richten Sie die Fernbedienung auf den Fernbedienungssensor der Anlage. •...
-
Página 35: Technische Spezifikationen
Änderungen. GARANTIE Lenco bietet Leistungen und Garantien im Einklang mit Europäischem Recht. Im Falle von Reparaturen (sowohl während als auch nach Ablauf der Garantiezeit) sollten Sie deshalb Ihren Einzelhändler kontaktieren. Wichtiger Hinweis: Es ist nicht möglich, Geräte für Reparaturen direkt an Lenco zu schicken. -
Página 36: Français
Français KCR-100 ATTENTION : L’utilisation de commandes ou de réglages ou l’exécution de procédures autres que ceux spécifiés dans ce manuel peut entraîner une exposition à des rayonnements dangereux. Cet appareil ne doit pas être réglé ou réparé par quiconque d’autre que du personnel qualifié. - Página 37 Cet appareil n’est pas destiné à être utilisé par des personnes (enfants compris) souffrant de handicaps physiques, sensoriels ou mentaux, ou manquant d’expérience et de connaissances, sauf si elles sont sous surveillance ou ont reçu des instructions sur l’utilisation correcte de l’appareil par la personne qui est responsable de leur sécurité. Ce produit est réservé...
- Página 38 ACCESSOIRES • Accessoires de montage (plaque en plastique + 2 jeux de vis + 4 entretoises + gabarit de perçage) Plaque en plastique Entretoise Gabarit de perçage • Mode d’emploi MONTAGE DU POSTE SOUS UNE ARMOIRE 1. Choisir l’emplacement d’installation de l’unité dans une armoire/étagère. Étant donné que les haut-parleurs de l’unité sont situés du côté...
- Página 39 FAÇADE 1. VEILLE /SOURCE Appuyez dessus pour mettre en marche l'appareil. Lorsque l’unité est allumée, appuyez sur ce bouton pour basculer entre les modes FM et Bluetooth. Maintenez appuyée pour passer en mode veille 2. ALLUMER/ÉTEINDRE L'ÉCLAIRAGE VERS LE BAS Faites glisser pour allumer ou éteindre l’éclairage vers le bas 3.
-
Página 40: Télécommande
14. Témoin FM-ST Il s’agit d’un témoin qui s’allume quand l’unité est en mode FM stéréo 15. Témoin PM Il s’agit d’un témoin qui s’allume à l’heure de l’après-midi lorsque le format des heures est 12 heures 16. Fenêtre du récepteur IR 17. - Página 41 Pour remplacer une pile usée, reportez-vous à la figure ci-dessous. En installant une pile, veillez à suivre les instructions. Compartiment à pile Sortez le compartiment à pile. Poussez dans ce sens. Pile CR2025 • Si la télécommande entre en conflit avec d’autres appareil, le fonctionnement sera affecté. •...
-
Página 42: Installation Des Piles
INSTALLATION DES PILES POUR LA SAUVEGARDE DE L’HEURE/CHAÎNES FM PRÉRÉGLÉES/MINUTEUR L’heure/chaînes FM préréglées/minuteur (si réglés) seront maintenus en cas de panne de courant en installant 2 piles AAA/LR03 (non fournies). Une fois le courant rétabli, vérifiez l’heure pour s’assurer qu’elle est correcte et la régler si nécessaire. INSTALLATION DES PILES 1. -
Página 43: Audio Bluetooth
2. Si l’unité n’a jamais été couplée à un appareil Bluetooth ou ne peut pas trouver le dernier appareil couplé, le témoin BT continue de clignoter. Activez la fonction Bluetooth de votre appareil et activez la recherche jusqu’à ce qu'il ait trouvé « Lenco KCR-100 ». -
Página 44: Réglage De L'horloge
RÉGLAGE DE L'HORLOGE 1. Éteignez l'appareil en le mettant en mode veille. 2. Maintenez appuyé le bouton CLOCK SET de l’unité (ou CLOCK SET de la télécommande) pour accéder au réglage de l’horloge. « 24H » ou « 12H » sera affiché. 3. - Página 45 Dépannage Pas d’alimentation • Assurez-vous que la prise secteur est bien branchée. • Assurez-vous que l'unité est allumée. La télécommande ne fonctionne pas. • Utilisez la télécommande près de l’unité. • Pointez la télécommande vers le capteur de la télécommande de l'unité. •...
-
Página 46: Caractéristiques Techniques
• Étant donné que nous améliorons constamment nos produits, leurs caractéristiques et fonctions peuvent changer sans préavis. GARANTIE Lenco propose un service et une garantie conformément à la législation européenne, ce qui signifie qu’en cas de besoin de réparation (aussi bien pendant et après la période de garantie), vous pouvez contacter votre revendeur le plus proche. -
Página 47: Español
Español KCR-100 PRECAUCIÓN: El uso de los controles o ajustes o el funcionamiento de los procedimientos excepto a aquellos especificados aquí pueden provocar una exposición peligrosa a la radiación. Esta unidad no debe ajustarse o repararse por ninguna persona salvo personal de servicio cualificado. -
Página 48: Instalación
Este producto está diseñado para un uso no profesional únicamente y no para un uso comercial o industrial. Asegúrese de que la unidad esté fijada en una posición estable. Los daños provocados por utilizar este producto en una posición inestable o por no seguir cualquier otra advertencia o precaución incluida en este manual de usuario no estarán cubiertos por la garantía. -
Página 49: Accesorios
ACCESORIOS • Kit de montaje (placa de plástico + 2 juegos de tornillos + 4 espaciadores + plantilla de papel para los agujeros del taladro) Plantilla de papel para los agujeros Placa de plástico Espaciador del taladro • Manual de instrucciones MONTAJE DEL CONJUNTO BAJO UN ARMARIO 1. - Página 50 PANEL FRONTAL 1. EN ESPERA /FUENTE Púlselo para encender la unidad. Cuando se encienda, pulsar este botón cambiará entre el modo FM y el modo Bluetooth. Manténgalo pulsado para apagarlo y entrar en modo en espera. 2. LUZ ENCENDIDA / APAGADA Deslícelo para encender o apagar la iluminación inferior.
-
Página 51: Led Del Temporizador
14. LED de FM-ST Se trata de un indicador y se enciende cuando se encuentra en modo FM estéreo 15. LED de PM Se trata de un indicador y se enciende cuando se encuentra en el formato de pantalla de 12 horas en hora vespertina 16. - Página 52 Para sustituir una pila gastada, remítase a la figura que se muestra debajo. Cuando inserte una pila, asegúrese de hacerlo en la dirección correcta. Porta pilas Saque el porta pilas Empújela según esta dirección Pila CR2025 • Si el mando a distancia entra en conflicto con otros dispositivos, se verá afectado el funcionamiento. •...
-
Página 53: Instalación De La Pilas
INSTALACIÓN DE LA PILAS PARA EL RELOJ / CANAL PRESINTONIZADO FM / RESPALDO DEL TEMPORIZADOR El reloj / el canal presintonizado FM / el temporizador (si está fijado) se mantendrán durante un fallo de alimentación instalando 2 pilas AAA/LR03 (no incluidas). Una vez que se restaure la alimentación, compruebe el reloj para asegurarse de que está bien y vuélvalo a configurar si es necesario. -
Página 54: Función Retardo
LED de BT seguirá parpadeando. Encienda la función Bluetooth de su dispositivo y active la búsqueda hasta que se encuentre “Lenco KCR-100”. Seleccione “Lenco KCR-100” en el dispositivo Bluetooth para realizar la conexión. Introduzca la contraseña “0000” si la solicita. -
Página 55: Configuración De Hora
3. Pulse el botón MIN. y SEC en la unidad principal (el botón MIN. y SEC. en el mando a distancia) para cambiar entre 24H (formato de 24 horas en pantalla) o 12H (formato de 12 horas en pantalla). Pulse el botón CLOCK SET en la unidad (el botón CLOCK SET en el mando a distancia) para confirmarlo. - Página 56 Solución de problemas No se enciende • Asegúrese de que el cable de la corriente principal está conectado de forma segura. • Asegúrese de que la unidad está encendida. El mando a distancia no funciona • Use el mando a distancia cerca de la unidad. •...
-
Página 57: Especificaciones Técnicas
GARANTÍA Lenco ofrece servicio y garantía en cumplimiento con las leyes de la Unión Europea, lo cual implica que, en caso de que su producto precise ser reparado (tanto durante como después del periodo de garantía), deberá contactar directamente con su distribuidor.