Publicidad
Idiomas disponibles
Idiomas disponibles
Enlaces rápidos
10˝ Pull-Chain Fan
Model: 8110WH-220
•
WARNING: To reduce the risk of shock, disconnect power
before servicing.
•
CAUTION: To reduce risk of fire and to properly exhaust air,
be sure to vent air outside. Do not vent exhaust air into
spaces within walls or ceilings or into attics, crawl spaces
or garages.
•
WARNING: To reduce the risk of fire or electric shock, do
not use this fan with any solid state speed control.
•
NOTE: Cutout dimension: 11
If your installation presents a problem that is not
explained here or if any part of these instructions is
not clear, consult a professional installer. If you are not
familiar with methods of installing electrical wiring, or if
you are not certain as to the correctness of any step or
procedure described here, secure the services of a
qualified electrician.
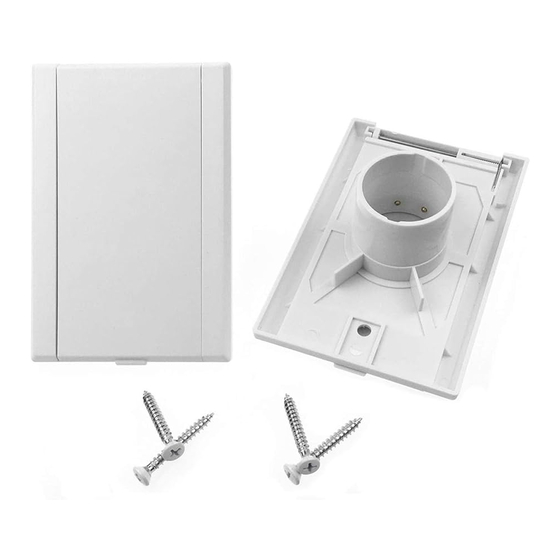
Installing the "A" Unit
The "A" Unit consists of the wall sleeve assembly, outlet
box and outlet box cover.
ADJUSTING THE WALL SLEEVES
1. Refer to Figure 1. Pull the inside sleeve out to the desired
wall thickness for the the circular flange to be flush with the
finished wall.
2. Align the slots in the inside sleeve to the holes in the
outside sleeve and fasten together with screws furnished.
NOTE: The knockouts of the outside sleeve are
removable to allow clearance space for the outlet box.
INSTALLING THE WALL SLEEVES
For installation into wood: nail outside panel to sheathing
through holes provided in flange of outside panel.
For installation into brick: grout unit into place so
that panel is flush with brick.
INSTALLING THE WIRING
Refer to Figures 2, 3 and 4.
NOTE: For ease of installation in existing construction, the
outlet box is held in place with two screws and is removable to
allow for installation through a circular hole.
1. Run house wiring (220 volts, 50/60 Hz, .4 amps) to the
unit's outlet box. Use approved wire connectors to make
connections and be certain the unit is properly grounded.
2. Position and secure outlet box cover.
1
⁄
" diameter.
8
INSTALLATION INSTRUCTIONS
READ & SAVE THESE INSTRUCTIONS!
FIGURE 1
FIGURE 2
FIGURE 3
Publicidad

Manuales relacionados para NuTone 8110WH-220


Resumen de contenidos para NuTone 8110WH-220
- Página 1 INSTALLATION INSTRUCTIONS READ & SAVE THESE INSTRUCTIONS! 10˝ Pull-Chain Fan Model: 8110WH-220 • WARNING: To reduce the risk of shock, disconnect power before servicing. • CAUTION: To reduce risk of fire and to properly exhaust air, be sure to vent air outside. Do not vent exhaust air into spaces within walls or ceilings or into attics, crawl spaces or garages.
- Página 2 INSTALLING THE "B" UNIT Refer to Figures 5 and 6. 1. Turn chain catch bracket so front hole is in line with hole in sleeve and fasten into place with screw provided. 2. Attach chain to the outside door. Hook the spring end of the chain into bracket at bottom of outside door.
- Página 3 INSTRUCCIONES DE INSTALACION ¡LEA Y GUARDE ESTAS INSTRUCCIONES! Ventilador de cadena de 25,5 cm Modelo: 8110WH-220 • ADVERTENCIA: Para reducir el riesgo de sacudida eléctrica, desconecte la corriente antes de darle servicio. • PRECAUCION: Para reducir el riesgo de incendio y para expulsar el aire correctamente, asegúrese de ventilar hacia...
- Página 4 INSTALACION DE LA UNIDAD “B” Vea las Figuras 5 y 6. 1. Gire la abrazadera del retén de la cadena de manera que el agujero frontal esté alineado con el agujero del manguito y fíjela en su sitio con el tornillo provisto. 2.