
Manuales relacionados para Optimus AT-M15SIP


Resumen de contenidos para Optimus AT-M15SIP
- Página 1 ALTAVOZ DE TECHO SIP SIP CEILING SPEAKER AT-M15SIP Manual de instalación y funcionamiento v .0 Installation and operating instructions v .0...
- Página 2 AT-M15SIP ALTAVOZ DE TECHO SIP INSTRUCIONES DE SEGURIDAD: IMPORTANTE: Lea atentamente las instrucciones de seguridad. Guarde este manual para futuras consultas. Asegúrese de que el voltaje de la red es el mismo que el del aparato. De lo contrario el aparato puede resultar dañado. Use siempre cables ya preparados para evitar riesgos de descargas eléctricas o fuego. En caso de tener dudas, consulte con un instalador cualificado. Antes de encender el aparato, asegúrese de que la toma de tierra está conectada. Se requiere personal cualificado para realizar todas las operaciones de mantenimiento. Nota: La información proporcionada por este manual no incluye detalles de diseño, producción o variaciones en el equipo. Tampoco incluye posibles situaciones de riesgo durante la instalación, funcionamiento o mantenimiento. Si usted necesita asistencia especial más allá del manual, por favor contacte con nuestro servicio técnico. AT-M15SIP Versión 1.0 Página 1 de 16...
-
Página 3: Tabla De Contenido
6.9. MENÚ IP FILTERING ..................... 12 6.10. MENÚ MAINTENANCE .................... 13 6.11. MENÚ SECURITY ...................... 13 6.12. MENÚ SYSTEM OVERVIEW .................. 14 ESPECIFICACIONES ...................... 15 CERTIFICADO DE GARANTÍA .................... 16 AT-M15SIP Versión 1.0 Página 2 de 16... -
Página 4: Connexión
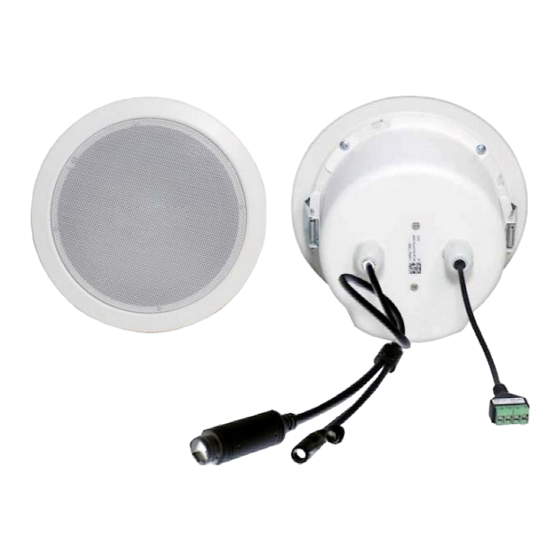
AT-M15SIP ALTAVOZ DE TECHO SIP 1. CONNEXIÓN Altavoz SIP con micrófono. El equipo dispone de una regleta para los contactos de entrada y salida y unos conectores para conexión Ethernet y alimentación. La conexión debe realizarse tal como se indica en el siguiente esquema. La alimentación se realiza mediante PoE. Use una toma Ethernet con alimentación PoE+ disponible. El equipo permite también la alimentación directa mediante una fuente de Alimentación externa de 12/24Vcc (no incluida). Cierre el contacto de entrada para activar la función predefinida en el menú SIP BUTTON. El contacto de salida se cerrará durante las llamadas SIP y Paging. AT-M15SIP Versión 1.0 Página 3 de 16... -
Página 5: Montaje
El AT‐M15SIP se puede configurar desde el software SipManager o desde el servidor web. Este manual se refiere únicamente a la configuración mediante servidor web. El servidor web se comparte entre varios dispositivos de la misma serie, por lo que algunos menús carecen de utilidad en este caso. 5. CONEXIÓN AL SERVIDOR WEB Se puede acceder al servidor web de la unidad ingresando la dirección IP en el campo de dirección del navegador web. La dirección IP predeterminada del dispositivo es 192.168.1.101. La dirección IP del PC debe estar en el mismo segmento de IP para permitir la conexión. Nota: Si se encuentra que la dirección IP es incorrecta o desconocida puede usar el software SipManager para averiguarla, confirmarla o modificarla si es necesario. AT-M15SIP Versión 1.0 Página 4 de 16... - Página 6 AT-M15SIP ALTAVOZ DE TECHO SIP Después de ingresar la dirección IP del dispositivo en el navegador web, se mostrará la interfaz de inicio de sesión. De forma predeterminada, tanto el nombre de usuario como la contraseña están en blanco. Puede iniciar sesión directamente. Si ha establecido algún nombre de usuario, debe entrar el nombre de usuario y la contraseña para iniciar sesión. AT-M15SIP Versión 1.0 Página 5 de 16...
-
Página 7: Configuración Del Sistema
AT-M15SIP ALTAVOZ DE TECHO SIP 6. CONFIGURACIÓN DEL SISTEMA Después de iniciar sesión, puede modificar las configuraciones siguientes. 6.1. MENÚ NETWORK Configure en este menú los parámetros de red, dirección IP, máscara de subred, puerta de enlace y direcciones DNS, ya sea en forma de DHCP o manualmente, tal como se muestra en la siguiente imagen. AT-M15SIP Versión 1.0 Página 6 de 16... -
Página 8: Menú Server
Esta unidad puede funcionar en modo P2P o servidor. En el caso de P2P puede recibir llamadas simplemente marcando su IP, pero también funciona marcando la forma SIP‐URI completa, extensión@IP. AT-M15SIP Versión 1.0 Página 7 de 16... -
Página 9: Menú Sip Intercom
Configure en Ring volume (1‐100) el volumen del timbre. Seleccione al menos 80 para tener un volumen estándar. Configure en Talk volume (1‐100) el volumen de la voz. Seleccione al menos 80 para tener un volumen estándar. Configure en el menú Codec, los códecs disponibles en la unidad. La prioridad del códec depende de su posición en la pantalla, la posición superior es la de mayor prioridad. AT-M15SIP Versión 1.0 Página 8 de 16... -
Página 10: Menú Sip Paging
AT-M15SIP ALTAVOZ DE TECHO SIP 6.5. MENÚ SIP PAGING Este menú se utiliza para configurar los parámetros de los mensajes de paging. Configure Input channel como mic. Configure en Input gain (1‐100) el volumen del micrófono. Ajuste a 100 y disminuya más tarde si es necesario. Configure en el menú Codec, el códec asociado a la función paging. Marque Paging tone Enable para activar un timbre antes del mensaje de voz. AT-M15SIP Versión 1.0 Página 9 de 16... -
Página 11: Menú Sip Multicast
AT-M15SIP ALTAVOZ DE TECHO SIP 6.6. MENÚ SIP MULTICAST Este menú se utiliza para configurar los canales de recepción multicast. El audio recibido por estos canales será transmitido por el altavoz. El equipo puede monitorizar 10 canales, cada uno su propia dirección y prioridad. Si el equipo recibe audio de varios canales al mismo tiempo, el canal con prioridad superior cortará a los canales de prioridad inferior. En este menú También se puede controlar el volumen de reproducción del canal multicast en Play volumen (1‐100). AT-M15SIP Versión 1.0 Página 10 de 16... -
Página 12: Menú Sip Button
AT-M15SIP ALTAVOZ DE TECHO SIP 6.7. MENÚ SIP BUTTON Este menú se utiliza para configurar las llamadas activadas por entrada de contacto. Ajuste Button Mode como trigger, para activación de pulso, o como Hold, para activación de nivel. Configure Button to hang up Allow, para permitir colgar las llamadas cerrando el contacto. Configure en Button1, la función del contacto de entrada, configure Call para llamadas SIP y Paging para llamadas paging. Configure en Destination el número de la extensión a llamar. Button2 y button3 no tienen ninguna función en este dispositivo. AT-M15SIP Versión 1.0 Página 11 de 16... -
Página 13: Menú Audio
AT-M15SIP ALTAVOZ DE TECHO SIP 6.8. MENÚ AUDIO Este menú no tiene utilidad en la versión actual. 6.9. MENÚ IP FILTERING Este menú no tiene utilidad en la versión actual. AT-M15SIP Versión 1.0 Página 12 de 16... -
Página 14: Menú Maintenance
AT-M15SIP ALTAVOZ DE TECHO SIP 6.10. MENÚ MAINTENANCE Este menú se puede utilizar para reiniciar el equipo, o restaurar sus valores predeterminados. 6.11. MENÚ SECURITY Este menú se puede utilizar para configurar el nombre de usuario y la contraseña para acceder al servidor web, en blanco por defecto. AT-M15SIP Versión 1.0 Página 13 de 16... -
Página 15: Menú System Overview
AT-M15SIP ALTAVOZ DE TECHO SIP 6.12. MENÚ SYSTEM OVERVIEW En este menú puede ver la información del dispositivo, la versión de firmware, los parámetros de red y el estado de la conexión. AT-M15SIP Versión 1.0 Página 14 de 16... -
Página 16: Especificaciones
15 Wrms Potencia de salida ‐52 dB Sensibilidad del micrófono 91 dB (1 W / 1 m) Sensibilidad del altavoz 103 dB (15 W / 1 m) Presión acústica SPL TCP/UDP, SIP (P2P y Servidor), UDP multicast Comunicación Ethernet 10/100Base‐TX, RJ45 Port Interface Ethernet MPEG, ADPC Decodificación de audio G.711a, G.711u, G.722 Codecs SIP Por software Control de volumen 100 ‐ 18000 Hz Respuesta en frecuencia 1 x CTin, 1 x CTout Contactos Metal pintado, color blanco Acabado 1 W reposo, 17 W máximo Consumo 1,2 Kg Peso ø x 90 mm Dimensiones 175 mm Orificio de empotrar AT-M15SIP Versión 1.0 Página 15 de 16... -
Página 17: Certificado De Garantía
8. CERTIFICADO DE GARANTÍA 1. CERTIFICADO DE GARANTÍA 1. La empresa OPTIMUS S.A. garantiza que sus productos se encuentran libres de defectos en materiales y de mano de obra en el momento de su entrega original al comprador. 2. La empresa OPTIMUS S.A. concede a sus productos, conforme a las condiciones aquí descritas, una garantía de dos (2) años a partir de la fecha de adquisición del producto por el comprador. -
Página 18: Safety Instructions
Before turn on the power, make sure the ground wire is connected. Maintenance operations require qualified personnel. Note: The information provided in this manual does not include details of design, production, or variations in equipment. Nor does it include possible risks during installation, operation or maintenance. If you need special assistance beyond the manual, please contact our customer service. AT-M15SIP Version 1.0 Page 1 of 16... - Página 19 6.9. IP FILTERING SETTINGS .................... 12 6.10. MAINTENANCE ...................... 13 6.11. SECURITY SETTINGS ..................... 13 6.12. SYSTEM OVERVIEW ..................... 14 SPECIFICATIONS ........................ 15 GUARANTEE CERTIFICATE .................... 16 AT-M15SIP Version 1.0 Page 2 of 16...
-
Página 20: Connection
SIP speaker with microphone. Unit includes terminals, for input and output contacts, and connectors for Ethernet connection and power supply. The connection must be made as indicated in the following diagram. Power is supplied via PoE. Use an available PoE+ powered Ethernet socket. The equipment also allows direct power supply through an external 12/24Vdc power supply (not included). Close the contact input to activate predefined function as set in SIP BUTTON SETTINGS. Contact out will be closed during SIP and Paging calls. AT-M15SIP Version 1.0 Page 3 of 16... -
Página 21: Mounting
AT‐M15SIP can be set from SipManager software or from the webserver. This manual refers to webserver configuration only. Webserver is shared among some equipment of the same series, so few menus are unused in this device. 5. CONNECTING TO THE WEB INTERFACE The unit’s webserver can be accessed by inputting IP address in web browser address field. The default IP address of the device is 192.168.1.101 The IP address of the computer must be in the same IP segment to allow the connection. Note: If the input IP address is found to be incorrect or unknown. You can use the software SipManager to search, confirm or modify it if necessary. AT-M15SIP Version 1.0 Page 4 of 16... - Página 22 AT-M15SIP SIP CEILING SPEAKER After inputting the IP address of the device in web browser, the login interface will be displayed, as shown in the figure below. By default, both, user name and password, are null values. You can log in directly. If you have set a user name, you need to fill in the username and password to log in. AT-M15SIP Version 1.0 Page 5 of 16...
-
Página 23: System Configuration
AT-M15SIP SIP CEILING SPEAKER 6. SYSTEM CONFIGURATION After login, you can modify the relevant settings. 6.1. NETWORK SETTINGS Set in this menu the network connection settings, IP address, Netmask, Gateway and DNS address, either in the form of DHCP or manually, as shown in the figure below. AT-M15SIP Version 1.0 Page 6 of 16... -
Página 24: Server Settings
AT-M15SIP SIP CEILING SPEAKER 6.2. SERVER SETTINGS This menu has not function in this device. 6.3. SIP ACCOUNT SETTINGS Set in this menu the SIP account settings. Set in user account the extension and password that the unit will use to connect to SIP server, the IP address and port of primary SIP server, and also the same values for secondary sip server if required. This unit can work in P2P or Server mode. In case of P2P it can receive calls just dialing its IP, but it also works when dialing complete SIP‐URI form, extension@IP. AT-M15SIP Version 1.0 Page 7 of 16... -
Página 25: Sip Intercom Settings
AT-M15SIP SIP CEILING SPEAKER 6.4. SIP INTERCOM SETTINGS This menu is used to set the audio parameters of the unit. Set Input channel to mic. Set in Input gain (1‐100) the microphone volume. Set 100 and decrease later if necessary. Set Automatic Eco Cancelation with AEC level. Use normal by default. Set in Auto answer time (0‐30) the seconds the unit will wait before answering an incoming call. Set at least 3 seconds if you want to hear the ring tone. Set in Ring volume (1‐100) the volume of the ring. Set at least 80 to have standard volume. Set in Talk volume (1‐100) the volume of the voice. Set at least 80 to have standard volume. Set in Codec menu, the available codecs of the unit. Priority of the codec is sort by its position on the screen, the top position is the highest priority one. AT-M15SIP Version 1.0 Page 8 of 16... -
Página 26: Sip Paging Settings
AT-M15SIP SIP CEILING SPEAKER 6.5. SIP PAGING SETTINGS This menu is use to set the parameters of paging messages. Set Input channel to mic. Set in Input gain (1‐100) the microphone volume. Set 100 and decrease it later if necessary. Set in Codec menu, the codec for paging function. Check Paging tone Enable to activate a chime before the voice message. AT-M15SIP Version 1.0 Page 9 of 16... -
Página 27: Sip Multicast Settings
In this menu you can also control the playback volume of the multicast channel in Play volume (1‐100). AT-M15SIP Version 1.0 Page 10 of 16... -
Página 28: Sip Button Settings
AT-M15SIP SIP CEILING SPEAKER 6.7. SIP BUTTON SETTINGS This menu is used to set the calls activated by contact input. Set Button Mode to trigger, for pulse activation, or to Hold, for level activation. Set Button to hang up Allow, to permit hanging up the calls by closing the contact. Set in Button1, the function of the input contact, set Call for SIP calls and Paging for paging calls. Set in Destination the number of the extension to call. Button2 and button3 has no function in this device. AT-M15SIP Version 1.0 Page 11 of 16... -
Página 29: Audio Settings
AT-M15SIP SIP CEILING SPEAKER 6.8. AUDIO SETTINGS This menu has not function in current version. 6.9. IP FILTERING SETTINGS This menu has not function in current version. AT-M15SIP Version 1.0 Page 12 of 16... -
Página 30: Maintenance
AT-M15SIP SIP CEILING SPEAKER 6.10. MAINTENANCE This menu can be used to restart the unit, or restore its default values. 6.11. SECURITY SETTINGS This menu can be used to set webserver’s access Username and Password, blank by default. AT-M15SIP Version 1.0 Page 13 of 16... -
Página 31: System Overview
AT-M15SIP SIP CEILING SPEAKER 6.12. SYSTEM OVERVIEW In this menu you can see device information, firmware version, network parameters and connection status. AT-M15SIP Version 1.0 Page 14 of 16... -
Página 32: Specifications
Rated output Power ‐52 dB Microphone sensitivity 91 dB (1 W / 1 m) Speaker sensitivity 103 dB (15 W / 1 m) Speaker SPL TCP/UDP SIP (P2P and Server mode), UDP multicast Network communication protocol 10/100Base‐TX, RJ45 Port Network Interface MPEG, ADPC Audio decoding G.711a, G.711u, G.722 SIP audio codec By software Volume control 100 ‐ 18000 Hz Frequency response 1 x CTin, 1 x CTout Contacts Painted metal, white color Finish 1 W standby, 17 W maximum Consumption 1.2 Kg Weight ø 200 x 90 mm Dimensions AT-M15SIP Version 1.0 Page 15 of 16... -
Página 33: Guarantee Certificate
6. The warranty does not cover travel for technical assistance except for those caused by incidents occurred during the first three months. 7. In the case of personal computers, the guarantee will not cover the elimination of computer viruses, the restoration of programmes damaged by these or the reinstallation of the disk following its deletion. 8. The rights of this guarantee are invalidated if the product has been repaired or opened by staff unauthorised by OPTIMUS S.A. or by the client himself. 9. If OPTIMUS S.A. were to establish before the purchaser that the damage affecting the unit does not entitle a claim to be made under the guarantee, the costs of checking the equipment incurred by OPTIMUS S.A. shall be borne by the client. 10. Products not covered by the guarantee shall only be repaired once payment has been effected by the client. In the event that the guarantee rights do not apply, OPTIMUS S.A. shall duly inform the client. If, within a period of 6 weeks from this communication, no written repair order is received from the client confirming acceptance of the costs, OPTIMUS S.A. shall return the unit in question to the client. In this case, the transport and packaging costs shall be invoiced separately and payment shall be made on delivery. In the event that a repair ...