Tabla de contenido
Publicidad
Idiomas disponibles
Idiomas disponibles
Enlaces rápidos
H-2449
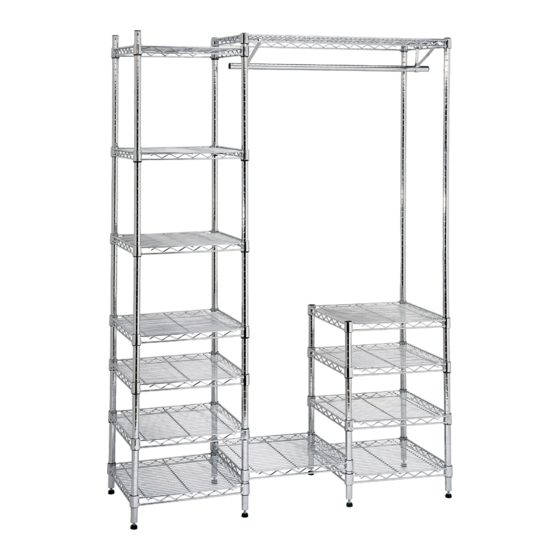
GARMENT STORAGE
CENTER WITH SHELVES
Shelf Support (52 Sets)
Self-leveler x 8
POST ASSEMBLY
1. Connect tall post tops and tall post bottoms to each
other by screwing them together. (See Figure 1)
NOTE: Tall post tops have a black plastic cap in
the top of the post.
Figure 1
TO INSTALL SELF-LEVELERS
NOTE: If installing casters, do not install self-
levelers.
1.
Make sure post is positioned as shown. (See Figure 2)
Figure 2
PAGE 1 OF 9
1-800-295-5510
uline.com
18 x 18" Shelf x 12
Tall Post Top with
Tall Post Bottom x 6
Connector x 6
ASSEMBLY
PARTS
Short Post x 2
2. Insert self-leveler into open end of post. Use a rubber
mallet/hammer or tap on ground to slide self-leveler
into post.
3. Repeat step 2 for all other posts.
TO INSTALL OPTIONAL CASTERS
1.
Make sure post is positioned as shown. (See Figure 3)
2. Engage the wheel brakes to keep casters from
rolling during assembly. Use a rubber mallet to tap
caster stem into posts. (See Figure 3)
Figure 3
Para Español, vea páginas 4-6.
Pour le français, consulter les pages 7-9.
36 x 18" Shelf x 1
Garment Rod x 1
Garment Rod Hanger x 2
0721 IH-2449
Publicidad
Tabla de contenido

Resumen de contenidos para Uline H-2449
- Página 1 Para Español, vea páginas 4-6. Pour le français, consulter les pages 7-9. H-2449 1-800-295-5510 uline.com GARMENT STORAGE CENTER WITH SHELVES PARTS 36 x 18" Shelf x 1 Shelf Support (52 Sets) 18 x 18" Shelf x 12 Garment Rod x 1...
-
Página 2: Unit Assembly
ASSEMBLY CONTINUED UNIT ASSEMBLY 5. Slide a square shelf onto the inner four posts until shelf slides firmly over the supports. (See Figure 6) Snap shelf supports into the very bottom groove of two short and two tall posts. (See Figure 4) Figure 6 2. - Página 3 (See Figure 13) 18. Pull garment rod Figure 13 back and down, one side at a time, until long end of garment rod hanger snaps into place. VIEW FROM THE BOTTOM 1-800-295-5510 uline.com PAGE 3 OF 9 0721 IH-2449...
-
Página 4: Centro De Almacenamiento Para Ropa Con Repisas
H-2449 800-295-5510 uline.mx CENTRO DE ALMACENAMIENTO PARA ROPA CON REPISAS PARTES 1 Repisa de 91 x 46 cm (36 x 18") 12 Repisas de 46 x 46 cm (18 x 18") Soporte para Repisas (52 sets) 1 Barra para Ropa... -
Página 5: Continuación De Ensamble
CONTINUACIÓN DE ENSAMBLE ENSAMBLE DE LA UNIDAD 5. Deslice una repisa cuadrada en los cuatro postes interiores hasta que la repisa se deslice con firmeza 1. Coloque los soportes para repisas a presión en la sobre los soportes. (Vea Diagrama 6) ranura inferior de dos postes cortos y dos postes largos. -
Página 6: Continuación Del Ensamblado De La Unidad
VISTA DESDE ABAJO para ropa se ajusten en su lugar. 800-295-5510 uline.mx PAGE 6 OF 9 0721 IH-2449... - Página 7 H-2449 1-800-295-5510 uline.ca CENTRE D'ENTREPOSAGE À VÊTEMENTS AVEC TABLETTES PIÈCES Tablette de 91 x 46 cm Tablette de 46 x 46 cm Support de tablette (36 x 18 po) x 1 (18 x 18 po) x 12 (52 ensembles) Tringle à vêtements x 1 Dispositif Grand montant supérieur...
- Página 8 ASSEMBLAGE SUITE ASSEMBLAGE DE L'UNITÉ 5. Glissez une tablette carrée sur les quatre montants intérieurs jusqu'à ce que la tablette repose Encliquetez les supports de tablette à la rainure fermement sur les supports. (Voir Figure 6) la plus basse des deux petits et des deux grands montants.
- Página 9 18. Tirez la tringle à vêtements vers l'arrière et vers le bas, tour à tour, jusqu'à ce que l'extrémité longue du support pour tringle à vêtements s'enclenche VUE DU DESSOUS en position. 1-800-295-5510 uline.ca PAGE 9 OF 9 0721 IH-2449...


