Publicidad
Idiomas disponibles
Idiomas disponibles
Enlaces rápidos
Wetterstation · Weather Station · Station météo · Weerstation · Stazione meteorologica ·
Estación meteorológica ·
BaroTemp HZ
DE
Bedienungsanleitung
EN
Instruction manual
FR
Mode d'emploi
NL
Gebruikershandleiding
IT
Istruzioni per l'uso
ES
Manual de instrucciones
Publicidad

Manuales relacionados para Bresser National Geographic BaroTemp HZ


Resumen de contenidos para Bresser National Geographic BaroTemp HZ
- Página 1 Wetterstation · Weather Station · Station météo · Weerstation · Stazione meteorologica · Estación meteorológica · BaroTemp HZ Bedienungsanleitung Istruzioni per l'uso Instruction manual Manual de instrucciones Mode d’emploi Gebruikershandleiding...
- Página 2 Desidera ricevere informazioni esaustive su questo prodotto in una lingua specifica? Venga a visitare il nostro sito Web al seguente link (codice QR Code) per conoscere le versioni disponibili. www.bresser.de/P9070110 RECYCLAGE (TRIMAN/FRANCE) GARANTIE · WARRANTY · GARANTÍA · GARANZIA www.bresser.de/warranty_terms...
- Página 3 Deutsch ........................English ........................Français ......................... Nederlands ......................Italiano........................Español ........................
- Página 4 Inhaltsverzeichnis 1 Impressum .............................. 5 2 Gültigkeitshinweis............................ 5 3 Eigenschaften.............................. 5 4 Zu dieser Anleitung............................ 6 5 Teileübersicht und Lieferumfang........................ 6 6 Displayanzeigen ............................. 7 7 Einstellen der Stadt............................ 8 8 Vor der Inbetriebnahme .......................... 8 9 Stromversorgung herstellen ......................... 9 10 Batteriestandsanzeige ...........................
- Página 5 „Garantie“ und „Service“ in dieser Dokumentation. Wir bitten um Verständnis, dass unaufgeforderte Rücksendungen nicht bearbeitet werden können. Irrtümer und technische Änderungen vorbehalten. © 2023 Bresser GmbH Alle Rechte vorbehalten. Die Reproduktion dieser Dokumentation – auch auszugsweise – in irgendeiner Form (z.B. Fotokopie, Druck, etc.) sowie die Verwendung und Verbreitung mittels elektronischer Systeme (z.B.
- Página 6 • Wettertrendanzeige • Doppelalarm mit Schlummerfunktion • Sonnenaufgangs- und Sonnenuntergangszeit • Zeitzone • 3 Stufen Hintergrundbeleuchtung 4 Zu dieser Anleitung HINWEIS Diese Bedienungsanleitung ist als Teil des Gerätes zu betrachten! Lesen Sie vor der Benutzung des Geräts aufmerksam die Sicherheitshinweise und die Bedienungsan- leitung.
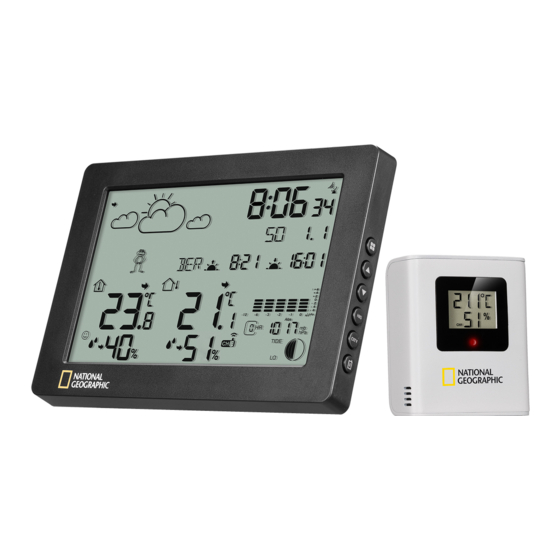
- Página 7 1 Bildschirm 2 SNOOZE/LIGHT-Taste (Schlummerfunktion / Displayhelligkeit einstellen) 3 MODE-Taste (Alarm 1, Alarm 2 anzeigen) 4 UP-Taste (Wert erhöhen) 5 DOWN-Taste (Wert verringern) 6 HIS-Taste (Barometerwert der letzten 12 Stunden) 7 CITY-Taste (Für Mondphasen, Gezeiten, 8 CHANNEL-Taste (Kanalwahl, CH1, CH2, Sonnenuntergang und Sonnenaufgang) CH3, Kanaldurchlauf) 9 Vorrichtung für Wandmontage...
- Página 8 Breitengrad Drücken Sie abschließend die Taste CITY, um die Einstellungen zu speichern und den Einstellungs- modus CITY zu verlassen. Stadtkürzel Eine Liste von Städten finden Sie als PDF-Datei unter: www.bresser.de/download/City_Codes 8 Vor der Inbetriebnahme HINWEIS Vermeidung von Verbindungsstörungen! Um Verbindungsstörungen zwischen den Geräten zu vermeiden, sind die folgenden Punkte bei der In- betriebnahme zu beachten.
- Página 9 3. Stromversorgung für den Sensor herstellen. 4. Basisgerät und Sensor innerhalb des effektiven Übertragungsbereichs aufstellen/betreiben. 5. Sicherstellen, dass Basisgerät und Funksensor auf den gleichen Kanal eingestellt sind. Bei einem Batteriewechsel stets die Batterien sowohl im Basisgerät als auch im Sensor entfernen und in richtiger Reihenfolge wieder neu einsetzen, damit die Funkverbindung erneut aufgebaut werden kann.
- Página 10 2. UP-Taste erneut ca. 2 Sekunden drücken um den Empfang des Funksignals zu beenden. 3. Wird weiterhin kein Funksignal empfangen, muss die Zeiteinstellung manuell vorgenommen wer- den. 12 Manuelle Zeiteinstellung 1. Halten Sie die MODE-Taste ca. 3 Sekunden lang gedrückt, um in den Zeiteinstellungsmodus zu gelangen.
- Página 11 16 Temperaturalarm und/oder Frostwarnung einschalten 1. Drücken Sie im normalen Anzeigemodus die DOWN-Taste, um den Temperaturalarm, die Frost- warnung oder beide zusammen nacheinander zu aktivieren oder zu deaktivieren. 2. Drücken Sie im Normalmodus die DOWN-Taste und halten Sie sie ca. 3 Sekunden lang gedrückt, um das Modell für die Einstellung des Außentemperaturalarms aufzurufen, die einzustellenden Zif- fern blinken, drücken Sie die UP- oder DOWN-Taste, um den Wert zu ändern, drücken Sie die MODE-Taste, um zur nächsten Einstellung zu gelangen.
- Página 12 • Drücken Sie im normalen Anzeigemodus die Taste HISTORY, um den Barometerwert der letzten 12 Stunden zu überprüfen. • Halten Sie im Normalmodus die Taste HISTORY gedrückt, um den Barometertyp auszuwählen, und drücken Sie die Tasten UP oder DOWN, um zwischen Absolutdruck und Relativdruck zu wäh- len.
- Página 13 23 Entsorgung Entsorgen Sie die Verpackungsmaterialien sortenrein. Informationen zur ordnungsgemäßen Entsorgung erhalten Sie beim kommunalen Entsorgungsdienstleister oder Umweltamt. Werfen Sie Elektrogeräte nicht in den Hausmüll! Gemäß der Europäischen Richtlinie 2012/19/EG über Elektro- und Elektronik-Altgeräte und deren Umsetzung in nationales Recht müssen verbrauchte Elektrogeräte getrennt gesam- melt und einer umweltgerechten Wiederverwertung zugeführt werden.
- Página 14 Die vollständigen Garantiebedingungen sowie Informationen zu Garantiezeitverlängerung und Ser- viceleistungen können Sie unter www.bresser.de/garantiebedingungen einsehen. 26 EG-Konformitätserklärung Hiermit erklärt Bresser GmbH, dass der Funkanlagentyp mit Artikelnummer 9070110 der Richtlinie 2014/53/EU entspricht. Der vollständige Text der EG-Konformitätserklärung ist unter der folgenden Internetadresse verfügbar: www.bresser.de/download/9070110/ CE/9070110_CE.pdf...
- Página 15 Table of contents 1 Imprint ................................ 16 2 Validity note .............................. 16 3 Features ................................ 16 4 About this Instruction Manual........................ 17 5 Parts overview and scope of delivery ...................... 17 6 Screen display .............................. 18 7 Setting the city.............................. 19 8 Before commissioning..........................
- Página 16 We ask for your understanding that unsolicited returns cannot be pro- cessed. Errors and technical changes excepted. © 2023 Bresser GmbH All rights reserved. The reproduction of this documentation - even in extracts - in any form (e.g. photocopy, print, etc.) as well as the use and distribution by means of electronic systems (e.g.
- Página 17 • Weather trend display • Dual alarm clock with snooze function • Sunrise and sunset time • Time zone • 3-level backlight 4 About this Instruction Manual NOTICE These operating instructions are to be considered a component of the device. Read the safety instructions and the instruction manual carefully before using this device.
- Página 18 3 MODE button (display alarm 1, alarm 2) 4 UP button (increase value) 5 DOWN button (decrease value) 6 HIS button (barometer reading of the last 12 hours) 7 CITY button (for moon phases, tides, sunset 8 CHANNEL button (channel selection, CH1, and sunrise) CH2, CH3, channel cycle) 9 Wall mount hole...
- Página 19 (A-Z) > The third letter for the city name (A-Z) > GMT time > Longitude > Latit- Finally, press the CITY button to save the settings and exit the CITY setting mode. City code You can find a list of cities as a PDF file at: www.bresser.de/download/City_Codes 8 Before commissioning NOTICE...
- Página 20 When changing the batteries, always remove the batteries from both the base unit and the sensor and reinsert them in the correct order so that the radio link can be re-established. If one of the two devices is operated via a mains power connection, the power connection must also be briefly disconnected for this device when the batteries are changed.
- Página 21 3. Press the UP or DOWN button to change the value. 4. Press the SET button to confirm and proceed to the next setting. 5. Sequence of settings: 6. Format 12/24H > Temperature unit >Barometer unit >Time zone > Hour > Minute>Year > Month>Date >Language of weekday 7.
- Página 22 Illustration 3: The weather trend indicators on the base station display Meaning of the icons (from left to right): sunny / partly cloudy / cloudy / rain / thunderstorm / snow Weather frog Illustration 4: The weather frog icon as weather trend indicator on the base station display Meaning of the icons (from left to right): summer temperatures, heat / comfortable temperatures / uncomfortable temperatures / winter temper- atures, cold...
- Página 23 19 Connecting remote sensors The weather station can display the readings from up to 3 wireless sensors* of the same type. Each radio sensor must be set to a separate channel. Proceed as follows to set the channel: 1. Remove the battery compartment cover of the wireless sensor. 2.
- Página 24 26 EC declaration of conformity Bresser GmbH hereby declares that the radio equipment type with item number 9070110 is in compliance with Directive 2014/53/EU. The full text of the EC Declaration of Conform- ity is available at the following web address: www.bresser.de/download/9070110/ CE/9070110_CE.pdf...
- Página 25 27 UKCA declaration of conformity A "Declaration of Conformity" in accordance with the applicable directives and relevant standards has been issued by Bresser GmbH The full text of the UKCA Declaration of Conformity is available at the following web address: www.bresser.de/download/9070110/ UKCA/9070110_UKCA.pdf...
- Página 26 Table des matières 1 Impressum .............................. 27 2 Note de validité............................. 27 3 Caractéristiques ............................ 27 4 A propos de ce mode d’emploi ........................ 28 5 Vue d’ensemble des pièces et contenu de la livraison ................ 29 6 Affichage sur écran............................ 30 7 Régler la ville ..............................
- Página 27 "Service" dans cette documentation. Nous vous demandons de comprendre que les retours non sollicités ne peuvent être traités. Sous réserve d’erreurs et de modifications techniques. © 2023 Bresser GmbH Tous droits réservés. La reproduction de cette documentation - même partielle - sous quelque forme que ce soit (par ex.
- Página 28 • Affichage des tendances météorologiques • Double alarme avec fonction snooze • Heure du lever et du coucher du soleil • Fuseau horaire • 3 niveaux de rétroéclairage 4 A propos de ce mode d’emploi INFORMATION Ce mode d’emploi fait partie intégrante de l’appareil. Lire attentivement les consignes de sécurité...
- Página 29 5 Vue d’ensemble des pièces et contenu de la livraison Fig. 1: Toutes les parties de la station de base et du capteur 1 Écran 2 Bouton SNOOZE/LIGHT (fonction snooze / réglage de la luminosité de l’écran) 3 Bouton MODE (afficher alarme 1, alarme 2) 4 Bouton UP (augmenter la valeur) 5 Bouton DOWN (diminution de la valeur) 6 Bouton HIS (valeur du baromètre des 12 der-...
- Página 30 Également requis (non inclus) : Station : 3 micro piles (1.5V, type AAA) Capteur : 2 micro piles (1,5 V, type AAA) 6 Affichage sur écran Fig. 2: Écran de la station de base 1 Flèche tendance prévision météo 2 Affichage graphique des tendances météoro- logiques pour les 12 prochaines heures 3 Heure actuelle 4 Alarme active...
- Página 31 Enfin, appuyez sur la touche CITY pour enregistrer les réglages et quitter le mode de réglage CITY. Code de la ville La liste des villes est disponible au format PDF à l'adresse suivante : www.bresser.de/download/Ci- ty_Codes 8 Avant la mise en service INFORMATION Évitez les erreurs de connexion !
- Página 32 2. Insérer les piles dans le compartiment. Lors de cette étape, respecter la polarité (+/-). 3. Replacer le couvercle du compartiment à piles. 4. Patienter jusqu’à ce que la température intérieure soit affichée sur l’appareil de base. Capteur sans fil 5.
- Página 33 1. Appuyez et maintenez le bouton MODE pendant env. 3 secondes pour activer en mode Réglage de l'heure. 2. Appuyez plusieurs fois sur le bouton MODE jusqu'à ce que l'affichage indique le décalage horaire 00 Hr. 3. Appuyez sur les boutons UP ou DOWN pour sélectionner le décalage de temps souhaité en heures (-12 à...
- Página 34 Monsieur Météo Fig. 4: L’affichage des tendances météorologiques avec Monsieur Météo sur l’écran de la station de base Signification des symboles (de gauche à droite): Températures estivales, Chaleur / Températures confortables / Températures inconfortables / Tempé- ratures hivernales, Froid 18 Pression atmosphérique barométrique / atmosphérique La pression atmosphérique (ci-après dénommée « pression atmosphérique ») est la pression en tout point de la Terre, qui est justifiée par le poids de la couche d’air au-dessus d’elle.
- Página 35 2. Réglez le sélecteur de canal sur le canal souhaité (1, 2 ou 3). 3. Replacez le couvercle du compartiment à piles. 4. Appuyez plusieurs fois sur la touche CHANNEL de la station de base pour afficher les lectures pour chaque canal ou alternativement. Le canal sélectionné est affiché à l’écran. 5.
- Página 36 Vous pouvez consulter l’intégralité des conditions de garantie ainsi que les informations sur l’exten- sion de la période de garantie et le détail de nos services via le lien suivant : www.bresser.de/garan- tiebedingungen.
- Página 37 Inhoudsopgave 1 Impressum .............................. 38 2 Geldigheidsverklaring.......................... 38 3 Eigenschappen............................. 38 4 Over deze handleiding .......................... 39 5 Onderdelenoverzicht en leveringsomvang.................... 39 6 Display weergave ............................ 40 7 De stad instellen............................ 41 8 Vóór gebruik .............................. 41 9 Instellen van de stroomvoorziening ...................... 42 10 Batterijniveau-indicator ..........................
- Página 38 Fouten en technische wijzigingen voorbehouden. © 2023 Bresser GmbH Alle rechten voorbehouden. De reproductie van deze documentatie - zelfs in uittreksels - in welke vorm dan ook (bv. fotokopie, af- drukken, enz.) evenals het gebruik en de verspreiding door middel van elektronische systemen (bv.
- Página 39 • Weergave trend • Dubbel alarm met sluimerfunctie • Tijd van zonsopgang en zonsondergang • Tijdzone • 3 niveaus achtergrondverlichting 4 Over deze handleiding INSTRUCTIE Deze handleiding moet worden gezien als onderdeel van het apparaat. Lees de veiligheidsinstructies en de handleiding zorgvuldig door voordat u dit apparaat in gebruik neemt.
- Página 40 1 Scherm 2 SNOOZE/LIGHT-knop (sluimerfunctie / hel- derheid display instellen) 3 MODE-knop (toon alarm 1, alarm 2) 4 UP-knop (waarde verhogen) 5 DOWN-knop (waarde verlagen) 6 HIS-knop (barometerstand van de laatste 12 uur) 7 CITY-knop (voor maanfasen, getijden, zons- 8 CHANNEL-knop (kanaalselectie, CH1, CH2, ondergang en zonsopgang) CH3, kanaal zoeken) 9 Hulpmiddel voor wandmontage...
- Página 41 (A-Z) > GMT tijd > Lengtegraad > Breedtegraad Druk ten slotte op de knop CITY om de instellingen op te slaan en de instellingsmodus CITY te verla- ten. City code Je kunt een lijst met steden als PDF-bestand vinden op: www.bresser.de/download/City_Codes 8 Vóór gebruik INSTRUCTIE Vermijd verbindingsfouten! Om verbindingsproblemen tussen de apparaten te voorkomen, moeten bij de ingebruikname de vol- gende punten in acht worden genomen.
- Página 42 5. Zorg ervoor dat het basisstation en de radiosensor op hetzelfde kanaal zijn ingesteld. Verwijder bij het vervangen van de batterijen altijd de batterijen in zowel het basisstation als de sensor en plaats deze in de juiste volgorde terug. Zo kan de radioverbinding weer tot stand komen. Als een van de twee apparaten via een netaansluiting wordt bediend, moet bij het vervangen van de batterijen ook de netaansluiting voor dit apparaat even worden losgekoppeld.
- Página 43 12 Handmatige tijdinstelling 1. Houd de MODE-knop ongeveer 3 seconden ingedrukt om de tijdinstelmodus te openen. 2. De in te stellen cijfers knipperen. 3. Druk op de knop UP of DOWN om de waarde te wijzigen. 4. Druk op de SET knop om te bevestigen en door te gaan naar de volgende instelling. 5.
- Página 44 17 Weertrend Uit de gemeten waarden wordt een weertrend voor de volgende 12-24 uur berekend en als volgt gra- fisch weergegeven: Afb. 3: De weertrend-weergave op de display van het basisstation Betekenis van de symbolen (van links naar rechts): Zonnig / Gedeeltelijk bewolkt / Bewolkt / Regen / Onweer / Sneeuw Kikker Afb. 4: De weertrend-weergave met de kikker op het scherm van het basisstation Betekenis van de symbolen (van links naar rechts):...
- Página 45 • Hoge luchtdruk wordt altijd geassocieerd met mooi weer, terwijl lage luchtdruk duidt op regenach- tig weer. 19 Externe sensoren aansluiten Het weerstation kan de meetwaarden van maximaal 3 draadloze sensoren* van hetzelfde type weer- geven. Elke draadloze sensor moet op een apart kanaal worden ingesteld. Ga als volgt te werk om het kanaal in te stellen: 1.
- Página 46 U kunt de volledige garantievoorwaarden, informatie over de verlenging van de garantieperiode en de details van onze dienstverlening raadplegen op www.bresser.de/warranty . 46 / 72...
- Página 47 26 EG-verklaring van overeenstemming Bresser GmbH verklaart hierbij dat het apparaat-type met artikelnummer 9070110 in over- eenstemming is met Richtlijn: 2014/53/EU. De volledige tekst van de EU-verklaring van overeenstemming is beschikbaar op het volgende internetadres: www.bresser.de/down- load/9070110/CE/9070110_CE.pdf 47 / 72...
- Página 48 Indice 1 Impressum .............................. 49 2 Nota di validità.............................. 49 3 Caratteristiche .............................. 49 4 Informazioni su questo manuale ........................ 50 5 Panoramica delle parti e ambito di fornitura ..................... 50 6 Indicazioni sul display .......................... 51 7 Impostazione della città.......................... 52 8 Prima della messa in servizio ........................
- Página 49 Con riserva di errori e modifiche tecniche. © 2023 Bresser GmbH Tutti i diritti riservati. La riproduzione di questo documento - anche parziale - in qualsiasi forma (ad es. fotocopia, stampa, ecc.) e l’uso e la diffusione a mezzo di sistemi elettronici (ad es.
- Página 50 • Doppio allarme con funzione snooze • Orario di alba e tramonto • Fuso orario • 3 livelli di retroilluminazione 4 Informazioni su questo manuale AVVERTENZA Le presenti istruzioni per l'uso sono da considerarsi parte integrante dell'apparecchio! Leggere attentamente le istruzioni di sicurezza e le istruzioni per l'uso prima di utilizzare l'apparecchio. Conservare questo manuale in un luogo sicuro per future consultazioni.
- Página 51 3 Pulsante MODE (mostra allarme 1, allarme 4 Pulsante SU (aumento del valore) 5 Pulsante GIÙ (riduzione del valore) 6 Pulsante HIS (valore del barometro delle ulti- me 12 ore) 7 Pulsante CITY (per fasi lunari, maree, tra- 8 Pulsante CHANNEL (selezione canale, CH1, monto e alba) CH2, CH3, scorrimento canale) 9 Dispositivo per il montaggio a parete...
- Página 52 (A-Z) > Ora GMT > Longitudine > Latitudine Infine, premere il pulsante CITY per salvare le impostazioni e uscire dalla modalità di impostazione CI- Codice città L'elenco delle città è disponibile in formato PDF all'indirizzo: www.bresser.de/download/City_Codes 8 Prima della messa in servizio AVVERTENZA...
- Página 53 4. Installare/attivare l'unità di base e il sensore entro il campo di trasmissione effettivo. 5. Accertarsi che l'unità base e il sensore senza fili siano impostati sullo stesso canale. Quando si sostituiscono le batterie, rimuovere sempre le batterie sia nell'unità base che nel sensore e reinserirle nell'ordine corretto in modo da poter ristabilire il collegamento radio.
- Página 54 2. premere nuovamente il pulsante UP per circa 2 secondi per interrompere la ricezione del segnale radio. 3. Se il problema persiste, l’orario deve essere impostato manualmente. 12 Impostazione manuale dell'ora 1. Tenere premuto il pulsante MODE per circa 3 secondi per accedere alla modalità di impostazione dell'ora.
- Página 55 16 Attivare l'allarme temperatura e/o l'avviso gelo 1. In modalità di visualizzazione normale, premere il pulsante GIÙ per attivare o disattivare l'allarme temperatura, l'allarme gelo o entrambi in successione. 2. In modalità normale, tenere premuto il pulsante GIÙ per circa 3 secondi per accedere al tipo di im- postazione dell'allarme della temperatura esterna;...
- Página 56 • In modalità di visualizzazione normale, premere il pulsante HISTORY per controllare la lettura del barometro nelle ultime 12 ore. • In modalità normale, tenere premuto il pulsante HISTORY per selezionare il tipo di barometro e premere i pulsanti SU o GIÙ per scegliere tra pressione assoluta e pressione relativa. •...
- Página 57 2. Se necessario, premere più volte il pulsante SNZ/Light per attenuare o disattivare la retroillumina- zione in tre passaggi (debole/media/forte) in tre passaggi. 23 Smaltimento Smaltire i materiali dell’imballaggio in base alla loro tipologia. Informazioni sullo smaltimento appropriato possono essere reperite presso il fornitore locale dei servizi di smaltimento o l’agenzia per l’ambiente.
- Página 58 . 26 Dichiarazione CE di conformità Il Bresser GmbH dichiara che il tipo di apparecchiatura radio con numero di articolo 9070110 è conforme alla direttiva 2014/53/UE. Il testo integrale della dichiarazione di con- formità CE è disponibile al seguente indirizzo Internet: www.bresser.de/down- load/9070110/CE/9070110_CE.pdf...
- Página 59 Índice de contenidos 1 Aviso legal .............................. 60 2 Nota de validez ............................. 60 3 Características.............................. 60 4 Sobre este manual de instrucciones de uso ..................... 61 5 Resumen de piezas y contenido del suministro .................. 62 6 Indicaciones de la pantalla.......................... 63 7 Ambientar la ciudad .............................
- Página 60 "Garantía" y "Servicio" en esta documentación. Rogamos entienda que las devoluciones no solicita- das, no pueden tramitarse. Salvo errores y modificaciones técnicas. © 2023 Bresser GmbH Quedan reservados todos los derechos Queda prohibida la reproducción de esta documentación -incluso en fragmentos- en cualquier forma (fotocopias, impresiones, etc), así...
- Página 61 • Indicación de la tendencia del tiempo • Doble alarma con función de repetición • Hora de salida y puesta del sol • Huso horario • 3 niveles de retroiluminación 4 Sobre este manual de instrucciones de uso ¡AVISO! El presente manual de instrucciones debe considerarse parte integrante del aparato. Lea atentamente las instrucciones de seguridad y el manual antes de utilizar este dispositivo.
- Página 62 5 Resumen de piezas y contenido del suministro Fig. 1: Todas las partes de la estación base y el sensor 1 Pantalla 2 Botón «SNOOZE/LIGHT» (repetición/luz) (función de repetición de la alarma / ajustar el brillo de la pantalla) 3 Botón «MODE» (modo) (mostrar alarma 1, 4 Botón «UP»...
- Página 63 19 Tapa del compartimento de las pilas (sensor inalámbrico) Contenido del suministro: Estación meteorológica (A), sensor de temperatura y humedad (B) También es necesario (no incluido en el volumen de suministro): Base: 3 pilas Micro (de 1,5 V, tipo AAA) Sensor: 2 pilas Micro (de 1,5 V, tipo AAA) 6 Indicaciones de la pantalla Fig. 2: Indicaciones en la pantalla de la base...
- Página 64 (A-Z) > Hora GMT > Longitud > Latitud Por último, pulse el botón CITY para guardar los ajustes y salir del modo de ajuste CITY. Código de la ciudad Encontrará una lista de ciudades en formato PDF en: www.bresser.de/download/City_Codes 8 Antes de la puesta en marcha ¡AVISO! Evite los fallos de conexión...
- Página 65 9 Establecer la alimentación eléctrica Aparato básico 1. Quitar la tapa del compartimento de las pilas. 2. Instalar las pilas en el compartimento de las pilas. Tener en cuenta la orientación correcta de los polos de las pilas (+/-). 3. Volver a poner la tapa del compartimento de las pilas. 4.
- Página 66 6. Formato 12/24H > Unidad de temperatura > Unidad del barómetro > Huso horario > Horas > Mi- nutos > Año > Mes > Fecha > Idioma del día de la semana 7. Por último, pulse el botón «MODE» (modo) para guardar los ajustes y salir del modo de configura- ción.
- Página 67 Fig. 3: Los indicadores de tendencias meteorológicas de la estación base Significado de los símbolos (de izquierda a derecha): Soleado / Parcialmente nublado / Nublado / Lluvia / Tormenta / Nieve Meteorólogo Fig. 4: La visualización de la tendencia meteorológica con el hombre del tiempo en la pantalla de la estación base Significado de los símbolos (de izquierda a derecha): Temperaturas de verano, calor / Temperaturas confortables / Temperaturas incómodas / Temperatu- ras de invierno, frío...
- Página 68 19 Conexión de sensores inalámbricos La estación meteorológica puede mostrar las lecturas de hasta 3 sensores inalámbricos* del mismo ti- po. Cada sensor inalámbrico debe ajustarse a un canal distinto. Proceda de la siguiente manera para ajustar el canal: 1. Retire la tapa del compartimento de las pilas del sensor inalámbrico. 2.
- Página 69 Las condiciones completas de garantía, así como información relativa a la ampliación de la garantía y servicios, puede encontrarse en www.bresser.de/warranty_terms. 69 / 72...
- Página 70 26 Declaración de Conformidad CE Por la presente, Bresser GmbH declara que el tipo de equipo de radio con 9070110 cum- ple con la Directiva 2014/53/EU. El texto completo de la declaración de conformidad CE está disponible en la siguiente dirección de Internet www.bresser.de/download/9070110/ CE/9070110_CE.pdf...
- Página 71 (de preferencia por Telephone*: +44 1342 837 098 e-mail). BRESSER UK Ltd e-mail: servicio.iberia@bresser-iberia.es Customer Support Teléfono*: +34 91 67972 69 Suite 3G, Eden House Enterprise Way...
- Página 72 Bresser GmbH Gutenbergstraße 2 46414 Rhede · Germany www.bresser.de @BresserEurope...