Tabla de contenido
Publicidad
Idiomas disponibles
Idiomas disponibles
Enlaces rápidos
Publicidad
Tabla de contenido

Manuales relacionados para asalvo TRONA ACTIVITY

Resumen de contenidos para asalvo TRONA ACTIVITY
- Página 1 TRONA ACTIVITY MANUAL DE INSTRUCCIONES REF: 13989 -15969 - 15976 www.asalvo.com...
- Página 2 ADVERTENCIAs CUIDADO! ADVERTENCIAS IMPORTANTE, CONSERVAR PARA FUTURAS CONSULTAS • Lea estas instrucciones detenidamente antes de usar este producto • Se recomienda el uso de la trona para niños de 6 meses a 3 años de edad (peso máximo hasta los 18 kg) que sean capaces de sentarse por sí mismos. Como mesa y silla pueden ser usados separadamente para dibujar, escribir y jugar hasta los 6 años. • ADVERTENCIA: No deje al niño sin vigilancia. • Verificar siempre la seguridad y la estabilidad de la trona antes de la utilización • Colocar siempre los 5 arneses de seguridad al niño verificando su correcto anclaje en la hebilla central. • Comprobar que estén correctamente fijados y ajustados a la medida del niño.
-
Página 3: Componentes
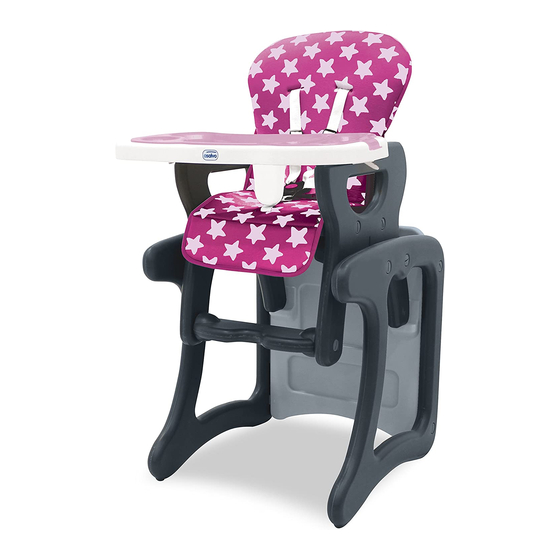
COMPONENTEs Arnés de protección Textil Bandeja auxiliar Respaldo Bandeja ajustable Mesa Asiento Reposabrazos Reposabrazos derch. de la silla izq. de la silla Travesaño Reposapiés Base izquierda de la mesa Base derecha de la mesa ES ES MONTAJE DE LA sILLA 1. Una el respaldo y el asiento, insertando el eje de acople por el orifico hasta el final (ver fig. 1 y 2) Asiento Reposabrazos izq. de Eje de acople la silla Resplado Reposabrazos derch. de la silla Perno del asiento Reposapiés Tuerca... -
Página 4: Montaje De La Mesa
MONTAJE DE LA sILLA 2. Inserte ambos pernos del asiento en los huecos correspondientes del reposabrazos izquierdo de la silla y luego del reposabrazos derecho de la misma (ver fig. 4) Ajuste el reposabrazos de la silla con un destornillador apretando la tuerca de plástico, de la misma forma, apriete la tuerca de plástico del otro lado (ver fig.5) MONTAJE DE LA MEsA... -
Página 5: Instalación Mesa Y Silla
INsTALACIÓN MEsA Y sILLA 4. Alinee la silla con la guía y bájela suavemente (ver fig. 10) hasta que se escuche un “click” (ver fig. 11) INsTALACIÓN Y AJUsTE DE LAs bANDEJAs 5. Alinee la bandeja auxiliar sobre la bandeja ajustable (ver fig. 12) Inserte la caja de protección en el fondo de la bandeja ajustable por la ranura (ver fig. 13) Bandeja auxiliar Bandeja ajustable Soporte central Manillar de ajuste de la bandeja... -
Página 6: Ajuste Del Respaldo
INsTALACIÓN Y AJUsTE DE LAs bANDEJAs Después de montar las bandejas, presione la manilla de ajuste debajo de la misma con los dedos e insértelo suavemente por las ranuras laterales del asiento hasta que ajuste perfectamente (ver fig. 14) La bandeja ajustable puede colocarse en 3 posiciones (ver fig. 15). -
Página 7: Uso Como Mesa De Juego Y Dibujo
COLOCACIÓN DEL NIñO EN LA TRONA 1. Coloque al niño en la trona cuando la silla y la mesa estén armadas. (ver fig. 21) 2. Asegure al niño con el arnés de seguridad y posteriormente cierre con la hebilla 3. Ajuste el largo del cinturón de seguridad al tamaño del niño 4. Instale la bandeja principal. Gracias Síguenos por adquirir un producto asalvo. www.asalvo.com... - Página 8 Importado por: Estar Asalvo S.L. CIF B91234286 C/1, PI Fridex · 41500 Alcalá de Guadaíra · Sevilla Tfno. 902 360 516 Fax: 955 631 205 email: info@asalvo.com www.asalvo.com...
- Página 9 HIgH CHAIR ACTIVITY USER GUIDE REF: 13989 -15969 - 15976 www.asalvo.com...
- Página 10 CAUTION CAUTION! CAUTION IMPORTANT, KEEP FOR FUTURE REFERENCE • Read the instructions carefully before using this product. • The high chair is recommended for use with children from 6 months to 3 years old (maximum weight up to 18 kg) who are able to sit up by themselves. As a table and chair can be used separately to draw, write and play until 6 years.
- Página 11 COMPONENTs Protective Harness Cover Auxiliary tray Backrest Adjustable tray Table Seat Armrest right Left armrest of armrest the chair Crossbar Footrest Left table base Right table stand ES EN INsTALLATION Of THE CHAIR 1. Put the backrest and base of the chair together, and insert the coupling shaft into the hole till the end. (see fig. 1 & 2) Seat Left armrest coupling shaft...
- Página 12 INsTALLATION Of THE CHAIR 2. Insert the two stud bolt of the base into the hole of the right chair feet, then insert the stud bolt of the foot rest into the hole of the right chair feet (see fig. 4) Buckle the chair feet, use the screwdriver to tighten the plastic screw up, use the same way to tighten the plastic screw at the reverse side (see fig.5) INsTALLATION Of THE TAbLE 3. Insert the plastic screw bar of table and crossbar into the hole of left table base (see fig. 7), and buckle the right table stand (see fig. 8). Use the screwdriver to tighten the plastic screw bar up, and use the same way to...
- Página 13 INsTALLATION Of TAbLE AND CHAIR 4. Align the chair with the buckle position and press it down smoothly (see fig. 10) until you hear an instinct click (see fig. 11) INsTALLATION AND ADJUsTMENT Of TRAY 5. Put the auxiliary tray aling to the adjustable tray (see fig. 12) Insert the protection box into the bottom of the adjustable tray along the slot (see fig. 13) Auxiliary tray Adjustable...
- Página 14 INsTALLATION AND ADJUsTMENT Of TRAY After assemblng all the spare parts of the adjustable tray, press the adjusting handle under the adjustable t ray w ith f inger a nd i nsert it smoothly till the bottom along the slot on the sides of the seat until buckled up (see fig. 14) With 3 buckle positions, the adjustable tray can be adjusted with 3 different positions (see fig. 15). ADJUsTMENT Of THE bACKREsT 3 positions for the backrest press upward the adjusting button (see fig. 16)
- Página 15 1. Put your children into the high chair when the table and chair are assembled together. (see fig. 21) 2. Buckle your children up by putting both belt clasps together and then push them in the belt lock. 3. Adjust the length of the safety belt to the children’s height. 4. Install the adjustable tray Thak you Follow us FOR PURCHASING ASALvO PRODUCT. www.asalvo.com...
- Página 16 Imported by: Estar Asalvo S.L. CIF B91234286 C/1, PI Fridex · 41500 Alcalá de Guadaíra · Sevilla Tfno. 902 360 516 Fax: 955 631 205 email: info@asalvo.com www.asalvo.com...
- Página 17 CADEIRA DE REFEIÇÃO ACTIVITY MANUAL DE INSTRUçõES REF: 13989 -15969 - 15976 www.asalvo.com...
- Página 18 ADVERTêNCIAs ATENÇÃO! ADVERTÊNCIA IMPORTANTE, GUARDAR PARA FUTURAS CONSULTAS • Leia as instruções atentamente antes de utilizar este producto. • Recomenda-se a utilização da cadeira de refeição para crianças dos 6 meses aos 3 anos de idade (peso máximo até 18 kg) que sejam capazes de se sentar sozinhas. Como mesa e cadeira, pode ser utilizada separadamente para desenhar, escrever e brincar até aos 6 anos. • ATENÇÃO: Não deixe nunca a criança sem vigilância. • Verificar sempre a segurança e a estabilidade da cadeira antes da sua utilização.
- Página 19 COMPONENTEs Arnês de proteção Tecido Bandeja auxiliar Encosto Bandeja ajustável Mesa Assento Apoio de braço Apoio de braço direito da cadeira esquerdo da cadeira Travessão Apoio de pés Base esquerda da mesa Base direita da mesa MONTAgEM DA CADEIRA 1. Una o encosto e o assento, introduzindo o eixo da junta pelo orifício até ao fim (ver fig. 1 e 2) Assento Apoio de braço Eixo de junta esquerdo da cadeira Encosto Apoio de braço direito da cadeira Perno do assento Apoio de pés Porcas...
- Página 20 MONTAgEM DA CADEIRA 2. Introduza ambos os pernos do assento nos buracos correspondentes do apoio de braço esquerdo da cadeira e, depois, do apoio de braço direito. (ver fig. 4) Ajuste o apoio de braços da cadeira com uma chave de parafusos, apertando a porca de plástico. Repita o processo com a porca de plástico do outro lado. (ver fig.5) MONTAgEM DA MEsA 3. Introduza os pernos da mesa e do travessão no buraco da base esquerda...
- Página 21 MONTAgEM DA MEsA E DA CADEIRA 4. Alinhe a cadeira com a guia e desça-a suavemente (ver fig. 10) até ouvir um clique. (ver fig. 11) MONTAgEM E AJUsTAMENTO DAs bANDEJAs 5. Alinee la bandeja auxiliar sobre la bandeja ajustable (ver fig. 12) Inserte la caja de protección en el fondo de la bandeja ajustable por la ranura (ver fig. 13) Bandeja auxiliar Bandeja ajustável Suporte central Cabo de ajuste da bandeja...
- Página 22 MONTAgEM E AJUsTAMENTO DAs bANDEJAs Depois de montar as bandejas, pressione o cabo de ajuste debaixo da mesma com os dedos e ajuste-o suavemente pelas ranhuras laterais do assento até se ajustar perfeitamente. (ver fig. 14) A bandeja ajustável pode ser colocada em 3 posições. (ver fig. 15).
- Página 23 COLOCAÇÃO DA CRIANÇA NA CADEIRA DE REfEIÇÃO 1. Coloque a criança na cadeira de refeição quando a cadeira e a mesa estiverem montadas. (ver fig. 21) 2. Segure a criança com o arnês de segurança e depois feche com a fivela. 3. Ajuste o comprimento do cinto de segurança ao tamanho da criança 4. Instale a bandeja principal Obrigado Siga-nos POR COMPRAR UN www.asalvo.com PRODUTO ASALvO...
- Página 24 Importado por: Estar Asalvo S.L. CIF B91234286 C/1, PI Fridex · 41500 Alcalá de Guadaíra · Sevilla Tfno. 902 360 516 Fax: 955 631 205 email: info@asalvo.com www.asalvo.com...