Tabla de contenido
Publicidad
Enlaces rápidos
APOLLO
Air conditioner without outdoor unit
Climatizzatore senza unità esterna
Acondicionador de aire sin unidad exterior
Ar condicionado sem unidade externa
Climatiseur sans unité extérieure
Klimagerät ohne Ausseneinheit
37.4254.109.00
06/2021
OPERATING
EN
INSTRUCTIONS
ISTRUZIONI
IT
D'USO
MODE
FR
D'EMPLOI
BEDIENUNGS-
DE
ANLEITUNG
INSTRUCCIONES
ES
DE USO
MANUAL
PT
DE INSTRUÇÕES
Publicidad
Capítulos
Tabla de contenido

Manuales relacionados para Argo APOLLO 12HP


Resumen de contenidos para Argo APOLLO 12HP
- Página 1 OPERATING INSTRUCTIONS ISTRUZIONI D’USO MODE D’EMPLOI BEDIENUNGS- ANLEITUNG INSTRUCCIONES APOLLO DE USO MANUAL DE INSTRUÇÕES Air conditioner without outdoor unit Climatizzatore senza unità esterna Climatiseur sans unité extérieure Klimagerät ohne Ausseneinheit Acondicionador de aire sin unidad exterior Ar condicionado sem unidade externa 37.4254.109.00 06/2021...
-
Página 2: Tabla De Contenido
CONTENTS SAFETY INSTRUCTIONS SIGNALING LEDs USING THE REMOTE CONTROL UNIT REMOTE CONTROL UNIT COOLING HEATING (IF AVAILABLE) AUTOMATIC OPERATION DEHUMIDIFYING (DRY) FAN ONLY ADJUSTING THE FAN SPEED SPLEEP MODE TURBO MODE ECO FUNCTION SETTING THE TIMER ADJUSTING THE AIR FLOW DIRECTION OPERATION WITHOUT THE REMOTE CONTROL UNIT TIPS FOR ENERGY SAVING TROUBLESHOOTING... -
Página 3: Signaling Leds
This air conditioner can be used by children aged from 8 years and above and persons with reduced ● physical, sensory or mental capabilities or lack of experience and knowledge if they have been given supervision or instruction concerning use of the air conditioner in a safe way and understand the hazards involved. -
Página 4: Using The Remote Control Unit
If there are curtains, doors or other objects that block ● USING THE REMOTE CONTROL UNIT the signal from the remote control to the air condi- HOW TO INSTALL BATTERIES tioner, the air conditioner will not be controlled by the Remove the lid in the rear part of the remote control ●... -
Página 5: Remote Control Unit
REMOTE CONTROL UNIT Fan speed DISPLAY Operation mode Automatic Cooling Displayed when transmitting data Dehumidification Temperature Heating indication Lock/unlock Timer Sleep mode Temperature symbol Flap Not real, it is always indoor temperature MODE SELECTOR BUTTON ON/OFF BUTTON Press this button to modify the air conditioner mode. -
Página 6: Cooling
When this happens, a protection function for the heat COOLING exchanger defrosting is activated. During this function operation, the indoor fan stops. Heating operation restarts NOTE after several minutes. (This interval will vary slightly Verify that the unit is connected to the depending on the room and outdoor temperature). -
Página 7: Adjusting The Fan Speed
ADJUSTING THE FAN SPEED TURBO MODE AUTOMATIC You can select TURBO only during cooling or heating Simply set the FAN selector to the position. A mode and not during automatic, dehumidifying (dry) and microcomputer automatically controls the fan speed when fan mode. -
Página 8: Setting The Timer
SETTING THE TIMER CAUTION A) HOW TO SET THE ON TIMER • Use the FLAP button on the remote control to adjust 1. In the standby state, press the the position of the flap. If you move the flap by hand, TIMER button once to enter the the factual flap position and the flap position on the timed power-on setting state:... -
Página 9: Tips For Energy Saving
Trouble: Clicking sound is heard from the air conditioner. TIPS FOR ENERGY SAVING Possible cause: DO NOT: 1. During operation, any plastic parts may expand or ● Block the air intake and outlet of the unit. shrink due to a sudden temperature change. In this If they are obstructed, the unit will not work well, and event, a clicking sound may occur. - Página 10 AUTO-DIAGNOSIS TABLE...
-
Página 13: How To Discharge The Condensate Water
HOW TO DISCHARGE THE CONDENSATE WATER The Humidity removed by the unit is collected and discharged automatically, but in special conditions some condensate water could remain inside the unit. If you are not going to make use of the air conditioner for a long period, it is necessary to discharge the eventual condensate water through the service cap for condensate discharge placed under the bottom panel of the unit:... -
Página 14: App Download And Setting Up Apollo In Wi-Fi Mode
APP DOWNLOAD AND SETTING UP APOLLO IN Wi-Fi MODE 1. Install the TuyaSmart App on your smartphone or tablet by framing the following QR code using a QR code reader (Alternatively, search and install the TuyaSmart App in the App store of your smartphone or tablet): 2. - Página 15 INFORMATION FOR CORRECT DISPOSAL OF THE PRODUCT IN ACCORDANCE WITH THE EUROPEAN DIRECTIVE 2012/19/EU At the end of its working life this equipment must not be disposed of as an household waste. It must be taken to special local community waste collection centres or to a dealer providing this service. Disposing of an electrical and electronic equipment separately avoids possible negative effects on the environment and human health deriving from an inappropriate disposal and enables its components to be recovered and recycled to obtain significant savings in energy and resources.
-
Página 16: Istruzioni Di Sicurezza
INDICE ISTRUZIONI DI SICUREZZA SPIE DI SEGNALAZIONE USO DEL TELECOMANDO TELECOMANDO RAFFREDDAMENTO RISCALDAMENTO (SE DISPONIBILE) FUNZIONAMENTO IN AUTOMATICO DEUMIDIFICAZIONE VENTILAZIONE SCELTA VELOCITÀ VENTILATORE PROGRAMMA NOTTURNO PROGRAMMA TURBO FUNZIONE ECO REGOLAZIONE DEL TIMER REGOLAZIONE DEL FLUSSO D’ARIA FUNZIONAMENTO SENZA TELECOMANDO CONSIGLI PER IL MASSIMO COMFORT E IL MINIMO CONSUMO IDENTIFICAZIONE E SOLUZIONE PROBLEMI DI FUNZIONAMENTO COME SVUOTARE L’ACCUMULO DI CONDENSA MANUTENZIONE E CURA... -
Página 17: Spie Di Segnalazione
Questo condizionatore può essere usato da bambini dagli 8 anni in su e da persone con ridotte capacità ● fisiche, sensoriali o mentali, oppure con mancanza di esperienza o di conoscenza, se hanno potuto beneficiare, attraverso l’intermediazione di una persona responsabile della loro sicurezza, di una sorveglianza o di istruzioni riguardanti l’uso del condizionatore e quindi hanno capito i possibili rischi. -
Página 18: Uso Del Telecomando
Se ci sono tende, porte o altri oggetti che bloccano il ● USO DEL TELECOMANDO segnale dal telecomando al climatizzatore, il climatiz- INSERIMENTO DELLE BATTERIE zatore non potrà essere controllato dal telecomando. Rimuovere il coperchio sul retro del telecomando: ● Non versare alcun liquido sul telecomando, non espor- ●... -
Página 19: Telecomando
TELECOMANDO Velocità ventilatore VISORE Modo di funzionamento Automatico Raffreddamento Conferma trasmissione dati al climatizzatore Deumidificazione Ventilazione Indicazione Riscaldamento temperatura Blocco/sblocco Timer Programma notturno Simbolo temperatura Deflettore Non reale, è sempre la temperatura ambiente PULSANTE MODO DI FUNZIONAMENTO PULSANTE ON/OFF Premere questo pulsante per modificare il Premere il pulsante ON/OFF, quando funzionamento del condizionatore. -
Página 20: Raffreddamento
Quando questo accade viene attivata un’opportuna RAFFREDDAMENTO protezione che consente lo sbrinamento dello scambiatore. In queste condizioni operative il ventilatore interno si ferma. NOTA Il funzionamento in riscaldamento riprende dopo alcuni Verificare che l’unità sia collegata alla minuti in relazione alle temperature ambiente ed esterna. rete elettrica. -
Página 21: Scelta Velocità Ventilatore
SCELTA VELOCITÀ VENTILATORE PROGRAMMA TURBO AUTOMATICO ll programma TURBO è selezionabile solo all’interno del modo raffreddamento o riscaldamento e non è selezionabile Impostare con il pulsante FAN la posizione “AUTOMATICO” . Il microprocessore controllerà automaticamente la nel modo automatico, deumidificazione e ventilazione. Il velocità... -
Página 22: Regolazione Del Timer
REGOLAZIONE DEL TIMER NOTE • Il deflettore si chiude automaticamente quando il sistema A) COME REGOLARE IL TIMER DI è spento. ACCENSIONE (ON) • Durante il funzionamento di riscaldamento, la velocità della ventola è bassa e il deflettore è in posizione 1. -
Página 23: Consigli Per Il Massimo Comfort E Il Minimo Consumo
Difetto: Il climatizzatore emette dei leggeri scricchiolii. CONSIGLI PER IL MASSIMO COMFORT Possibile causa: ED UN MINIMO CONSUMO 1. Durante il funzionamento con il variare della temperatura le parti in plastica subiscono delle dilatazioni che EVITARE: causano questo inconveniente. Di ostruire le griglie di mandata e aspirazione dell’unità, ●... - Página 24 TABELLA AUTO-DIAGNOSI...
-
Página 27: Come Svuotare L'accumulo Di Condensa
COME SVUOTARE L’ACCUMULO DI CONDENSA L’umidità asportata dall’unità viene raccolta e smaltita autonomamente, ma in particolari condizioni potrebbe verificarsi un accumulo. Ogni volta si preveda un lungo periodo d’inattività è necessario svuotare l’eventuale condensa accumulata tramite l’apposito tappo di servizio posto sotto il pannello inferiore: •... -
Página 28: Download Dell'app E Impostazione Apollo In Modalità Wi-Fi
DOWNLOAD DELL’APP E IMPOSTAZIONE APOLLO IN MODALITÀ Wi-Fi 1. Installare l’App TuyaSmart sul proprio smartphone o tablet inquadrando il QR code seguente utilizzando un QR code reader (In alternativa cercare e installare l’app TuyaSmart nell’app store del proprio smartphone o tablet): 2. - Página 29 INFORMAZIONE PER IL CORRETTO SMALTIMENTO DEL PRODOTTO ai sensi dell’art.26 D.Lgs. 14/03/14, no.49 “ATTUAZIONE DELLA DIRETTIVA EUROPEA 2012/19/UE SUI RIFIUTI DA APPARECCHIATURE ELETTRICHE ED ELETTRONICHE Alla fine della sua vita utile questo apparecchio non deve essere smaltito insieme ai rifiuti domestici. Richiamiamo l’importante ruolo del consumatore nel contribuire al riutilizzo, al riciclaggio e ad altre forme di recupero di tali rifiuti.
-
Página 30: Instructions De Securite
SOMMAIRE INSTRUCTIONS DE SECURITE VOYANTS DE SIGNALISATION UTILISATION DE LA TELECOMMANDE TELECOMMANDE REFROIDISSEMENT CHAUFFAGE (SI DISPONIBLE) FONCTIONNEMENT AUTOMATIQUE DESHUMIDIFICATION VENTILATION REGLAGE DE LA VITESSE DU VENTILATEUR PROGRAMME NOCTURNE PROGRAMME TURBO FONCTION ECO REGLAGE DU TEMPORISATEUR REGLAGE DU FLUX D’AIR FONCTIONNEMENT SANS LA TELECOMMANDE CONSEILS POUR LE CONFORT ET L’ECONOMIE DE L’ENERGIE GUIDE DE DEPANNAGE COMMENT VIDER LE CONDENSAT... -
Página 31: Voyants De Signalisation
Ce climatiseur peut être utilisé par les enfants de 8 ans et plus et les personnes dont les capacités physiques, ● sensorielles ou mentales sont réduites, ou les personnes dénouées d’expérience ou de connaissance, si elles on pu bénéficier, par l’intermédiaire d’une personne responsable pour leur sûreté, d’une surveillance ou d’instruction préalable concernant l’utilisation du climatiseur et puis ils ont réalisés les risques potentiels. -
Página 32: Utilisation De La Telecommande
S’il y a des rideaux, des portes ou d’autres objets qui ● UTILISATION DE LA TELECOMMANDE bloquent le signal de la télécommande vers le clima- INSTALLATION DES PILES tiseur, le climatiseur ne peut pas être contrôlé par la Enlever le covvercle des piles de la telecommande: ●... - Página 33 TELECOMMANDE Velocità ventilatore AFFICHAGE Mode de fonctionnement Auto Refroidissement Confirme la transmission des données au climatiseur Deshumidification Ventilation Indication de Chauffage température Verrouiller / déverrouiller Temporisateur Programme nocturne Symbole de température Volet Pas réel, c’est toujours la température ambiante BOUTON MODE DE FONCTIONNEMENT BOUTON ON/OFF Appuyer sur ce bouton pour choisir le Appuyez sur le bouton ON / OFF, lorsque...
-
Página 34: Refroidissement
Dans ce cas une protection est activée qui permettra REFROIDISSEMENT le dégivrage du echangeur. Lorsque cette fonction est activée, le ventilateur intérieur s’arrête. REMARQUE Le fonctionnement en chauffage reprend après quelques Vérifier que l’unité est connecté à minutes en fonction de la température ambiante et de la l’alimentation électrique. -
Página 35: Reglage De La Vitesse Du Ventilateur
PROGRAMME TURBO REGLAGE DE LA VITESSE DU VENTILATEUR AUTOMATIQUE Il est possible sélectionner le programme TURBO seulement pendant le mode de refroidissement ou chauffage, mais Mettre le sélecteur FAN SPEED (vitesse du ventilateur) pas pendant le mode automatique, déshumidification et en position . -
Página 36: Reglage Du Temporisateur
REGLAGE DU TEMPORISATEUR REMARQUES • Le volet se referme automatiquement quand l’appareil A) REGLAGE DE MISE EN MARCHE est mis hors tension. (ON) • Pendant le chauffage, la vitesse du ventilateur est basse et le volet reste en position horizontale jusqu’à ce que 1. -
Página 37: Conseils Pour Le Confort Et L'economie De L'energie
Panne: Le climatiseur émet des craquements. CONSEILS POUR LE CONFORT Cause possible: ET L’ECONOMIE DE L’ENERGIE 1. Pendant le fonctionnement, à la suite d’un changement de température les pièces en plastique de l’appareil se EVITER: dilatent ou se rétrécissent, ce qui provoque un léger ●... - Página 38 TABLEAU AUTODIAGNOSTIC...
-
Página 41: Comment Vider Le Condensat
COMMENT VIDER LE CONDENSAT L’humidité absorbée par l’unité est recueillie et vidée automatiquement, mais dans des conditions particulieres le condensât pourrait rester dans l’unité. Si vous prévoyez de ne pas utiliser le climatiseur pendant une longue période, il est nécessaire vider l’éventuel condensat en utilisant le bouchon de service placé... -
Página 42: Télécharger L'app Et Régler Apollo En Mode Wi-Fi
TÉLÉCHARGER L’APP ET RÉGLER APOLLO EN MODE Wi-Fi 1. Installez l’application TuyaSmart sur votre smartphone ou tablette en encadrant le code QR suivant à l’aide d’un lecteur de code QR (Alternativement, recherchez et installez l’application TuyaSmart dans l’App Store de votre smartphone ou tablette): 2. - Página 43 AVERTISSEMENT POUR L’ELIMINATION CORRECT DU PRODUIT AUX TERMES DE LA DIRECTIVE EUROPEENNE 2012/19/UE Au terme de son utilisation cet équipement ne doit pas être éliminé avec les ordures ménagères. Le produit doit être remis à l’un des centres de collecte sélective locaux ou auprès des revendeurs assurant ce service. Eliminer séparément un équipement électrique et électronique permet d’éviter des potentielles retombées négatives pour l’environnement et la santé...
- Página 44 INHALTSVERZEICHNIS SICHERHEITSANWWEISUNGEN WARNUNG LICHTEN BENUTZUNG DER FERNBEDIENUNG FERNBEDIENUNG KÜHLUNG HEIZUNG (WENN VERFÜGBAR) AUTOMATISCHER BETRIEB ENTFEUCHTUNG VENTILATION WAHL DER VENTILATOR-GESCHWINDIGKEIT NACHT-PROGRAMM TURBO PROGRAMM ECO-FUNKTION TIMER-EINSTELLUNG LUFTSTROM-EINSTELLUNG BETRIEBSWEISE OHNE FERNBEDIENUNG RATSCHLÄGE FÜR HÖCHSTEN KOMFORT UND NIEDRIGSTEN VERBRAUCH FESTSTELLUNG UND BEHEBUNG VON BETRIEBSSTÖRUNGEN WIE DIE KONDENSWASSER ZU ENTLEEREN PFLEGE UND WARTUNG APP-DOWNLOAD UND APOLLO-EINSTELLUNG IM Wi-Fi MODUS...
-
Página 45: Warnung Lichten
Dieses Klimagerät sollte von Kindern ab 8 Jahren und von Personen mit eingeschränkten körperlichen, ● sensoriellen und geistigen Fähigkeiten, Personen mit wenig Verfahrung und Kenntnis über dem Umgang mit dem Klimagerät bedient werden. Im Bedarfsfall sind solche Personen von einer verantwortlichen Person entsprechend zu überwachen oder einzuweisen, so dass, sie di auftretenden Gefahren vestehen konnen. -
Página 46: Benutzung Der Fernbedienung
Wenn Vorhänge, Türen oder andere Gegenstände das ● BENUTZUNG DER FERNBEDIENUNG Signal von der Fernbedienung zum Klimagerät blo- EINSETZEN DER BATTERIEN ckieren, kann das Klimagerät nicht über die Fernbe- Die Abdeckung auf der Rückseite der Fernbedienung ● dienung gesteuert werden. entfernen: drücken Sie leicht mit Ihrem Finger und Schütten Sie keine Flüssigkeit auf die Fernbedienung, ●... -
Página 47: Fernbedienung
FERNBEDIENUNG Velocità ventilatore ANZEIGE Betriebsweise Automatik Kuhlung Datenverkehrsbestatigung Entfeuchtung Ventilazione Temperaturanzeige Ventilation Sperren / Entsperren Timer Nacht - Programm Temperatursymbol Klappe Non reale, è sempre la temperatura ambiente TASTE ON/OFF (ein/aus) PULSANTE MODO DI FUNZIONAMENTO Drücken Sie die EIN / AUS-Taste, wenn D i e s e T a s t e d r ü... -
Página 48: Kühlung
In diesem Fall wird eine Schutz-Funktion aktiviert, die die KÜHLUNG Abtauung der Kondensatoreinheit erlaubt. Während dieser Funktion bleibt der Ventilator der Inneneinheit stehen. Je ANMERKUNG nach Raum-und Außentemperatur arbeitet das Gerät nach Nachprüfen, daß die Einheit an die einigen Minuten wieder. Stromversorgung verbunden ist. -
Página 49: Wahl Der Ventilator-Geschwindigkeit
WAHL DER VENTILATOR-GESCHWINDIGKEIT TURBO PROGRAMM AUTOMATIK Das TURBO Programm kann nur während Kühlung oder Mit der Taste FAN die Position “AUTO” eingeben. Heizung Betriebsweise und nicht während automatischer, Entfeuchtung und Ventilation Betriebsweise ausgewählt Der Mikroprozessor wird automatisch die Ventilator- werden. Das TURBO Programm ermöglicht die Geschwindigkeit kontrollieren. -
Página 50: Timer-Einstellung
TIMER - EINSTELLUNG ANMERKUNGEN • Beim Ausschalten des Geräts schließt sich die Klappe A) WIE DIE EINSCHALT- TIMER automatisch. EINZUSTELLEN IST (ON) • Während des Heizbetriebs ist die Gebläsedrehzahl 1. Drücken Sie im Standby-Modus zunächst sehr niedrig, und die Klappe befindet sich in die TIMER-Taste einmal, um auf der horizontalen Position, bis Warmluft aus dem Gerät zu strömen beginnt. -
Página 51: Ratschläge Für Höchsten Komfort Und Niedrigsten Verbrauch
Störung: Knackgeräusche werden vom Klimagerät gehört. RATSCHLÄGE FÜR HÖCHSTEN KOMFORT Mögliche Ursache: UND NIEDRIGSTEN VERBRAUCH 1. W ä h r e n d d e m B e t r i e b k ö n n e n p l ö t z l i c h e Temperaturwechsel eine Ausdehnung bzw. - Página 52 SELBSTDIAGNOSE TABELLE...
-
Página 55: Wie Die Kondenswasser Zu Entleeren
WIE DIE KONDENSWASSER ZU ENTLEEREN Das Klimagerät beseitigt die Luftfeuchte, die automatisch ablaufen lassen wird, aber auf besonderen Fälle könnte die Kondenswasser in dem Boden der Einheit bleiben. Jedes Mal sollen Sie die Einheit für einen längeren Zeitraum nicht benutzen, entleeren Sie das eventuelle Kondenswasser durch dem Dienstkappe, der sich unter dem Unterpanel der Einheit befindet: •... -
Página 56: App-Download Und Apollo-Einstellung Im Wi-Fi Modus
APP-DOWNLOAD UND APOLLO-EINSTELLUNG IM Wi-Fi MODUS 1. Installieren Sie die TuyaSmart-App auf Ihrem Smartphone oder Tablet, indem Sie den folgenden QR-Code mit einem QR-Code-Leser einrahmen (Alternativ können Sie die TuyaSmart-App im App Store Ihres Smartphones oder Tablets suchen und installieren): 2. - Página 57 HINWEIS FÜR DIE KORREKTE ENTSORGUNG DES PRODUKTS IN ÜBEREINSTIMMUNG MIT DER EUROPÄISCHEN RICHTLINIE 2012/19/EU Am Ende seiner Nutzzeit darf dieses Gerät nicht zusammen mit dem Hausmüll beseitigt werden. Es darf zu den örtlichen Sammelstellen oder zu den Fachhändlern, die einen Rücknahmeservice anbieten, gebracht werden.
-
Página 58: Normas De Seguridad
INDICE NORMAS DE SEGURIDAD LUZES DE SEÑALIZACIONES USO DEL MANDO A DISTANCIA MANDO A DISTANCIA REFRIGERACION CALEFACCION (SI DISPONIBLE) FUNCIONAMIENTO EN AUTOMATICO DESHUMIDIFICACION VENTILACION SELECCION DE LA VELOCIDAD DEL VENTILADOR PROGRAMA NOCTURNO PROGRAMA TURBO FUNCIÓN ECO REGULACION DEL TEMPORIZADOR AJUSTE DEL FLUJO DE AIRE FUNCIONAMIENTO SIN MANDO A DISTANCIA CONSEJOS PARA OBTENER MAXIMO CONFORT CON MINIMO CONSUMO PROBLEMAS DE FUNCIONAMIENTO, IDENTIFICACION Y SOLUCIONES... -
Página 59: Luzes De Señalizaciones
Este acondicionador está diseñado para ser utilizado por los niños de 8 años o más y personas con ● discapacidades físicas, sensoriales o mentales o que carezcan de la experiencia y el conocimiento necesarios, si han recibido la debida supervisión o capacitación para el uso del acondicionador por parte de una persona responsable de su seguridad y han entendido los posibles riesgos. -
Página 60: Uso Del Mando A Distancia
Si hay cortinas, puertas u otros objetos que bloquean ● USO DEL MANDO A DISTANCIA la señal del mando a distancia al acondicionador, el COMO COLOCAR LAS PILAS mando a distancia no puede controlar el acondiciona- Remover la tapa detrás del mando a distancia: presione ●... -
Página 61: Mando A Distancia
MANDO A DISTANCIA Velocidad del ventilador VISOR Modo de funcionamiento Automático Refrigeración Confirmación de la transmisión de los datos al acondicionador Deshumidificación Ventilación Indicación de Calefacción temperatura Bloqueo / desbloqueo Temporizador Programa nocturno Símbolo de temperatura Deflector No es real, siempre es temperatura ambiente PULSADOR MODO DE FUNCIONAMIENTO PULSADOR ON/OFF Presionar este pulsador para modificar... -
Página 62: Refrigeracion
Cuando esto sucede una función de protección es activada REFRIGERACIÓN que habilita la descongelación del intercambiador. Con esta función activada el ventilador interno se para. NOTA Después de unos minutos, el funcionamiento en modo Verificar que la unidad está conectada calefacción inicia de nuevo en relación con la temperatura a la alimentación eléctrica. -
Página 63: Seleccion De La Velocidad Del Ventilador
SELECCION DE LA VELOCIDAD DEL VENTILADOR PROGRAMA TURBO AUTOMÁTICO El programa TURBO puede ser seleccionado sólo durante el funcionamiento en refrigeración o calefacción y non durante Activar con el pulsador FAN la posición El microprocesador controlará automáticamente la el funcionamiento automático, en deshumidificación y velocidad del ventilador. -
Página 64: Regulacion Del Temporizador
REGULACION DEL TEMPORIZADOR NOTAS • El deflector se cierra automáticamente cuando el sistema A) CÓMO REGULAR EL TEMPORIZA- se apaga. DOR DE ENCENDIDO (ON) • Durante la función de calefacción, el ventilador funciona a baja velocidad y el deflector está en posición 1. -
Página 65: Consejos Para Obtener Maximo Confort Con Minimo Consumo
Problema: El acondicionador produce ligeros crujidos. CONSEJOS PARA OBTENER MAXIMO Posible causa: CONFORT CON MINIMO CONSUMO 1. En fase de calefacción o refrigeración las partes de plástico sufren dilataciones/contracciones que causan EVITAR: este fenómeno. Obstruir las rejillas de envío y de aspiración de la unidad; ●... -
Página 66: Tabla Autodiagnóstico
TABLA AUTODIAGNÓSTICO... -
Página 69: Como Descargar El Agua De Condensacion
COMO DESCARGAR EL AGUA DE CONDENSACION El acondicionador absorbe la humedad del aire y la descarga autónomamente, pero en condiciones particulares la condensación podría quedarse dentro de la unidad. Cuando se decide no utilizar el acondicionador por un largo período de tiempo, descargar la condensación eventual a través de la tapa de servicio situada debajo del panel inferior de la unidad: •... -
Página 70: Descarga De La App Y Configuración De Apollo En Modo Wi-Fi
DESCARGA DE LA APP Y CONFIGURACIÓN DE APOLLO EN MODO Wi-Fi 1. Instale la aplicación TuyaSmart en su smartphone o tableta enmarcando el siguiente código QR con un lector de códigos QR (Alternativamente, busque e instale la aplicación TuyaSmart en la tienda de aplicaciones de su smartphone o tableta): •... - Página 71 ADVERTENCIA PARA LA ELIMINACIÓN CORRECTA DEL PRODUCTO SEGÚN LA DIRECTIVA EUROPEA 2012/19/UE Al final de su vida útil, este equipo no debe eliminarse junto a los desechos domésticos. Debe entregarse a centros específicos de recogida diferenciada locales o a distribuidores que facilitan este servicio. Eliminar por separado un equipo eléctrico y electrónico significa evitar posibles consecuencias negativas para el medio ambiente y la salud derivadas de una eliminación inadecuada y permite reciclar los materiales que lo componen, obteniendo asi un ahorro importante de energía y recursos.
-
Página 72: Instruções De Segurança
INDICE INSTRUÇÕES DE SEGURANÇA LUZES DE SINALIZAÇÃO UTILIZAÇÃO DA UNIDADE DE CONTROLE REMOTO UNIDADE DE CONTROLE REMOTO ARREFECIMENTO AQUECIMENTO (SE DISPONÍVEL) OPERAÇÃO AUTOMÁTICA DESUMIDIFICAÇÃO VENTILAÇÃO AJUSTE DA VELOCIDADE DO VENTILADOR PROGRAMA NOTURNO PROGRAMA TURBO FUNÇÃO DE SECAGEM FUNÇÃO DE ECONOMIA DE ENERGIA AJUSTE DO TIMER AJUSTE DA DIREÇÃO DO FLUXO DE AR OPERAÇÃO SEM CONTROLE REMOTO... -
Página 73: Luzes De Sinalização
Este climatizador pode ser usado por meninos maiores de 8 anos e por pessoas com reduzidas capacidades ● físicas, sensoriais ou mentais, ou sem a necessária experiência e conhecimento, se há formação para a utilização do climatizador por uma pessoa responsável para suas segurança e se entendessem os possíveis siscos. -
Página 74: Utilização Da Unidade De Controle Remoto
Se houver cortinas, portas ou outros objetos que blo- ● UTILIZAÇÃO DA UNIDADE DE CONTROLE REMOTO queiem o sinal do controle remoto para o ar condicio- COLOCAÇÃO DAS PILHAS nado, o ar condicionado não poderá ser controlado Remover a tampa que está atrás do telecomando: ●... -
Página 75: Unidade De Controle Remoto
UNIDADE DE CONTROLE REMOTO Velocidad del ventilador VISOR Modos de operação Automatico Arrefecimento Confirma trasmissão de dados para o ar condicionado Desumificação Ventilação Indicação de Aquecimento temperatura Bloqueio / desbloqueio Temporizador Programa noturno Símbolo de temperatura Defletor Não é real, é sempre a temperatura ambiente BOTÃO SELECTOR DO MODO DE OPERAÇÃO BOTÃO ON/OFF Pressionar este botão para mudar o... -
Página 76: Arrefecimento
ARREFECIMENTO Quando isto acontece, uma adequada protecção vem activada e consente o descongelamento do trocador. NOTA Nestas situações, o ventilador na unidade interior para. A operação de aquecimento recomeça passados alguns Verifique se a unidade está ligada à minutos. Este intervalo varia ligeiramente dependendo rede da corrente elétrica. -
Página 77: Ajuste Da Velocidade Do Ventilador
AJUSTE DA VELOCIDADE DO VENTILADOR PROGRAMA TURBO AUTOMÁTICO O programa TURBO só pode ser selecionado durante Use o botão FAN para definir a posição “AUTOMÁTICO” o modo de arrefecimento ou aquecimento e não pode . Um microcomputador, no aparelho de ar ser selecionado no modo automático, desumidifição condicionado, controla a velocidade de ventilação quando e ventilação. -
Página 78: Ajuste Do Timer
AJUSTE DO TIMER NOTAS • O defletor fecha-se automaticamente quando o aparelho A) COMO AJUSTAR O TEMPORIZADOR está desligado. • Durante a operação de aquecimento, a velocidade do DE IGNIÇÃO (ON) ventilador pode ser muito baixa e o defletor estará na 1. -
Página 79: Sugestões Para Garantir O Máximo Conforto E O Mínimo Consumo
Defeito: Ouve-se estalido no aparelho de ar condicionado. SUGESTÕES PARA GARANTIR O MÁXIMO Possível causa: CONFORTO E O MÍNIMO CONSUMO 1. Durante a operação as partes plásticas podem expandir ou encolher devido à uma mudança súbita de NÃo faça: temperatura. Neste caso, pode-se ouvir um estalido. Bloquear a entrada e saída de ar do aparelho. - Página 80 TABELA AUTO-DIAGNÓSTICO...
-
Página 83: Como Esvaziar A Condensação Acumulada
COMO ESVAZIAR A CONDENSAÇÃO ACUMULADA A humidade extraída da unidade é recolhida e eliminada autonomamente embora, em determinadas situações, possa haver de qualquer modo alguma acumulação. Sempre que houver previsão de um período extenso de não funcionamento do aparelho, é necessário esvaziar a eventual condensação acumulada através da tampa de serviço próprio, sob o painel inferior da unidade: •... -
Página 84: Download Do Aplicativo E Configuração Apollo No Modo Wi-Fi
DOWNLOAD DO APLICATIVO E CONFIGURAÇÃO APOLLO NO MODO WI-FI 1. Instale o aplicativo TuyaSmart no seu smartphone ou tablet enquadrando o seguinte código QR usando um leitor de código QR (Como alternativa, pesquise e instale o aplicativo TuyaSmart na loja de aplicativos do seu smartphone ou tablet): •... - Página 85 ADVERTÊNCIA PARA A ELIMINAÇÃO CORRECTA DO PRODUTO NOS TERMOS DA DIRECTIVA EUROPÉIA 2012/19/UE No fim da sua vida útil, este equipamento não deve ser eliminado juntamente com o lixo doméstico. Deve ser depositado nos centros especializados de recolha diferenciada locais ou nos revendedores que forneçam este serviço.
-
Página 86: Leitfaden Zu Wi-Fi (Englisch / Italienisch)
Wi-Fi GUIDE (English / Italian) GUIDA Wi-Fi (Inglese / Italiano) GUIDE Wi-Fi (Anglais / Italien) LEITFADEN ZU Wi-Fi (Englisch / Italienisch) GUÍA Wi-Fi (Inglés / Italiano) GUIA DE Wi-Fi (Inglês / Italiano) - Página 87 CONNECT APOLLO TO TUYASMART APP 1. Click on 2. In the left bar select 3. In the right area select “” “Add device” “Large Home Appliance” “Air Conditioner” 4. After allowing the App to access the position according to the desired data, select the Wi-Fi network to which you want to connect Apollo and enter the...
- Página 88 5. After checking that the Wi-Fi light on Apollo is blinking 6. Wait for the pairing process between the Smartphone rapidly, click on “” and the unit Apollo to end successfully and click on “Done” “Confirm indicator rapidly blink” Once everything is set, the Wi-Fi light on the unit will remain fixed and the Smartphone can be used for all available functions.
- Página 89 USE APOLLO VIA TUYASMART APP Open the app and use the available controls for the unit Apollo. FIRST SCREEN AFTER THE HEATING MODE SETTING (HOT) TEMPERATURE SETTING CONNECTING PROCEDURE + and - FLAP POSITION FAN SPEED (AUTO)
- Página 90 COOLING MODE SETTING (COLD) FAN MODE SETTING (WIND) AUTOMATIC MODE SETTING (AUTO) UNIT IN STAND-BY TIMER: If you use the Timer to turn the unit on/off (Power ON/Power OFF) at the desired IT IS POSSIBLE TO SELECT THE hours and days, remember that the system works according to to the previous settings. TIMER...
- Página 91 ATTENTION: Once the timer is set, you can decide to activate or deactivate it, if necessary, or to delete the setting. ACTIVATE / DEACTIVATE CLICK ON THE TIME TO BE DELETED THEN CONFIRM CLICK HERE TO ENTER THE SPECIAL FUNCTIONS (SETTING) SPECIAL FUNCTIONS CORRISPONDENTI A TASTI TELECOMANDO:...
- Página 92 COLLEGAMENTO APOLLO ALL’APP TUYASMART 1. Premere su 2. Nella barra di sinistra selezionare 3. Nell’area di destra selezionare “Aggiungi dispositivo” “Grande elettrodomestico” “Condizionatore d’aria” 4. Dopo aver consentito all’App di accedere alla posizione secondo i criteri desiderati, selezionare la rete Wi-Fi a cui si desidera connettere Apollo e immettere la password della rete dove é...
- Página 93 5. Dopo aver verificato che la spia Wi-Fi su Apollo stia 6. Attendere che la procedura di collegamento tra lo Smartphone e l’unità Apollo termini con esito positivo lampeggiando più velocemente, cliccare su e cliccare su “Fine” “Conferma che l’indicatore led lampeggi velocemente” Una volta configurato il tutto, la spia Wi-Fi sull’unità...
- Página 94 UTILIZZARE APOLLO TRAMITE L’APP TUYASMART Aprire l’app ed utilizzare i comandi disponibili per l’unità Apollo. PRIMA SCHERMATA DOPO LA IMPOSTAZIONE MODO IMPOSTAZIONE TEMPERATURA PROCEDURA DI COLLEGAMENTO RISCALDAMENTO (HOT) + e - REGOLAZIONE FLAP VELOCITA’ VENTOLA (AUTO)
- Página 95 IMPOSTAZIONE MODO IMPOSTAZIONE MODO IMPOSTAZIONE MODO RAFFREDDAMENTO (COLD) VENTILAZIONE (WIND) AUTOMATICO (AUTO) UNITÀ IN STAND-BY TIMER: Se utilizzate il Timer per accendere/spegnere l’unità (Power ON/Power OFF) alle E’ POSSIBILE SELEZIONARE ore e giorni desiderati, ricordatevi che il sistema funzionerà in relazione alle impostazioni IL TIMER precedenti.
- Página 96 ATTENZIONE: Una volta impostato il timer, si può decidere di attivarlo o disattivarlo all’occorrenza oppure di eliminare l’impostazione. ATTIVA / DISATTIVA PREMI SULL’ORARIO DA CANCELLARE POI CONFERMA PREMERE QUI PER ACCEDERE FUNZIONI SPECIALI (SETTING) ALLE FUNZIONI SPECIALI CORRISPONDENTI A TASTI TELECOMANDO: SLEEP LIGHT TURBO...
- Página 97 Società a socio unico Via Alfeno Varo, 35 - 25020 Alfianello - BS - Italy Tel. +39 030 7285700 www.argoclima.com...
- Página 98 INSTALLATION INSTRUCTIONS MANUALE D’INSTALLAZIONE NOTICE D’INSTALLATION INSTALLATIONS- ANLEITUNGEN INSTRUCCIONES APOLLO DE INSTALACIÓN INSTRUÇÕES DE INSTALAÇÃO Air conditioner without outdoor unit Climatizzatore senza unità esterna Climatiseur sans unité extérieure Klimagerät ohne Ausseneinheit Acondicionador de aire sin unidad exterior Ar condicionado sem unidade externa 37.4255.192.02 01/2021...
- Página 99 CONTENTS 1 - Generalities ......... . .3 2 - Presentation .
-
Página 100: Operating Conditions
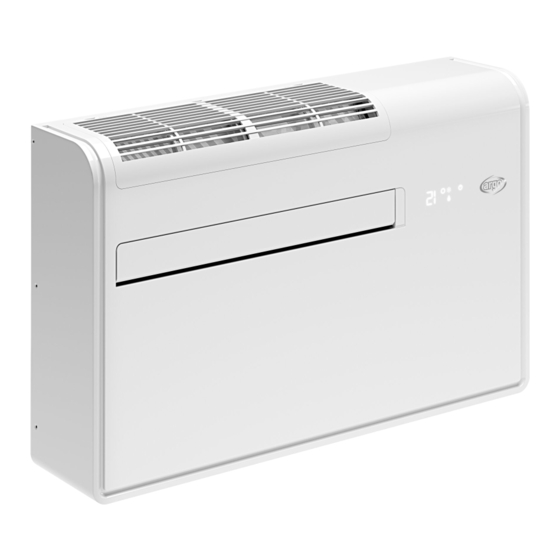
For safe installation and trouble-free operation, you must: • Carefully read this instruction booklet before beginning. • Follow each installation or repair step exactly as shown. • Observe all local, state and national electrical (and safety) codes. • Pay close attention to all warning and caution notices given in this manual. •... - Página 101 2 - PRESENTATION 2.1 - DESCRIPTION OF THE PARTS 1. Wireless remote control unit 2. Signaling LEDs and receiver 3. Supply air deflector 4. Air intake grille (removable) 5. Air filter 6. Electric cable with plug 7. Air inlet hole with fan 8.
-
Página 102: Accessories Supplied With The Unit
2.2 - SIGNALING LEDs 1. Receiver : it receives signals transmitted from the remote control. 2. COOLING LED: This LED lights up when the air conditioner is operating in cooling mode. 3. HEATING LED: This LED lights up when the air conditioner is operating in heating mode. -
Página 103: Installation Site Selection
2.4 - DIMENSIONS Unit: mm 3 - INSTALLATION 3.1 - INSTALLATION SITE SELECTION IMPORTANT NOTES AVOID • The wall must be a perimeter one. • Proximity to heat sources, exhaust fans. • Select a sufficiently strong wall to support the weight of •... -
Página 104: How To Install The Unit
Level CAUTION After the selection of the installation site, according Drilling template to the above mentioned points, be sure not to make holes in areas where electrical wiring or conduits are located, damaging them. Make sure that there are no obstacles in the conduits inside the wall affecting the free circulation of the external air. - Página 105 CAUTION SPECIAL CAUTION WHEN DRILLING AIR HOLES IN THE WALL • Drill the wall using the proper tools in order to facilitate your job and prevent damage. • The best tools for drilling large holes in walls are special drills called core borers with very high twisting torque and adjustable rotating speed depending on the diameter of the hole to be drilled.
- Página 106 - Fix the two external grids as follows: • Apply the adhesive insulating tape (Fig. 7) on the tubes’ wings at the wall. (Fig. 5) Insulating • Fit the small eyelet of the spring, with the long tape stem, on the cap pin (2 caps + 2 springs for each grid).
-
Página 107: Electrical Connection
- Hang up the unit at the anchoring brackets by simultaneously inserting the condensate discharge pipe into the wall hole. Lift it by holding it from the sides of the lower base. To facilitate the operation of fastening it to the bracket, tilt it slightly towards you. -
Página 108: Electrical Wiring Diagram
4 - ELECTRICAL WIRING DIAGRAM Colour of the wires Black Brown Blue Green White Yellow... - Página 109 INDICE 1 - Generalità ..........3 2 - Presentazione .
-
Página 110: Generalità
Per un’installazione sicura e un buon funzionamento è necessario: • Leggere attentamente questo manuale di istruzioni prima di iniziare. • Seguire tutte le istruzioni di installazione o riparazione esattamente come mostrato. • Osservare tutte le norme elettriche (e di sicurezza) locali, statali e nazionali. •... -
Página 111: Presentazione
2 - PRESENTAZIONE 2.1 - DESCRIZIONE DELLE PARTI 1. Telecomando a raggi infrarossi 2. Spie di segnalazione e ricevitore 3. Deflettore mandata aria 4. Griglia aspirazione aria (rimovibile) 5. Filtro Aria 6. Cavo elettrico con spina 7. Foro entrata dell’aria con ventilatore 8. - Página 112 2.2 - SPIE DI SEGNALAZIONE 1. Ricevitore: riceve i segnali inviati dal telecomando. 2. S p i a R A F F R E D D A M E N T O : Q u e s t a s p i a s i accende quando il climatizzatore sta funzionando in raffreddamento.
-
Página 113: Dimensioni E Peso
2.4 - DIMENSIONI E PESO Unit: mm 3 - INSTALLAZIONE 3.1 - SCELTA DEL LUOGO DI INSTALLAZIONE NOTE IMPORTANTI EVITARE • La parete deve essere perimetrale. • La vicinanza a fonti di calore o ad aree interessate da • Verificare che la parete scelta sia sufficientemente espulsioni di aria calda. - Página 114 Livella PRECAUZIONE Dopo aver scelto, secondo i criteri elencati, la Dima di posizione per l’installazione, assicurarsi che nei punti foratura in cui verranno praticati i fori non vi siano strutture o impianti (tubazioni idrauliche, collegamenti elettrici) che potrebbero essere danneggiati. Controllare inoltre che non via siano impedimenti alla libera circolazione dell’aria esterna attraverso i condotti nella parete.
- Página 115 PRECAUZIONE PRECAUZIONI PARTICOLARI DURANTE L’ESECUZIONE DEI FORI PER L’ARIA NEL MURO • Forare il muro utilizzando gli strumenti adeguati per facilitare il lavoro e prevenire danni. • I migliori strumenti per eseguire fori di grandi dimensioni nelle pareti sono trapani speciali chiamati carotatori con coppia di torsione molto elevata e velocità...
- Página 116 - Fissare le due griglie esterne, come segue: • Applicare il nastro isolante adesivo (Fig. 7) sopra le alette del tubo al muro. (Fig. 5) Nastro • Infi lare l’occhiello più piccolo della molla sul tappo isolante in plastica della griglia (2 tappi + 2 molle per ogni griglia).
-
Página 117: Collegamento Elettrico
- Appendere l’unità alle staffe di appensione inserendo contemporaneamente il tubo di scarico condensa nel foro del muro. Sollevare l’unità tenendola dai lati del basamento. Per facilitare l’operazione di fissaggio alla staffa, inclinarla leggermente verso di sé. Per effettuare il collegamento elettrico e fissare il tubo di scarico, posizionare un cuneo tra il climatizzatore e la parete. -
Página 118: Schema Elettrico
4 - SCHEMA ELETTRICO Colori dei cavi Nero Marrone Verde Rosso Bianco Giallo... - Página 119 SOMMAIRE 1 - Généralités ......... . .3 2 - Présentation .
-
Página 120: Conditions D'utilisation
Pour effectuer une installation sûre et obtenir un fonctionnement sans problème, il vous faut: • Lire attentivement cette brochure d’information avant de commencer. • Respecter les consignes à chaque étape de l’installation ou de la réparation. • Respecter toutes les réglementations électriques (et de sécurité) locales, régionales et nationales. •... - Página 121 2 - PRÉSENTATION 2.1 - DESCRIPTION DES PIÈCES 1. Télécommande à infrarouge 2. Voyants de signalisation et récepteur 3. Déflecteur de soufflage d’air 4. Grille d’aspiration d’air inférieure (amovible) 5. Filtre à air 6. Câble électrique avec fiche 7. Trou entrée de l’air avec ventilateur 8.
-
Página 122: Accessoires Livres Avec L'unite
2.2 - VOYANTS DE SIGNALISATION 1. Récepteur : reçoit les signaux de la télécommande. 2. Voyant REFROIDISSEMENT: Ce voyant s’allume lorsque le climatiseur fonctionne en mode refroidissement. 3. Voyant CHAUFFAGE: Ce voyant s’allume lorsque le climatiseur fonctionne en mode chauffage. 4. -
Página 123: Dimensions Et Poids
2.4 - DIMENSIONS ET POIDS Unit: mm 3 - INSTALLATION 3.1 - EMPLACEMENT D’INSTALLATION EVITARE REMARQUES IMPORTANTES ÉVITEZ • La paroi doit être périmétrale. • La proximité de sources de chaleur, ventilateurs • Assurez-vous que la paroi choisie soit suffisamment d’évacuation, etc. - Página 124 Niveau PRUDENCE ! Après avoir choisi, selon les critères ci-dessus Support de énumérés, l’emplacement d’installation, assurez-vous perçage que dans la paroi où vous ferez les trous, il n’y a pas des câbles électriques ou des conduits qui pourraient être endommagés. Vérifier aussi qu’il n’y est pas d’obstacles à...
- Página 125 PRUDENCE ! PRÉCAUTIONS SPÉCIALES PENDANT L’EXÉCUTION DES TROUS POUR L’AIR DANS LE MUR • Percer le mur à l’aide des outils appropriés pour faciliter le travail et éviter les dommages. • Les meilleurs outils pour faire de grands trous dans les murs sont des forets spéciaux appelés carottiers avec un couple très élevé...
- Página 126 - Fixez les deux grilles externes, comme suit: • Appliquer le ruban isolant adhésif (Fig.7) sur les languettes du tuyau au mur. (Fig. 5) Ruban • Insérez l’œillet le plus petit du ressort sur le capu- isolant chon en plastique de la grille (2 capuchons + 2 res- sorts pour chaque grille).
-
Página 127: Branchement Électrique
- Accrocher l’unité aux supports en insérant simultanément le tuyau de vidange de condensât dans le trou du mur. Soulevez l’unité en la tenant par les côtés de la base. Pour faciliter l’opération de fixation au support, inclinez- la légèrement vers vous. Pour effectuer le raccordement électrique et fixer le tuyau de vidange, placez un coin entre le climatiseur et le mur. -
Página 128: Schéma Électrique
4 - SCHÉMA ÉLECTRIQUE Colori dei cavi Noir Marron Bleu Vert Rouge Blanc Jaune... - Página 129 INHALTSVERZEICHNIS 1 - Allgemeines ......... . .3 2 - Präsentation .
- Página 130 Für eine sichere Installation und einen sorgenfreien Betrieb müssen Sie: • Diese Anleitung vor Arbeitsbeginn aufmerksam lesen. • Jeden Installations- oder Reparaturschritt entsprechend der Beschreibung ausführen. • Alle örtlichen, regionalen und landesweiten Vorschriften zum Umgang mit Elektrizität (und für die Sicherheit) befolgen. •...
- Página 131 2 - PRESENTAZIONE 2.1 - BESCHREIBUNG DER TEILEN 1. Fernbedienung mit infrarot-Signalen 2. Anzeigen und Empfänger 3. Luftzufuhr Klappe 4. Luftansauggrill (abnehmbar) 5. Luftfilter 6. Stromkabel mit Stecker 7. Zuluft Öffnung mit Ventilator 8. Abluft Öffnung 9. Kondenswasserablauf 10. Wartungsdeckel für Kondenswasserablauf 11.
-
Página 132: Mitgeliefertes Zubehör
2.2 - WARNUNG LICHTEN 1. Empfänger: empfängt die von der Fernbedienung ausgesandten Signale. 2. KÜHLUNG Licht: Dieses Licht leuchtet auf, wenn sich das Klimagerät im Kühlungsbetrieb befindet. 3. HEIZUNG Licht: Dieses Licht leuchtet auf, wenn sich das Klimagerät im Heizungsbetrieb befindet. 4. -
Página 133: Abmessungen Und Gewicht
2.4 - ABMESSUNGEN UND GEWICHT Unit: mm 3 - INSTALLATION 3.1 - AUFSTELLUNGSORT WICHTIGE HINWEISE • Die Wand soll eine Außenwand sein. • Versichern Sie sich, daß die gewählte Wand das Gewicht VERMEIDEN SIE der Einheit tragen kann. • Wärmequellen, Sauggebläse. •... -
Página 134: Installation Der Einheit
Waage VORSICHT Nachdem Sie das Aufstellungsort gewählt haben, Bohrschablone indem Sie die vorstehende Punkte folgen, versichern Sie sich, daß kein Loch im Bereich mit elektrischen Kabeln und Rohrkabeln gebohrt wird. Prüfen Sie auch, daß keine Hindernisse den Aussenluftumlauf in der Plastikröhre in der Wand unterbrechen können. - Página 135 VORSICHT BESONDERE VORSICHTSMASSNAHMEN BEI DER DURCHFÜHRUNG VON LUFTLÖCHERN IN DER WAND • Bohren Sie die Wand mit den entsprechenden Werkzeugen, um die Arbeit zu erleichtern und Beschädigungen zu vermeiden. • Die besten Werkzeuge zum Bohren großer Löcher in Wänden sind Spezialbohrer, sogenannte Kernbohrer mit sehr hohem Drehmoment und einstellbarer Drehzahl, abhängig vom Durchmesser des zu bohrenden Lochs.
- Página 136 - Befestigen Sie die beiden äußeren Gitter wie folgt: • Bringen Sie das selbstklebende Isolierband (Abb. 7) auf die Flügel der Rohre an der Wand an. (Abb. 5) Isolier- • Setzen Sie die kleinere Öse der Feder auf die Plas- band tikkappe des Gitters (2 Kappe + 2 Federn für jedes Gitter).
-
Página 137: Elektrischer Anschluss
- Hängen Sie die Einheit an die Wandbefestigungswinkel, indem Sie gleichzeitig das Kondensatablaufrohr in die Wandöffnung einführen. Heben Sie die Einheit an den Seiten des Sockels an. Zur Erleichterung der Befestigung, kippen Sie sie leicht zu Ihnen. Um die elektrische Verbindung herzustellen und das Abflussrohr zu befestigen, platzieren Sie einen Keil zwischen der Einheit und der Wand. - Página 138 4 - ELEKTRISCHE SCHALTPLAN Kabelfarben Schwarz Braun Blau Grün Weiß Gelb...
- Página 139 INDICE 1 - Generalidades .........3 2 - Presentación .
-
Página 140: Generalidades
Para una instalación segura y un buen funcionamiento es necesario: • Leer atentamente este manual de instrucciones antes de comenzar. • Seguir con exactitud todas las instrucciones de instalación y reparación. • Observar todas las normas eléctricas (y de seguridad) locales, regionales y nacionales. •... -
Página 141: Presentación 2.1 - Descripción De Las Partes
2 - PRESENTACIÓN 2.1 - DESCRIPCIÓN DE LAS PARTES 1. Mando a distancia de rayos infrarrojos 2. Luzes de señalizaciones y receptor 3. Deflector salida aire 4. Rejilla aspiración aire inferior (extraíble) 5. Filtro del aire 6. Cable eléctrico con clavija 7. -
Página 142: Material Suministrado
2.2 - LUZES DE SEÑALIZACIONES 1. Receptor: recibe las señales enviadas por el mando a distancia. 2. Luz REFRIGERACIÓN: Se enciende cuando el acondicionador está funcionando en modo de refrigeración. 3. Luz CALEFACCIÓN: Se enciende cuando el acondicionador está funcionando en modo de calefacción. -
Página 143: Dimensiones Y Peso
2.4 - DIMENSIONES Y PESO Unit: mm 3 - INSTALACIÓN 3.1 - LUGAR DE INSTALACIÓN NOTAS IMPORTANTES EVITAR • La pared debe comunicar con el exterior. • Zonas expuestas a fuentes de calor y corrientes de aire • Controlar que la pared de apoyo es lo suficientemente caliente. -
Página 144: Cómo Instalar La Unidad
Nivela PRECAUCIÓN Una vez elegida la posición para la instalación, teniendo Plantilla de perforación en cuenta los criterios antes expuestos, asegurarse de que no hayan partes eléctricas o instalaciones en las zonas donde se realizaran los agujeros. Controlar ademas que no hayan obstáculos a la libre circulación del aire exterior a través de los tubos en la pared. -
Página 145: Precauciones Especiales Durante La Ejecución De Los Agujeros Para El Aire En La Pared
PRECAUCIÓN PRECAUCIONES ESPECIALES DURANTE LA EJECUCIÓN DE LOS AGUJEROS PARA EL AIRE EN LA PARED • Perfore la pared con las herramientas adecuadas para facilitar el trabajo y evitar daños. • Las mejores herramientas para hacer agujeros grandes en las paredes son los taladros especiales llamados taladros de núcleo con un par de torsión muy alto y una velocidad de rotación ajustable de acuerdo con el diámetro del agujero que se perforará. -
Página 146: Preparación Para La Descarga Condensa De La Condensación
- Sujete las dos rejillas externas, de la siguiente manera: • Aplicar la cinta aislante adhesiva (Fig. 7) sobre las pestañas del tubo a la pared. (Fig. 5) Cinta • Inserte el ojal más pequeño del resorte en la tapa aislante de plástico de la rejilla (2 tapas + 2 resortes para cada rejilla). -
Página 147: Conexión Eléctrica
- Colgar la unidad a la placas de soporte insertando simultáneamente el tubo de drenaje de condensación en el orificio de la pared. Levante la unidad sosteniéndola por los lados de la base. Para facilitar la operación de fijación al soporte, inclínelo ligeramente hacia usted. -
Página 148: Esquema Eléctrico
4 - ESQUEMA ELÉCTRICO Colori dei cavi Negro Marrón Azul Verde Rojo Blanco Amarillo... - Página 149 INDICE 1 - Generalidades .........3 2 - Apresentação .
-
Página 150: Condições De Utilização
Para uma instalação segura e um bom funcionamento é necessário: • Ler atenciosamente este manual de instruções antes de iniciar. • Seguir todas as instruções de instalação ou conserto exatamente como indicado. • Observar todas as normas elétricas (e de segurança) locais, estaduais e nacionais. •... - Página 151 2 - APRESENTAÇÃO 2.1 - DESCRIÇÃO DAS PARTES 1. Mando a distancia de rayos infrarrojos 2. Luzes de señalizaciones e receptor 3. Deflector salida aire 4. Grelha inferior para aspiração de ar (removível) 5. Filtro aire 6. Cable eléctrico con clavija 7.
-
Página 152: Acessórios Fornecidos Com A Unidade
2.2 - LUZES DE SINALIZAÇÃO 1. Receptor : recebe os sinais enviados pelo controle remoto. 2. Luz ARREFECIMENTO: Esta luz acende-se quando o ar condicionado está operando no modo de arrefecimento. 3. Luz AQUECIMENTO: Esta luz acende-se quando o ar condicionado está... -
Página 153: Dimensões E Peso
2.4 - DIMENSÕES E PESO Unit: mm 3 - INSTALAÇÃO 3.1 - SELECÇÃO DA POSIÇÃO DE INSTALAÇÃO NOTAS IMPORTANTES EVITE • A parede deve ser um muro exterior. • Fontes de calor, ventoinhas de escape de ar quente. • Certifique-se de que o muro seleccionado tem robustez •... -
Página 154: Como Instalar A Unidade
Nivel PRECAUÇÃO Depois de ter escolhido a posição de instalação de Molde de acordo com os critérios supracitados, assegure-se perfuração de que nos pontos onde os furos serão realizados não passem canos de água nem cabos eléctricos, porque podem danificar-se. Verifique se há... - Página 155 PRECAUÇÃO PRECAUÇÕES ESPECIAIS DURANTE A EXECUÇÃO DOS FUROS PARA O AR NA PAREDE • Perfure a parede usando as ferramentas apropriadas para facilitar o trabalho e evitar danos. • As melhores ferramentas para fazer grandes furos nas paredes são as brocas especiais, denominadas brocas de núcleo com torque de torção e velocidade de rotação muito altos, ajustáveis de acordo com o diâmetro do furo a ser perfurado.
- Página 156 - Prenda as duas grades externas, como a seguir: • Aplique a fi ta adesiva (Fig. 7) acima das abas do tubo na parede. (Fig. 5) Fita • Insira o olhal menor da mola na tampa plástica da adesiva grelha (2 tampas + 2 molas para cada grelha). Fig. 8 •...
-
Página 157: Ligação Eléctrica
- P e n d u r e a u n i d a d e n o s s u p o r t e s i n s e r i n d o simultaneamente o tubo de drenagem de condensação no orifício da parede. -
Página 158: Esquema Elétrico
4 - ESQUEMA ELÉTRICO Cores dos cabos Preto Marrom Azul Verde Vermelho Branco Amarelo... - Página 159 Società a socio unico Via Alfeno Varo, 35 - 25020 Alfianello - BS - Italy Tel. +39 030 7285700 www.argoclima.com...
- Página 160 Tipo di prodotti : CLIMATIZZATORE MONOBLOCCO SENZA UNITA’ ESTERNA Marchio : ARGO Modello/i : APOLLO 12HP è/sono conforme/i ai seguenti Direttive e Regolamenti UE: • Direttiva RED 2014/53/UE • Direttiva RoHS 2 2011/65/+ UE emend. All. II UE 863/2015 (RoHS 3) •...