Tabla de contenido
Publicidad
Idiomas disponibles
Idiomas disponibles
Enlaces rápidos
USER MANUAL / MODE D'EMPLOI / MANUAL DEL USUARIO
BATTERY CHARGER 4.3A / CHARGEUR DE BATTERIE 4.3A / CARGADOR DE BATERÍAS 4.3A
5 YEAR WARRANTY / GARANTIE DE 5 ANS / GARANTÍA DE 5 AÑOS
FOR ALL 12V TYPES OF LEAD-ACID BATTERIES FULLY AUTOMATIC
POUR TOUTES LES BATTERIES AU PLOMB 12V ENTIÈREMENT AUTOMATIQUES
PARA TODO TIPO DE BATERÍAS DE PLOMO DE 12V TOTALMENTE AUTOMÁTICO
Publicidad
Tabla de contenido

Manuales relacionados para CTEK Barret-Jackson


Resumen de contenidos para CTEK Barret-Jackson
- Página 1 USER MANUAL / MODE D'EMPLOI / MANUAL DEL USUARIO BATTERY CHARGER 4.3A / CHARGEUR DE BATTERIE 4.3A / CARGADOR DE BATERÍAS 4.3A 5 YEAR WARRANTY / GARANTIE DE 5 ANS / GARANTÍA DE 5 AÑOS FOR ALL 12V TYPES OF LEAD-ACID BATTERIES FULLY AUTOMATIC POUR TOUTES LES BATTERIES AU PLOMB 12V ENTIÈREMENT AUTOMATIQUES PARA TODO TIPO DE BATERÍAS DE PLOMO DE 12V TOTALMENTE AUTOMÁTICO...
-
Página 2: Important Safety Instructions
1065. 2. Do not expose charger to rain or snow. 3. Use of an attachment not recommended or sold by CTEK may result in a risk of fire, electric shock or injury to CHARGE CABLE persons. -
Página 3: Personal Precautions
REASON, IT IS OF OUTMOST enough for AC ampere rating of charger as specified in “RECOMMENDED MINIMUM AWG SIZE FOR AC IMPORTANCE THAT YOU EXTENSION CORDS”. 6. Do not operate charger with damaged cord or plug – FOLLOW THE INSTRUCTIONS return the charger to the retailer. -
Página 4: Charger Location
f) Be extra cautious to reduce risk of dropping a metal tool d) Add distilled water in each cell until battery acid reaches onto battery. It might spark or short-circuit battery or level specified by battery manufacturer. Do not overfill. other electrical part that may cause explosion. -
Página 5: Dc Connection Precautions
DC CONNECTION d) Determine which post of battery is grounded (connected) to the chassis. If negative post is grounded to the chassis PRECAUTIONS (as in most vehicles) see (e). If positive post is grounded to the chassis, see (f). a) Connect and disconnect dc output clips only after setting e) For Negative-grounded vehicle, connect POSITIVE any charger switches to “off”... -
Página 6: Important Safety Information
CAUSE BATTERY EXPLOSION. • Check the charger cables prior to use. Ensure that no cracks have occurred in the cables or in the bend protec- TO REDUCE RISK OF tion. A charger with damaged cables must be returned to the retailer. A SPARK NEAR BATTERY: • Ensure that the cabling does not jam or comes into contact with hot surfaces or sharp edges. - Página 7 CONNECT AND • This appliance is not designed for use by young children or people who cannot read or understand the manual unless DISCONNECT THE they are under the supervision of a responsible person to ensure that they can use the battery charger safely. Store CHARGER TO A BATTERY and use the battery charger out of the reach of children, and ensure that children cannot play with the charger.
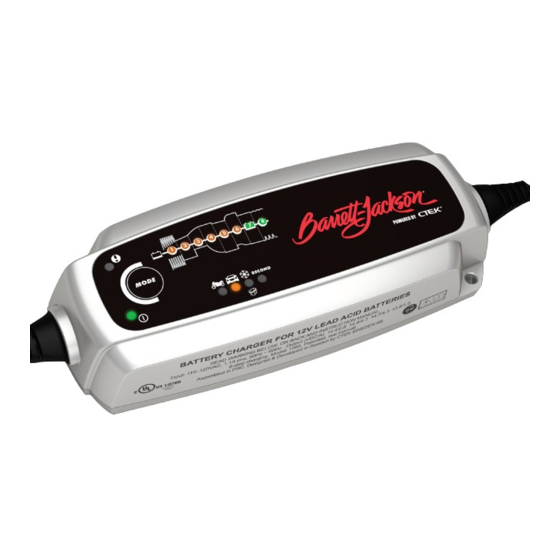
- Página 8 OPERATING INSTRUCTIONS 1. Connect the charger to the battery. 2. Connect the charger to the wall socket. The power lamp will indicate that the mains cable is connected to the wall socket. The error lamp will indicate if the battery clamps are incorrectly connected. The reverse polarity protection will ensure that the battery or charger will not be damaged.
-
Página 9: Charging Programs
CHARGING PROGRAMS Settings are made by pressing the MODE-button. After about two seconds the charger activates the selected program. The selected program will be restarted next time the charger is connected. THE TABLE ExPLAINS THE DIFFERENT CHARGING PROGRAMS: PROGRAM BATTERY SIzE (AH) ExPLANATION TEMP RANGE Small battery program -4ºF–122ºF... - Página 10 DESULPHATION SOFT START BULK ABSORPTION ANALYSE RECOND FLOAT PULSE 15.8V 0.8A until 12.6V Increasing volt- Declining cur- Checks if volt- 13.6V 12.7V–14.4V age to 14.4V. rent. 14.4V age drops to 0.8A 0.8–0.4A 0.8A 15.8V 4.3A until 12.6V Increasing volt- Declining cur- Checks if volt- 13.6V 12.7V–14.4V...
- Página 11 STEP 1 DESULFATION STEP 8 PULSE Detects sulfated batteries. Pulsing current and voltage, Maintaining the battery at 95–100% capacity. The charger removes sulfate from the lead plates of the battery restoring monitors the battery voltage and gives a pulse when neces- the battery capacity.
-
Página 12: Maintenance Instructions
ERROR LAMP MAINTENANCE INSTRUCTIONS If the error lamp is lit, check the following: 1. Is the chargers positive lead connected The battery charger model 1065 is maintenance-free. The to the battery’s positive pole? charger must not be opened; doing so will invalidate the warranty. -
Página 13: Technical Specifications
TECHNICAL SPECIFICATIONS Model number 1065 Rated Voltage AC 110–120VAC, 50–60Hz Charging voltage 14.4V, 14.7V, 15.8V Min battery voltage 2.0V Charging current 4.3A Current, mains 1.1A rms (at full charging current) Back current drain* <1Ah/month Ripple** <4% of rated current Ambient temperature -4°F to +122°F (-20˚C to +50˚C), output power is reduced automatically at high temperatures Charger type Eight step, fully automatic charging cycle Battery types... - Página 14 RCD 000911839 CTM 405811 mentioned above, i.e. no consequential damages. Moreover, US7005832B2 RCD 081418 CTM 830545751 pending CTEK Power Inc is not obligated to any other warranty other EP1716626 pending RCD 001119911-0001 CTM 1475420 pending than this warranty. SE526631 RCD 001119911-0002...
- Página 15 SUPPORT CTEK support is available at www.smartercharger.com, via e-mail at support@smartercharger.com or by reaching us at 1-800-941-7611. To view or download the latest version of this product manual visit www.smartercharger.com/manuals. 14 • EN...
-
Página 16: Consignes De Sécurité Importantes
MISE EN GARDE : Ce produit contient des substances de batterie à la pointe de la technologie proposés par chimiques reconnues par l'État de Californie comme étant CTEK Sweden AB. Le chargeur optimise la durée de vie de la cancérigènes ou toxiques pour la reproduction. batterie. - Página 17 BATTERIES PRODUISENT DES celles du chargeur; b) la rallonge doit être correctement câblée et en bon état; c) le calibre des fils doit être GAZ EXPLOSIFS. IL EST DONC suffisant pour l'intensité nominale CA (ampères) du chargeur, comme indiqué dans le tableau « CALIBRE ESSENTIEL DE RESPECTER MINIMUM RECOMMANDÉ...
-
Página 18: Avant De Charger Une Batterie
AVANT DE CHARGER UNE d) En cas de projections d'acide sur la peau ou les vêtements, rincer immédiatement à l'eau savonneuse. BATTERIE En cas de projection d'acide dans les yeux, rincer immédiatement à l'eau courante froide pendant un a) Si nécessaire, retirer la batterie à charger du véhicule en minimum de 10 minutes et consulter immédiatement un détachant toujours dans un premier temps la borne de médecin. -
Página 19: Emplacement Du Chargeur
EMPLACEMENT DU SUIVRE CES ÉTAPES POUR CHARGEUR LA CHARGE D'UNE BATTERIE a) Installer le chargeur le plus loin possible de la batterie, INSTALLÉE DANS UN en fonction de la longueur des câbles. VÉHICULE. UNE ÉTINCELLE b) Ne jamais placer le chargeur directement au-dessus de la batterie en cours de charge. - Página 20 SUIVRE CES ÉTAPES POUR d) Déterminer quelle borne est mise à la masse (connectée au châssis). Si c'est la borne négative (comme dans LA CHARGE D'UNE BATTERIE la plupart des véhicules), aller à (e). Si c'est la borne positive, aller à (f). INSTALLÉE HORS D'UN e) Sur un véhicule à...
- Página 21 e) Pour déconnecter le chargeur, procéder dans l'ordre fréquentes persistent toujours. Ne pas laisser une batterie inverse du branchement et couper la première connexion en cours de charge sans surveillance pendant une période en se tenant aussi loin que possible de la batterie. de temps prolongée.
- Página 22 CALIBRE MINIMUM BRANCHEMENT ET RECOMMANDÉ POUR LES DÉBRANCHEMENT DU CORDONS DE RALLONGE CHARGEUR ET DE LA BATTERIE LONGUEUR DU CALIBRE MINIMUM CORDON (AWG) PIEDS (M) 25 (7,6) 50 (15,2) 100 (30,5) Comfort 150 (45,6) Connect – – Comfort Connect Comfort FR • 7...
-
Página 23: Directives D'utilisation
DIRECTIVES D'UTILISATION 1. Brancher le chargeur à la batterie. 2. Brancher le chargeur à la prise murale. Le voyant d'alimentation indiquera que le cordon d'alimentation est branché à la prise murale. Si le témoin d'anomalie se met en marche, cela indique que les pinces de la batterie ne sont pas fixées correctement. La protection d'inversion de polarité... -
Página 24: Programmes De Charge
PROGRAMMES DE CHARGE Pour choisir un réglage, appuyer sur le bouton MODE. Le chargeur active le programme sélectionné après deux secondes environ. Le programme sélectionné se mettra en marche lors du branchement du chargeur la fois suivante. LE TABLEAU ExPLIqUE LES DIFFÉRENTS PROGRAMMES DE CHARGE : CAPACITÉ... - Página 25 DESULPHATION SOFT START BULK ABSORPTION ANALYSE RECOND FLOAT PULSE 15,8 V 0,8 A jusqu'à Augmentation Réduction Vérifie si la 13,6 V 12,7 V–14,4 V 12,6 V de la tension à de l'intensité. tension baisse 0,8 A 0,8-0,4 A 14,4 V. 0,8 A 14,4 V à 12 V 15,8 V 4,3 A jusqu'à Augmentation Réduction Vérifie si la 13,6 V...
- Página 26 ÉTAPE 1 DESULFATATION ÉTAPE 8 PULSE Détecte les batteries sulfatées. Impulsion de courant et de Maintient la batterie à 95 - 100 % de sa capacité. Le tension, élimine le sulfate des plaques de plomb de la batterie chargeur surveille la tension de la batterie et envoie au et restaure sa capacité.
-
Página 27: Consignes D'entretien
TÉMOIN D'ANOMALIE CONSIGNES D'ENTRETIEN Si le témoin d'anomalie s'allume, vérifier ce qui suit : Le chargeur modèle 1065 ne requiert aucun entretien particulier. Le démontage du chargeur n'est pas autorisé 1. Le fil positif du chargeur est-il branché et entraîne l'annulation de la garantie. Si le cordon sur la borne positive de la batterie? d'alimentation est endommagé, le chargeur doit être retourné... -
Página 28: Spécifications Techniques
SPÉCIFICATIONS TECHNIqUES Numéro de modèle 1065 Tension CA nominale 110–120 VCA, 50–60 Hz Tension de charge 14,4 V, 14,7 V, 15,8 V Tension minimum de la 2,0 V batterie Intensité de charge 4,3 A Intensité du secteur 1,1 A rms (pour la pleine intensité de charge) Consommation par <1Ah/mois retour de courant* : Ondulation**... -
Página 29: Garantie Limitée
été ouvert, manipulé avec négligence ou réparé par US7638974B2 RCD 081244 V28573IP00 EP1903658 pending RCD 321198 CTM 1082141 pending un intervenant autre que CTEK Power Inc ou ses représentants EP09180286.8 pending RCD 321197 CTM 2010004118 pending agréés. CTEK Power Inc n'offre aucune autre garantie que US12/646405 pending ZL 200830120184.0 CTM 4-2010-500516 pending cette garantie limitée et décline toute responsabilité... -
Página 30: Service À La Clientèle
SERVICE À LA CLIENTÈLE Soutien CTEK est disponible à www.smartercharger. com, via e-mail à support@smartercharger.com ou en communiquant avec nous au 1-800-941-7611. Pour consulter ou télécharger la dernière version de ce produit manuel visite www.smartercharger.com/manuals. FR • 15... - Página 31 16 • FR...
-
Página 32: Introducción
(flotante y por pulsos). Forma parte de la familia de PROPUESTA 65 DE CALIFORNIA cargadores de baterías de CTEK Sweden AB. Estos cargado- ADVERTENCIA: este producto contiene sustancias químicas res representan lo más avanzado en tecnología de carga de que el Estado de California reconoce como causantes de baterías. -
Página 33: Precauciones Personales
GENERAN GASES del cargador; b) El cable alargador está correctamente conectado y en buenas condiciones eléctricas; y c) El EXPLOSIVOS DURANTE calibre de los cables es suficientemente grueso para la corriente alterna nominal del cargador, según se espe- EL FUNCIONAMIENTO cifica en “CALIBRE AWG MÍNIMO RECOMENDADO PARA ALARGADORES”. -
Página 34: Preparación De La Carga
PREPARACIÓN DE LA CARGA c) Lleve en todo momento protección completa para los ojos y la ropa. Evite tocarse los ojos mientras trabaja a) Si fuera necesario retirar la batería de un vehículo para cerca de una batería. cargarla, siempre quite primero el terminal de tierra de d) Si el ácido de la batería entrase en contacto con su piel la batería. -
Página 35: Medidas De Seguridad Para La Conexión De Cc
HACERLA EXPLOTAR. PARA b) Nunca coloque el cargador directamente sobre la bate- ría que está cargando; los gases de la batería podrían REDUCIR EL RIESGO DE corroer y estropear el cargador. c) Nunca permita que gotee el ácido de la batería mientras CHISPAS CERCA DE LA lee el peso específico del electrólito o rellena la batería. -
Página 36: Una Chispa Cerca De La Batería Podría Hacerla
EXPLOTAR. PARA REDUCIR EL a piezas de chapa de la carrocería. Conecte la pinza a una pieza metálica de gran calibre del bastidor o del RIESGO DE CHISPAS CERCA bloque motor. f) Para vehículos con el borne positivo conectado a tierra, DE LA BATERÍA: conecte la pinza NEGATIVA (NEGRA) del cargador de baterías al borne NEGATIVO (NEG, N, –) que no va... -
Página 37: Información Sobre Seguridad
¡INFORMACIÓN SOBRE • Controle siempre que el cargador haya conmutado a la ETAPA 7 antes de dejarlo desatendido y conectado SEGURIDAD! durante periodos prolongados. Si el cargador no ha con- mutado a la ETAPA 7 en un plazo de 50 horas, ello indica • No cargue otras baterías distintas a las especificadas en que hay un fallo. - Página 38 CALIBRE AWG MíNIMO CONExIÓN Y RECOMENDADO PARA DESCONExIÓN DEL CABLES PROLONGADORES CARGADOR A UNA DE CA BATERíA LONGITUD DEL CABLE CALIBRE AWG DEL CABLE (PIES) M 25 (7,6) 50 (15,2) Comfort 100 (30,5) Connect 150 (45,6) – – Comfort Connect Comfort ES • 7...
- Página 39 INSTRUCCIONES DE FUNCIONAMIENTO 1. Conecte el cargador a la batería. 2. Enchufe el cargador en la toma de red eléctrica. El piloto de encendido indicará si el cable de la red está enchufado al tomacorriente de pared. El piloto de error indica si las pinzas de la batería están mal conectadas. La protección contra polaridad reversa garantiza que ni la batería ni el cargador sufrirán daños.
-
Página 40: Programas De Carga
PROGRAMAS DE CARGA Para hacer la selección, pulse el botón MODE (Modo). Al cabo de unos dos segundos, el cargador activa el programa seleccio- nado. El programa seleccionado se volverá a iniciar la siguiente vez que se conecte el cargador. ESTA TABLA DESCRIBE LOS DISTINTOS PROGRAMAS DE CARGA: CAPACIDAD DE LA GAMA DE... - Página 41 DESULPHATION SOFT START BULK ABSORPTION ANALYSE RECOND FLOAT PULSE (Desulfatación) (Inicio suave) (Volumen) (Absorción) (Análisis) (Regeneración) (Flotante) (Pulsos) 15,8 V 0,8A hasta Voltaje cre- Corriente decre- Comprueba si 13,6 V 12,7–14,4 V 12,6 V ciente hasta ciente. 14,4 V el voltaje cae a 0,8 A 0,8-0,4 A 14,4 V.
-
Página 42: Lista Para Usar
ETAPA 1 DESULFATION (DESULFATACIÓN) ETAPA 7 FLOAT (FLOTANTE) Detecta las baterías sulfatadas. Corrientes y voltajes pulsantes Mantiene el voltaje de la batería al nivel máximo mediante eliminan los sulfatos de las placas de plomo de la batería y carga a voltaje constante. restablecen su capacidad. -
Página 43: Piloto De Error
PILOTO DE ERROR INSTRUCCIONES DE MANTENIMIENTO Si se enciende el piloto de error, compruebe lo siguiente: 1. ¿Está conectado al polo positivo de la El cargador de baterías modelo de 1065 no precisa batería el cable positivo del cargador? mantenimiento. Nunca abra el cargador; ello anularía la garantía. -
Página 44: Especificaciones Técnicas
ESPECIFICACIONES TÉCNICAS Número de modelo 1065 Voltaje nominal de CA 110–120 VAC, 50–60 Hz Voltaje de carga 14,4 V, 14,7 V, 15,8 V Voltaje de batería mín. 2,0V Corriente de carga 4,3 A Corriente, red eléctrica 1,1A rms (a plena corriente de carga) Pérdidas de contracorriente* <1A h/mes Ondulación** <4% de la corriente nominal... -
Página 45: Garantía Limitada
GARANTíA LIMITADA LOS PRODUCTOS DE CTEK ESTáN PROTEGIDOS POR: CTEK Power Inc, expide la presente garantía limitada al com- prador original de este producto. Esta garantía limitada no es transferible. La garantía rige para defectos de fabricación y 2012-05-30 material durante cinco años a partir de la fecha de compra. -
Página 46: Soporte Técnico
SOPORTE TÉCNICO CTEK soporte está disponible en www.smartercharger.com, vía correo electrónico a support@smartercharger.com o comunicándose con nosotros al 1-800-941-7611. Para ver o descargar la última versión de este producto manual visite www.smartercharger.com/manuals. ES • 15... - Página 47 16 • ES...
- Página 48 1. Connect 1. Brancher 1. Conecte 2. Connect 3. Press 3. Appuyer sur 3. Pulse the charger to le chargeur à el cargador the charger to the MODE-button le bouton MODE el botón MODE the battery! la batterie! a la batería! the wall socket! to select charging pour choisir le...