Tabla de contenido
Publicidad
Idiomas disponibles
Idiomas disponibles
Enlaces rápidos
Nice
0682
ERA TIME
Digital Transmitter
EN - Instructions and warnings for installation and use
IT - Istruzioni ed avvertenze per l'installazione e l'uso
FR - Instructions et avertissements pour l'installation et l'utilisation
ES - Instrucciones y advertencias de instalación y uso
DE - Installierungs-und Gebrauchsanleitungen und Hinweise
PL - Instrukcje i ostrzeżenia dotyczące instalacji i użytkowania urządzeń
NL - Aanwijzingen en aanbevelingen voor installatie en gebruik
Publicidad
Tabla de contenido

Manuales relacionados para Nice ERA TIME


Resumen de contenidos para Nice ERA TIME
- Página 1 Nice 0682 ERA TIME Digital Transmitter EN - Instructions and warnings for installation and use IT - Istruzioni ed avvertenze per l’installazione e l’uso FR - Instructions et avertissements pour l’installation et l’utilisation ES - Instrucciones y advertencias de instalación y uso DE - Installierungs-und Gebrauchsanleitungen und Hinweise PL - Instrukcje i ostrzeżenia dotyczące instalacji i użytkowania urządzeń...
-
Página 2: Product Description And Intended Use
8:37 on Saturday and Sunday; another The ERA TIME is a radio transmitter for awning and shutter control systems. Along could be raising the awnings at 18:50 every day of the week. -
Página 3: Product Installation
2 - PRODUCT INSTALLATION Rain and Sun sensors; those coming from the Wind sensor continue to remain active since they provide protection for the awning or shutter. 2.1 - Turn on the transmitter – Set the clock and other basic –... - Página 4 PROCEDURE 1 - Making the BASIC SETTINGS after powering up the transmitter Step 1 Step 2 Step 3 example: example: example: Friday Su Mo Tu We Fr Sa set the HOUR confirm set the MINUTES confirm set DAY (name) confirm Step 4 Step 5 Step 6...
- Página 5 3 movements ... release PROCEDURE 3 - Memorizing the ERA TIME as “Second (third, fourth...) Transmitter” Run the following procedure only if one or more transmitters are already memorized in the automation. If no transmitter has yet been memorized, you MUST use Procedure 2.
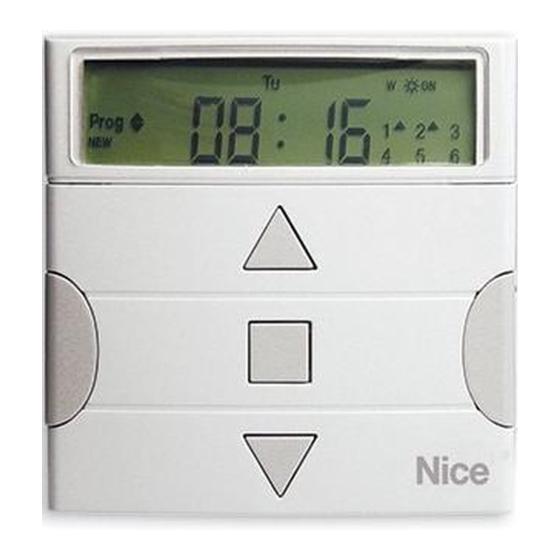
- Página 6 3 - DISPLAY MESSAGES AND THEIR MEANING 2.3 - Installing the transmitter’s mount The following figure shows all messages and symbols displayed on the transmitter’s • The transmitter’s mount must be secured to a vertical wall. display, in relation to the operation in question. •...
-
Página 7: Main Screen
When an event is being programmed (Procedure 6), this symbol in- Prog Indicate that an event is being copied (Procedure 9). dicates that the special “Sensor ON/OFF” function has been de- COPY activated for the event being programmed. Therefore, the auto- Indicate that the internal date and time are being set (Procedure mated system will not be managed by the automatic commands Prog... - Página 8 • set the internal clock and date with Procedure 10 (N.B.: If you have run Procedure 1 after powering up the transmitter, only use Procedure 10 to change the basic settings). 6 - SETTING THE SPECIAL FUNCTION PARAMETERS Caution! – When programming events, if you want to enable the “on vacation” and “planetary time” special functions, the parameters for these functions must already have been set.
- Página 9 PROCEDURE 5 - Configuring the “PLANETARY TIME” special function This function advances/delays the programmed time of the event, day by day throughout the year, in relation to the local time at which the sun rises and sets: for instance. in summer the function advances events in the morning and delays events in the afternoon.
- Página 10 Step 1 Step 2 Step 3 Step 4 Auto main Prog screen Prog NEWU stop/esc Auto Prog several times ... (display) 2 times (display) confirm Prog. EVENTS confirm NEW EVENT confirm Step 5 Step 6 Step 7 ... example: example: Mo Tu We Th Fr Sa...
- Página 11 ... Step 11 Step 12 ... slow flashing • fast flashing = function selected • slow flashing = function deselected several times ..... to select / deselect the function confirm PARTIAL MANOEUVRE ... Step 12 Step 13 • fast flashing = function selected example: •...
- Página 12 PROCEDURE 7 - Modifying (“MOD”) an existing event All programmed events can be modified at any time. To modify an event, first find and select it from the events stored in the transmitter’s memory. Step 1 Step 2 Step 3 Step 4 ...
- Página 13 PROCEDURE 8 - Deleting (“DEL”) an existing event Any programmed event can be deleted at any time. To delete an event, first find and select it from the events stored in the transmitter’s memory. Step 1 Step 2 Step 3 Step 4 ...
- Página 14 PROCEDURE 9 - Copying (“COPY”) an existing event To quickly program a new event similar to an existing one, you can copy the existing one and then modify only the settings which are different. To copy an event, first find and select it from the events stored in the transmitter’s memory.
- Página 15 8 - MAKING THE BASIC SETTINGS (without powering off the transmitter) The basic settings are normally prompted for automatically by the system, after the transmitter has been powered up (batteries inserted), and is done with Procedure 1. You can also make these settings (or correct them once they have been memorized) even without the need to power off the device. To do so, use Procedure 10. Note – This procedure only affects the clock and date settings.
-
Página 16: Using The Transmitter
9 - USING THE TRANSMITTER This chapter describes how to use the transmitter once it has been installed and programmed. To call up the main screen You can return to the main screen at any time by repeatedly pressing n/esc until “Auto” starts flashing. Step 1 - end The display shows: the flashing “Auto”... - Página 17 – To LOCK the ▲, n, ▼ and “ok” keys: 01. Call up the term “Auto” on the display (= automatic mode activated). 02. Press the “sel” key 7 times, until the symbol disappears. Step 1 Step 2 - end main Auto screen...
- Página 18 Important – The transmitter will now only operate in manual mode, i.e. under direct user control. To send a manual command to one or more groups The user can send manual commands only if the transmitter is set to automatic mode (“Auto”) or when it is set to manual mode (“Man”). It cannot be used to send manual commands when set to programming mode (“Prog”).
- Página 19 Caution! – If the “Sun ON” (or “Sun OFF”) symbol is on the display, when the command is sent to the automation system, it will also send this setting (read the description of the special “Sensor ON/OFF” function in Section 1 of the manual). Alternatively, first cancel the “Sun ON” (or “Sun OFF”) setting using Procedure G in Section 9. Sending a manual command when the automatic mode on the transmitter is deactivated (“Man”) In this mode, the user can send a command to any group or set of groups, as follows.
- Página 20 To activate or deactivate the special “Sensor ON/OFF” function within one or more groups Caution! • If there are no climate sensors in your installation, please ignore this procedure. • Before carrying out the procedure we advise you to read the descrip- tion of the special “Sensor ON/OFF”...
-
Página 21: Battery Replacement
10 - BATTERY REPLACEMENT ... Step 5 - end When “ ” displays, it is time to change the batteries as soon as possible. In this example: situation, there is a risk that the commands may not be sent properly to the automa- tions. -
Página 22: Descrizione Del Prodotto E Destinazio- Ne D'uso
(apertura o chiusura delle tapparelle, delle tende, ecc.), in un ERA TIME è un trasmettitore radio destinato al comando di automatismi per ten- dato momento della giornata e in uno o più giorni della settimana, come stabilito de da sole e tapparelle. -
Página 23: Installazione Del Prodotto
2 - INSTALLAZIONE DEL PRODOTTO 2.1 - Accendere il trasmettitore – Impostare l’orologio e altri parametri di base, dopo l’inserimento della pila 8.30 10.45 12.15 14.30 17.15 19.30 • Il trasmettitore funziona con due pile, già inserite al suo interno, ma che sono scol- legate per evitare che si consumino inutilmente. - Página 24 PROCEDURA 1 - Per impostare i PARAMETRI DI BASE dopo aver dato alimentazione al trasmettitore Passo 1 Passo 2 Passo 3 esempio: esempio: esempio: venerdì Su Mo Tu We Fr Sa impostare ORA confermare impostare MINUTI confermare impostare GIORNO (nome) confermare Passo 4 Passo 5...
- Página 25 ... rilasciare PROCEDURA 3 - Per memorizzare ERA TIME come “Secondo (o terzo, quarto, ecc.) Trasmettitore” Usare la seguente procedura soltanto se nell’automatismo è già memorizzato uno o più trasmettitori. Se non è presente nessun trasmettitore, usare tassativamente la Pro- cedura 2.
- Página 26 3 - LE INDICAZIONI SUL DISPLAY E IL LORO 2.3 - Installazione del supporto del trasmettitore SIGNIFICATO • Il supporto del trasmettitore deve essere installato su una parete verticale. • Il trasmettitore deve essere installato in ambienti protetti. Non installarlo all’esterno La seguente figura mostra tutte le indicazioni e i simboli che possono apparire sul o in zone a rischio di intemperie.
- Página 27 Durante la programmazione di un “evento” (Procedura 6), questo sim- Prog Indicano che è in programmazione la “cancellazione di un even- bolo indica che è stata disattivata la funzione speciale “Sensore On/ to” (Procedura 8). off” per l’evento che si sta programmando. Quindi, l’automatismo Prog Indicano che è...
- Página 28 A questo punto effettuare le varie procedure di programmazione: • impostare i parametri delle funzioni speciali: “in vacanza”, con la Procedura 4, e “orario planetario”, con la Procedura 5 (Nota – Se nel dare alimentazione al trasmettitore è stata eseguita la Procedura 1, non serve impostare di nuovo l’orario planetario con la Procedura 5); •...
-
Página 29: Procedura 6 - Per Programmare Un Nuovo Evento
PROCEDURA 5 - Per regolare il parametro della funzione speciale “ORARIO PLANETARIO” Questa funzione anticipa o ritarda l’orario programmato per l’esecuzione degli eventi, intervenendo giorno per giorno, nell’arco dell’anno, in funzione dell’ora locale in cui sorge il sole e di quella in cui tramonta: ad esempio, in estate la funzione anticipa gli eventi del mattino e ritarda quelli del pomeriggio. Normalmente l’impostazione del para- metro di questa funzione viene richiesta automaticamente dal sistema, dopo l’inserimento delle pile nel trasmettitore, e deve essere eseguita con la Procedura 1. - Página 30 Passo 1 Passo 2 Passo 3 Passo 4 Auto schermata Prog principale Prog NEWU stop/esc Auto Prog più volte... (display) 2 volte (display) confermare Prog. EVENTI confermare NUOVO EVENTO confermare Passo 5 Passo 6 Passo 7 ... esempio: esempio: Mo Tu We Th Fr Sa impostare l’ORA...
- Página 31 ... Passo 11 Passo 12 ... lampeggio lento • lampeggio veloce = funzione selezionata • lampeggio lento = funzione deselezionata più volte ....per selezionare o per deselezionare la funzione confermare MANOVRA PARZIALE ... Passo 12 Passo 13 • lampeggio veloce = funzione selezionata esempio: •...
-
Página 32: Procedura 7 - Per Modificare ("Mod") Un Evento Esistente
(10) - Dopo aver premuto il tasto “ok” il sistema memorizza il nuovo evento e sul display ritorna a lampeggiare la scritta “NEW” (Passo 15), indicando che il trasmettitore è pronto per l’eventuale programmazione di un nuovo evento. Quindi, se si desidera programmare un altro evento, ripetere la Procedura 6 partendo dal Passo 4, altri- menti, se si desidera uscire dal modo programmazione e ritornare alla schermata principale, eseguire il Passo 16. -
Página 33: Procedura 9 - Per Copiare ("Copy") Un Evento Esistente
Passo 1 Passo 2 Passo 3 Passo 4 ... Auto schermata Prog principale Prog NEWU stop/esc Auto Prog più volte ... (display) 2 volte (display) confermare (display) confermare (display) 2 volte ... Passo 4 Passo 5 - fine Opzione A: per cancellare tutti gli eventi in una sola volta... - Página 34 Passo 1 Passo 2 Passo 3 Passo 4 ... Auto schermata Prog principale Prog NEWU stop/esc Auto Prog più volte ... (display) 2 volte (display) confermare (display) confermare (display) 3 volte ... Passo 4 Passo 5 continua ... scegliere Prog l’evento da...
- Página 35 PROCEDURA 10 - Per regolare l’orologio e il datario interno Passo 1 Passo 2 Passo 3 Auto schermata principale Prog Auto stop/esc Prog più volte ... (display) 2 volte (display) confermare (display) 1 volta ORA - DATARIO confermare Passo 4 Passo 5 Passo 6...
- Página 36 9 - COME USARE IL TRASMETTITORE I paragrafi di questo capitolo descrivono come usare il trasmettitore al termine di tutte le fasi di installazione e di programmazione. Per richiamare la schermata principale Da qualsiasi ambiente o schermata è possibile ritornare al punto di partenza, ovvero alla schermata principale, premendo ripetutamente il tasto n/esc fino a far lampeg- giare l’indicazione “Auto”.
- Página 37 – Per BLOCCARE i tasti ▲, n, ▼, “ok”: 01. Richiamare nel display la scritta “Auto” (= modo automatico attivato). 02. Premere 7 volte il tasto “sel”, fino a far scomparire il simbolo . Passo 1 Passo 2 - fine schermata Auto principale...
- Página 38 Per inviare un comando manuale a uno o più gruppi L’utente può inviare comandi manuali solo quando nel trasmettitore è impostato il modo automatico (“Auto”) oppure quando questo è disattivato (“Man”). Non è possibile in- viare comandi manuali quando nel trasmettitore è impostato il modo programmazione (“Prog”). Invio di un comando manuale quando nel trasmettitore è...
- Página 39 Attenzione! – Se sul display è presente il simbolo “sole ON” (o “sole OFF”), l’invio del comando all’automatismo invia anche questa impostazione (leggere la descrizione della funzione speciale “Sensore ON / OFF”, nel capitolo 1 del manuale). In alternativa, cancellare prima l’impostazione “sole ON” (o “sole OFF”) con la Procedura G del capitolo 9. Invio di un comando manuale quando nel trasmettitore è...
- Página 40 Per attivare o disattivare manualmente la funzione speciale “Sensore ON / OFF”, all’interno di uno o più gruppi Attenzione! • Se nella vostra installazione non sono presenti sensori climatici, ignorare la presente procedura. • Prima di effettuare la procedura si consiglia di leggere la descrizione della funzione speciale “Sensore ON / OFF”, nel capitolo 1 del manuale.
-
Página 41: Sostituzione Delle Pile
10 - SOSTITUZIONE DELLE PILE ... Passo 5 - fine Quando si accende l’indicazione “ ” vuol dire che le pile sono scariche e che è esempio: necessario sostituirle quanto prima. In questa situazione, infatti, c’è il rischio che i comandi non possano essere inviati correttamente alle automazioni. Per sostituire le stop/esc pile procedere come indicato nella figura in basso. -
Página 42: Description Du Produit Et Application
1 - DESCRIPTION DU PRODUIT ET APPLICATION • Qu’est-ce qu’un « événement » ? C’est l’envoi automatique, par l’émetteur, ERA TIME est un émetteur radio destinés au contrôle automatique des stores et d’une commande de mouvement (ouverture ou la fermeture des volets roulants, volets. -
Página 43: Installation Du Produit
2 - INSTALLATION DU PRODUIT option peut être programmée manuellement et à tout moment par l’utilisateur (voir le paragraphe G au chapitre 9). 2.1 - Allumer l’émetteur - Régler l’horloge et les autres para- mètres de base, après l’insertion de la pile •... - Página 44 PROCÉDURE 1 - Pour définir les PARAMÈTRES DE BASE après avoir mis l’émetteur sous tension Étape 1 Étape 2 Étape 3 exemple : exemple : exemple : vendredi Su Mo Tu We Fr Sa configurer HEURE confirmer configurer MINUTES confirmer configurer JOUR (nom) confirmer Étape 4 Étape 5...
- Página 45 (allumé en permanence) PROCÉDURE 3 - Pour mémoriser le ERA TIME comme « Deuxième (ou troisième, quatrième, etc.) Émetteur » Utiliser la procédure suivante uniquement si un ou plusieurs émetteurs sont déjà stockés dans l’automatisme. Si aucun émetteur n’est présent, utiliser uniquement la Pro- cédure 2.
- Página 46 3 - LES INDICATIONS SUR L’AFFICHEUR ET 2.3 - Installation du support de l’émetteur LEUR SIGNIFICATION • Le support de l’émetteur doit être installé sur un mur vertical. • L’émetteur doit être installé dans des environnements protégés. Ne pas l’installer à La figure suivante propose toutes les indications et les symboles qui peuvent appa- l’extérieur ou dans des zones à...
-
Página 47: Description Générale De La Programmation
Lors de la programmation d’un « événement » (Procédure 6), ce sym- Prog Indiquent que l'« annulation d'un événement » est en program- bole indique que la fonction spéciale Capteur On/Off » a été désac- mation (procédure 8). tivée pour l’événement en cours de programmation. L’automatisme Prog Indiquent que la « copie d'un événement » est en programmation ne sera donc plus géré... - Página 48 À ce stade, effectuer les diverses procédures de programmation : • définir les paramètres des fonctions spéciales : « en vacances », avec la Procédure 4 et « mode cosmique », avec la Procédure 5 (Remarque – si en mettant l’émetteur sous tension, la Procédure 1 a été...
- Página 49 PROCÉDURE 5 - pour configurer le paramètre de la fonction spéciale « MODE COSMIQUE » Cette fonction avance ou retarde l’heure prévue pour l’exécution des événements, en intervenant de jour en jour, tout au long de l’année, selon l’heure locale à laquelle le so- leil se lève et se couche : par exemple, en été, la fonction anticipe les événements du matin et retarde ceux de l’après-midi. Normalement, le réglage du paramètre de cette fonction est demandé...
- Página 50 Étape 1 Étape 2 Étape 3 Étape 4 Auto page-écran Prog principale Prog NEWU stop/esc Auto Prog plusieurs fois ... (afficheur) 2 fois (afficheur) confirmer Prog ÉVÉNEMENTS confirmer NOUVEAU ÉVÉNEM. confirmer Étape 5 Étape 6 Étape 7 ... exemple : exemple : Mo Tu We Th Fr Sa...
- Página 51 ... Étape 11 Étape 12 ... clignotement lent • clignotement rapide = fonction sélectionnée • clignotement lent = fonction non sélectionnée plusieurs fois ....pour activer ou désactiver la fonction confirmer MANŒUVRE PARTIELLE ... Étape 12 Étape 13 • clignotement rapide = fonction sélectionnée exemple : •...
- Página 52 indiquer que l’émetteur est prêt pour la programmation éventuelle d’un nouvel événement. Donc, si un autre événement doit être programmé, répéter la Procédure 6 à partir de l’étape 4, sinon, s’il faut quitter le mode programmation et retourner à la page-écran principale, effectuer l’étape 16. PROCÉDURE 7 - pour modifier («...
- Página 53 Étape 1 Étape 2 Étape 3 Étape 4 ... Auto page-écran Prog principale Prog NEWU stop/esc Auto Prog plusieurs fois ... (afficheur) 2 fois (afficheur) confirmer (afficheur) confirmer (afficheur) 2 fois ... Étape 4 Étape 5 - fin Option A : pour éliminer tous les événements en une seule fois...
- Página 54 Étape 1 Étape 2 Étape 3 Étape 4 ... Auto page-écran Prog principale Prog NEWU stop/esc Auto Prog plusieurs fois ... (afficheur) 2 fois (afficheur) confirmer (afficheur) confirmer (afficheur) 3 fois ... Étape 4 Étape 5 suite ... choisir Prog l’événement...
- Página 55 PROCÉDURE 10 - Pour régler l’horloge et la date interne Étape 1 Étape 2 Étape 3 Auto page-écran principale Prog Auto stop/esc Prog plusieurs fois ... (afficheur) 2 fois (afficheur) confirmer (afficheur) 1 fois HEURE - DATE confirmer Étape 4 Étape 5 Étape 6...
- Página 56 9 - COMMENT UTILISER L’ÉMETTEUR Les paragraphes de ce chapitre décrivent comment utiliser l’émetteur à la fin de toutes les phases de l’installation et de la programmation. Pour rappeler la page-écran principale Il est possible de revenir au point de départ de n’importe quel environnement ou page-écran, c’est-à-dire depuis la page-écran principale, en appuyant à plusieurs reprises sur la touche n/esc jusqu’à...
- Página 57 – Pour VERROUILLER les touches ▲, n, ▼, « ok » : 01. Rappeler à l’écran le message « Auto » (= mode automatique activé). 02. Appuyer 7 fois sur la touche « sel » jusqu’à ce que le symbole disparaisse. Étape 1 Étape 2 - fin page-écran Auto principale (allumé en per- stop/esc Auto manence) 7 fois touches verrouillées plusieurs fois ... (afficheur) confirmer (afficheur)
- Página 58 Pour envoyer une commande manuelle à un ou plusieurs groupes L’utilisateur peut envoyer des commandes manuelles uniquement lorsque l’émetteur est en mode automatique (« Auto ») ou quand il est désactivé (« Man »). Il n’est pas pos- sible d’envoyer des commandes manuelles lorsque l’émetteur est configuré sur le mode de programmation (« Progr »). Envoi d’une commande manuelle en cas de mode automatique configuré...
- Página 59 Attention ! – Si l’écran affiche le symbole « soleil ON » (ou « soleil OFF »), la commande envoyée à l’automatisme comprend également cette configuration (lire la descrip- tion de la fonction spéciale « Capteur ON / OFF » au chapitre 1 du manuel). Autrement, effacer tout d’abord la configuration « soleil ON » (ou « soleil OFF ») selon la Procé- dure G du chapitre 9. Envoi d’une commande manuelle en cas de mode automatique désactivé dans l’émetteur (« Man ») Dans ce mode, l’utilisateur peut envoyer une commande à un ou plusieurs groupes (au choix) de la façon suivante. 01. Rappeler à l’écran le message « Man » (= mode automatique désactivé).
- Página 60 Attention ! – Si l’écran affiche le symbole « soleil ON » (ou « soleil OFF »), la commande envoyée à l’automatisme comprend également cette configuration (lire la descrip- tion de la fonction spéciale « Capteur ON / OFF » au chapitre 1 du manuel). Autrement, effacer tout d’abord la configuration « soleil ON » (ou « soleil OFF ») selon la Procé- dure G du chapitre 9. Pour activer ou désactiver manuellement la fonction spéciale « Capteur ON / OFF » dans un ou plusieurs groupes. Attention ! • Ignorer cette procédure en cas d’installation dépourvue de capteurs climatiques. • Avant de lancer la procédure, il est conseillé de lire la description de la fonction spéciale « Capteur ON / OFF » au chapitre 1 du manuel. • L’utilisateur ne peut configurer manuellement la fonction que lorsque le mode automatique est dé- sactivé (c’est-à-dire lorsque l’écran affiche le message « Man »).
-
Página 61: Remplacement Des Piles
10 - REMPLACEMENT DES PILES ... Étape 5 - fin Quand l’indication « » s'allume, cela signifie que les piles sont usées et qu'il faut exemple : les changer au plus tôt. Dans cette situation, il existe un risque que les commandes ne soient pas transmises correctement aux automatismes. -
Página 62: Descripción Del Producto Y Uso Previsto
b) - el mando dirigido a un grupo acciona simultáneamente todos los au- ESPAÑOL tomatismos que forman parte del grupo, haciéndoles ejecutar la misma maniobra. • El transmisor permite el mando de un grupo a la vez o de varios grupos reunidos en un “grupo múltiple”. -
Página 63: Instalación Del Producto
2 - INSTALACIÓN DEL PRODUCTO 2.1 - Encender el transmisor – Ajustar la hora y los otros pará- metros básicos, después de colocar la pila 8.30 10.45 12.15 14.30 17.15 19.30 • El transmisor funciona con dos pilas que ya están contenidas en su interior pero se encuentran desconectadas para evitar un consumo inútil. -
Página 64: Procedimiento 1 - Para Ajustar Los Parámetros Básicos Después De Conectar La Alimentación Al Transmisor
PROCEDIMIENTO 1 - Para ajustar los PARÁMETROS BÁSICOS después de conectar la alimentación al transmisor Paso 1 Paso 2 Paso 3 ejemplo: ejemplo: ejemplo: viernes Su Mo Tu We Fr Sa ajustar HORA confirmar ajustar MINUTOS confirmar ajustar DÍA (nombre) confirmar Paso 4 Paso 5... - Página 65 ... soltar PROCEDIMIENTO 3 - Para memorizar ERA TIME como “Segundo (o tercero, cuarto, etc.) transmisor” Utilizar el siguiente procedimiento sólo si en el automatismo ya se han memorizado uno o varios transmisores. Si no hay ningún transmisor memorizado, utilizar sin falta el Procedimiento 2.
-
Página 66: Instalación Del Soporte Del Transmisor
3 - LAS INDICACIONES EN PANTALLA Y SU 2.3 - Instalación del soporte del transmisor SIGNIFICADO • El soporte del transmisor se debe instalar sobre una pared vertical. • El soporte del transmisor se debe instalar en un ambiente protegido. No instalarlo La siguiente figura ilustra todas las indicaciones y los símbolos que pueden aparecer en el exterior ni a la intemperie. -
Página 67: Descripción General De La Programación
Durante la programación de un “evento” (Procedimiento 6), este sím- Prog Indican que hay una “anulación de evento” en programación (pro- bolo indica que se ha desactivado la función especial “Sensor On/ cedimiento 8). Off” para el evento en programación. El automatismo ya no será Prog Indican que hay una “copia de evento”... - Página 68 miento 4 y “horario planetario” con el Procedimiento 5 (Nota – Si al alimentar el transmisor se ejecutó el Procedimiento 1, no hace falta volver a programar el horario planetario siguiendo el Procedimiento 5); • programar los “eventos” con el Procedimiento 6 más el Procedimiento 7, 8, 9; •...
-
Página 69: Programar Los Eventos
PROCEDIMIENTO 5 - Para regular el parámetro de la función especial “HORARIO PLANETARIO” Esta función anticipa o retarda el horario programado para la ejecución de los eventos, interviniendo día a día durante todo el año, en función de la hora local de la salida y de la puesta del sol;... - Página 70 Paso 1 Paso 2 Paso 3 Paso 4 Auto pantalla Prog principal Prog NEWU stop/esc Auto Prog varias veces... (pantalla) 2 veces (pantalla) confirmar Prog. EVENTOS confirmar NUEVO EVENTO confirmar Paso 5 Paso 6 Paso 7 ... ejemplo: ejemplo: Mo Tu We Th Fr Sa HORA...
- Página 71 ... Paso 11 Paso 12 ... parpadeo lento • parpadeo rápido = función seleccionada • parpadeo lento = función deseleccionada varias veces .... para seleccionar o deseleccionar la función confirmar MANIOBRA PARCIAL ... Paso 12 Paso 13 ejemplo: • parpadeo rápido = función seleccionada •...
-
Página 72: Procedimiento 7 - Para Modificar ("Mod") Un Evento Existente
PROCEDIMIENTO 7 - Para modificar (“MOD”) un evento existente Los eventos programados se pueden modificar en cualquier momento. Para modificar un evento primero hay que buscarlo y seleccionarlo en la memoria del transmisor. Paso 1 Paso 2 Paso 3 Paso 4 ... Auto pantalla Prog... -
Página 73: Procedimiento 9 - Para Copiar ("Copy") Un Evento Existente
... Paso 4 Paso 5 - fin Opción A: para borrar todos los eventos de una sola vez Prog 1 vez DELU Opción B: para seleccionar el borrar un evento evento a borrar a la vez BORRAR evento confirmar (pantalla) confirmar (pantalla) borrar adelante (▲);... -
Página 74: Para Aumentar La Seguridad De La Recepción Del Mando Por Parte Del Automatismo
... Paso 4 Paso 5 continúa ... seleccionar Prog el evento a Nota COPYT copiar COPIAR evento confirmar (pantalla) 1 vez adelante (▲); atrás (▼) confirmar NOTAS: (1) - El sistema visualiza (en orden cronológico) los días de la semana que contienen eventos y el detalle de los eventos. Al pulsar varias veces la tecla ▲(*) el sistema visualiza el primer día programado de la semana (éste parpadea mientras los otros permanecen encendidos de manera fija);... -
Página 75: Procedimiento 10 - Para Ajustar La Hora Y La Fecha
PROCEDIMIENTO 10 - Para ajustar la hora y la fecha Paso 1 Paso 2 Paso 3 Auto pantalla principal Prog Auto stop/esc Prog varias veces... (pantalla) 2 veces (pantalla) confirmar (pantalla) 1 vez HORA - FECHA confirmar Paso 4 Paso 5 Paso 6 ejemplo:... -
Página 76: Cómo Utilizar El Transmisor
9 - CÓMO UTILIZAR EL TRANSMISOR En este capítulo se explica cómo utilizar el transmisor una vez finalizada la instalación y la programación. Para volver a la pantalla principal Desde cualquier entorno o pantalla es posible volver al punto de partida, es decir, a la pantalla principal, pulsando varias veces la tecla n/esc hasta que parpadee la in- dicación “Auto”. - Página 77 – Para BLOQUEAR las teclas ▲, n, ▼, “ok”: 01. Activar el modo automático; debe aparecer en pantalla la indicación “Auto”. 02. Pulsar 7 veces la tecla “sel” para hacer aparecer el símbolo . Paso 1 Paso 2 - fin pantalla Auto principal...
- Página 78 Para enviar un mando manual a uno o varios grupos El usuario puede enviar mandos manuales sólo cuando en el transmisor está seleccionado el modo automático (“Auto”) o cuando éste se encuentra desactivado (“Man”). No es posible enviar mandos manuales cuando en el transmisor está seleccionado el modo programación (“Prog”). Envío de un mando manual cuando en el transmisor está...
- Página 79 ¡Atención! – Si en pantalla aparece el símbolo “sol ON” (o “sol OFF”), el envío del mando al automatismo implica el envío de esta selección (leer la descripción de la fun- ción especial “Sensor ON / OFF” en el capítulo 1 del manual). Como alternativa, es posible anular primero la selección “sol ON” (o “sol OFF”) con el Procedimiento G del capítulo 9.
- Página 80 ¡Atención! – Si en pantalla aparece el símbolo “sol ON” (o “sol OFF”), el envío del mando al automatismo implica el envío de esta selección (leer la descripción de la fun- ción especial “Sensor ON / OFF” en el capítulo 1 del manual). Como alternativa, es posible anular primero la selección “sol ON” (o “sol OFF”) con el Procedimiento G del capítulo 9.
-
Página 81: Sustitución De Las Pilas
10 - SUSTITUCIÓN DE LAS PILAS ... Paso 5 - fin Cuando se enciende la indicación “ ”, las pilas están descargadas y es necesario ejemplo: sustituirlas cuanto antes. En esta situación, los mandos no se pueden enviar correc- tamente a los automatismos. Cambiar las pilas como se indica en la figura abajo. stop/esc ¡Atención! –... - Página 82 Befehls zur Bewegung (Öffnung oder Schlie- ßung der Rollläden, Markisen usw.) durch den Sender zu einer bestimmten Uhrzeit ERA TIME ist ein Funksender für die Steuerung von automatischen Systemen für und an einem oder mehreren Wochentagen. Beispielsweise ist ein Ereignis der Be- Markisen und Rollläden.
-
Página 83: Installation Des Produkts
2 - INSTALLATION DES PRODUKTS 2.1 - Den Sender einschalten - Die Uhr und die anderen Basispa- 8.30 10.45 12.15 14.30 17.15 19.30 rameter eingeben, nachdem die Batterien eingelegt wurden • Der Sender funktioniert mit zwei Batterien, die schon eingelegt aber nicht ange- schlossen sind, um ein unnötiges Entladen zu vermeiden. - Página 84 VERFAHREN 1 - Zum Einstellen der BASISPARAMETER nach dem Einschalten der Stromversorgung des Senders Schritt 1 Schritt 2 Schritt 3 Beispiel: Beispiel: Beispiel: Freitag Su Mo Tu We Fr Sa Eingabe STUNDEN Bestätigen Eingabe MINUTEN Bestätigen WOCHENTAG (Name) einstellen Bestätigen Schritt 4 Schritt 5 Schritt 6...
- Página 85 ... Loslassen VERFAHREN 3 - Speichern des ERA TIME als „Zweiten (oder dritten, vierten usw.) Sender” Verwenden Sie das folgende Verfahren nur, wenn in der Automatisierung bereits einer oder mehrere Sender gespeichert sind. Wenn kein Sender vorhanden ist, muss un- bedingt Verfahren 2 verwendet werden.
- Página 86 3 - DIE BILDSCHIRMANGABEN UND IHRE 2.3 - Installation der Senderhalterung BEDEUTUNG • Die Senderhalterung muss an einer senkrechten Wand installiert werden. • Der Sender muss in geschützter Umgebung installiert werden. Nicht im Außenbe- In der folgenden Abbildung werden alle Angaben und Symbole gezeigt, die je nach reich oder in Wettereinflüssen ausgesetzten Bereichen installieren.
- Página 87 Während der Programmierung eines „Ereignisses“ (Verfahren 6) zeigt Prog Anzeige, wenn die „Löschung eines Ereignisses” programmiert dieses Symbol die Deaktivierung der Sonderfunktion „Sensor ein/ wird (Verfahren 8). aus“ für das betreffende Ereignis an. Der Antrieb wird also ab dem Prog Anzeige, wenn die „Kopie eines Ereignisses”...
- Página 88 Jetzt können die verschiedenen Programmierungsverfahren eingegeben werden: • die Parameter der Sonderfunktionen eingeben: „Im Urlaub” durch Verfahren 4, „Erdzeit” durch Verfahren 5 (Hinweis – Wenn beim Stromanschluss des Senders Verfahren 1 ausgeführt wurde, muss die Erdzeit nicht erneut durch Verfahren 5 eingegeben werden); •...
- Página 89 VERFAHREN 5 - Einstellen der Parameter der Sonderfunktion „ERDZEIT” Durch diese Funktion wird die programmierte Uhrzeit für die Durchführung der Ereignisse im Laufe des Jahres täglich nach vorne oder nach hinten verlegt, je nach der loka- len Uhrzeit des Sonnenaufgangs und -untergangs: im Sommer werden beispielsweise die Ereignisse am Morgen früher und jene am Abend später ausgeführt. Normalerwei- se erscheint nach dem Einlegen der Batterien in den Sender eine Aufforderung zur Eingabe dieses Funktionsparameters, das dann durch Verfahren 1 eingegeben werden muss.
- Página 90 Schritt 1 Schritt 2 Schritt 3 Schritt 4 Auto Hauptbild- Prog schirm Prog NEWU stop/esc Auto Prog mehrmals ... (Display) 2 Mal (Display) Bestätigen Prog. EREIGNISSE Bestätigen NEUES EREIGNIS Bestätigen Schritt 5 Schritt 6 Schritt 7 ... Beispiel: Beispiel: Mo Tu We Th Fr Sa STUNDEN...
- Página 91 ... Schritt 11 Schritt 12 ... langsames Blinken • schnelles Blinken = Funktion eingeschaltet • langsames Blinken = Funktion ausgeschaltet mehrmals ..... zum Einschalten oder Ausschalten der Funktion Bestätigen TEILBEWEGUNG ... Schritt 12 Schritt 13 • schnelles Blinken = Funktion eingeschaltet Beispiel: •...
- Página 92 (10) - Nach dem Drücken der Taste „OK“ speichert das System das neue Ereignis und das Display zeigt erneut die Angabe „NEW“ (Schritt 15) an als Hinweis, dass der Sender für die Programmierung eines weiteren Ereignisses bereit ist. Wenn Sie also ein weiteres Ereignis speichern möchten, Verfahren 6 ab Schritt 4 wiederholen, andernfalls Schritt 16 ausführen, um den Programmiermodus zu verlassen und zum Hauptbildschirm zurückzukehren.
- Página 93 Schritt 1 Schritt 2 Schritt 3 Schritt 4 ... Auto Hauptbild- Prog schirm Prog NEWU stop/esc Auto Prog mehrmals ... (Display) 2 Mal (Display) Bestätigen (Display) Bestätigen (Display) 2 Mal ... Schritt 4 Schritt 5 - Ende Option A: Sämtli- che Ereignisse auf einmal löschen Prog...
- Página 94 Schritt 1 Schritt 2 Schritt 3 Schritt 4 ... Auto Hauptbild- Prog schirm Prog NEWU stop/esc Auto Prog mehrmals ... (Display) 2 Mal (Display) Bestätigen (Display) Bestätigen (Display) 3 Mal ... Schritt 4 Schritt 5 Fortsetzung ... Ereignis wählen, Prog das kopiert wer- Hinweis...
- Página 95 unterbrechen. In diesem Fall muss jedoch Verfahren 10 angewendet werden. Hinweis – Durch dieses Verfahren können nur die Parameter der Uhrzeit und des Datums eingestellt werden. Zum Einstellen des Parameters der Sonderfunktion „Erdzeit” Verfahren 5 anwenden. VERFAHREN 10 - Einstellen der Uhrzeit und des internen Datums Schritt 1 Schritt 2 Schritt 3...
- Página 96 9 - GEBRAUCH DES SENDERS In diesem Abschnitt wird beschrieben, wie der Sender nach Abschluss aller Installations- und Programmierungsvorgänge verwendet werden soll. Aufrufen des Hauptbildschirms Aus jeder Umgebung oder von jedem Bildschirm aus können Sie zum Ausgangspunkt bzw. dem Hauptbildschirm zurückkehren, indem Sie wiederholt die Taste n/esc drücken, bis die Anzeige „Auto”...
- Página 97 – Zum BLOCKIEREN der Tasten ▲, n, ▼, „ok”: 01. Im Display die Meldung „Auto” (= automatischer Modus aktiviert) aufrufen. 02. Drücken Sie 7-mal die Taste „sel“, bis das Symbol verlöscht. Schritt 1 Schritt 2 - Ende Hauptbild- Auto schirm Auto...
- Página 98 Übermitteln eines manuellen Befehls an eine oder mehrere Gruppen Der Benutzer kann nur dann manuelle Befehle übermitteln, wenn im Sender der automatische Modus („Auto”) eingestellt ist oder wenn dieser ausgeschaltet wurde („Man”). Manuelle Befehle können nicht übermittelt werden, wenn im Sender der Programmiermodus („Prog”) eingestellt ist. Eingabe eines manuellen Befehls, wenn der Sender in die Automatikfunktion geschaltet ist („Auto“) In dieser Betriebsart können Sie einen Befehl wie folgt an eine einzelne Gruppe (nach Wahl) oder an sämtliche Gruppen (gleichzeitig) übertragen.
- Página 99 Achtung! – Wenn am Display das Symbol „Sonne ON” (oder „Sonne OFF”) erscheint, wird bei der Übermittlung des Befehls an die Automatisierung auch diese Einstellung weitergegeben (Beschreibung der Sonderfunktion „Sensor ON/OFF” in Kapitel 1 des Handbuchs durchlesen). Andernfalls zuerst die Einstellung „Sonne ON” (oder „Sonne OFF”) durch Verfahren G in Kapitel 9 löschen.
- Página 100 Achtung! – Wenn am Display das Symbol „Sonne ON” (oder „Sonne OFF”) erscheint, wird bei der Übermittlung des Befehls an die Automatisierung auch diese Einstellung weitergegeben (Beschreibung der Sonderfunktion „Sensor ON/OFF” in Kapitel 1 des Handbuchs durchlesen). Andernfalls zuerst die Einstellung „Sonne ON” (oder „Sonne OFF”) durch Verfahren G in Kapitel 9 löschen.
-
Página 101: Austausch Der Batterien
10 - AUSTAUSCH DER BATTERIEN ... Schritt 5 - Ende Wenn die Anzeige „ ” aufleuchtet, bedeutet dies, dass die Batterien leer sind und Beispiel: so bald wie möglich ersetzt werden müssen. In dieser Situation besteht nämlich die Gefahr, dass die Befehle nicht korrekt an die Automatisierungen übermittelt werden stop/esc können. - Página 102 • Co to jest „zdarzenie”? Jest to automatyczne wysłanie przez nadajnik polece- 1 - OPIS PRODUKTU I JEGO PRZEZNACZENIE nia wykonania ruchu (otwarcia lub zamknięcia rolet, markiz, itp.) w danej chwili dnia i w jednym lub kilku dniach tygodnia, w sposób ustalony i zaprogramowany ERA TIME jest nadajnikiem radiowym służącym do sterowania automatyką do mar- przez użytkownika. Na przykład, zdarzeniem jest polecenie otwarcia rolet o godzi- kiz i rolet. Oprócz normalnego, ręcznego funkcjonowania, posiada również system nie 8:37 w Sobotę i Niedzielę; innym zdarzeniem jest polecenie podniesienia mar- do automatycznego przesyłania poleceń, który może być programowany przez użyt-...
-
Página 103: Montaż Produktu
2 - MONTAŻ PRODUKTU 2.1 - Włączyć nadajnik – Ustawić zegar i inne parametry podstawowe po uprzednim włożeniu baterii. 8.30 10.45 12.15 14.30 17.15 19.30 • Nadajnik funkcjonuje przy użyciu dwóch baterii, już umieszczonych w jego wnę- trzu, ale odłączonych, w celu uniknięcia ich niepotrzebnego zużycia. W celu włą- “ON” “---” “OFF”... - Página 104 PROCEDURA 1 - Aby ustawić PARAMETRY PODSTAWOWE po podłączeniu zasilania do nadajnika Krok 1 Krok 2 Krok 3 przykład: przykład: przykład: piątek Su Mo Tu We Fr Sa ustawić DZIEŃ (nazwa) ustawić GODZINĘ potwierdzić ustawić MINUTY potwierdzić potwierdzić Krok 4 Krok 5 Krok 6 przykład: przykład: przykład:...
- Página 105 (zapalony światłem stałym) przytrzymać wciśnięty ... 3 ruchy ... zwolnić PROCEDURA 3 - Aby wczytać ERA TIME jako „Drugi (lub trzeci, czwarty, itp.) Nadajnik” Użyć niniejszej procedury wyłącznie, gdy w automatyce jest już wczytany jeden lub kilka nadajników. Jeżeli nie jest obecny żaden nadajnik, należy obowiązkowo użyć Pro- cedury 2. Krok 1 - 2 - 3 - 4 Krok 5 Krok 6 ...
- Página 106 3 - WSKAZÓWKI NA WYŚWIETLACZU I ICH 2.3 - Montaż uchwytu nadajnika ZNACZENIE • Uchwyt nadajnika należy zamontować na pionowej ścianie. • Montaż musi być wykonany w strefie chronionej. Nie montować uchwytu na ze- Na poniższym rysunku przedstawiono wskazówki i symbole, które mogą się pojawić wnątrz lub w strefach zagrożonych występowaniem niesprzyjających warunków na wyświetlaczu nadajnika, w zależności od wykonywanego działania. pogodowych. • Strefa 1: symbole, które wyświetlają tryby funkcjonowania i typologie programo- • Uchwyt nadajnika musi być ustawiony na wysokości 1,5m od podłoża. wania. • Przed przymocowaniem uchwytu nadajnika na stałe, ustawić tymczasowo nadaj- • Strefa 2: symbole, które wyświetlają zegar tygodniowy, wartość parametrów pod- nik w miejscu montażu jego uchwytu i wysłać polecenie do wszystkich automatyk, upewniając się, że otrzymały one przesłane polecenie.
- Página 107 W trakcie programowania „zdarzenia” (Procedura 6), ten symbol in- Prog Wskazują, że w programowaniu jest obecne „kasowanie zdarze- formuje o tym, że została dezaktywowana funkcja specjalna „Czuj- nia” (Procedura 8). nik On/Off” dla zdarzenia, które się właśnie programuje. Tym sa- Prog Wskazują, że w programowaniu jest obecne „kopiowanie zdarze- mym, urządzenie sterujące automatyką nie będzie wykonywało au- nia” (Procedura 9). COPY tomatyczne polecenia wydawane przez czujniki klimatyczne, od mo- mentu zajścia zdarzenia. Stan ten dobiegnie końca po wykonaniu Wskazują, że w programowaniu jest obecna “regulacja zegara i Prog...
- Página 108 i „Czas planetarny”, przy użyciu Procedury 5 (Uwaga – Jeżeli podczas doprowadzania zasilania do nadajnika przeprowadzono Procedurę 1, nie jest konieczne ponowne ustawianie czasu planetarnego przy użyciu Procedury 5); • zaprogramować „zdarzenia”, przy użyciu Procedury 6 i Procedury 7, 8, 9; • ustawić zegar i datownik wewnętrzny, przy użyciu Procedury 10 (Uwaga – Jeżeli podczas doprowadzania zasilania do nadajnika przeprowadzono Procedurę 1, należy użyć Procedury 10 wyłącznie do wniesienia ewentualnych zmian do ustawionych parametrów podstawowych). 6 - USTAWIĆ PARAMETRY „FUNKCJI SPECJALNYCH” Uwaga! – Podczas programowania zdarzeń, jeżeli pragnie się włączyć funkcje specjalne „Na wakacjach ” i „Czas planetarny”, konieczne jest uprzednie ustawienie para- metrów tych funkcji. W celu wykonania ustawień, należy użyć następujących procedur. PROCEDURA 4 - Aby wyregulować parametry funkcji specjalnej „NA WAKACJACH” Funkcja ta przesuwa, w przypadkowy sposób, czas zdarzenia o kilka minut w stosunku do zaprogramowanego czasu; w ten sposób umożliwia symulację obecności osób w domu nawet wtedy, gdy mieszkańcy są nieobecni. Jeżeli funkcja „Na wakacjach” została włączona dla jednego lub kilku zdarzeń, należy również ustawić wartość maksy- malnego żądanego odchylenia w stosunku do godziny zaprogramowanej na wykonanie zdarzeń. Jeżeli funkcja nie została włączona dla żadnego z utworzonych zdarzeń,...
- Página 109 PROCEDURA 5 - Aby wyregulować parametr funkcji specjalnej „CZAS PLANETARNY” Funkcja ta przyspiesza lub opóźnia czas zaprogramowany na wykonanie zdarzeń, działając dzień po dniu, podczas całego roku, w zależności od miejscowej godziny wscho- du i zachodu słońca: na przykład, w lecie funkcja ta powoduje przyspieszenie zdarzeń porannych i opóźnienie zdarzeń popołudniowych. Zazwyczaj, ustawienie parametru tej funkcji jest wymagane w sposób automatyczny przez system po włożeniu baterii do nadajnika i musi być wykonane przy użyciu Procedury 1. Jeżeli natomiast w tej chwili procedura została przesunięta w czasie, w celu późniejszego ustawienia czasu planetarnego, bez wyciągania i wkładania baterii, należy stosować poniższą Procedurę 5. Krok 1 Krok 2 Krok 3 Auto strona główna Prog Auto stop/esc Prog kilka razy ... (wyświetlacz) 2 razy (wyświetlacz) potwierdzić...
- Página 110 Krok 1 Krok 2 Krok 3 Krok 4 Auto strona Prog główna Prog NEWU stop/esc Auto Prog Programowanie kilka razy ... (wyświetlacz) 2 razy (wyświetlacz) potwierdzić potwierdzić NOWE ZDARZENIE potwierdzić ZDARZEŃ Krok 5 Krok 6 Krok 7 ... przykład: przykład: Mo Tu We Th Fr Sa...
- Página 111 ... Krok 11 Krok 12 ... wolne miganie • szybkie miganie = funkcja włączona • szybkie miganie = funkcja wyłączona kilka razy ....w celu włączenia lub wyłączenia funkcji potwierdzić MANEWR CZĘŚCIOWY ... Krok 12 Krok 13 • szybkie miganie = funkcja włączona przykład: • wolne miganie = funkcja wyłączona CZAS RUCHU CZĘ- kilka razy ..
- Página 112 (10) - Po naciśnięciu przycisku „ok”, system wczytuje nowe zdarzenie i na wyświetlaczu miga napis „NEW”, (krok 15) wskazując, że nadajnik jest gotowy do ewentualnego zaprogramowania nowego zdarzenia. Jeżeli pragnie się zaprogramować nowe zdarzenie, należy powtórzyć Procedurę 6, rozpoczynając od Kroku 4. W przeciwnym razie, jeżeli pragnie się wyjść z trybu programowania i powrócić na stronę główną, należy wykonać Krok 16. PROCEDURA 7 - Aby dokonać zmiany („MOD”) istniejącego zdarzenia Wszystkie już zaprogramowane zdarzenia mogą być zmienione w każdej chwili. W celu dokonania zmiany zdarzenia, należy najpierw je odszukać i wybrać spośród zdarzeń obecnych w pamięci nadajnika. Krok 1 Krok 2 Krok 3 Krok 4 ... Auto strona Prog główna Prog NEWU stop/esc Auto Prog kilka razy ... (wyświetlacz) 2 razy (wyświetlacz)
- Página 113 Krok 1 Krok 2 Krok 3 Krok 4 ... Auto strona Prog główna Prog NEWU stop/esc Auto Prog kilka razy ... (wyświetlacz) 2 razy (wyświetlacz) potwierdzić (wyświetlacz) potwierdzić (wyświetlacz) 2 razy ... Krok 4 Krok 5 - koniec Opcja A: aby usunąć jednora- zowo wszystkie...
- Página 114 Krok 1 Krok 2 Krok 3 Krok 4 ... Auto strona Prog główna Prog NEWU stop/esc Auto Prog kilka razy ... (wyświetlacz) 2 razy (wyświetlacz) potwierdzić (wyświetlacz) potwierdzić (wyświetlacz) 3 razy ... Krok 4 Krok 5 ciąg dalszy ... wybrać...
- Página 115 PROCEDURA 10 - Aby wyregulować zegar i datownik wewnętrzny Krok 1 Krok 2 Krok 3 Auto strona główna Prog Auto stop/esc Prog GODZINA kilka razy ... (wyświetlacz) 2 razy (wyświetlacz) potwierdzić (wyświetlacz) 1 raz potwierdzić DATOWNIK Krok 4 Krok 5 Krok 6 przykład:...
- Página 116 9 - JAK UŻYWAĆ NADAJNIKA W poniższym rozdziale opisano sposób użycia nadajnika po zakończeniu wszystkich faz montażowych i programowania. Aby przywołać stronę główną Z każdej strefy lub strony można powrócić do punktu wyjścia, to znaczy na stronę główną, naciskając kilkakrotnie przycisk n/esc aż do rozpoczęcia migania napisu „Auto”. Krok 1 - koniec Na ekranie wyświetlane są: migający napis „Auto”, bieżąca godzina, bieżący dzień tygodnia stop/esc i godzina (czas letni lub zimowy). kilka razy ... (wyświetlacz) Aby włączyć funkcjonowanie w trybie automatycznym („Auto”) 01. Przywołać stronę główną naciskając kilkakrotnie przycisk n/esc, aż do rozpoczęcia migania przez napis „Auto”. Potwierdzić wybór naciskając przycisk „ok” (= napis „Auto” świeci światłem stałym).
- Página 117 – Aby ZABLOKOWAĆ przyciski ▲, n, ▼, „ok”: 01. Na wyświetlaczu wywołać napis „Auto” (= aktywowano tryb automatyczny). 02. 7-krotnie nacisnąć przycisk „sel”, do momentu zniknięcia symbolu . Krok 1 Krok 2 - koniec strona Auto główna (zapalony świa- stop/esc Auto tłem stałym) kilka razy ... (wyświetlacz) potwierdzić (wyświetlacz) 7 razy (wyświetlacz) przyciski zablokowane –...
- Página 118 Aby wysłać polecenie ręczne do jednego lub większej liczby zespołów Użytkownik może wysłać polecenia ręczne wyłącznie, gdy w nadajniku jest ustawiony tryb automatyczny („Auto”) lub, gdy jest on wyłączony („Man”). Wysyłanie poleceń ręcz- nych nie jest możliwe, gdy nadajnik jest ustawiony w trybie programowania („Prog”). Wysyłanie polecenia ręcznego w trakcie gdy nadajnik ustawiony jest na tryb automatyczny („Auto”) W tym trybie użytkownik może wysłać polecenie do jednej grupy (do wyboru) lub do wszystkich grup (równocześnie), postępując w następujący sposób. – Aby wysłać polecenie do POJEDYNCZEGO zespołu: 01. Na wyświetlaczu wywołać napis „Auto” (= aktywowano tryb automatyczny). 02.
- Página 119 Uwaga! – Jeśli na wyświetlaczu obecny jest symbol „słońce ON” (lub „słońce OFF”), w chwili wysłania polecenia do urządzenia sterującego automatyką, wysyłane jest rów- nież to właśnie ustawienie (patrz: opis funkcji specjalnej „Czujnik ON / OFF” w rozdziale 1 podręcznika). Zamiennie, można najpierw usunąć ustawienie „słońce ON” (lub „słoń- ce OFF”), korzystając w tym celu z Procedury G opisanej w rozdziale 9. Wysyłanie polecenia ręcznego w trakcie gdy nadajnik ma wyłączony tryb automatyczny („Man”) W tym trybie użytkownik może wysłać polecenie do jednego zespołu lub kilku zespołów (do wyboru), w następujący sposób. 01. Na wyświetlaczu wywołać napis „Man” (= dezaktywowano tryb automatyczny). 02. Kilkakrotnie nacisnąć przycisk „sel” przesuwając (migający) kursor pomiędzy poszczególnymi grupami (uwaga – po grupie 6, jeśli chce się powrócić do grupy 1 na- leży raz jeszcze, trzykrotnie, nacisnąć przycisk „sel”). Kursor należy zatrzymać obok grupy, którą chce się wybrać. • Potwierdzić wybór naciskając przycisk „ok” (kursor przestaje migać). 03.
- Página 120 Uwaga! – Jeśli na wyświetlaczu obecny jest symbol „słońce ON” (lub „słońce OFF”), w chwili wysłania polecenia do urządzenia sterującego automatyką, wysyłane jest rów- nież to właśnie ustawienie (patrz: opis funkcji specjalnej „Czujnik ON / OFF” w rozdziale 1 podręcznika). Zamiennie, można najpierw usunąć ustawienie „słońce ON” (lub „słoń- ce OFF”), korzystając w tym celu z Procedury G opisanej w rozdziale 9. W celu ręcznego aktywowania lub dezaktywowania funkcji specjalnej „Czujnik ON / OFF” wewnątrz jednej lub więcej grup Uwaga! • Jeśli Państwa instalacja nie jest wyposażona w czujniki klimatyczne, należy zignorować niniejszą procedurę. • Przed rozpoczęciem procedury należy zapoznać się z opisem funkcji specjalnej „Czujnik ON / OFF”, zamieszczonej w rozdziale 1 podręcznika. • Użytkownik może ręcznie ustawić funkcję tylko wtedy, gdy dezak- tywowany został tryb automatyczny (tj. na wyświetlaczu widoczny jest napis „Man”).
-
Página 121: Wymiana Baterii
10 - WYMIANA BATERII ... Krok 5 - koniec Zaświecenie się wskaźnika „ ” oznacza rozładowanie baterii i konieczność ich przykład: jak najszybszej wymiany. W tej sytuacji istnieje ryzyko nieprawidłowego przesłania poleceń do automatyk. Aby wymienić baterie, należy postępować w sposób przed- stop/esc stawiony na poniższym rysunku. Uwaga! – Po dokonaniu wymiany baterii, należy ponownie ustawić parame- potwierdzić... - Página 122 b) - de instructie gericht aan een groep activeert gelijktijdig alle automati- NEDERLANDS seringen die deel uitmaken van de betreffende groep en laat hen hetzelfde manoeuvre uitvoeren. • De zender kan één groep per keer bedienen, ofwel meerdere groepen tegelijkertijd, die in een “meervoudige groep”...
-
Página 123: Installatie Van Het Product
2 - INSTALLATIE VAN HET PRODUCT gebeurtenis automatisch de geprogrammeerde optie uit – zie het voorbeeld in de navolgende afbeelding), of iedere optie kan op eender welk moment door de gebruiker handmatig worden geprogrammeerd (zie hoofdstuk 9, paragraaf G). 2.1 - Zender inschakelen – Klok en andere basisparameters in- stellen na plaatsing van de batterij •... - Página 124 PROCEDURE 1 - Instelling van de BASISPARAMETERS nadat de zender onder stroom is gesteld Stap 1 Stap 2 Stap 3 voorbeeld: voorbeeld: voorbeeld: vrijdag Su Mo Tu We Fr Sa UUR instellen bevestigen MINUTEN instellen bevestigen DAG (naam) instellen bevestigen Stap 4 Stap 5 Stap 6...
- Página 125 ... loslaten PROCEDURE 3 - Opslag van ERA TIME als “Tweede (of derde, vierde ...) zender” Volg de onderstaande procedure alleen als in de automatisering al één of meer zenders zijn opgeslagen. Als er nog geen zenders opgeslagen zijn, dient u absoluut Proce- dure 2 te volgen.
-
Página 126: De Aanduidingen Op Het Display En Hun Betekenis
3 - DE AANDUIDINGEN OP HET DISPLAY EN 2.3 - Installatie van de zenderhouder HUN BETEKENIS • De zenderhouder moet aan een verticale wand geïnstalleerd worden. • De zender moet in een beschermde omgeving geïnstalleerd worden. Installeer hem De volgende afbeelding omvat alle aanwijzingen en de symbolen die op het display niet buiten of in een omgeving die onderhevig is aan de weersomstandigheden. - Página 127 Prog Bij het programmeren van een “gebeurtenis” (Procedure 6) geeft dit Geven aan dat het “wissen van een gebeurtenis” wordt gepro- symbool aan dat de speciale functie “Sensor ON/OFF” gedeacti- grammeerd (Procedure 8). veerd is voor de gebeurtenis die geprogrammeerd wordt. De auto- Prog Geven aan dat het “kopiëren van een gebeurtenis”...
- Página 128 Nu kunt u de verschillende programmeerprocedures uitvoeren: • De parameters van de speciale functies instellen: “Met verlof” via Procedure 4 en “Wereldklok” via Procedure 5 (Opmerking – Als bij inschakeling van de zender Proce- dure 1 is uitgevoerd, moet u de wereldklok niet opnieuw instellen via Procedure 5). •...
- Página 129 PROCEDURE 5 - Instelling van de parameter van de speciale functie “WERELDKLOK” Deze functie vervroegt of verlaat het geprogrammeerde tijdstip voor de uitvoering van gebeurtenissen door iedere dag in de loop van het jaar de tijd aan te passen op basis van het lokale tijdstip van zonsopgang en zonsondergang: zo laat de functie bijvoorbeeld gebeurtenissen in de voormiddag vroeger plaatsvinden, en gebeurtenissen in de namiddag later.
- Página 130 Stap 1 Stap 2 Stap 3 Stap 4 Auto hoofd Prog scherm Prog NEWU stop/esc Auto Prog meerdere Progr. GEBEURTE- NIEUWE (display) 2 maal (display) bevestigen bevestigen bevestigen malen... NISSEN GEBEURTENIS Stap 5 Stap 6 Stap 7 ... voorbeeld: voorbeeld: Mo Tu We Th Fr Sa...
- Página 131 ... Stap 11 Stap 12 ... langzaam knipperend • snel knipperend = functie geselecteerd • langzaam knipperend = functie gedeselecteerd meerdere malen .... om de functie te selecteren of te deselecteren bevestigen GEDEELTELIJK MANOEUVRE ... Stap 12 Stap 13 •...
- Página 132 (10) - Na het indrukken van de toets “ok” slaat het systeem de nieuwe gebeurtenis op en op het display begint de melding “NEW” opnieuw te knipperen (stap 15) om aan te geven dat de zender klaar is om eventueel een nieuwe gebeurtenis te programmeren. Dus als u nog een gebeurtenis wilt programmeren, herhaalt u Procedure 6 vanaf stap 4;...
- Página 133 Stap 1 Stap 2 Stap 3 Stap 4 ... Auto hoofdscherm Prog Auto Prog NEWU stop/esc Prog meerdere malen ... (display) 2 maal (display) bevestigen (display) bevestigen (display) 2 maal ... Stap 4 Stap 5 - einde Optie A: om alle gebeurtenissen in één keer te wissen Prog...
-
Página 134: Basisparameters Instellen (Zonder De Zender Eerst Uit Te Schakelen)
Stap 1 Stap 2 Stap 3 Stap 4 ... Auto hoofd Prog scherm Prog NEWU stop/esc Auto Prog meerdere malen ... (display) 2 maal (display) bevestigen (display) bevestigen (display) 3 maal ... Stap 4 Stap 5 vervolg ... de te kopiëren Prog gebeurtenis... -
Página 135: Procedure 10 - De Interne Klok En Datumaanduiding Instellen
PROCEDURE 10 - De interne klok en datumaanduiding instellen Stap 1 Stap 2 Stap 3 Auto hoofd scherm Prog Auto stop/esc Prog meerdere malen ... (display) 2 maal (display) bevestigen (display) 1 maal UUR - DATUM bevestigen Stap 4 Stap 5 Stap 6 voorbeeld:... -
Página 136: Hoe De Zender Gebruiken
9 - HOE DE ZENDER GEBRUIKEN In de paragrafen van dit hoofdstuk wordt beschreven hoe u de zender moet gebruiken nadat alle stappen van de installatie en de programmering zijn doorlopen. Om naar het hoofdscherm terug te keren Het is mogelijk om vanuit iedere omgeving of ieder scherm terug te keren naar het vertrekpunt, zijnde het hoofdscherm, door herhaaldelijk op de toets n/esc te drukken tot de melding “Auto”... - Página 137 – Om de toetsen ▲, n, ▼, “ok” te VERGRENDELEN: 01. Reset op het display de melding “Auto” (= automatische modus geactiveerd). 02. Druk 7 maal op de toets “sel” tot het symbool verdwijnt. Stap 1 Stap 2 - einde hoofd Auto scherm...
- Página 138 Om een handmatige instructie naar één of meer groepen te verzenden De gebruiker kan alleen handmatige instructies verzenden wanneer de automatische modus in de zender is ingesteld (“Auto”) of wanneer deze gedeactiveerd is (“Man”). Het is niet mogelijk om handmatige instructies te verzenden wanneer de zender in de programmeermodus is ingesteld (“Prog”). Verzending van een handmatige instructie wanneer de automatische modus in de zender is ingesteld (“Auto”) In deze modus kan de gebruiker een instructie verzenden naar één enkele groep (naar keuze) of naar alle groepen (tegelijkertijd).
- Página 139 Let op! – Als op het display het symbool “zon ON” (of “zon OFF”) verschijnt, wordt door de verzending van de instructie naar de automatisering ook deze instelling verzon- den (zie de beschrijving van de speciale functie “Sensor ON/OFF” in hoofdstuk 1 van de handleiding). Alternatief kunt u eerst de instelling “zon ON” (of “zon OFF”) wissen via Procedure G van hoofdstuk 9.
- Página 140 Let op! – Als op het display het symbool “zon ON” (of “zon OFF”) verschijnt, wordt door de verzending van de instructie naar de automatisering ook deze instelling verzon- den (zie de beschrijving van de speciale functie “Sensor ON/OFF” in hoofdstuk 1 van de handleiding). Alternatief kunt u eerst de instelling “zon ON” (of “zon OFF”) wissen via Procedure G van hoofdstuk 9.
-
Página 141: Vervangen Van De Batterijen
10 - VERVANGEN VAN DE BATTERIJEN ... Stap 5 - einde Wanneer de melding “ ” begint te branden, wil dat zeggen dat de batterijen leeg voorbeeld: zijn en dat ze zo snel mogelijk vervangen moeten worden. In dat geval bestaat er immers een risico dat de instructies niet correct naar de automatiseringen verzonden stop/esc kunnen worden. - Página 142 - Table E table for planning and recalling events and - Appendix how they have been configured. - Tabella E - Appendice tabella per pianificare gli eventi e per anno- tare gli eventi memorizzati. - Appendice - Tableau E tableau pour programmer les événements et pour rappeller les événements mémorisés. - Apéndice - Tabla E tabla para planificar los eventos y para...
- Página 143 EN - Name event Time Week day Groups and manoeuvres programmed Special functions IT - Nome evento Orario Giorni della settimana Gruppi e manovre programmate Funzioni speciali FR - Nom événement Horaire Jours de la semaine Groupes et manœuvres planifiées Fonctions spéciales ES - Nombre evento Horario...
- Página 144 Paris 26 Olsztyn 58 UNITED STATES ASIA • - Table D • Reims 27 Poznan 59 Code Code - Tabella D • - Ta- Rennes 28 Warsaw 60 Chicago 87 Abu Dhabi 105 bleau D • - Tabla Rouen 29 Wroclaw 61 Dallas 88 Adana 106...
-
Página 145: Technical Specifications
• All technical specifications stated herein refer to an ambient temperature of 20° C • DIRECTIVE 1999/5/EC OF THE EUROPEAN PARLIAMENT AND OF THE (± 5° C). • NICE reserves the right to make changes to products at any time when COUNCIL of 9 March 1999 on radio equipment and telecommunications deemed necessary, maintaining the same intended use and functionality. -
Página 146: Smaltimento Del Prodotto
• Tutte le caratteristiche tecniche riportate sono riferite ad una temperatura ambien- 9 marzo 1999 riguardante le apparecchiature radio e le apparecchiature ter- tale di 20°C (± 5°C). • Nice si riserva il diritto di ap portare modifiche al prodotto in minali di comunicazione e il reciproco riconoscimento della loro conformità, qualsiasi mo mento lo riterrà... -
Página 147: Mise Au Rebut Du Produit
Ce produit fait partie intégrante de l’automatisme qu'il commande et doit donc être ment officiel déposé au siège social de Nice S.p.A. et, en particulier, à la dernière mise à jour dis- mis au rebut avec ce dernier. Comme pour l’installation, à la fin de la durée de vie ponible avant l’impression de ce manuel. -
Página 148: Eliminación Del Producto
Este producto es parte integrante del automatismo y, por consiguiente, deberá eli- oficial que se encuentra en la sede de Nice S.p.a. y, en particular, con la última revisión disponible antes de la impresión de este manual. El texto ha sido readaptado por motivos de impresión. No minarse junto con éste. -
Página 149: Entsorgung Des Produktes
Erklärung in Übereinstimmung mit der Richtlinie 1999/5/EG 11 - ENTSORGUNG DES PRODUKTES Hinweis: Der Inhalt dieser Erklärung stimmt mit dem offiziell beim Geschäftssitz der Nice S.p.a. Dieses Produkt ist Bestandteil der Automatisierungssteuerung und muss daher ge- hinterlegten Dokument überein, insbesondere mit der letzten, vor dem Druck dieses Handbuchs meinsam mit dieser entsorgt werden. -
Página 150: Utylizacja Produktu
– Widmo radiowe (art. 3(3)): EN 300 220-2 V2.4.1:2012 szacowany na około 25 metrów wewnątrz budynków . l Kodowanie radiowe: Zgodnie z dyrektywą 1999/5/WE (Załącznik V) produktowi została przyznana „O-Code”, kompatybilny z „Flo-R” (dwa standardy Nice Spa); rolling code 72–bitowy. klasa 1 i został on oznaczony: 0682 l Rozdzielczość zegara: 1 minuta. l Precyzja zegara: ±150 sekund/rok. l Maksymalna liczba wczytywanych zdarzeń: 100 l Stopień... -
Página 151: Afdanking Van Het Product
• Alle vermelde technische specificaties hebben betrekking op een omgevingstempe- ratuur en de wederzijdse erkenning van hun conformiteit, op basis van de ratuur van 20 °C (± 5 °C). • Nice behoudt zich het recht voor om, op elk moment dat volgende geharmoniseerde normen: dit noodzakelijk wordt geacht, wijzigingen aan het product aan te brengen, waarbij –... - Página 152 Nice SpA Oderzo TV Italia www.niceforyou.com info@niceforyou.com...