
Manuales relacionados para Samson Go Mic Mobile


Resumen de contenidos para Samson Go Mic Mobile
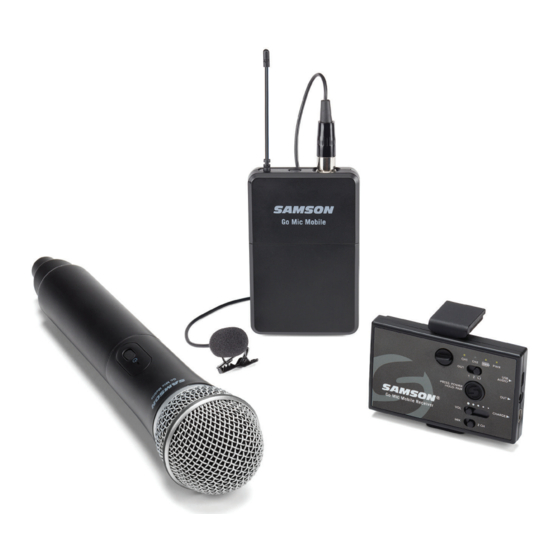
- Página 1 Go Mic Mobile Professional Wireless System for Mobile Filmmaking Quick Start Guide...
-
Página 2: Important Safety Information
By doing so you will ensure that your disposed product undergoes the necessary treatment, recovery and recycling and thus prevent potential negative effects on the environment and human health. Copyright 2017, Samson Technologies Corp. v4 Samson Technologies Corp. 278-B Duffy Ave Hicksville, NY 11801 www.samsontech.com... - Página 3 Owner’s Manual Important Safety Information Read these instructions. 13. Unplug the apparatus during lightning storms, or when unused for long periods Keep these instructions. of time. Heed all warnings. 14. Refer all servicing to qualified personnel. Follow all instructions. Service is required when the apparatus Do not use this apparatus near water.
- Página 4 WARNING: The battery (battery or batteries or battery pack) shall not be exposed to excessive heat such as sunshine, fire or the like. Hereby, Samson Technologies Corp., declares that this Go Mic Mobile Wireless System is in compliance with the essential requirements and other relevant provisions of Directive 2014/53/ EU.
- Página 5 RA number prior to shipping your unit. Please retain the original packing materials and, if possible, return the unit in its original carton. If your Go Mic Mobile Wireless System was purchased outside of the United States, contact your local distributor for warranty details...
- Página 6 USB port” it will take 10 hours. The max run time from a full battery is approximately 7–13 hours. Note: The Go Mic Mobile receiver does not recharge from the Micro USB port, so the battery level will decrease if plugged into a computer. If you want to power the receiver while it is connected to a device, you will also need to connect the Mini USB port to the computer or AC adapter.
- Página 7 OUT Jack - Use this 3.5mm jack when connecting to an analog input or headphones. 10. USB CHARGE Port - Use this Mini USB jack to connect the Go Mic Mobile Receiver to the included AC adapter to charge the receiver’s internal battery.
- Página 8 Go Mic Mobile Go Mic Mobile Receiver (GMM) Callouts 12. Adjustable Mounting Arm - This mounting arm is adjustable to affix the GMM Receiver to a smartphone. To adjust, loosen the Lock Screw on the top of the GMM Receiver. To fix the arm in place, tighten the Lock Screw.
- Página 9 Press >5 seconds to enter pairing mode. Battery Cover - Unscrew the battery cover and slide down to open the Go Mic Mobile Handheld battery compartment. Battery Holder - Open the battery holder by pressing the tab and lifting the cover. Insert...
- Página 10 Go Mic Mobile PXD2 Belt Pack Transmitter Callouts Input Connector - Connect the input device via the mini-XLR connector. The PXD2 is supplied with a lavalier microphone. Status Indicator - This LED displays the operation mode Power/Pair Switch - Press <5 seconds to turn the unit on or off.
- Página 11 Owner’s Manual Getting Started - Pairing The Go Mic Mobile system will come paired from the factory. If you need to re-pair the system for any reason follow these steps: 1. Turn on the Go Mic Mobile Receiver (GMM) and Go Mic Mobile transmitter by pressing their Power/Pair buttons for less than 5 seconds.
- Página 12 Go Mic Mobile Getting Started - Audio Connections The Go Mic Mobile can be connected to a smartphone using the Micro USB digital output or 3.5mm analog output. Connecting to an iOS device (iPhone, iPad or iPod Touch) Using the included Micro USB to Lightning cable, connect the cable to the USB Audio Output jack on the GMM to the Lightning connector on the iOS device.
- Página 13 Good audio can vastly improve a poorly shot video, but bad audio can hurt any video. In order to achieve the best results when adding audio to video with the Go Mic Mobile, it is important to pay attention to the gain staging of the transmitters and receiver. If the signal is too high, it can overload or distort.
-
Página 14: Mounting Accessories
Go Mic Mobile Go Mic Mobile Mounting Instructions Mounting Accessories Adjustable Insert Cover Mounting Arm 1/4”-20 Mounting Mounting Arm Cold Shoe Adapter Thumb Screw Large Hook-and- Small Hook-and- loop loop Mounting to a smartphone 1. Loosen the Lock Screw until the Adjustable Mounting Arm can be moved. - Página 15 6. Remove the backing of the loop side and position the receiver on the rear side of the tablet. 7. Press the Go Mic Mobile Receiver against the tablet to secure. 8. If the Go Mic Mobile Receiver is not secure, use the additional Small Hook-and- loop section..
- Página 16 Go Mic Mobile Mounting to a tripod 1. Affix the 1/4”-20 Mounting Arm to the Go Mic Mobile Receiver by first removing the fixed Mounting Arm using the two Phillips head screws. 2. Attach the GMM to the tripod following the tripod mounting instructions.
- Página 17 Arm with the Insert Cover piece. 4. Replace the Lock Screw 5. Position the included shoe mount adapter on the bottom of the Go Mic Mobile Receiver, take note that the shoe mount adapter is keyed so it will stay in position when attached to the receiver.
- Página 18 PXD2 Belt Pack Transmitter Input Connector Mini-XLR (P3) RF Power <10 mW EIRP Power Requirements Two AA (LR6) alkaline batteries Battery Life 20 hours At Samson, we are continually improving our products, therefore specifications and images are subject to change without notice.
- Página 19 Owner’s Manual Declaration “Made for iPod,” “Made for iPhone,” and “Made for iPad” mean that an electronic accessory has been designed to connect specifically to iPod, iPhone, or iPad, respectively, and has been certified by the developer to meet Apple performance standards. Apple is not responsible for the operation of this device or its compliance with safety and regulatory standards.
-
Página 20: Informations De Sécurité Importantes
Go Mic Mobile Informations de sécurité importantes Cet éclair avec le symbole de flèche dans un triangle équilatéral est destiné à alerter l’utilisateur de la présence de « tension dangereuse » non isolée à l’intérieur du produit qui peut être d’une importance suffisante pour constituer un ATTENTION risque de choc électrique. - Página 21 Mode d’emploi Informations de sécurité importantes Lisez ces instructions. 14. Confiez l’entretien à du personnel d’entretien qualifié. Une réparation est nécessaire si Conservez ces instructions. l’appareil a été endommagé d’une façon Respectez tous les avertissements. quelconque, par exemple si le cordon d’alimentation ou la fiche sont endommagés, Suivez toutes les instructions.
- Página 22 équivalent. Par la présente, Samson Technologies Corp., déclare que ce système sans fil Go Mic Mobile est conforme aux exigences essentielles et autres dispositions pertinentes de la directive 2014/53/CE. Cette déclaration de conformité...
- Página 23 Mode d’emploi Introduction Merci d’avoir acheté le système sans fil Samson Go Mic Mobile de Samson. Le Go Mic Mobile est un double système sans fil conçu pour fournir un son de qualité professionnelle pour la vidéo mobile. Jumelez et mixez deux émetteurs au récepteur Go Mic Mobile et transformez votre appareil mobile en studio de production vidéo complet.
- Página 24 7 à 13 heures. Remarque : Le récepteur Go Mic Mobile ne se recharge pas à partir du port Micro USB, le niveau de la batterie diminuera donc s’il est branché sur un ordinateur. Si vous voulez mettre le récepteur sous tension pendant qu’il est connecté...
- Página 25 Prise OUT - Utilisez cette prise de 3,5 mm pour connecter une entrée analogique ou un casque. Port USB CHARGE - Utilisez cette mini prise USB pour connecter le récepteur Go Mic Mobile à l’adaptateur secteur fourni pour charger la batterie interne du récepteur.
- Página 26 Go Mic Mobile Légendes du récepteur Go Mic Mobile (GMM) Bras de montage réglable - Ce bras de montage est ajustable pour fixer le récepteur GMM sur un smartphone. Pour procéder au réglage, desserrez la vis de verrouillage située sur le dessus du récepteur GMM.
- Página 27 Couvercle de batterie - Dévissez le couvercle de la batterie et ouvrez le compartiment de la batterie du Go Mic Mobile de poche. Support de batterie - Ouvrez le support de batterie en appuyant sur la languette et en levant le couvercle.
- Página 28 Go Mic Mobile Légendes de l’émetteur de ceinture PXD2 Connecteur d’entrée - Raccordez le dispositif d’entrée via le connecteur mini-XLR. Le PXD2 est fourni avec un microphone cravate. Indicateur d’état - Ce voyant affiche le mode de fonctionnement Touche Power/Pair - Appuyez sur la touche pendant plus de 5 secondes pour mettre l’unité...
- Página 29 Mode d’emploi Démarrage - Appariement Le système Go Mic Mobile est apparié en usine. Si, pour une raison quelconque, vous devez apparier à nouveau le système, exécutez les étapes suivantes : Allumez le récepteur Go Mic Mobile (GMM) et l’émetteur Go Mic Mobile en appuyant sur les touches Power/Pair pendant moins de 5 secondes.
- Página 30 Go Mic Mobile Démarrage - Connexions audio Le Go Mic Mobile peut être connecté à un smartphone en utilisant la sortie numérique Micro USB ou une sortie analogique de 3,5 mm. Connexion à un dispositif iOS (iPhone, iPad ou iPod Touch) A l’aide d’un câble Micro USB vers Lightning inclus, connectez le câble à...
- Página 31 Afin d’obtenir les meilleurs résultats lors de l’ajout d’audio à la vidéo avec le Go Mic Mobile, il est important de prêter attention à l’étage du gain des émetteurs et du récepteur. Si le signal est trop élevé, il peut se saturer ou se déformer.
-
Página 32: Montage Des Accessoires
Go Mic Mobile Instructions de montage du Go Mic Mobile Montage des accessoires Bras de montage Pièce de Bras de montage Bras de montage réglable recouvrement 1/4”-20 Adaptateur pour Vis à ailettes Grande section de Petite section de griffe crochet et boucle... - Página 33 Retirez le dos de la boucle et placez le récepteur à l’arrière de la tablette. Appuyez le récepteur mobile Go Mic Mobile contre la tablette pour le fixer. Si le récepteur mobile Go Mic Mobile n’est pas sécurisé, utilisez la petite section supplé- mentaire crochet et boucle...
-
Página 34: Montage Sur Un Trépied
Go Mic Mobile Montage sur un trépied Fixez le bras de montage 1/4"-20 au récepteur mobile Go Mic en enlevant d’abord le bras de montage fixe à l’aide des deux vis cruciformes. Fixez le GMM au trépied en suivant les instructions de montage du trépied. - Página 35 Owner’s Manual Fixation sur un adaptateur à griffe Retirez le bras de montage fixe en dévissant les deux vis. Le bras de montage réglable peut être retiré en desserrant la vis de verrouillage, en faisant glisser le bras en position fermée, puis en dévissant complètement la vis de verrouillage avant de la retirer.
- Página 36 Puissance RF 10 mW EIRP Puissance nécessaire Deux piles alcalines AA (LR6) Durée de vie de la pile 20 heures Chez Samson, nous améliorons en permanence nos produits, par conséquent, les spécifications et les images sont susceptibles d’être modifiées sans préavis.
- Página 37 Owner’s Manual Déclaration "Made for iPod","Made for iPhone" et "Made for iPad" signifient qu’un accessoire électronique a été conçu pour se connecter spécifiquement à l’iPod, iPhone ou iPad, respectivement, et a été certifié par le déve- loppeur pour répondre aux normes de performance Apple. Apple n’est pas responsable du fonctionnement de cet appareil ni de sa conformité...
-
Página 38: Wichtige Sicherheitshinweise
Go Mic Mobile Wichtige Sicherheitshinweise Das Dreieck mit dem Blitz-Pfeil- Symbol soll den Anwender darauf hinweisen, dass nicht isolierte „gefährliche Spannung“ im Gerätegehäuse vorhanden ist und diese u. U. ein Stromschlagrisiko darstellt. ACHTUNG RISQUE D’ÉLECTROCUTION ! NE PAS OUVRIR ! Das Dreieck mit dem ACHTUNG: NEHMEN SIE NIEMALS Ausrufezeichen soll für den... - Página 39 Benutzerhandbuch Wichtige Sicherheitshinweise Lesen Sie diese Anleitung. 13. Ziehen Sie den Netzstecker des Geräts aus der Steckdose, wenn ein Gewitter aufzieht Bewahren Sie diese Anleitung gut auf. oder das Gerät voraussichtlich für längere Beachten Sie sämtliche Warnhinweise. Zeit ungenutzt bleibt. Befolgen Sie sämtliche Anweisungen.
- Página 40 WARNUNG: Die Batterie (Batterie, Akku oder gebündelte Batterie) darf niemals großer Hitze wie direk- tem Sonnenlicht, Feuer oder ähnlichem ausgesetzt werden. Hiermit erklärt die Samson Technologies Corp., dass das vorliegende kabellose Go Mic Mobile-System die wesentlichen Anforderungen und sonstige anwendbare Bestimmungen der Richtlinie 2014/53/EU erfüllt.
- Página 41 Einführung Herzlichen Glückwunsch zum Erwerb eines drahtlosen Go Mic Mobile-Systems von Samson. Das Go Mic Mobile ist ein duales Drahtlossystem, das dafür ausgelegt ist, für unterwegs gedrehte Filme Tonspuren in Profiqualität bereitzustellen. Paaren und mischen Sie zwei Sender für Ihr GMM und verwandeln Sie Ihr Mobilgerät in ein vollwertiges Videoproduktionsstudio.
- Página 42 Go Mic Mobile Aufladen der Batterie des Empfängers Ihres Go Mic Mobile-Systems Im Gehäuse des Empfängers Ihres Go Mic Mobile-Systems befindet sich ein Lithium- Ionen-Akku. Der Empfänger wird über den Mini-USB-Anschluss, der seitlich am Empfänger angebracht ist, aufgeladen. Verwenden Sie, um den Empfänger aufzuladen, das USB-Ladekabel und den AC-Adapter.
- Página 43 Tonquelle oder einen Kopfhörer/ein Paar Ohrhörer anschließen. USB-Ladeanschluss (CHARGE) – Über diese Mini-USB-Steckbuchse können Sie den Empfänger ihres Go Mic Mobile-Systems an den im Lieferumfang enthaltenen AC-Adapter anschließen, um die Batterie im Gehäuse des Empfängers aufzuladen. Verriegelungsschraube – Drehen Sie diese links herum, um die Schraube zu lösen und die Befestigungsstrebe einzustellen.
- Página 44 Go Mic Mobile Die einzelnen Elemente am Empfänger Ihres Go Mic Mobile (GMM)-Systems Verstellbare Befestigungsstrebe – Diese Befestigungsstrebe kann verstellt werden, damit sich der GMM-Empfänger an einem Smartphone anbringen lässt. Lösen Sie die Verriegelungsschraube oben am Empfänger Ihres GMM-Systems. Ziehen...
- Página 45 Sie ihn > 5 Sekunden gedrückt, um in den Pairing-Modus zu wechseln. Batteriefachabdeckung – Schrauben Sie, um das Batteriefach des in der Hand gehaltenen Teils Ihres Go Mic Mobile-Systems zu öffnen, die Batteriefachabdeckung los und schieben Sie diese nach unten. Batteriehalterung – Öffnen Sie die Batteriehalterung, indem Sie auf die Lasche drücken und die Abdeckung anheben.
- Página 46 Go Mic Mobile Die Bestandteile des Tragegurtsets für den Sender PXD2 Eingangssteckverbinder – Schließen Sie hier das Eingabegerät über den Mini-XLR-Stecker an. Ihr PXD2 wird mit einem Halsmikrofon („Lavaliermikrofon“) ausgeliefert. Statusanzeige – Diese LED zeigt den Betriebsmodus an. Schalter Power/Pair (Ein/Aus / Pairing) – Drücken Sie diesen Schalter und halten Sie ihn < 5...
- Página 47 Modus. Wenn kein Sender mit dem Empfänger gepaart ist, überschreitet das GMM- System sein Zeitlimit und kehrt in den Pairing-Zustand davor zurück. Hinweis: Schalten Sie, wenn Sie an Ihrem Go Mic Mobile-System ein Pairing ausführen, unbedingt nur einen GMM-Empfänger ein. Es darf sich immer nur ein Mikrofon im Pairing-...
- Página 48 Go Mic Mobile Erste Schritte – Audio-Verbindungen Ihr Go Mic Mobile kann über den digitalen Micro-USB-Anschluss oder den analogen 3,5mm-Ausgang an ein Smartphone angeschlossen werden. Verbindung zu einem iOS-Gerät (iPhone, iPad oder iPod Touch) Schließen Sie das mitgelieferte Micro USB-auf-Lightning-Kabel an die Buchse des USB Audio-Ausgangs am GMM und an die Lightning-Steckbuchse am iOS-Gerät an.
- Página 49 Gute Audioqualität kann ein schlecht gefilmtes Video beachtlich aufwerten, schlechte Audioqualität hingegen ist Gift für jedes Video. Damit Sie optimale Ergebnisse erzielen, wenn Sie mit Go Mic Mobile Ihrem Video eine Tonspur hinzufügen, ist es wichtig, dass Sie exakt auf das Gain-Verhalten von Sendern und Empfänger achtgeben. Wenn die Signalfrequenz zu hoch ist, kann es zu Überlast oder Verzerrung kommen.
- Página 50 Go Mic Mobile Montageanweisungen Go Mic Mobile Montagezubehör Verstellbare Einschubabdeckung Befestigungsstrebe Befestigungsstrebe Befestigungsstrebe 1/4” - 20 Zubehörschuh- Flügelschraube Großes Klettstück Kleines Klettstück Adapter Montage an einem Smartphone Lösen Sie die Verriegelungsschraube, bis Sie die verstellbare Befestigungsstrebe bewegen können. Positionieren Sie den Empfänger an der Rückseite Ihres Smartphones.
- Página 51 Entfernen Sie die Schutzschicht von der Maschenseite des Klettverschlusses und positionieren Sie den Empfänger hinten an Ihrem Tablet-Computer. Drücken Sie zum Befestigen den Empfänger Ihres Go Mic Mobile-Systems gegen Ihren Tablet-Computer. Nutzen Sie, wenn der Empfänger Ihres Go Mic Mobile-Systems nicht fest sitzt, das kleine Zusatz-Klettstück.
- Página 52 9,5 mm (3/8“) ist, die im Lieferumfang enthaltene Flügelschraube, bevor Sie den Empfänger Ihres Go Mic Mobile-Systems am Stativ befestigen. Befestigen Sie das Smartphone am Empfänger Ihres Go Mic Mobile-Systems. Halten Sie sich hierbei an die Anweisungen aus dem mit „Befestigung an einem Smartphone“...
- Página 53 Setzen Sie die Verriegelungsschraube wieder ein. Positionieren Sie den mitgelieferten Zubehörschuh-Adapter an der Unterseite des Empfängers Ihres Go Mic Mobile-Systems. Beachten Sie dabei, dass der Zubehörschuh-Adapter verkeilt ist, sodass er in seiner Position verbleibt, wenn er am Empfänger befestigt wird.
-
Página 54: Technische Daten
Tragegurtset für den Sender PXD2 Eingangssteckverbinder Mini-XLR (P3) Funkfrequenzleistung < 10 mW (äquivalente isotrope Strahlungsleistung) Leistungsaufnahme Zwei alkalische Akkus AA (LR6) Akkulaufzeit 20 Stunden Bei Samson verbessern wir unsere Produkte kontinuierlich. Entsprechend behalten wir uns das Recht vor, Spezifikationen und Abbildungen ohne vorherige Ankündigung zu ändern. - Página 55 Owner’s Manual Erklärung Die Kennzeichnungen „Made for iPod“, „Made for iPhone“ und „Made for iPad“ bedeuten, dass ein elektronischer Zubehörartikel speziell für die Verbindung zu iPod, iPhone oder iPad entwickelt wurde und von seinem Entwickler auf die Leistungsstandards von Apple hin zerti- fiziert wurde.
- Página 56 Go Mic Mobile Información importante sobre seguridad Este símbolo de un relámpago con punta de flecha dentro de un triángulo equilátero está destinado a alertar al usuario de la presencia de "voltaje peligroso" no aislado dentro de la caja del producto, que puede ser de la suficiente magnitud ATENCIÓN...
- Página 57 Manual del propietario Información importante sobre seguridad Lea estas instrucciones. 14. Encargue todas las reparaciones a personal cualificado. Las reparaciones son necesarias Guarde estas instrucciones. cuando el aparato ha resultado dañado en Preste atención a todas las advertencias. cualquier forma; por ejemplo, si el enchufe o el cable de alimentación están dañados, se Siga todas las instrucciones.
- Página 58 ADVERTENCIA: La pila (pila o pilas o pack de pilas) no deberá exponerse a un calor excesivo, como el de la luz solar, el fuego u otras fuentes caloríficas similares. Por el presente, Samson Technologies Corp. declara que este Sistema Inalámbrico Go Mic Mobile cumple con los requerimientos esenciales y con el resto de provisiones relevantes de la Directiva 2014/53/EU. La declaración de conformidad puede consultarse en:...
-
Página 59: Introducción
Go Mic Mobile incluye todos los cables necesarios para conectar el Receptor Go Mic Mobile (GMM) a un smartphone o una cámara digital (con entrada de audio). Go Mic Mobile funciona con dispositivos iOS, Android, Mac OS y Windows. Los brazos de montado con cierre permiten montar el receptor Go Mic Mobile directamente en la parte trasera de un smartphone sin tapar la lente del teléfono. -
Página 60: Carga De La Pila Del Receptor Go Mic Mobile
10 horas. El tiempo de funcionamiento máximo con la pila totalmente cargada es de 7 a 13 horas. Nota: el Receptor Go Mic Mobile no se recarga desde el puerto USB Micro, así que el nivel de la pila disminuirá si lo enchufa a un PC. Si quiere recargar el receptor mientras lo tiene conectado a un dispositivo, también deberá... - Página 61 Manual del propietario Leyendas del Receptor Go Mic Mobile Receiver (GMM) Botón de Encendido/Sincronización - Pulse menos de 5 segundos para encender o apagar la unidad. Pulse y mantenga pulsado durante más de 5 segundos para entrar en el modo de sincronización.
-
Página 62: Leyendas Del Receptor Go Mic Mobile Receiver (Gmm)
Go Mic Mobile Leyendas del Receptor Go Mic Mobile Receiver (GMM) Brazo de Montado Ajustable - Este brazo de montado es ajustable para poder unir el Receptor GMM a un smartphone. Para unirlos, afloje el tornillo de fijación en la parte superior del Receptor GMM. -
Página 63: Leyendas Del Transmisor De Mano Hxd2
Manual del propietario Leyendas del Transmisor de Mano HXD2 Indicador de estado - Este LED muestra el modo de operación: Botón de Encendido/Sincronización - Pulse <5 segundos para encender o apagar la unidad. Pulse >5 segundos para entrar en el modo de sincronización. -
Página 64: Leyendas Del Transmisor De Cintura Pxd2
Go Mic Mobile Leyendas del Transmisor de cintura PXD2 Conector de entrada - Conecte el dispositivo de entrada mediante el conector mini-XLR. El PXD2 se suministra con un micrófono de corbata. Indicador de estado - Este LED muestra el modo de operación:... -
Página 65: Empezando - Sincronización
Cuando el receptor y el transmisor estén sincronizados los LEDs emitirán un rápido destello y el transmisor brillará con un sólido color verde, y el LED CH 1 del GMM, con un sólido color blanco. El LED CH 2 del Receptor Go Mic Mobile empezará ahora a iluminarse lentamente. -
Página 66: Empezando - Conexiones De Audio
Go Mic Mobile Empezando - Conexiones de audio Go Mic Mobile puede conectarse a un smartphone utilizando la salida digital USB Micro o una salida analógica de 3,5mm. Conexión a un dispositivo iOS (iPhone, iPad o iPod Touch) Use el cable eléctrico incluido en el Micro USB, conecte el cable al jack de salida audio USB al conector eléctrico en el dispositivo iOS. -
Página 67: Empezando - Configuración Del Sistema De Volumen
Ganancia (dentro del compartimento de las pilas) hasta llegar a un buen nivel de grabación, mientras habla a través del Transmisor de Go Mic Mobile. Si el indicador del CH correspondiente parpadea con una luz roja, disminuya el control de Ganancia (dentro del compartimento de las pilas) hasta que la luz roja desaparezca o solo produzca destellos ocasionales con señales muy altos. -
Página 68: Instrucciones De Montado De Go Mic Mobile
Go Mic Mobile Instrucciones de montado de Go Mic Mobile Accesorios de montado Brazo de montado Tapa Brazo de montado Brazo de montado ajustable 1/4”-20 Adaptador de zapata Tuerca Pieza grande del Pieza pequeña del gancho y bucle gancho y bucle Montado en un Smartphone Afloje el tornillo de fijación hasta que pueda mover el brazo de montado. -
Página 69: Montado En Una Tableta
Elimine la cobertura de la parte del bucle y coloque el receptor en la parte trasera de la tablet. Presione el Receptor Go Mic Mobile contra la tablet para asegurarlo. Si el Receptor Go Mic Mobile Receiver no queda fijo, use la sección pequeña del gancho y bucle. -
Página 70: Montado En Un Trípode
Go Mic Mobile Montado en un trípode Junte el brazo de montado 1/4”-20 al Receptor Go Mic Mobile sacando primero el brazo de montado fijo (desatornillar los dos tornillos de estrella). Una el GMM al trípode siguiendo las instrucciones de montado del trípode. -
Página 71: Unión Con Un Adaptador De Zapata
Cambie el tornillo de fijación Coloque el adaptador de zapata incluido en el fondo del Receptor Go Mic Mobile; note que el adaptador de zapata se acopla, por lo que permanecerá en la misma posición cuando lo una al receptor. -
Página 72: Especificaciones
<10 mW EIRP Requisitos de alimentación Dos pilas alcalinas AA (LR6) Vida útil de la pila 20 horas En Samson estamos continuamente mejorando nuestros productos; por lo tanto, las especifica- ciones e imágenes están sujetas a cambios sin previo aviso. -
Página 73: Declaración
Owner’s Manual Declaración “Made for iPod”, “Made for iPhone” y “Made for iPad” significa que un accesorio electrónico se ha diseña- do para conectar específicamente a un iPod, iPhone o iPad, respectivamente, y que su desarrollador ha comprobado que cumple con los estándares de funcionamiento de Apple. Apple no se hace responsable del funcionamiento de este dispositivo o de su cumplimiento con los estándares de seguridad y regulación. -
Página 74: Importanti Indicazioni Di Sicurezza
Go Mic Mobile Importanti indicazioni di sicurezza Il simbolo del fulmine con punta a forma di freccia all'interno di un triangolo equilatero indica la presenza di tensione pericolosa non isolata all'interno del prodotto di potenza tale da ATTENZIONE costituire rischio di folgorazione. - Página 75 Manuale per l'uso Importanti indicazioni di sicurezza Leggere queste istruzioni. utilizza un carrello, prestare attenzione durante lo spostamento della Conservare queste istruzioni. combinazione carrello/apparecchio per Osservare tutte le avvertenze. evitare lesioni dovute al ribaltamento. Seguire tutte le istruzioni. 13. Scollegare l'apparecchio dalla rete Non usare l'apparecchio in prossimità...
- Página 76 AVVERTENZA: Non esporre la batteria (batteria, batterie o accumulatore) a un livello di calore eccessivo dovuto a luce del sole, fuoco o simili. Con il presente documento, Samson Technologies Corp. dichiara che il dispositivo wireless Go Mic Mobile è conforme ai requisiti essenziali e alle altre disposizioni rilevanti della direttiva 2014/53/UE.
- Página 77 Il Go Mic Mobile include tutti i cavi necessari per collegare il ricevitore Go Mic Mobile (GMM) a uno smartphone o a una videocamera digitale (con un ingresso audio).
-
Página 78: Ricarica Della Batteria Del Ricevitore Del Go Mic Mobile
La durata massima della batteria a piena carica è di circa 7–13 ore. Nota: il ricevitore del Go Mic Mobile non si ricarica tramite la porta Micro USB, quindi il livello della batteria cala se collegato a un computer. Se si desidera alimentare il ricevitore mentre è... - Página 79 10. Porta di CARICA USB – Servirsi di questo jack Mini USB per collegare il ricevitore del Go Mic Mobile all’adattatore CA in dotazione e caricarne la batteria interna. 11. Vite di bloccaggio – Girare a sinistra per allentare la vite e regolare il braccio di...
- Página 80 Go Mic Mobile Ricevitore Go Mic Mobile (GMM) – Descrizione 12. Braccio di montaggio regolabile – Questo braccio di montaggio è regolabile per fissare il ricevitore GMM a uno smartphone. Per regolare, allentare la vite di bloccaggio in cima al ricevitore GMM.
- Página 81 Coperchio batterie – Svitare il coperchio e farlo scorrere verso il basso per aprire il vano batterie del Go Mic Mobile. Vano batterie – Aprire il vano batterie premendo la linguetta e sollevando il coperchio.
- Página 82 Go Mic Mobile Trasmettitore Belt Pack PXD2 – Descrizione Porta di ingresso – Collegare il dispositivo di ingresso tramite il connettore mini-XLR. Con il PXD2 è fornito un microfono lavalier. Spia di stato – Questo LED mostra a display la modalità...
- Página 83 2. Sul GMM, tenere premuto il tasto Power/Pair per più di 5 secondi. Il LED CH1 inizia a lampeggiare lentamente. 3. Sul trasmettitore Go Mic Mobile, tenere premuto il tasto Power/Pair per più di 5 secondi. Il LED del trasmettitore inizia a lampeggiare lentamente.
- Página 84 Servendosi del cavo da Micro USB a Lightning in dotazione, collegare il cavo dl jack di uscita USB Audio del GMM al connettore Lightning sul dispositivo iOS. Una volta collegato, il dispositivo iOS riconoscerà il Go Mic Mobile come dispositivo di ingresso audio.
- Página 85 è in grado di rovinare qualsiasi video. Per ottenere i risultati migliori al momento di aggiungere audio a video con il Go Mic Mobile, è importante prestare attenzione al guadagno dei trasmettitori e del ricevitore. Se il segnale è troppo alto, può provocare sovraccarico o distorsione.
-
Página 86: Accessori Di Montaggio
Go Mic Mobile Go Mic Mobile - Istruzioni di montaggio Accessori di montaggio Braccio di montaggio Coperchio Braccio di montaggio Braccio di regolabile montaggio 1/4”-20 Adattatore attacco Vite ad alette Velcro grande Velcro piccolo a slitta Montaggio su smartphone 1. Allentare la vite di bloccaggio fino a quando non è possibile muovere il braccio di montaggio regolabile. -
Página 87: Montaggio Su Tablet
6. Rimuovere la pellicola di protezione e posizionare il ricevitore sul retro del tablet. 7. Premere il ricevitore Go Mic Mobile contro il tablet per fissarlo. 8. Se il ricevitore Go Mic Mobile non è ben fissato, servirsi della piccola fascetta di velcro aggiuntiva.. -
Página 88: Montaggio Su Treppiede
Go Mic Mobile Montaggio su treppiede 1. Fissare il braccio di montaggio da 1/4”-20 al ricevitore Go Mic Mobile rimuoven- do innanzitutto il braccio di montaggio fisso servendosi delle due viti con testa a croce. 2. Fissare il GMM al treppiede seguendo le istruzioni di montaggio di quest’ultimo. -
Página 89: Fissaggio Ad Un Adattatore A Slitta
4. Riposizionare la vite di bloccaggio 5. Posizionare l’adattatore con attacco a slitta in dotazione sulla parte inferiore del ricevitore Go Mic Mobile, assicurandosi che sia ben fissato in modo che rimanga in posizione quando collegato al ricevitore. 6. Servendosi di un cacciavite con testa a croce, fissare l’adattatore con attacco a slitta al ricevitore, stringendo la vite in dotazione. -
Página 90: Specifiche Tecniche
Connettore di ingresso Mini-XLR (P3) Potenza in RF <10 mW EIRP Requisiti di alimentazione Due batterie alcaline AA (LR6) Durata batteria 20 ore Samson migliora continuamente i suoi prodotti, pertanto specifiche tecniche e immagini sono soggette a modifica senza preavviso. - Página 91 Owner’s Manual Dichiarazione “Adatto per iPod”, “Adatto per iPhone” e “Adatto per iPad” significa che un accessorio elettronico è stato progettato per il collegamento specifico a iPod, iPhone, o iPad, rispettiva- mente, e che lo sviluppatore ha certificato che tale accessorio soddisfa i requisiti standard operativi di Apple.
- Página 92 Samson Technologies Corp. 278-B Duffy Ave Hicksville, New York 11801 Phone: 1-800-3-SAMSON (1-800-372-6766) Fax: 631-784-2201 www.samsontech.com...