Tabla de contenido
Publicidad
Idiomas disponibles
Idiomas disponibles
Enlaces rápidos
HORUS
Cronotermostato da parete
programma giornaliero settimanale
Wall time-thermostat daily-weekly programme
Chronothermostat mural programme journalier-hebdomadaire
Cronotermostato de pared programa diario-semanal
Wandzeitthermostat Täglich-wöchentliches Programm
Cronotermostat de perete cu program zilnic sau săptămânal
GW 1 7 1
GW 14 7 1
Publicidad
Capítulos
Tabla de contenido

Manuales relacionados para Gewiss Chorus GW 10 701


Resumen de contenidos para Gewiss Chorus GW 10 701
- Página 1 HORUS Cronotermostato da parete programma giornaliero settimanale Wall time-thermostat daily-weekly programme Chronothermostat mural programme journalier-hebdomadaire Cronotermostato de pared programa diario-semanal Wandzeitthermostat Täglich-wöchentliches Programm Cronotermostat de perete cu program zilnic sau săptămânal GW 1 7 1 GW 14 7 1...
- Página 2 CEI 64-8 per gli apparecchi per uso domestico e similare, in ambienti non polverosi ed ove non sia necessaria una protezione speciale contro la penetrazione di acqua. L'organizzazione di vendita GEWISS é a disposizione per chiarimenti e informazioni tecniche.
-
Página 3: Tabla De Contenido
INDICE ISTRUZIONI D’IMPIEGO pag. - Descrizione generale....................- Descrizione comandi ....................- Modalità di funzionamento ..................- Selezione riscaldamento/condizionamento .............. - Impostazione parametri................... - Personalizzazione programma giornaliero..............12 - Forzatura temporanea della temperatura..............13 - Funzione party......................14 - Funzione holiday ..................... 15 - Copia del programma festivo................... -
Página 4: Istruzioni D'impiego
ISTRUZIONI D’IMPIEGO Descrizione generale Il cronotermostato gestisce il controllo della temperatura ambiente ed il comando caldaie, valvole di zona, condizionatori, fan coil, ecc. , attraverso un’uscita a relè. Tramite l’attivazione dei moduli di uscita abbinati è possibile comandare: caldaie, valvole di zona, condizionatori, fan-coil, ecc. -
Página 5: Descrizione Comandi
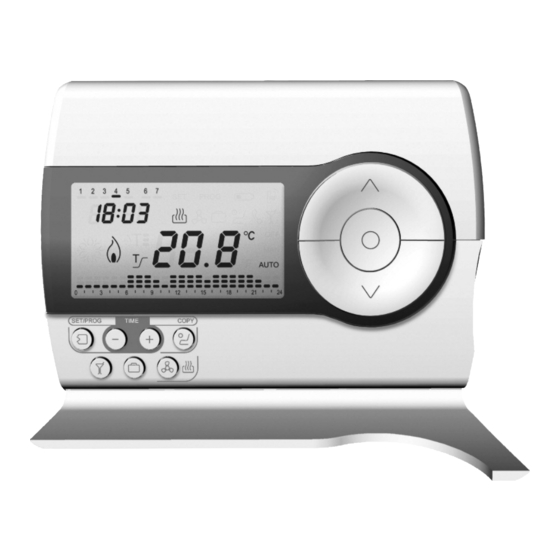
ISTRUZIONI D’IMPIEGO Descrizione comandi PULSANTI DI COMANDO Simbolo Programmazione / impostazione b Regolazione tempo c Party d Holiday e Selezione riscaldamento / condizionamento f Copia g Regolazione temperatura (+) / Selezione parametri h Selezione modalità funzionamento / conferma i Regolazione temperatura (–) / Selezione parametri SEGNALAZIONI A DISPLAY j Modalità... -
Página 6: Modalità Di Funzionamento
ISTRUZIONI D’IMPIEGO Modalità di funzionamento Il cronotermostato prevede 3 differenti modalità di funzionamento: - AUTOMATICO - MANUALE - OFF/ANTIGELO / PROTEZIONE ALTE TEMPERATURE Per commutare da una modalità ad un'altra si utilizza il tasto Nel funzionamento automatico il cronotermostato uti- lizza un programma che può... -
Página 7: Selezione Riscaldamento/Condizionamento
ISTRUZIONI D’IMPIEGO Modalità di funzionamento Durante il funzionamento, l’attivazione del riscaldamento o del condizionamento sono se- gnalate nel modo seguente: Riscaldamento Il simbolo indica l’accensione del riscaldamento. Condizionamento Il simbolo indica l’accensione del condizionamento. Selezione riscaldamento/condizionamento Premendo il tasto è possibile commutare il tipo di funzionamento tra riscaldamento/ condizionamento e viceversa. -
Página 8: Impostazione Parametri
ISTRUZIONI D’IMPIEGO Impostazione parametri Per eseguire l’impostazione dei parametri premere una volta il tasto Sul display appaiono il simbolo SET e l’orologio, mentre la barra del giorno della settimana inizia a lampeggiare. A questo punto è possibile modificare, in sequenza: - giorno della settimana, - ore, - minuti,... - Página 9 ISTRUZIONI D’IMPIEGO Impostazione parametri Impostazione dell’ora Quando le cifre dell’ora lampeggiano, impostare l’ora, con i tasti Per confermare il valore impostato, premere il tasto entro 30 secondi. Impostazione dei minuti Quando le cifre dei minuti lampeggiano, impostare i mi- nuti, con i tasti Per confermare il valore impostato, premere il tasto entro 30 secondi.
- Página 10 ISTRUZIONI D’IMPIEGO Impostazione parametri Impostazione Set-Point T1 All’apparire del simbolo il valore di temperatura inizia a lampeggiare. Regolare il valore di T1 con i tasti Per confermare il valore impostato, premere il tasto entro 30 secondi. Impostazione Set-Point T2 All’apparire del simbolo il valore di temperatura inizia a lampeggiare.
- Página 11 ISTRUZIONI D’IMPIEGO Impostazione parametri Attivazione autoapprendimento All’apparire del simbolo , attivare (ON) o disattivare (OFF) la funzione con i tasti Per confermare il valore impostato, premere il tasto entro 30 secondi. L’autoapprendimento permette di ottimizzare l’anticipo (max. 2 ore) sull’attivazione del riscaldamento. Il cronotermostato gestisce automaticamente l’anticipo, in modo da garantire la temperatura impostata all’inizio di ogni periodo del profilo programmato.
-
Página 12: Personalizzazione Programma Giornaliero
ISTRUZIONI D’IMPIEGO Personalizzazione programma giornaliero Per eseguire la personalizzazione del programma giornaliero preimpostato, o apportare una modifica, premere due volte il tasto Sul display appare il simbolo PROG mentre la barra del primo giorno della settimana inizia a lampeggiare. Selezionare il giorno desiderato con i tasti Per confermare la selezione, premere il tasto entro 30 secondi. -
Página 13: Forzatura Temporanea Della Temperatura
ISTRUZIONI D’IMPIEGO Personalizzazione programma giornaliero L’orario viene decrementato/incrementato con passi di 15 minuti ad ogni pressione dei ta- , è perciò possibile definire fino a 4 periodi di programmazione per ogni ora. Procedere in modo analogo a quanto sopra indicato, fino al completamento del profilo. Copia del Programma Qualora si desideri copiare il programma sul giorno successivo, confermare la programma- zione eseguita premendo il tasto... -
Página 14: Funzione Party
ISTRUZIONI D’IMPIEGO Funzione party In modalità AUTO, la funzione Party permette di escludere temporaneamente il programma impostato inserendo manualmente un set point di temperatura diverso, per un periodo compreso tra 1 e 23 ore. Questa funzione può essere usata, ad esempio, per prolungare il periodo di comfort durante una cena, una festa, ecc. -
Página 15: Funzione Holiday
ISTRUZIONI D’IMPIEGO Funzione Holiday In modalità AUTO, la funzione Holiday permette di escludere temporaneamente il program- ma settimanale impostato inserendo manualmente un set point di temperatura diverso, per un periodo compreso tra 1 e 99 giorni. Questa funzione può essere usata, ad esempio, per programmare un periodo di economia durante una vacanza e la riattivazione del programma il giorno del rientro. -
Página 16: Copia Del Programma Festivo
ISTRUZIONI D’IMPIEGO Copia del programma festivo In modalità AUTO, è possibile copiare il profilo del giorno festivo su un qualsiasi giorno del- la settimana. Questa funzione è particolarmente utile quando si desidera un regime di comfort tempora- neo, ad esempio, in una festività infrasettimanale. Per attivare la funzione premere il tasto , sul display lampeggiano il simbolo... -
Página 17: Funzionamento Manuale
ISTRUZIONI D’IMPIEGO Funzionamento manuale Per attivare la modalità di funzionamento manuale, pre- mere il tasto , finché sul display appare la scritta MAN. Il set point della temperatura appare per circa due secondi. Con i tasti impostare il valore del set point deside- rato, premere il tasto , o attendere 5 secondi per confermare l’impostazione. -
Página 18: Segnalazione Batterie In Esaurimento
ISTRUZIONI D’IMPIEGO Segnalazione batterie in esaurimento Quando le batterie sono in fase di esaurimento, sul di- splay inizia a lampeggiare il simbolo Il funzionamento del cronotermostato è comunque ga- rantito. In tal caso è necessario procedere quanto prima alla sostituzione delle batterie. Il funzionamento del cronotermostato non è... -
Página 19: Programmi Preimpostati
ISTRUZIONI D’IMPIEGO Programmi preimpostati Il cronotermostato dispone di 2 programmi preimpostati, uno per il riscaldamento ed uno per il condizionamento. PROGRAMMA RISCALDAMENTO Lunedì - Venerdì | 3 | | 6 | | 9 | | 12 | | 15 | | 18 | | 21 | | 24... -
Página 20: Parametri Preimpostati
ISTRUZIONI D’IMPIEGO Programmi preimpostati Giorno della settimana 1: lunedì 00:00 Set point temperatura riscaldamento 16 °C 18 °C 20 °C 5 °C antigelo Set point temperatura condizionamento 24 °C 26 °C 28 °C 35 °C protezione Autoapprendimento Funzione disabilitata (OFF) Differenziale di regolazione Riscaldamento 0.2 °C... -
Página 21: Istruzioni D'installazione
ISTRUZIONI D’INSTALLAZIONE Montaggio ATTENZIONE • Prima dell’installazione assicurarsi che i moduli di uscita associati, ricevano cor- rettamente i comandi. • Nella fase di installazione rispettare il verso di montaggio ( ) riportato sulla ba- se di supporto. Montaggio con tasselli. Montaggio su scatola 3 posti. - Página 22 ISTRUZIONI D’INSTALLAZIONE Montaggio Accesso ai morsetti Collegamento alla caldaia/condizionatore ed al remotizzatore (3 cavi)
- Página 23 ISTRUZIONI D’INSTALLAZIONE Montaggio Fissaggio a scatto del cronotermostato sulla relativa base e bloccaggio con vite. Per la corretta rilevazione della temperatura dell’ambiente da controllare è importante non installare il cronotermostato in nicchie, dietro porte, vicino a finestre o sorgenti di calore.
-
Página 24: Descrizione Morsetti
ISTRUZIONI D’INSTALLAZIONE Descrizione morsetti Collegamento per remotizzatore (linea seriale) 4 - TX (dati in uscita) 5 - GND (comune) 6 - RX (dati in ingresso) Collegamento per comando caldaia o condizionatore. Contatto in uscita 1 NA/NC 5A (AC1) / 2A (AC15), 250Vac. 1 - comune 2 - contatto NA 3 - contatto NC... -
Página 25: Sostituzione Batterie
ISTRUZIONI D’INSTALLAZIONE Sostituzione batterie 3 batterie alcaline 1,5V, tipo AAA Non disperdere le batterie scariche nell’ambiente... -
Página 26: Caratteristiche Funzionali/Dati Tecnici
CARATTERISTICHE FUNZIONALI / DATI TECNICI Tipo di funzionamento: riscaldamento e condizionamento Modalità di funzionamento: automatico, manuale e antigelo Temperatura operativa: -5° ÷ +45°C Temperatura misurata: 0 ÷ +45°C Sonda di temperatura: NTC, 100K a 25°C Accuratezza della misura: ±0,5°C a 20°C Programmi preimpostati: n°... - Página 27 E N G L I S H Wall time-thermostat daily-weekly programme...
- Página 28 IEC 60364, or the European harmonization document HD 60364. Gewiss sales organization is ready to provide full explanations and technical data on request.
- Página 29 INDEX OPERATING INSTRUCTIONS page - General description ....................30 - Description of the controls..................31 - Operating modes..................... 32 - Heating / Air conditioning selection ................. 33 - Parameter setting....................34 - Personalizing the daily program ................38 - Temporary forcing of the temperature ..............39 - Party function......................
-
Página 30: Operating Instructions
OPERATING INSTRUCTIONS General description The time-thermostat manages ambient temperature control and control of the boilers, zone valves, conditioning units, fan-coils, etc. through a relay output. Activating the combined output modules makes it possible to control: boilers, zone valves, air conditioners, fan-coils, etc. The timer-thermostat is provided with a display, 3 control buttons that are always accessi- ble and 7 control buttons accessible when the hatch is open. -
Página 31: Description Of The Controls
OPERATING INSTRUCTIONS Description of the controls CONTROL BUTTONS Symbol Programming / setting b Regulate time c Party d Holiday e Select heating / air conditioning f Copy g Regulate temperature (+) / Select parameters h Select operating mode / Confirm i Regulate temperature (–) / Select parameters DISPLAY INDICATIONS j Functioning mode... -
Página 32: Operating Modes
OPERATING INSTRUCTIONS Operating modes The timer-thermostat offers 3 different operating modes:: - AUTOMATIC - MANUAL - OFF/ANTIFREEZE/HIGH TEMPERATURE PROTECTION is used to switch from one mode to another. In automatic operation the timer-thermostat uses a program that can be different for every day of the week. The text AUTO, the ambient temperature measured and the symbol of the set point relative to the current quarter of an hour appear on the display. -
Página 33: Heating / Air Conditioning Selection
OPERATING INSTRUCTIONS Operating modes When operating, the activation of the heating or air conditioning is signaled as follows: Heating The symbol shows switching on of the heating. Air conditioning The symbol shows switching on of the air conditioning. Heating / Air conditioning selection Pressing key is used to switch the type of operating from heating to air conditioning and vice versa. -
Página 34: Parameter Setting
OPERATING INSTRUCTIONS Parameter setting Press the key once to set the parameters. The SET symbol and the clock appear on the display, while the bar of the day of the week starts blinking. At this point it is possible to modify, in sequence: - day of the week, - hours, - minutes,... - Página 35 OPERATING INSTRUCTIONS Parameter setting Setting the time When the hour figures blink, set the hour with keys Press key within 30 seconds to confirm the set value. Setting the minutes When the minutes figures blink, set the minutes with keys Press key within 30 seconds to confirm the set value.
- Página 36 OPERATING INSTRUCTIONS Parameter setting Setting Set Point T1 When symbol appears, the temperature value starts to blink. Regulate the value of T1 with keys Press key within 30 seconds to confirm the set value. Setting Set Point T2 When symbol appears, the temperature value starts to blink.
- Página 37 OPERATING INSTRUCTIONS Parameter setting Activating self-learning When symbol appears, activate (ON) or deactivate (OFF) the function with keys Press key within 30 seconds to confirm the set value. Self-learning is used to activate the advance (max. 2 hours) on activating the heating. The timer-thermostat automatically manages the advance, so as to guarantee the temperature set at the start of each period of the programmed profile.
-
Página 38: Personalizing The Daily Program
OPERATING INSTRUCTIONS Personalizing the daily program twice to personalize the preset daily program or to make a modification. . Press key The PROG symbol appears on the display while the bar for the first day of the week will start to blink. Select the first day required with keys Press key within 30 seconds to confirm the... -
Página 39: Temporary Forcing Of The Temperature
OPERATING INSTRUCTIONS Personalizing the daily program The time is decreased/increased with steps of 15 minutes each time keys , are pressed, so it is possible to define up to 4 programming periods for each hour. Proceed in the same way as described above until the profile is complete. Copying the Program If it is required to copy the program to the next day, confirm the programming performed by pressing key... -
Página 40: Party Function
OPERATING INSTRUCTIONS Party function In AUTO mode, the Party function is used to temporarily exclude the set program by manually entering a set point for a different temperature, for a period of between 1 and 23 hours inclusive. This function can be used, for example, to extend the comfort period during a dinner, a party, etc. -
Página 41: Holiday Function
OPERATING INSTRUCTIONS Holiday function In AUTO mode, the Holiday function is used to temporarily exclude the set weekly program by manually entering a set point for a different temperature, for a period of between 1 and 99 days inclusive. This function could be used, for example, to program a period of economy during a holiday with reactivation of the program on the day of return. -
Página 42: Sunday's Program Copy
OPERATING INSTRUCTIONS Sunday’s program copy In AUTO mode it is possible to copy the sunday's profile to any day of the week. This function is particularly useful when a period of temporary comfort is required, for example, on a public holiday during the week. Press key , to activate the function, the symbol and the bar of the feast day start blinking on the display. -
Página 43: Manual Operation
OPERATING INSTRUCTIONS Manual operation To activate manual operating mode, press key , until the text MAN appears on the display. The temperature set point appears for about two seconds. Use keys to set the required set point value, press , or wait 5 seconds to confirm the setting. Remote control The time-thermostat can be connected to the GSM GW 90 821 remote control unit by a serial connection. -
Página 44: Low Batteries Indication
OPERATING INSTRUCTIONS Low batteries indication When the batteries charge is low, the symbol on the display starts to blink. Operation of the timer- thermostat is guaranteed in any case. In this case, the batteries must be replaced as soon as possible. Timer-thermostat operation is no longer guaranteed when symbol is fixed on, in this case the last operation guaranteed is automatic deactivation of the heating/air... -
Página 45: Preset Programs
OPERATING INSTRUCTIONS Preset programs The timer-thermostat has 2 preset programs, one for heating and one for air conditioning. HEATING PROGRAM Monday - Friday | 3 | | 6 | | 9 | | 12 | | 15 | | 18 | | 21 | | 24 Saturday - Sunday... -
Página 46: Preset Parameters
OPERATING INSTRUCTIONS Preset parameters Day of the week 1: Monday Time 00:00 Heating temperature set point 16 °C 18 °C 20 °C 5 °C antifreeze Air conditioning temperature set point 24 °C 26 °C 28 °C 35 °C protection Self-learning Function disabled (OFF) Differential regulation Heating... -
Página 47: Installation Instructions
INSTALLATION INSTRUCTIONS Installation WARNING • Before installation ensure that the associated output modules receive the commands correctly. • In the installation phase respect the assembly direction ( ) on the base of the support. Fitting with wall plugs. Fitting to a 3-bay box. - Página 48 INSTALLATION INSTRUCTIONS Installation Access to the terminals. Connection to the boiler/air conditioner and the remote control unit (3 cables)
- Página 49 INSTALLATION INSTRUCTIONS Installation Click fixing of the timer-thermostat on the relative base and locking with screw. For correct reading of the ambient temperature to be controlled, it is important that the timer-thermostat is not installed in niches. Behind doors or near windows or sources of heat.
-
Página 50: Connection Terminals
INSTALLATION INSTRUCTIONS Connection terminals Remote control unit connection (serial line). 4 - TX (output data) 5 - GND (common) 6 - RX (input data) Connection for boiler or air conditioner control. Output contact 1 NA/NC 5A (AC1) / 2A (AC15), 250Vac. 1 - Common 2 - NA contact 3 - NC contact... -
Página 51: Battery Replacement
INSTALLATION INSTRUCTIONS Battery replacement 3x1.5V type AAA alkaline batteries Do not dispose of dead batteries in the environment. -
Página 52: Functional Details / Technical Data
FUNCTIONAL DETAILS / TECHNICAL DATA Type of operation: heating and air conditioning Operating mode: automatic, manual and antifreeze Operating temperature: -5° ÷ +45°C Measured temperature: 0 ÷ +45°C Temperature probe: NTC, 100K at 25°C Measurement accuracy: ±0.5°C at 20°C Preset programs: 2 weekly programs (heating and air conditioning) Resolution hourly programming:... - Página 53 F R A N Ç A I S Chronothermostat mural programme journalier-hebdomadaire...
- Página 54 électriques à basse tension CEI 60364, ou le document d'harmonisation européen HD 60364. e réseau de vente de Gewiss est prêt à fournir des explications complètes et des données techniques sur demande.
- Página 55 INDEX MODE D’EMPLOI page - Description générale ....................56 - Description des commandes ................... 57 - Modalités de fonctionnement .................. 58 - Sélection chauffage / climatisation................59 - Programmation paramètres..................60 - Personnalisation du programme journalier .............. 64 - Forçage temporaire de la température ..............65 - Fonction Party ......................
-
Página 56: Mode D'emploi
MODE D’EMPLOI Description générale Le chronothermostat gère le contrôle de la température ambiante et la commande de chaudières, vannes de zone, climatiseurs, fan-coils, etc., grâce à une sortie à relais. Grâce à l’activation des modules de sortie accouplés il est possible de commander: haudières, vannes de zone, climatiseurs, fan-coils, etc. -
Página 57: Description Des Commandes
MODE D’EMPLOI Description des commandes TOUCHES DE COMMANDE Symbole Programmation / réglage b Réglage du temps c Party d Holiday e Sélection chauffage / climatisation f Copie g Réglage température (+) / Sélection paramètres h Sélection modalité fonctionnement / confirmation i Réglage température (-) / Sélection paramètres INDICATIONS SUR L’AFFICHEUR j Modalité... -
Página 58: Modalités De Fonctionnement
MODE D’EMPLOI Modalité de fonctionnement Le chronothermostat prévoit 3 modes de fonctionnement différents: - AUTOMATIQUE - MANUEL - OFF/ANTIGEL / PROTECTION HAUTES TEMPÉRATURES Pour commuter d’un mode à un autre on utilise la touche Dans le fonctionnement automatique, le cronothermostat utilise un programme qui peut être différencié... -
Página 59: Sélection Chauffage/Climatisation
MODE D’EMPLOI Modalité de fonctionnement Pendant le fonctionnement, l’activation du chauffage ou de la climatisation est signalée de la façon suivante: Chauffage Le symbole indique l’allumage du chauffage. Climatisation Le symbole indique l’allumage de la climatisation. Ç Sélection chauffage/climatisation En appuyant sur la touche on peut commuter le type de fonctionnement de chauffage à... -
Página 60: Programmation Paramètres
MODE D’EMPLOI Programmation paramètres Pour exécuter la programmation des paramètres, appuyer une fois sur la touche Sur l’afficheur apparaissent le symbole SET et l’horloge, tandis que la barre du jour de la semaine commence à clignoter. Il est alors possible de modifier, en séquence : - jour de la semaine, - heures, - minutes,... - Página 61 MODE D’EMPLOI Programmation paramètres Programmation de l’heure Quand les chiffres de l’heure clignotent, programmer l’heure avec les touches Pour confirmer la valeur programmée, appuyer sur la touche dans 30 secondes. Programmation minutes Quand les chiffres des minutes clignotent, programmer les minutes avec les touches Pour confirmer la valeur programmée, appuyer sur la touche dans 30 secondes.
- Página 62 MODE D’EMPLOI Programmation paramètres Programmation du Set-point T1 Quand le symbole apparaît, la valeur de température commence à clignoter. Régler la valeur de T1 avec les touches Pour confirmer la valeur programmée, appuyer sur la touche dans 30 secondes. Programmation du Set-point T2 Quand le symbole apparaît, la valeur de température commence à...
- Página 63 MODE D’EMPLOI Programmation paramètres Activation autoapprentissage Quand le symbole , apparaît, activer (ON) ou désactiver (OFF) la fonction, avec les touches Pour confirmer la valeur programmée, appuyer sur la touche dans 30 secondes. L’autoapprentissage permet d’optimiser l’avance (max. 2 heures) sur l'activation du chauffage. Le chronothermostat gère automatiquement l'avance, de façon à...
-
Página 64: Personnalisation Du Programme Journalier
MODE D’EMPLOI Personnalisation du programme journalier Pour exécuter la personnalisation du programme journalier préprogrammé, ou pour faire une modification, appuyer deux fois sur la touche Sur l’afficheur apparaît le symbole PROG, et la barre du premier jour de la semaine commence à clignoter. Sélectionner le jour désiré, avec les touches Pour confirmer la sélection, appuyer sur la touche avant 30 secondes. -
Página 65: Forçage Temporaire De La Température
MODE D’EMPLOI Personnalisation du programme journalier L’horaire diminue/augmente avec des pas de 15 minutes à chaque pression des touches ,il est donc possible de définir jusqu’à 4 périodes de programmation pour chaque heure. Procéder de façon analogue à tout ce qui est indiqué ci-dessus, jusqu’à ce que le profil soit achevé. -
Página 66: Fonction Party
MODE D’EMPLOI Fonction party Dans le mode AUTO, la fonction Party permet d’exclure temporairement le programme pro- grammé en insérant à la main un set-point de température différent, pour une période al- lant de 1 à 23 heures. On peut utiliser cette fonction, par exemple, pour prolonger la pério- de de confort pendant un dîner, une fête, etc. -
Página 67: Fonction Holiday
MODE D’EMPLOI Fonction holiday Dans le mode AUTO, la fonction Holiday permet d’exclure temporairement le programme hebdomadaire programmé, en insérant manuellement un set-point de température différent, pour une période allant de 1 à 99 jours. On peut utiliser cette fonction, par exemple, pour programmer une période d’économie pendant les vacances et la réactivation du programme le jour de la rentrée. -
Página 68: Copie Du Programme Jour De Fête
MODE D’EMPLOI Copie du programme jour de fête Dans le mode AUTO il est possible de copier le profil du jour de fête sur n’importe quel jour de la semaine. Cette fonction est particulièrement utile quand on désire un régime de confort temporaire, par exemple pour un jour de fête à... -
Página 69: Fonctionnement Manuel
MODE D’EMPLOI Fonctionnement manuel Pour activer le mode de fonctionnement manuel, appuyer sur la touche , jusqu’à ce que le display affiche le message MAN. Le set point de la température apparaît pendant environ deux secondes. Avec les touches programmer la valeur de set- point désirée ;... -
Página 70: Signalisation Batteries En Cours D'épuisement
MODE D’EMPLOI Signalisation batteries en cours d’épuisement Quand les batteries sont en phase d’épuisement, le commence à clignoter sur l’afficheur . symbole De toute façon le fonctionnement du chronothermostat est garanti. Dans ce cas il est nécessaire de procéder à remplacer les batteries le plus tôt possible. -
Página 71: Programmes Préréglés
MODE D’EMPLOI Programmes préprogrammés Le chronothermostat dispose de 2 programmes préréglés, un pour le chauffage et un pour la climatisation. PROGRAMME CHAUFFAGE Lundi - Vendredi | 3 | | 6 | | 9 | | 12 | | 15 | | 18 | | 21 | | 24... -
Página 72: Paramêtres Préréglés
MODE D’EMPLOI Programmes préprogrammés Jour de la semaine 1: lundi Heure 00:00 Set-point température chauffage 16 °C 18 °C 20 °C 5 °C antigel Set-point température climatisation 24 °C 26 °C 28 °C 35 °C protection Autoapprentissage Fonction désactivée (OFF) Différential de réglage Chauffage 0.2 °C... -
Página 73: Instructions Pour L'installation
INSTRUCTIONS POUR L’INSTALLATION Montage ATTENTION • Avant l’installation, vérifier que les modules de sortie associés reçoivent correc- tement les commandes. • Pendant la phase d’installation respecter le sens de montage ( ) indiqué sur la base de support. Montage avec chevilles. Ç... - Página 74 INSTRUCTIONS POUR L’INSTALLATION Montage Accès aux bornes Connexion à la chaudière / au climatiseur et au système de contrôle à distance (3 câbles).
- Página 75 INSTRUCTIONS POUR L’INSTALLATION Montage Fixation à déclic du chronothermostat sur la base relative, et blocage avec des vis. Ç Pour que l’on puisse relever correctement la température du milieu à contrôler, il est important de ne pas installer le chronothermostat dans des niches, derrière des portes, à...
-
Página 76: Description Bornes
INSTRUCTIONS POUR L’INSTALLATION Description bornes Connexion par le système de contrôle à distance (ligne sérielle) 4 - TX (données en sortie) 5 - GND (commun) 6 - RX (données en entrée) Raccordement pour commande chaudière ou climatiseur. Contact en sortie 1 NA/NC 5A (AC1) / 2A (AC15), 250Vac 1 - Commun 2 - Contact NA 3 - Contact NC... -
Página 77: Remplacement Des Batteries
INSTRUCTIONS POUR L’INSTALLATION Remplacement des batteries Ç 3 batteries alcalines 1,5 V, type AAA Ne pas jeter les batteries déchargées dans la nature... -
Página 78: Caractéristiques Fonctionnelles / Données Techniques
CARACTÉRISTIQUES FONCTIONNELLES / DONNÉES TECHNIQUES Type de fonctinnement : chauffage et climatisation Modalités de fonctionnement : automatique, manuel et antigel Température de fonctionnement : -5° ÷ +45°C Température mesurée : 0 ÷ +45° C Sonde de température : NTC, 100K à 25°C Précision de la mesure : ±0,5°C à... - Página 79 E S P A Ñ O L Cronotermostato de pared programa diario-semanal...
-
Página 80: Atención - Importante
Chorus se pueden instalar en ambientes no polvorientos y en los lugares donde no se requiere una protección especial contra la penetración del agua. La organización de ventas GEWISS está a su disposición para aclaraciones e informaciones técnicas. - Página 81 ÍNDICE INSTRUCCIONES DE USO: pag. - Descripción general....................82 - Descripción mandos....................83 - Modalidad de funcionamiento.................. 84 - Selección calefacción/acondicionador ..............85 - Programación parámetros ..................86 - Personalización programa diario................90 - Forzado temporal de la temperatura................ 91 - Función Party ......................
-
Página 82: Instrucciones De Uso
INSTRUCCIONES DE USO Descripción general El cronotermostato controla la temperatura ambiente y el mando calderas, válvulas de zona, acondicionadores, fan coil, etc, mediante una salida de relé. Mediante la activación de los módulos de salida combinados es posible controlar: calderas, válvulas de zona, acondicionadores, fan-coil, etc. -
Página 83: Descripción Mandos
INSTRUCCIONES DE USO Descripción mandos PULSADORES DE MANDO Símbolo Programación b Ajuste tiempo c Party d Holiday e Selección calefacción / acondicionador f Copia g Ajuste temperatura (+) / Selección parámetros h Selección modalidad funcionamiento / confirmación i Ajuste temperatura (-) / Selección parámetros SEÑALACIONES DE PANTALLA j Modalidad de funcionamiento AUTO-MAN-OFF... -
Página 84: Modalidad De Funcionamiento
INSTRUCCIONES DE USO Modalidad de funcionamiento El cronotermostato prevé 3 modalidades diferentes de funcionamiento: - AUTOMÁTICO - MANUAL - OFF/ANTICONGELANTE / PROTECCIÓN ALTAS TEMPERATURAS Para conmutar desde una modalidad a otra se utiliza la tecla En el funcionamiento automático el cronotermo estado utiliza un programa que puede ser diferenciado para cada día de la semana. -
Página 85: Selección Calefacción/Acondicionador
INSTRUCCIONES DE USO Modalidad de funcionamiento Durante el funcionamiento, la activación de la calefacción o del acondicionador están indicadas de la manera siguiente: Calefacción El símbolo indica el encendido de la calefacción. Acondicionador El símbolo indica el encendido del acondicionador. Selección calefacción/acondicionador Presionando la tecla es posible conmutar el tipo de funcionamiento entre... -
Página 86: Programaciones Parámetros
INSTRUCCIONES DE USO Programaciones parámetros Para efectuar la programación de los parámetros presione una vez la tecla En la pantalla aparecen el símbolo SET y el reloj, mientras que la barra del día de la semana empieza a parpadear. En este momento es posible cambiar, en secuencia: - día de la semana, - horas, - minutos,... - Página 87 INSTRUCCIONES DE USO Programaciones parámetros Programación de la hora Cuando las cifras de la hora parpadeen, programe la hora, con las teclas Para confirmar el valor programado, presione la tecla antes de 30 segundos. Programación de los minutos Cuando las cifras de los minutos parpadeen, programe los minutos, con las teclas Para confirmar el valor programado, presione la tecla antes de 30 segundos.
- Página 88 INSTRUCCIONES DE USO Programaciones parámetros Programación Set-Point T1 Cuando aparezca el símbolo el valor de temperatura empieza a parpadear. Ajuste el valor de T1 con las teclas Para confirmar el valor programado, presione la tecla antes de 30 segundos. Programación Set-Point T2 Cuando aparezca el símbolo el valor de temperatura empieza a parpadear.
- Página 89 INSTRUCCIONES DE USO Programaciones parámetros Activación autoaprendizaje Cuando aparezca el símbolo , active (ON) o desactive (OFF) la función con las teclas Para confirmar el valor programado, presione la tecla antes de 30 segundos. El autoaprendizaje permite optimizar el adelanto (máx 2 horas) en la activación de la calefacción.
-
Página 90: Personalización Programa Diario
INSTRUCCIONES DE USO Personalización programa diario Para realizar la personalización del programa diario programado previamente, o efectuar un cambio, presione dos veces la tecla En la pantalla aparece el símbolo PROG mientras que la barra del día de la semana empieza a parpadear. Seleccione el día deseado con las teclas Para confirmar la selección, presione la tecla antes... -
Página 91: Forzado Temporal De La Temperatura
INSTRUCCIONES DE USO Personalización programa diario El horario disminuye/aumenta con pasos de 15 minutos cada vez que se pulsan las teclas , y por esto es posible definir hasta 4 períodos de programación para cada hora. Procédase analógicamente a como se indica arriba, hasta completar el perfil. Copia del Programa Cuando se desee copiar el programa en el día sucesivo, confirme la programación realizada presionando la tecla... -
Página 92: Función Party
INSTRUCCIONES DE USO Función party En modalidad AUTO, la función Party permite excluir temporalmente el programa programado introduciendo manualmente un set point de temperatura diferente, durante un período comprendido entre 1 y 23 horas. Esta función puede usarse, por ejemplo, para prolongar el período de confort durante una cena, una fiesta, etc…... -
Página 93: Función Holiday
INSTRUCCIONES DE USO Función holiday En modalidad AUTO, la función Holiday permite excluir temporalmente el programa semanal programado introduciendo manualmente un set point de temperatura diferente, durante un período comprendido entre 1 y 99 días. Esta función puede usarse por ejemplo, para programar un período de economía durante las vacaciones y la reactivación del programa el día de vuelta. -
Página 94: Copia Del Programa Festivo
INSTRUCCIONES DE USO Copia del programa festivo En modalidad AUTO es posible copiar el perfil del día festivo en cualquier día de la semana. Esta función es especialmente útil cuando se desea un régimen de confort temporal, por ejemplo, en una festividad entre semana. Para activar la función presione la tecla , en la pantalla parpadean el símbolo... -
Página 95: Funcionamiento Manual
INSTRUCCIONES DE USO Funcionamiento manual Para activar la modalidad de funcionamiento manual, pulse la tecla , hasta que en la pantalla aparezca la imagen MAN. El set point de la temperatura aparece durante aproximadamente dos segundos. Con las teclas programe el valor del set point deseado, presione la tecla , o espere 5 segundos para confirmar la programación. -
Página 96: Reset Y Reajuste De Los Valores Previamente Programados
INSTRUCCIONES DE USO Señal de pilas agotadas Cuando las pilas estén casi agotadas, en la pantalla empieza a parpadear el símbolo El funcionamiento del cronotermostato está garantizado. En tal caso es necesario proceder lo antes posible con la sustitución de las pilas. El funcionamiento del cronotermostato no puede estar garantizado cuando el símbolo está... -
Página 97: Programas Previamente Programados
INSTRUCCIONES DE USO Programas previamente programados El cronotermostato dispone de 2 programas previamente programados, uno para la calefacción y otro para el acondicionador. PROGRAMA CALEFACCIÓN Lunes - Viernes | 3 | | 6 | | 9 | | 12 | | 15 | | 18 | | 21 |... -
Página 98: Parámetros Preprogramados
INSTRUCCIONES DE USO Programas previamente programados Día de la semana 1: lunes Hora 00:00 Set point temperatura calefacción 16 °C 18 °C 20 °C 5 °C anticongelante Set point temperatura acondicionador 24 °C 26 °C 28 °C 35 °C protección Autoaprendizaje Función deshabilitada (OFF) Diferencial de ajuste... -
Página 99: Instrucciones De Instalación
INSTRUCCIONES DE INSTALACIÓN Montaje ATENCIÓN • Antes de la instalación asegúrese de que los módulos de salida asociados, reciban correctamente las órdenes. • En la fase de instalación respete la parte de montaje ( ) indicada en la base del soporte. - Página 100 INSTRUCCIONES DE INSTALACIÓN Montaje Acceso a los bornes Conexión a la caldera/acondicionador y al indicador remoto (3 cables)
- Página 101 INSTRUCCIONES DE INSTALACIÓN Montaje Fijación del cronotermostato con enganche en la relativa base y bloqueo con tornillo. Para la correcta detección de la Ñ temperatura del ambiente que se debe controlar es importante que no instale el cronotermostato en cavidades, detrás de las puertas, cerca de las ventanas o fuentes de calor.
-
Página 102: Descripción Bornes
INSTRUCCIONES DE INSTALACIÓN Descripción bornes Conexión para indicador remoto (línea de serie) 4 - TX (datos en salida) 5 - GND (común) 6 - RX (datos en entrada) Conexión para mando caldera o acondicionador. Contacto en salida 1 NA/NC 5A (AC1)/2A (AC15), 250Vac 1 - Común 2 - Contacto NA 3 - Contacto NC... -
Página 103: Sustitución Pilas
INSTRUCCIONES DE INSTALACIÓN Sustitución pilas 3 pilas alcalinas 1,5V, tipo AAA Ñ No disperse las pilas agotadas en el ambiente... -
Página 104: Características Funcionales/Datos Técnicos
CARACTERÍSTICAS FUNCIONALES/DATOS TÉCNICOS Tipo de funcionamiento: calefacción y acondicionador Modalidad de funcionamiento: automático, manual y anticongelante Temperatura operativa: -5° ÷ +45°C Temperatura medida: 0 ÷ +45°C Sonda de temperatura: NTC, 100K a 25°C Exactitud de la medida: ±0,5°C a 20°C Programas previamente programados: n°... - Página 105 D E U T S C H Wandzeitthermostat Täglich-wöchentliches Programm...
- Página 106 Die Produkte der Reihe Chorus sind für die Installation gemäß den Bestimmungen der Normen HD 384 / IEC364 bezüglich Haushaltsgeräte u.ä. in staubfreien Räumen und in Räumen, in denen keine spezielle Absicherung gegen das Eindringen von Wasser erforderlich ist, bestimmt. Die GEWISS-Verkaufsorganisation steht Ihnen für weitere technische Informationen gerne zur Verfügung...
- Página 107 INHALTSVERZEICHNIS BEDIENUNGSANLEITUNG seite - Allgemeine Beschreibung ..................108 - Beschreibung der Steuerungen ................109 - Betriebsart ......................110 - Heizen/Klima-Auswahl ................... 111 - Parameter-Einstellung .................... 112 - Kundenspezifische Gestaltung des täglichen Programms ........116 - Momentane Übersteuerung der Temperatur ............117 - Betrieb Party ......................
-
Página 108: Bedienungsanleitung
BEDIENUNGSANLEITUNG Allgemeine beschreibung Das Zeitthermostat steuert über einen Relaisausgang die Überwachung der Umgebung- stemperatur und die Heizkesselsteuerung, Zonenventile, Klimageräte, Fan-Coil, usw. Durch die Aktivierung der gekoppelten Ausgangsmodule ist es möglich folgendes zu steu- ern: Heizkessel, Bereichsventile, Klimaanlagen, Fan-Coil, etc. Der Chronothermostat ist mit einem Display, mit 3 Steuertasten ausgestattet die immer zu- gänglich sind und mit 7 Tasten die bei offener Klappe zugänglich sind. -
Página 109: Beschreibung Der Steuerungen
BEDIENUNGSANLEITUNG Beschreibung der steuerungen STEUERUNGSTASTEN Symbol Programmierung / Einstellung b Zeitregulierung c Party d Holiday e Heizen/Klima-Auswahl f Kopie g Temperatureinstellung (+) / Parameter-Auswahl h Betriebsart-Auswahl / Bestätigung i Temperatureinstellung (- ) / Parameter-Auswahl DISPLAY-ANZEIGEN j Betriebsart AUTO-MAN-OFF k Temperaturmaßeinheit °C / °F l Gemessene Raumtemperatur m Gestaltung des täglichen Programms... -
Página 110: Betriebsart
BEDIENUNGSANLEITUNG Betriebsart Der Chronothermostat sieht drei verschiedenen Betriebsarten vor: - AUTOMATISCH - MANUELL - AUS / FROSTSCHUTZ / ÜBERTEMPERATURSCHUTZ Um von einer Modalität in die andere zu schalten verwendet man die Taste Im automatischen Betrieb verwendet der Zustand- schronometer ein Programm, das für jeden Tag der Wo- che differenziert werden kann. -
Página 111: Heizen/Klima-Auswahl
BEDIENUNGSANLEITUNG Betriebsart Während dem Betrieb werden die Aktivierung der Heizung oder der Klimatisierung auf fol- gende Weise signalisiert: Heizung Das Symbol zeigt das Einschalten der Heizung an. Klimatisierung Das Symbol zeigt das Einschalten der Klimatisierung. Heizen/klima-auswahl Wenn man die Taste betätigt ist es möglich die Betriebsart von Heizung in Klimatisie- rung und umgekehrt zu schalten. -
Página 112: Parameter-Einstellung
BEDIENUNGSANLEITUNG Parameter-einstellung Um die Einstellung der Parameter durchzuführen einmal die Taste betätigen. Auf dem Display erscheint das Symbol Set und die Uhr, während der Balken des Wochentages zu blinken beginnt. An diesem Punkt ist es möglich in der folgenden Sequenz folgende Änderungen durchzuführen: - Wochentag - Stunden,... - Página 113 BEDIENUNGSANLEITUNG Parameter-einstellung Einstellung Uhrzeit Wenn die Ziffern der Stunde blinken, die Stunde mit den Tasten einstellen. Zum Bestätigen des eingestellten Wertes, drücken Sie die Taste innerhalb 30 Sekunden. Einstellung Minuten Wenn die Ziffern der Minuten blinken, die Minuten mit den Tasten einstellen.
- Página 114 BEDIENUNGSANLEITUNG Parameter-einstellung Einstellung Bezugswert T1 Wenn das Symbol erscheint, beginnt der Tempera- turwert zu blinken. Stellen Sie den Wert T1 mit den Tasten ein. Zum Bestätigen des eingestellten Wertes, drücken Sie die Taste innerhalb 30 Sekunden. Einstellung Bezugswert T2 Wenn das Symbol erscheint, beginnt der Temperatu- renwert zu blinken.
- Página 115 BEDIENUNGSANLEITUNG Parameter-einstellung Selbstlernen-Aktivierung Wenn das Symbol , erscheint, die Funktion mit den Tasten (ON) einschalten oder (OFF) ausschalten. Zum Bestätigen des eingestellten Wertes, drücken Sie die Taste innerhalb 30 Sekunden. Das Selbstlernen ermöglicht es die Verfrühung zu optimieren (max. 2 Stunden) der Schaltung der Heizung.
-
Página 116: Kundenspezifische Gestaltung Des Täglichen Programms
BEDIENUNGSANLEITUNG Kundenspezifische gestaltung des täglichen programms Um die kundenspezifische Gestaltung des täglichen voreingestellten Programms oder Än- betätigen . derungen durchzuführen, zwei mal die Taste Auf dem Display erscheint das Symbol PROG, während der Balken des ersten Wochentages zu blinken beginnt. Der gewünschte Tag mit den Tasten anwählen. -
Página 117: Momentane Übersteuerung Der Temperatur
BEDIENUNGSANLEITUNG Kundenspezifische gestaltung des täglichen programms Die Uhrzeit wird mit 15 Minuten-Schritten, mit jeder Betätigung der Tasten gesenkt/gesteigert, es ist also möglich bis zu 4 Programmierungsperioden für jede Stunde zu definieren. Wie oben beschrieben, bis zur Vervollständigung des Profils vorgehen. Kopie des Programms Möchte man das Programm auf den nächsten Tag kopieren, die durchgeführte Programmie- rung bestätigen, indem man die Taste... -
Página 118: Funktion Party
BEDIENUNGSANLEITUNG Funktion party In der Modalität AUTO, ermöglicht es die Funktion Party vorläufig das eingestellte Programm auszuschließen, indem man manuell einen anderen Temperatur-Bezugswert für eine Zeit zwischen 1 und 23 Stunden eingibt. Diese Funktion kann zum Beispiel verwendet werden, um den Komfortzeitabschnitt während eines Essens, einer Party, etc. zu verlängern. Um die Funktion zu aktivieren betätige man die Taste während , auf dem Display erscheint das Symbol... -
Página 119: Funktion Holiday
BEDIENUNGSANLEITUNG Funktion holiday In der Modalität AUTO, ermöglicht es die Funktion Holiday vorläufig das eingestellte Wo- chenprogramm auszuschließen, indem man manuell einen anderen Temperatur-Bezugs- wert für eine Zeit zwischen 1 und 99 Tagen eingibt. Diese Funktion kann zum Beispiel ver- wendet werden, um einen Sparzeitabschnitt während dem Urlaub und das Wiedereinschal- ten des Programms am Tag der Rückkehr zu programmieren. -
Página 120: Kopie Des Feiertagprogramms
BEDIENUNGSANLEITUNG Kopie des feiertagprogramms In der Modalität AUTO ist es möglich das Profil des Feiertages auf einen beliebigen Wochentag zu kopieren. Diese Funktion ist ganz besonders von Nutzen wenn man ein vorläufiges Komfortregime, zum Beispiel an einem Feiertag unter der Woche erhalten möchte. Um die Funktion zu aktivieren, die Taste , betätigen. -
Página 121: Manueller Betrieb
BEDIENUNGSANLEITUNG Manueller betrieb Um die manuelle Betriebsmodalität zu aktivieren, betätige man die Taste , bis auf dem Display MAN erscheint. Der Temperatur-Bezugswert beginnt zu blinken. Mit den Taste den gewünschten Bezugswert einstellen, die Taste , betätigen oder 5 Sekunden warten, um die Einstellung zu bestätigen. Fernbedienung Das Zeitthermostat kann über einen seriellen Anschluss am GSM Transceiver GW 90 821 angeschlossen werden. -
Página 122: Anzeige Batterien Kurz Vor Erschöpfung
BEDIENUNGSANLEITUNG Anzeige batterien kurz vor erschöpfung Wenn die Batterien sich kurz vor deren Erschöpfung befinden, beginnt auf dem Display das Symbol blinken. Der Betrieb des Chronothermostats wird auf jeden Fall gewährleistet. In diesem Fall müssen die Batterien so bald wie möglich ausgewechselt werden. Der Betrieb des Chronothermostats wird nicht mehr gewährleistet, wenn das Symbol andauernd aufleuchtet. -
Página 123: Voreingestellte Programme
BEDIENUNGSANLEITUNG Voreingestellte programme Der Chronothermostat verfügt über 2 voreingestellte Programme, eines zum Heizen und eines zur Klimatisierung. HEIZEN-PROGRAMM Montag - Freitag | 3 | | 6 | | 9 | | 12 | | 15 | | 18 | | 21 | | 24 Samstag - Sonntag | 3 |... -
Página 124: Voreingestellte Parameter
BEDIENUNGSANLEITUNG Voreingestellte programme Tag der Woche 1: Montag Uhrzeit 00:00 Heizentemperatur-Bezugswert 16 °C 18 °C 20 °C 5 °C frostschutz Klimatemperatur-Bezugswert 24 °C 26 °C 28 °C 35 °C Schutz Selbstlernfunktion Außer betrieb (OFF) Heizeinstellungsdifferential Heizung 0.2 °C Klimatisierung 0.5 °C Temperaturmaßeinheit °C... -
Página 125: Installationsanweisungen
INSTALLATIONSANWEISUNGEN Montage VORSICHT • Vor der Installation versichere man sich, dass die assoziierten Ausgangsmodule die Befehle korrekt erhalten. • In der Installationsphase berücksichtige man die Montagerichtung die auf dem Halterungsbasis angezeigt wurde ( Montage mit Dübeln. Montage auf dem 3-Platz Kasten. - Página 126 INSTALLATIONSANWEISUNGEN Montage Zugang zu den Klemmen Anschluss an Heizkessel/Klimaanlage und Fernbedienung (3 Adern).
- Página 127 INSTALLATIONSANWEISUNGEN Montage Schnappbefestigung des Chronothermostats auf der jeweiligen Basis und Blockierung mit einer Schraube. Zur korrekten Erhebung der Umgebungstemperatu r die zu kontrollieren ist, ist es wichtig den Chronothermostat nicht in Nischen, hinter Türen, in die Nähe von Fenstern oder Hitzequellen zu installieren.
-
Página 128: Beschreibung Der Klemmen
INSTALLATIONSANWEISUNGEN Beschreibung der klemmen Anschluss für den Transceiver (serielle Linie) 4 - TX (ausgehende Daten) 5 - GND (allgemein) 6 - RX (eingehende Daten) Anschluss für Heizkessel- oder Klimaanlagensteuerung. Ausgangskontakt 1 NO/NG 5A (AC1) / 2A (AC15), 250Vac 1 - Allgemein 2 - Kontakt NA 3 - Kontakt NC... -
Página 129: Auswechseln Der Batterien
INSTALLATIONSANWEISUNGEN Auswechseln der batterien 3 Alkalienbatterien 1,5 V, Typ AAA Die leeren Batterien nicht in der Umgebung entsorgen... -
Página 130: Funktionseigenschaften Und Technische Daten
FUNKTIONSEIGENSCHAFTEN / TECHNISCHE DATEN Betriebstyp: Heizung und Klimatisierung Betriebsart: automatisch, manuell und Frostschutz Betriebstemperatur: -5° ÷ +45°C Gemessene Temperatur: 0 ÷ +45°C Temperatursensor: NTC, 100K a 25°C Messgenauigkeit: ±0,5°C bis 20°C Voreingestellte Programme: 2 wöchentliche Programme (Heizung und Klimatisierung) Auflösung Programmierung der Uhrzeit: 15 Minuten max. - Página 131 R o m â n ă Cronotermostat de perete cu program zilnic sau săptămânal...
- Página 132 Produsele din gama Chorus trebuie să fie instalate în medii fără praf şi în care nu este necesară o protecţie specială împotriva pătrunderii apei, în conformitate cu dispoziţiile standardului CEI 64-8 privind aparatele de uz casnic și scopuri similare. Punctele de vânzare GEWISS vă stau la dispoziţie pentru clarificări şi informaţii tehnice.
- Página 133 IndeX InstRuCțIunI de utIlIzARe pag. - Descriere generală ..................134 - Descrierea comenzilor ................135 - Moduri de funcționare.................. 136 â - Selectare încălzire/răcire ................137 ă - Setarea parametrilor..................138 - Personalizarea programului zilnic..............142 - Forțarea temporară a temperaturii .............. 143 - Funcţia Party ....................
-
Página 134: Instrucțiuni De Utilizare
InstRuCțIunI de utIlIzARe descriere generală Cronotermostatul gestionează comanda temperaturii mediului și comanda centralelor termice, a valvelor de zonă, a aparatelor de aer condiționat, a ventilatoarelor, etc. prin intermediul unei ieșiri cu releu. Prin activarea modulelor de ieșire combinate, puteți comanda: centrale termice, valve de zonă, aparate de aer condiționat, ventilatoare, etc. -
Página 135: Descrierea Comenzilor
InstRuCțIunI de utIlIzARe descrierea comenzilor ButoAne de ComAndă simbol â Programare/setare Reglare oră ă Party Holiday Selectare încălzire / răcire Copiere Reglare temperatură (+) / Selectare parametri Selectarea modului de funcționare / confirmare Reglare temperatură (–) / Selectare parametri semnAlIzăRI Pe AFIȘAJ Modul de funcționare Auto-mAn-oFF Unitate de măsură... -
Página 136: Moduri De Funcționare
InstRuCțIunI de utIlIzARe moduri de funcționare Cronotermostatul are 3 moduri diferite de funcționare: - AutomAtă - mAnuAlă - oFF/AntIÎnGHeț / PRoteCțIe lA temPeRAtuRI RIdICAte Pentru a comuta de la un mod la altul, se utilizează tasta Pentru funcționarea în modul automat, cronoter- mostatul utilizează... -
Página 137: Selectare Încălzire/Răcire
InstRuCțIunI de utIlIzARe moduri de funcționare În timpul funcționării, activarea încălzirii sau a răcirii sunt semnalate după cum urmea- ză: â ă Încălzire Simbolul indică pornirea încălzirii. Răcire (aer condiționat) Simbolul indică pornirea răcirii. selectare încălzire/răcire Apăsând tasta puteți comuta tipul de funcționare între încălzire/ răcire și invers. Încălzire Simbolul reprezintă... -
Página 138: Setarea Parametrilor
InstRuCțIunI de utIlIzARe setarea parametrilor Pentru a seta parametrii, apăsați o dată tasta Pe afișaj, apar simbolul SET și ceasul, iar liniuța zilei din săptămână începe să cli- pească. În acest punct, puteți efectua modificările dorite în următoarea ordine: - ziua din săptămână, - ore, - minute, - unitatea de măsură... - Página 139 InstRuCțIunI de utIlIzARe setarea parametrilor setarea orei Când cifrele orei clipesc, setați ora cu ajutorul taste- â ă Pentru a confirma valoarea setată, apăsați tasta în 30 secunde. setarea minutelor Când cifrele minutelor clipesc, setați minutele cu aju- torul tastelor Pentru a confirma valoarea setată, apăsați tasta în 30 secunde.
- Página 140 InstRuCțIunI de utIlIzARe setarea parametrilor setarea valorii de referință t1 La apariția simbolului valoarea temperaturii începe să clipească. Reglați valoarea T1 cu ajutorul tastelor Pentru a confirma valoarea setată, apăsați tasta în 30 secunde. setarea valorii de referință t2 La apariția simbolului valoarea temperaturii începe să...
- Página 141 InstRuCțIunI de utIlIzARe setarea parametrilor Activare recunoaștere automată La apariția simbolului , activați (ON) sau dezacti- â vați (OFF) funcția cu ajutorul tastelor ă Pentru a confirma valoarea setată, apăsați tasta în 30 secunde. Recunoașterea automată permite optimizarea antici- pării (max 2 ore) la activarea încălzirii. Cronotermostatul gestionează...
-
Página 142: Personalizarea Programului Zilnic
InstRuCțIunI de utIlIzARe Personalizarea programului zilnic Pentru a personaliza programul zilnic setat în prealabil sau pentru a face o modifica- re, apăsați de două ori tasta Pe afișaj apare mesajul PROG și liniuța primei zile a săptămânii începe să clipească. Selectați ziua dorită... -
Página 143: Forțarea Temporară A Temperaturii
InstRuCțIunI de utIlIzARe Personalizarea programului zilnic Ora scade/crește în trepte de 15 minute la fiecare apăsare a tastelor și astfel pot fi definite până la 4 perioade de programare în fiecare oră. â ă Procedați la fel ca în indicațiile de mai sus până la finalizarea profilului. Copierea programului În cazul în care doriți să... -
Página 144: Funcţia Party
InstRuCțIunI de utIlIzARe Funcţia Party În modul AUTO, funcția Party permite excluderea temporară a programului setat, in- troducând manual o valoare de referință diferită pentru temperatură pe o perioadă cu- prinsă între 1 și 23 ore. Această funcție poate fi utilizată, de exemplu, pentru a pre- lungi o perioadă... -
Página 145: Funcţia Holiday
InstRuCțIunI de utIlIzARe Funcţia Holiday În modul AUTO, funcția Holiday permite excluderea temporară a programului săptă- mânal setat, introducând manual o valoare de referință diferită pentru temperatură pe â o perioadă cuprinsă între 1 și 99 zile. ă Această funcție poate fi utilizată, de exemplu, pentru a programa o perioadă de econo- mie în timpul unei vacanțe și reactivarea programului în ziua întoarcerii din vacanță. -
Página 146: Copierea Programului Pentru Zile De Sărbătoare
InstRuCțIunI de utIlIzARe Copierea programului pentru zile de sărbătoare În modul AUTO, puteți copia profilul zilei de sărbătoare în orice zi a săptămânii. Această funcție este utilă în special când se dorește un regim de confort temporar, de exemplu, într-o zi de sărbătoare din cursul săptămânii. Pentru a activa funcția, apăsați tasta , pe afișaj clipesc simbolul... -
Página 147: Funcționare Manuală
InstRuCțIunI de utIlIzARe Funcționare manuală Pentru a activa modul de funcționare manual, apăsați tasta , până când pe afișaj apare mesajul MAN. â Valoarea de referință a temperaturii apare timp de ă aproximativ două secunde. Cu ajutorul tastelor , setați valoarea de referin- ță... -
Página 148: Semnalizarea Epuizării Bateriei
InstRuCțIunI de utIlIzARe semnalizarea epuizării bateriei Atunci când bateriile sunt pe cale să se consume, pe afișaj începe să clipească simbolul Funcționarea cronotermostatului este însă garantată. În acest caz, trebuie să înlocuiți bateriile cât mai cu- rând posibil. Funcționarea cronotermostatului nu mai este garantată atunci când simbolul este aprins cu lumină... -
Página 149: Programe Setate În Prealabil
InstRuCțIunI de utIlIzARe Programe setate în prealabil Cronotermostatul are 2programe setate în prealabil, unul pentru încălzire și unul pen- tru răcire. â ă PRoGRAmul ÎnCălzIRe luni - Vineri | 3 | | 6 | | 9 | | 12 | | 15 | | 18 | | 21 |... -
Página 150: Parametri Setați În Prealabil
InstRuCțIunI de utIlIzARe Programe setate în prealabil ziua din săptămână 1: luni 00:00 Valoare de referință temperatură de încălzire t1 16 °C 18 °C 20 °C 5 °C antiîngheț Valoare de referință temperatură de răcire (aer condiționat) 24 °C 26 °C 28 °C 35 °C protecție... -
Página 151: Instrucțiuni De Instalare
InstRuCțIunI de InstAlARe montare AtențIe • Înainte de instalare, asigurați-vă că modulele de ieșire asociate primesc co- â menzile în mod corect. ă • la instalare, respectați sensul de montare ( ) indicat pe baza suportului. Montare cu dibluri. Montare pe doză cu 3posturi. - Página 152 InstRuCțIunI de InstAlARe montare Acces la terminale Conectare la centrala termică/aparatul de aer condiționat și la comunicator (3 cabluri)
- Página 153 InstRuCțIunI de InstAlARe montare Fixarea cu clic sonor a cronotermostatului pe â baza aferentă și blocarea ă cu șurub. Pentru detectarea corectă a temperaturii mediului care trebuie comandată, este important să nu instalați cronotermostatul în nișe, în spatele ușilor, lângă ferestre sau surse de căldură.
-
Página 154: Descrierea Terminalelor
InstRuCțIunI de InstAlARe descrierea terminalelor Conectare pentru comunicator (linie serială) 4 - TX (date de ieșire) 5 - GND (comună) 6 - RX (date de intrare) Conectare pentru comandarea centralei termice și a aparatului de aer condiționat. Contact de ieșire 1 ND/NÎ5A (AC1) / 2A (AC15), 250Vc.a. 1 - comun 2 - contact ND 3 - contact NÎ... -
Página 155: Înlocuirea Bateriilor
InstRuCțIunI de InstAlARe Înlocuirea bateriilor â ă 3 baterii alcaline 1,5V, tip AAA nu aruncați bateriile epuizate în mediul ambiant... -
Página 156: Caracteristici Funcționale/Date Tehnice
CARACteRIstICI FunCțIonAle / dAte teHnICe Tipul funcționării: încălzire și răcire (aer condiționat) Moduri de funcționare: automat, manual și antiîngheț Temperatura de funcționare: -5° ÷ +45°C Temperatura măsurată: 0 ÷ +45°C Sondă de temperatură: NTC, 100KΩ a 25°C Precizia de măsurare: ±0,5°C a 20°C Programe setate în prealabil: 2 programe săptămânale... - Página 160 According to the applicable Decisions and European Directives, the responsible for placing the apparatus on the Community market is: GEWISS S.p.A. Via A.Volta, 1 IT-24069 Cenate Sotto (BG) Italy Tel: +39 035 946 111 Fax: +39 035 946 270 E-mail: qualitymarks@gewiss.com +39 035 946 111 sat@gewiss.com...