Tabla de contenido
Publicidad
Enlaces rápidos
Serial number | Número de serie
See rating Label on grill for serial number.
El número de serie se encuentra en la etiqueta de
especificaciones de la parrilla.
Date purchased | Fecha de compra
If you have questions or need assistance
during assembly, please call 1-800-241-7548.
Si tiene alguna pregunta o si Necesita
ayuda durante el Ensamblado, llámenos Al
1-800-241-7548.
Tools needed for assembly:
Phillips Screwdriver
Two adjustable wrenches
(Tools not provided)
08/13/14 • 42804873
15302030
Herramientas necesarias para el armado:
Destornillador Phillips
Dos llaves regulables
(Las herramientas no previstas)
CHARCOAL
GRILL 625
Publicidad
Capítulos
Tabla de contenido

Manuales relacionados para Char-Broil 625


Resumen de contenidos para Char-Broil 625
-
Página 1: Product Record Information
CHARCOAL 15302030 GRILL 625 Serial number | Número de serie See rating Label on grill for serial number. El número de serie se encuentra en la etiqueta de especificaciones de la parrilla. Date purchased | Fecha de compra If you have questions or need assistance during assembly, please call 1-800-241-7548. -
Página 2: Tabla De Contenido
THIS GRILL IS FOR OUTDOOR USE TABLE OF CONTENTS ONLY. Product Record Information............1 Safety Symbols.................2-3 WARNING Preparing to use your Grill ............4 Grill Maintenance.................4 Failure to follow all manufacturer’s instructions could Cooking Tips................4-5 result in serious personal injury and/or property damage. Limited Warranty................6 Parts Diagram................12 CAUTION... - Página 3 WARNING WARNING Most surfaces on this unit are hot when in use. Use extreme FAILURE TO READ AND FOLLOW INSTRUCTIONS caution. Keep others away from unit Always wear protective FOR LIGHTING CHARCOAL MAY RESULT IN SERIOUS clothing to prevent injury. PERSONAL INJURY AND OR PROPERTY DAMAGE.
-
Página 4: Preparing To Use Your Grill
PREPARING TO USE YOUR GRILL GRILL MAINTENANCE Before cooking with your grill, the following steps should be Frequency of clean up is determined by how often the grill is closely followed to both cure the finish and season the interior used. -
Página 5: Direct And Indirect Grilling
Know When Your Fire is Ready Grilling with Wood Chips/Wood Chunks For a more robust smoke flavor while using charcoal briquettes Successful charcoal grilling depends on a good fire. The general or lump charcoal, try adding wood chips or several wood chunks rule for knowing when your coals are ready for grilling is to make to the fire. -
Página 6: Limited Warranty
LIMITED WARRANTY This warranty only applies to units purchased from an authorized retailer. Manufacturer warrants to the original consumer-purchaser only that this product shall be free from defects in workmanship and materials after correct assembly and under normal and reasonable home use for the periods indicated below beginning on the date of purchase*. -
Página 7: Símbolos De Seguridad
TABLE DES MATIÈRES CET APPAREIL EST CONÇU POUR UN USAGE À L'EXTÉRIEUR Por su propia seguridad...............1 UNIQUEMENT Símbolos de seguridad.............7-8 Preparativos para usar su parrilla ..........9 AVERTISSEMENT Mantenimiento de la parrilla............9 Consejos para cocinar............9-10 Omettre de suivre toutes les instructions du fabricant Garantía limitada................11 pourrait causer des blessures graves ou des dommages matériels. - Página 8 AVERTISSEMENT AVERTISSEMENT LE FAIT DE NE PAS LIRE ET RESPECTER LES La plupart des surfaces de cet appareil deviennent chaudes INSTRUCTIONS POUR ALLUMER LE CHARBON PEUT pendant l'utilisation. Soyez extrêmement prudent. Gardez ENTRAÎNER DE GRAVES BLESSURES, DES les autres personnes à l'écart de l'appareil. Portez toujours DOMMAGES MATÉRIELS OU LES DEUX.
-
Página 9: Preparación Para Usar Su Parrilla
Limpiar con un cepillo pesados como cepillo de Char-Broil ADVERTENCIA broca. Vuelva a aplicar manteca vegetal y el calor, como se indica arriba para volver a la temporada de las rejas. -
Página 10: Asado Directo E Indirecto
Cómo asar con astillas/trocitos de madera Cómo saber cuándo está listo el fuego Para lograr un sabor ahumado más fuerte con briquetas o La buena calidad del asado al carbón depende de la calidad del carbón de madera en bloques, pruebe poner varias astillas o fuego en la parrilla. -
Página 11: Garantía Limitada
GARANTÍA LIMITADA Esta garantía es válida únicamente para las unidades adquiridas de los distribuidores autorizados. El fabricante le garantiza únicamente al consumidor- comprador original, que este producto no presentará defectos de mano de obra ni de materiales por el período indicado a continuación, contado desde la fecha de compra*, si se arma correctamente y se usa en el hogar, en condiciones normales y razonables. -
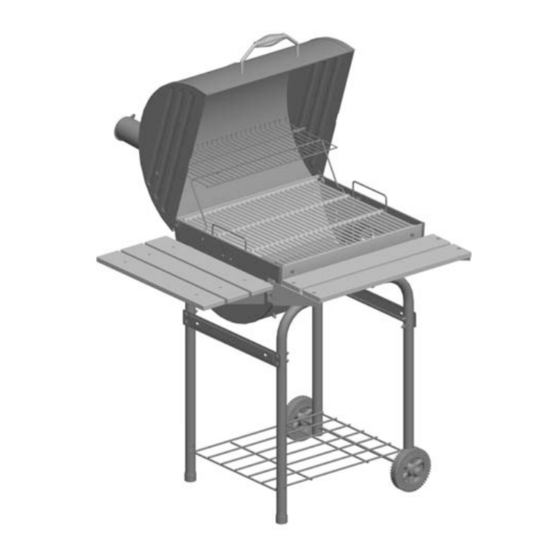
Página 12: Parts Diagram
Parts Diagram Diagrama de Piezas... -
Página 13: Parts List
PARTS LIST Key Qty Description Key Qty Description Lid Assembly Temperature Gauge Swing-Away Grate Wheel Cooking grate Storage Rack Fire Grate Hanger Lid Hinge Pin Kit Butterfly Damper Smoke Stack Ash Pan/Fire grate Handle Barrel Spring Front Shelf Bracket, RH Lid Handle Front Shelf Bracket, LH Side Shelf... -
Página 14: Assembly
ASSEMBLY MONTAJE FIRST, GET A HELPER! This unit is heavy and requires a second person for lifting and moving. NEXT, pick a suitable location to work. Open the carton and slit the corners so that the carton lays flat. This will give you a protective surface during assembly. - Página 15 Lay the leg assembly on its side with cart braces pointing upward. insert the storage rack hooks into leg holes and swing rack upward, parallel to leg braces. Coloque el montaje de la pierna de su lado con las piernas hacia arriba tirantes. insertar el bastidor de madera ganchos en los agujeros de la pierna y swing rack hacia arriba, paralela a la pierna tirantes.
- Página 16 Insert a small Hitch Pin Clip into the hole at one end of the axle and bend the ends of the pin back so that it cannot be removed. Slide a wheel onto the axle. Slide the axle through the holes at the ends of the short legs. Slide the remaining wheel onto the axle and secure with the remaining Hitch Pin Clip.
- Página 17 • Attach LH and RH Front Shelf Brackets to the firebox using 4 each 1/4-20" Shoulder Bolts and 4 each 1/4-20 flange nuts. • After the front shelf brackets are secured, attach the front shelf slats to the brackets using 4 each 1/4-20x1 screws and 4 each 1/4-20 flange nuts.
- Página 18 Place Grill Lid on top of firebox assembly. Align hinge holes on back of unit. With the aid of a helper, attach Grill Lid to firebox using 2 each Hinge Pins. Once Hinge Pins are in place, insert Large Hitch Pin Clip into hole in Hinge Pin. Next, install Smokestack by inserting 2 each 1/4-20x3/4 screws though Grill Lid, insert Smokestack into Grill Lid hole as shown, then secure using 2 each 1/4-20 flange nuts.
- Página 19 Install the Swing-Away Grate by inserting 2 each 1/4-20x2" screws (one for each side of the lid) into Grill Lid and secure with 2 each 1/4-20 flange nuts. Place the wire loop in Swing-Away over the shaft of the bolt, as shown below. Similarly secure the Swing-Away leg to the firebox using 2 each 1/4-20x3/4"...
- Página 20 Insert the Ash Pan/Fire Grate into the firebox as shown below. The charcoal tray hanger will rest on the hanger tabs on the firebox. Next remove the wingnut from the Temperature Gauge and insert the gauge through the hole in the Grill Lid. Secure the gauge with the wingnut from inside the grill lid, shown below.
- Página 21 Place the 3 Cooking Grates into the firebox. The Cooking Grates will rest on the front and rear ledges of the firebox. Next, Attach the Grease Cup Clip as shown. Your grill is now completely assembled. Please refer to page 3 for instructions on how to prepare and season your grill prior to cooking.
-
Página 22: Hardware List
HARDWARE LIST LISTA DE HERRAJES Hardware is shown actual size. You may have spare hardware after assembly is complete. Los herrajes se muestran en tamaño real. Es posible que le sobren piezas después que termine de armar la unidad. 1/4” 1/4”... - Página 24 ©2014 Char-Broil, LLC. Columbus, GA, 31902. Printed in China. Imprimé en Chine. Impreso en China. ©2014 Assembly instructions. ©2014 Assemblée des instructions. ©2014 Instrucciones de ensamblado.