Tabla de contenido
Publicidad
Idiomas disponibles
Idiomas disponibles
Enlaces rápidos
Publicidad
Tabla de contenido
Solución de problemas

Manuales relacionados para Black+Decker SCD7007SSD


Resumen de contenidos para Black+Decker SCD7007SSD
- Página 1 7 QUART DIGITAL SLOW COOKER WITH TEMPERATURE PROBE + PRECISION SOUS-VIDE OLLA DE COCCIÓN LENTA DIGITAL DE 7 CUARTOS CON SONDA DE TEMPERATURA + COCCIÓN AL VACÍO PRECISA u s e an d ca re ma nual m an ua l d e uso y cuida d o SCD 7007 SSD SCD 7007 MB D...
- Página 2 Please Read and Save this Use and Care Book. IMPORTANT SAFEGUARDS. When using electrical appliances, basic safety precautions should always be fol- lowed to reduce the risk of fire, electric shock, and/or injury, including the following: • READ ALL INSTRUCTIONS. •...
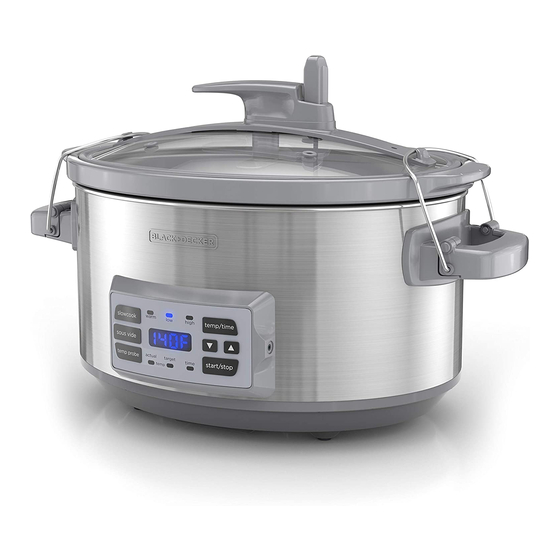
- Página 3 GETTING TO KNOW YOUR SOUS-VIDE SLOW COOKER Lid handle 7. Handles 2. Tempered glass Lid 8. Rack (Part # SCD7007-04) (Part #SCD7007-01) gray 9. Cooking base (Part # SCD7007MBD-01) black 10.
-
Página 4: Getting Started
GETTING STARTED This appliance is intended for household use only. • Remove all packing material, any stickers, and the plastic band around the power plug. • Go to www.prodprotect.com/blackanddecker to register your product. • Wash all removable parts as instructed in CARE AND CLEANING. Place the clean, dry stoneware pot in the cooking base •... - Página 5 Lock both the handles by pushing down on them. This will lock the lid in place. Always make sure the handles are securely in the locked position before moving the slow cooker. (C) Important: Always carry the slow cooker from the cooking base handles.
- Página 6 Note: You may adjust the time during the cooking cycle by pressing the arrows. After 3 seconds of no buttons being pressed, the numbers will stop flashing and the new amount of time for cooking will begin. End of cooking cycle: When time is up, the unit will beep three times and automatically switch to Keep Warm.
- Página 7 SLOW COOKING VEGETABLES • Place vegetables such as carrots, potatoes, turnips, and beet at the very bottom of the stoneware pot and always cover them with liquids. They usually take longer to cook than most meat. • Vegetables cook well; they develop better flavor and don’t break down as they would in your oven.
- Página 8 The number display will show the actual temperature that the probe is sensing from within the food. Note: The actual temperature may display higher than set temperature in temp probe function. This is normal. The temperature will return to the set temperature as the unit calibrates.
- Página 9 Food Temperature Time Notes Whole Chicken- 160°F–170°F 4–8 hours The chicken will start up to 5 lbs. (2.25 kg) (70–76 °C) to fall apart if left in the unit longer than 8 hours. SOUS-VIDE temp Place rack into the center bottom of the stoneware pot. Add hot water and fill to approximately half way.
- Página 10 10. The default cooking temperature is set at 135°F. Adjust to your desired temperature with the arrows. The available range is 100°F to 203°F in this function. Press TEMP/TIME to set the time you wish to cook. The “time” light will go on. The default is one (01:00) hour.
-
Página 11: Care And Cleaning
SOUS-VIDE COOKING CHART Food Temperature Cooking Time* Notes Beef steaks- Rare: Rare: Be aware that if (NY Strip; sirloin, 118°F – 130°F 1 hour – 2 ½ hrs. you want to cook tenderloin, ribeye, (48 – 55 °C) your steak rare Medium: T-Bone) then do not leave... -
Página 12: Troubleshooting
Wash stoneware pot and glass lid in warm water with dish soap. Remove the rubber gasket and hand wash separately. If food sticks to the stoneware pot, fill with warm and dish water and allow it to soak before cleaning with a nonabrasive scouring pad. - Página 13 PROBLEM POSSIBLE CAUSE SOLUTION Food is overcooked • There may be a • As you use the slow while slow cooking difference between cooker settings, make your favorite recipe note of any changes and the operation of in time on your the slow cooker.
-
Página 14: Warranty Information
WARRANTY INFORMATION Two-Year Limited Warranty (Applies only in the United States and Canada) For service, repair or any questions regarding your appliance, call the appropriate 800 number listed within this section. Please DO NOT return the product to the place of purchase. Also, please DO NOT mail product back to manufacturer, nor bring it to a service center. -
Página 15: Instrucciones Importantes De Seguridad
Por favor lea este instructivo antes de usar el producto. INSTRUCCIONES IMPORTANTES DE SEGURIDAD Cuando se utilizan aparatos eléctricos, siempre se debe respetar ciertas medidas de seguridad a fin de re- ducir el riesgo de un incendio, un choque eléctrico y (o) lesiones a las personas, incluyendo las siguientes: •... -
Página 16: Conozca Su Olla De Cocción Lenta Al Vacío
CONOZCA SU OLLA DE COCCIÓN LENTA AL VACÍO Asa de la tapa 7. Asas 2. Tapa de vidrio resistente 8. Rejilla (Pieza # SCD7007-04) (pieza #SCD7007-01) gris 9. -
Página 17: Preparación Para Utilizar Su Olla De Cocción Lenta
INFORMACIÓN IMPORTANTE ACERCA DE SU OLLA DE COCCIÓN LENTA BLACK+DECKER • La olla de gres se calienta. Cuando la esté utilizando, siempre use guantes de cocina o agarraderas de ollas al tocar cualquier superficie interior o exterior de la olla. -
Página 18: Cómo Asegurar Y Abrir El Seguro De La Tapa
CÓMO ASEGURAR Y ABRIR EL SEGURO DE LA TAPA Coloque la olla de gres en la base de cocción. Luego coloque la tapa, con la junta instalada, arriba. Lleve los alambres de seguridad situados en ambas asas hacia arriba y alrededor hasta que encajen en los ganchos en la tapa. -
Página 19: Consejos Generales Para Cocción Lenta
Enchufe el aparato. La pantalla del panel de control parpadeará “----“. Esto indica que el calor está apagado y que el aparato está listo para ajustarse y comenzar a cocinar. Presione el botón “slowcook” (cocción lenta) hasta que la luz situada arriba de su selección de “high”... -
Página 20: Cocción Lenta De Carnes
COCCIÓN LENTA DE CARNES • Cuanto mayor sea el contenido de grasa de la carne, menor será la cantidad de líquido necesaria. Si va a cocinar carne con un alto contenido de grasa, coloque rodajas gruesas de cebolla debajo para que la carne no se deposite sobre la grasa. -
Página 21: Sonda De Temperatura
SONDA DE TEMPERATURA temp Añada proteína a la olla de cerámica y cubra con la tapa. Enchufe el aparato. La pantalla del panel de control parpadeará “----“. Esto indica que el calor está apagado y que el aparato esta listo para ajustarse y comenzar a cocinar. -
Página 22: Tabla De Cocción Con La Sonda De Temperatura
PRECAUCIÓN: Para la seguridad de los alimentos, no mantenga los alimentos en o menos de 130°F por más de 2 horas. • Desenchufe el aparato cuando no esté en uso y siempre permita que se enfríe completamente antes de limpiarlo. TABLA DE COCCIÓN CON LA SONDA DE TEMPERATURA Alimento Temperatura... - Página 23 COCCIÓN AL VACÍO (SOUS-VIDE) temp Coloque la rejilla en el centro del fondo de la olla de cerámica. Añada agua caliente y llene hasta aproximadamente la mitad. Nota: El uso de agua caliente de la llave es un buen comienzo para gran parte de la cocción al vacío.
-
Página 24: Sellar/Terminar Los Alimentos
10. Presione el botón “temp/time” (temperatura/tiempo) para fijar el tiempo de cocción deseado. La luz de la función “time” (tiempo) se iluminará. El tiempo preprogramado es una hora (01:00) Ajuste el tiempo de cocción utilizando los botones de flechas. Presione el botón “start/stop” para comenzar el ciclo de cocción. La luz de la función “actual temp”... -
Página 25: Cuidado Y Limpieza
TABLA DE COCCIÓN SOUS-VIDE Alimento Temperatura Tiempo de Notas Coccion* Bistec de carne de Crudo: Crudo: Esté atento si res - (filete de lomo 48 – 55 °C 1 hora – 2 ½ horas desea cocinar su corto, cortado tipo (118°F –... -
Página 26: Almacenamiento
Lave la olla de cerámica y la tapa de vidrio con agua caliente y líquido de fregar. Retire la junta de goma y lave a mano por separado. Si los alimentos están pegados en la olla de cerámica, llene la olla con agua caliente y líquido de fregar y deje remojar antes de limpiarla con un estropajo no abrasivo. - Página 27 PROBLEMA CAUSA POSIBLE SOLUCIÓN Los alimentos se coc- • Puede haber una • Mientras utiliza los inaron demasiado en el diferencia entre su ajustes de la olla de ciclo de cocción lenta. receta favorita y la cocción lenta, esté operación de la olla al tanto de cualquier de cocción lenta.
- Página 28 IN FOR M AC I Ó N D E G A R A N T Í A Dos Años de Garantía Limitada (Solamente aplica en los Estados Unidos y el Canadá). Para servicio, reparaciones o preguntas relacionadas al producto, por favor llame al número del centro de servicio que se indica para el país donde usted compró...
- Página 29 P Ó L I Z A D E G A R A NT Í A (Válida sólo para México) DURACIÓN Spectrum Brands de México, SA de CV garantiza este producto por 2 años a partir de la fecha original de compra. ¿Qué...
-
Página 30: Necesita Ayuda
¿ N E CES I TA AY UDA? Para servicio, reparaciones o preguntas relacionadas al producto, por favor llame al número del centro de servicio que se indica para el país donde usted compró su producto. NO devuélva el producto al fabricante. Llame o lleve el producto a un centro de servicio autorizado. - Página 31 Por favor llame al número correspondiente que aparece en la lista a continuación para solicitar que se haga efectiva la garantía y donde Ud. puede solicitar servicio, reparaciones o partes en el país donde el producto fué comprado. Argentina Honduras Atención al consumidor Serviteca 0800 444 7296...
- Página 32 BLACK+DECKER and the BLACK+DECKER logos and product names are trademarks of The Black & Decker Corporation, used under license. All rights reserved. BLACK+DECKER y los logos y nombres de productos de BLACK+DECKER son marcas registradas de The Black & Decker Corporation, usados bajo licencia. Todos los derechos reservados.